All products were chosen independently by our editorial team. This review contains affiliate links and we may receive a commission for purchases made. Please read our affiliates FAQ page to find out more.

Make your own cyanotype fabric

Learn how to do cyanotype printing on fabric and use the power of the sun to make your own funky textiles.

Try our magazines – get 6 issues from just £9.99!

Published: March 21, 2024 at 9:00 am

Cyanotype printing is a fun and experimental craft which can be used on a wide range of surfaces and mediums. This solar photography technique is most commonly used on thick paper and fabric, but the method is the same for both mediums.

It’s a great craft to try incorporating into your sewing projects, allowing you to make your own unique and custom fabrics.

You can try making lots of small sections of cyanotype fabric to use in patchwork projects, or alternatively you could make a larger fabric print and then cut out your favourite parts.

undefined

What material should be used for cyanotype printing?

When creating cyanotype fabric it’s best to use natural untreated materials such as an undyed 100% cotton, linen or hemp.

We’ve used calico cotton in the following tutorial, but it’s worth noting that the thickness of the fabric will determine how much of your print shows through on the other side.

If you were to use a thin fabric such as silk, then you can potentially make a double sided cyanotype fabric as the material will be thin enough to see the print on both sides.

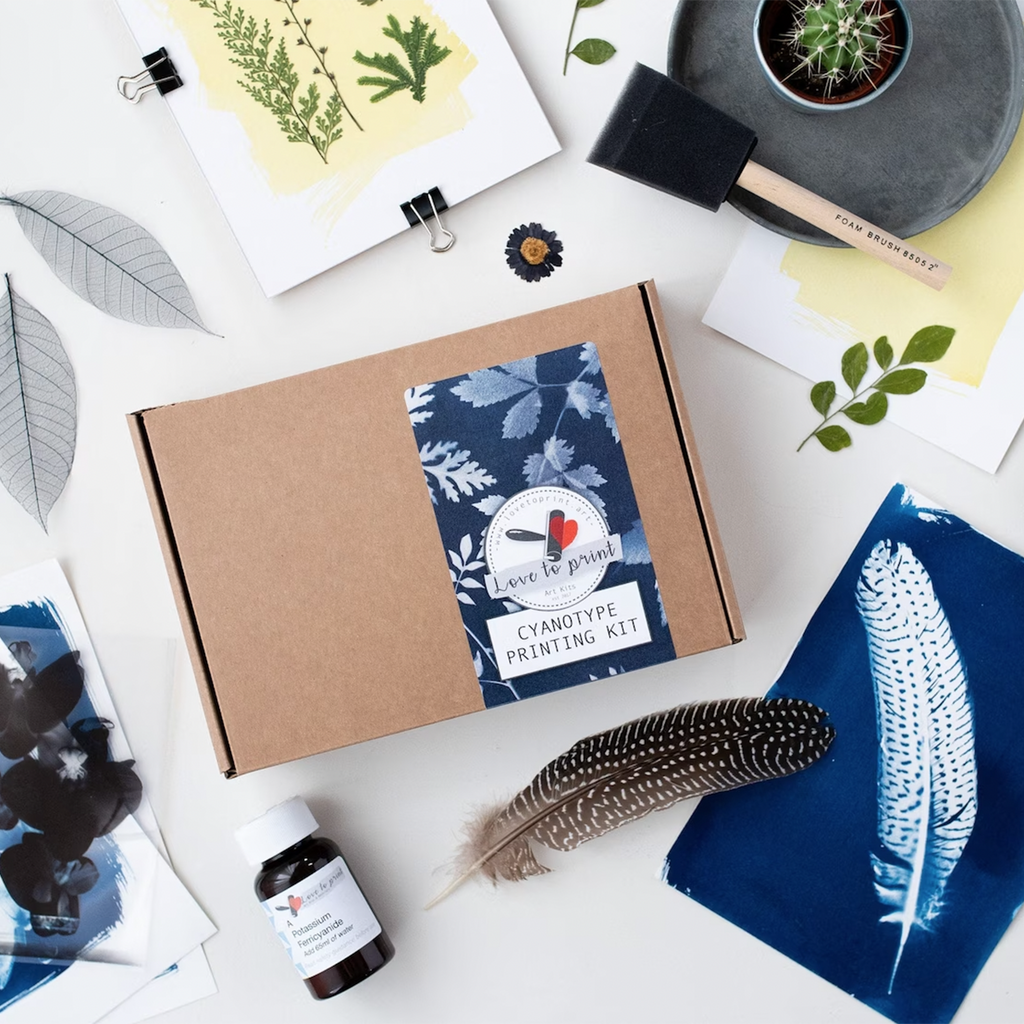
Get your cyanotype printing materials

Want to try it yourself? Find all the materials you need to make cyanotype fabric here.

Is cyanotype printing safe?

As long as you use common sense, follow instructions and take basic precautions, cyanotype printing is perfectly safe.

Cyanotype printing occurs due to a chemical reaction that takes place when exposed to the UV rays of the sun. These chemicals are of a very low toxicity so are safe to work with.

The cyanotype solution can easily stain both skin and fabrics, so you should wear rubber gloves and protect surfaces with newspaper when handling the solution.

While it’s a very minimal risk, there’s the potential for a very small amount of fumes to be created when making your prints (especially if you are experimenting with adding in different ingredients), so working in a well ventilated area and wearing a face mask is also advised.

When making cyanotype fabric, remember that your solution may soak through the material, so ensure there is adequate protection underneath your fabric.

The chemicals involved can be an irritant. If you get any solution on your skin wash immediately. If you accidentally get any of the solution or dry chemicals in your eye, wash with cold water and seek medical advice.

You can find more safety advice in our full guide to cyanotype printing.


How to care for your cyanotype fabric

Once you’ve made your cyanotype fabric, it’s advisable to keep washing to a minimum. To preserve your prints it’s best to hand wash in cold water using a non-phosphate detergent.

Most of the big name laundry detergents are phosphate free but you should always check first.

How is cyanotype fabric made

Cyanotype photography works by coating a fabric surface in a light-sensitive solution. You can buy pre prepared fabric or you can mix and apply the solution yourself.

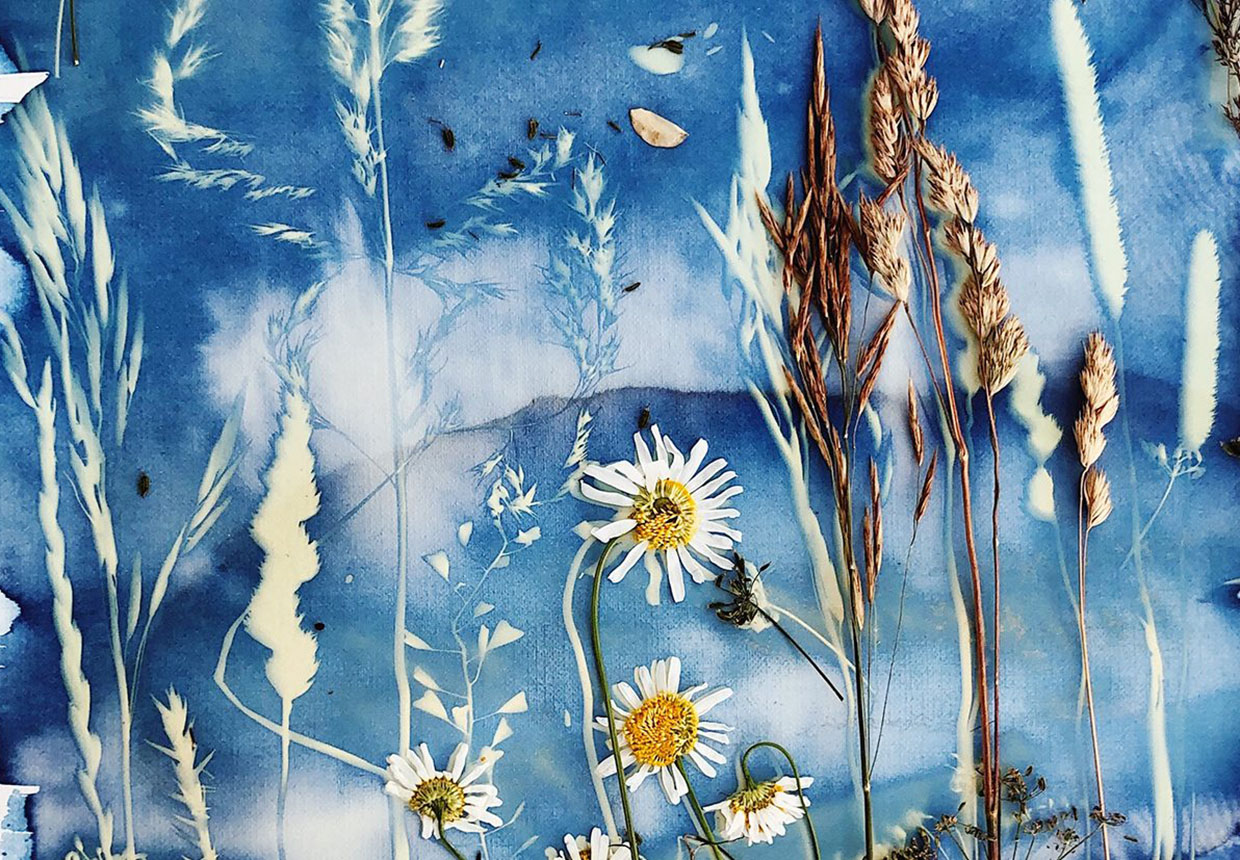
Objects are then placed onto the surface before being exposed to the sun. The areas that are exposed to the sun react with the UV rays, whereas the areas that are covered by your objects do not - creating a negative silhouette style image.

When your fabric has been adequately exposed you then wash the solution off the material, where you will see the classic cyanotype Prussian blue develop.

You can find a full explanation of the scientific process as well as loads more handy information in our guide to cyanotype printing.


You will need:

  • Cyanotype solutions or pre prepared cyanotype fabric
  • Foam brush or Paint brush
  • Measuring cup/jug
  • Mixing cup
  • Photo frame (or cardboard and perspex sheet) (optional)
  • Newspaper
  • Protective gloves/mask
  • Objects to use in your print

Preparing your cyanotype fabric

Step 1

In the next steps we will show you how to prepare your cyanotype solution and coat your fabric with it. If you’re using pre prepared cyanotype fabric, you can skip these steps and go straight to making your print.

preparing cyanotype fabric – mixer

To start, gather your materials and prepare your work area so that it is clear.

These first few steps will need to be performed in a dimly lit environment, so as to not expose the solution to UV rays prematurely. It doesn’t need to be pitch black (you still need to see what you’re doing), but curtains and blinds should be closed. Fluorescent lights can also interact with the solution, so try not to have any bright lights in the room.

You will need to leave your light-sensitive solution to dry so you may want to work somewhere where you have access to a dark cupboard or won’t be disturbed.

When you have your work area set up, mix your two cyanotype chemicals as per their instructions.

Generally, your dry chemicals will be supplied in separate bottles. You add a specified amount of water to each bottle, put the lids back on and mix well.

Then you mix an equal amount of each chemical into a mixing pot.


Step 2

Now you need to apply your solution to your fabric. There are two ways that you can do this:

Method A

Using a foam brush or a paint brush, coat your fabric with the solution. Keep in mind that a little goes a long way. You want to achieve an even coverage without any of the solution pooling. This method is best for if you want to paint shapes or just a portion of a fabric.

preparing cyanotype fabric – coating with brush

Method B

This method is best for if you want to coat the entirety of small sections of fabric. Scrunch your fabric up as small as you can, and (wearing gloves) push it into the mixing cup so that it soaks up the solution.

You may need to remove the fabric and reinsert it a few times to make sure all of the fabric is completely covered.

Once you have an even coverage, squeeze any of the excess solution out of the fabric back into the mixing cup.

preparing cyanotype fabric – scrunch fabric


Step 3

Now you need to let your fabric dry. For best results hang your fabrics up to dry, although small amounts of fabric will dry flat providing they’re not too saturated.

You want to leave your fabrics to fully dry in a dark environment for at least 24 hours.

preparing cyanotype fabric – drying


Making your cyanotype print

Step 1

Now comes the fun part – making your print! Whether you’ve just dried your own coated fabrics or are using pre prepared fabrics, the following steps are the same for both.

Before you get your cyanotype fabric out of its dark storage place (or packaging), you’ll want to collect and prepare the items you want to use in your print.

You can have lots of fun experimenting with different items, and achieve different effects with items that have transparent qualities. Flowers, leaves and feathers are always popular choices, but you can find lots more inspiration in our list of cyanotype ideas to try.

When you’re ready, place your items on top of your cyanotype fabric.

You can either enjoy the chaos and randomly place your items on top of your material, or if you would like something more curated, try laying out your items on paper first and perfecting your composition, then you can transfer them to your material.

cyanotype printing on fabric – exposure

Many people will use an empty picture frame or sheet of glass/perspex to lay on top of their cyanotype surface once they have added their objects. This isn’t completely necessary and you can make cyanotype prints without it, but it will help to flatten objects as well as keeping your items in place and preventing lighter objects such as leaves from being caught by draughts. You can secure the glass/perspex in place with the help of bulldog/binder clips.

We would advise adding your items while the fabric is still in the dark/dim environment so that you can take your time before going onto the next step. If this isn’t convenient you can add your items once you start the next step, but you will want to be quick so that you don’t expose the uncovered surface any longer than you have to.


Step 2

Now comes the exciting part – exposing your fabric to the sun!

The amount of time you need to leave your print depends on factors like the seasons, weather and time of day.

For example, on a clear summer day your print might be exposed in just a couple of minutes, whereas on a cold cloudy winters day it might need more like an hour.

You may want to experiment with test strips first to get an idea of how long an exposure is needed.

cyanotype printing on fabric – exposed

As soon as you show your cyanotype surface to the sun, you will see your coated fabric quickly turn from a light yellow with a slight green tint to a turquoise green shade.

This will then start to fade gradually, turning to a silvery bluish grey tone – signifying that the chemical reaction has occurred.


Step 3

Once you’re happy that your fabric has been adequately exposed, remove the glass (if using) as well as your items. You should be able to see yellow silhouettes of where your items have been.

Now take your prints to either a tub of cold water or a sink/bath/shower. You want to wash off all of the solution with cold water, so either run under a tap, or if using a bowl repeatedly pour water over the fabric.

cyanotype printing on fabric – washing

You will quickly see the silvery grey tone transform into a deep rich blue colour, and the yellow should wash away to reveal the original surface colour. Wash for at least 5 minutes to ensure you have completely washed away all the solution.


Step 4

Hopefully you can now see that your cyanotype print has worked successfully, so all you need to do is wring out any excess water and hang it up to dry.

cyanotype printing on fabric – drying

The reaction should have been completed and all the solution should be washed off, but it’s still recommended not to hang it out in direct sun just in case it damages or fades your print.

Love to print cyanotype kit

Keep it simple with a craft kit

If you don’t have lots of crafty bits and bobs, or perhaps know a friend that would love cyanotype printing, then check out our pick of the best cyanotype kits to buy online.

That’s how to make cyanotype fabrics! Now that you know the basics, you can start making your own prints or even get experimental.

cyanotype printing on fabric – finished

In the cyanotype fabric print below, we’ve experimented with the wet cyanotype process – where you lightly moisten the fabric and cyanotype coating, before adding in extra ingredients to corrupt the chemical reaction.

In this print we’ve sprayed on some diluted vinegar, dropped on some soap bubbles, and thrown on some turmeric and salt. We’ve then added rusty metal washers, lichen, mosses and sticks to create our print. You can see that as well as the yellow from the turmeric, there are darker blue sections made by adding the diluted vinegar.

cyanotype printing experiment

You can find out more about different effects you can achieve in our beginners guide to cyanotype printing.


Shopping list

Can’t wait to get started, here’s what we used in this tutorial!


There’s no mistakes when you’re experimenting

We love the experimental nature of cyanotype printing and the big reveal when you finally wash your print.

Once you’ve made your first print, don’t be surprised if you want to make another one straight away – it’s slightly addictive. But that’s the beauty of it, with every experiment you learn a little bit more!

Get inspired to make prints with a difference

It’s not all about pretty plant prints, there’s loads of creative ways to make cyanotype images. Check out our pick of cyanotype ideas to try and unleash your inner artist with Gathered.

Cyanotype ideas