All products were chosen independently by our editorial team. This review contains affiliate links and we may receive a commission for purchases made. Please read our affiliates FAQ page to find out more.

Phases of the moon wall hanging

Bring some galactic wonder indoors with Lucy Crick of Eclectic Eccentricity DIY lino printing tutorial. Make her phases of the moon wall hanging and go star gazing!

Try 6 issues of your choice of craft magazine from just £9.99

Published: February 25, 2021 at 8:18 am

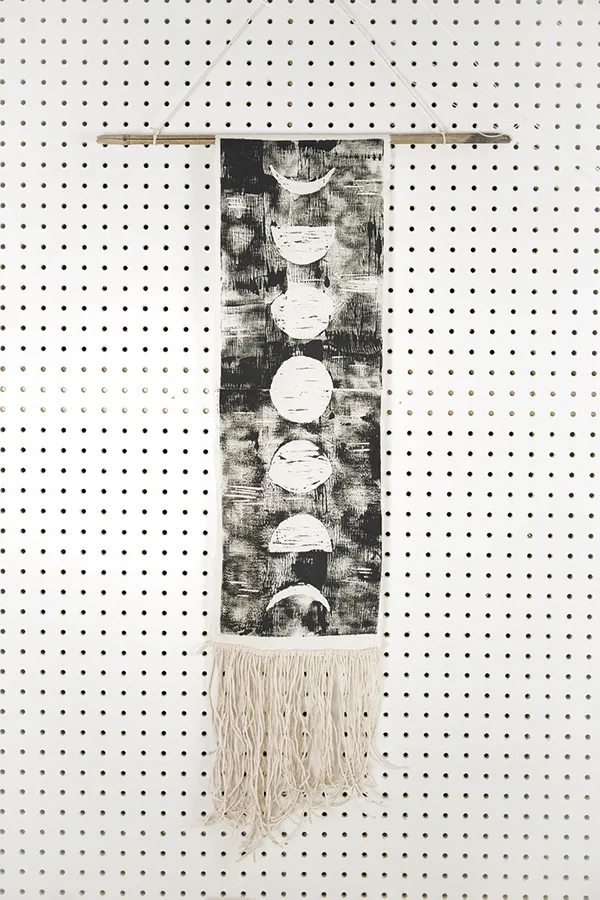
The beauty of the night sky is that no matter where you are in the world, you can gaze up at it and know everyone else is seeing the same – no matter what shape and phase the moon's cycle. Bring a slice of this natural wonder into your space with this cosmic- inspired wall art set – designer Lucy Crick of jewellery label Eclectic Eccentricity studied astronomy at university, so she knows a thing or two about stargazing.

When cutting your linen, measure against the size of your lino and leave enough space at the top and bottom to fix the dowel and apply fringing. As for the bottom trim, we used a natural- coloured, thick variety, but you could also use coloured string or wool depending on the final look you're after. Then once you've finished, turn the page to make constellation art to go with it – if you're giving it as a gift, try recreating the relevant star sign.

Once you've mastered the art of DIY lino printing check out our pottery projects like our DIY coasters and salt spoons tutorial. Want to learn more about lino printing? Take a look at our lino cutting for beginners guide. You might also enjoy our screen printing for beginners guide and our block printing for beginners guide.

Materials

DIY lino printing

You will need:

  • Linen
  • lino printing kit
  • Scissors

Step 1

diy lino printing phases of the moon step1

Cut out your ‘full moon’ shape from card by drawing around a cup or other round object. We made seven phases, going from full, gibbous, half and crescent on each side. You can cut each phase from the one template.

Step 2

diy lino printing phases of the moon step2

Place the template on the bottom of the lino, halfway down the moon and draw around it – this means you can flip your template over to do the other half of the phases, rather than cutting out the template all over again or needing a giant piece of lino.

Step 3

diy lino printing phases of the moon step3

Cut a sliver off to create both a gibbous moon and crescent. Thinking about how much space you have, draw around the gibbous onto the lino, then cut a straight-edged piece off to create a half-moon. Draw around that onto the lino then, finally, draw around the crescent template.

Step 4

diy lino printing phases of the moon step4

Carefully cut out the negative space (where the ink won’t go) from your piece of lino using a cutting tool. Leaving a few higher edges to your cuts will give your moons a little rough surface texture. Similarly, cut a few negative lines out of your positive space (where your ink will go) to give the night sky a little more visual interest.

Step 5

diy lino printing phases of the moon step 5

Squeeze out some paint onto the flat plate or tile. Roll your roller up and down until it’s fully coated and the paint goes tacky. Roll onto your cut lino a couple of times, making sure it’s applied thickly and evenly.

Step 6

diy lino printing phases of the moon step6Take a deep breath and turn the lino over onto the top section of your fabric. Leave enough space
to do the same on the bottom half, as well as about 4cm (1 /8") worth of fabric to roll over the top bamboo cane. Press it down using your hands or the baren, then lift off.

Step 7

diy lino printing phases of the moon step10a

Apply more ink to the lino then turn it upside down to create the second half of the phases. Carefully, without actually placing it on the fabric, line up the cut with the existing print (using the edges of the top half of the full moon is a good guide). Place it on and press down, then lift off. Leave to dry for a few hours or overnight, if possible.

diy lino printing phases of the moon step10a

Come back the next day and admire your DIY lino printing skills!

Step 8

Once fully dry, roll the top piece of blank fabric over the bamboo cane and secure on the underside using strong glue or a glue gun.

Step 9

diy lino printing phases of the moon step9

To make the tassel fringing, cut a piece of string a couple of cm longer than the width of the hanging. Then cut several (we used 52) pieces of string, double the length you want them to hang down. Fold these in half and tie them with ‘cow hitch’ knots (see image) vertically over the horizontal piece. You can then trim them or cut into a point, but we’ve kept ours au naturel.

Step 10

diy lino printing phases of the moon step11

Fix to the bottom of the hanging with strong glue, or stitch it on if you’re feeling super crafty (we were a little lazy after all that knotting). Trim any extra bits for a neat finish.

Step 11

diy lino printing phases of the moon wall hanging

Tie one last length of string to the top bamboo cane to hang and you're all done. Your journey in DIY lino printing is complete!

Now you’ve mastered the art of DIY lino printing you can start making all sorts of prints! Hang your phases of the moon wall hanging up proudly and make a whole bunch for your friends. Find your next project from our free daily craft patterns and if you aren’t sure what you should start next then take our creative hobbies for adults quiz. 

diy lino printing phases of the moon