Make your own quilted jacket – the perfect lightweight layer for spring and summer
Start practising your best “Thanks, I made it” response for the attention this cropped quilted jacket from Debbie Wainhouse will bring!
This quilted jacket sewing pattern can be adjusted to suit your figure and the cropped length gives it a stylish modern feel. It's ideal for wearing on spring and summer evenings when the heat of the day has faded. You could also make one to wear in early autumn before the weather turns chilly.
Here, we've used a patterned fabric on the outside with a tie dye lining, but you could make your pattern the opposite way. It would look great with a plain outer layer and patterned fabric on the rolled up sleeves.
If you're new to sewing, you may find it useful to take a look at our sewing for beginners or our how to use a sewing machine guides to boost your skills. Want to sew some more jackets? Check out our best coat sewing patterns for more inspiration.
Read on to learn how to make your own quilt jacket pattern with our step-by-step guide.
Notes
- Seam allowance is 1cm unless otherwise stated.
- Full instructions for drafting your pattern are given, and you can follow the pattern diagram below for guidance.
- A note on erasable pens: some pens disappear with heat but reappear with cold, so we would advise patch testing your pen on a scrap piece of your fabric. Iron to erase and place in the freezer to see if it reappears.
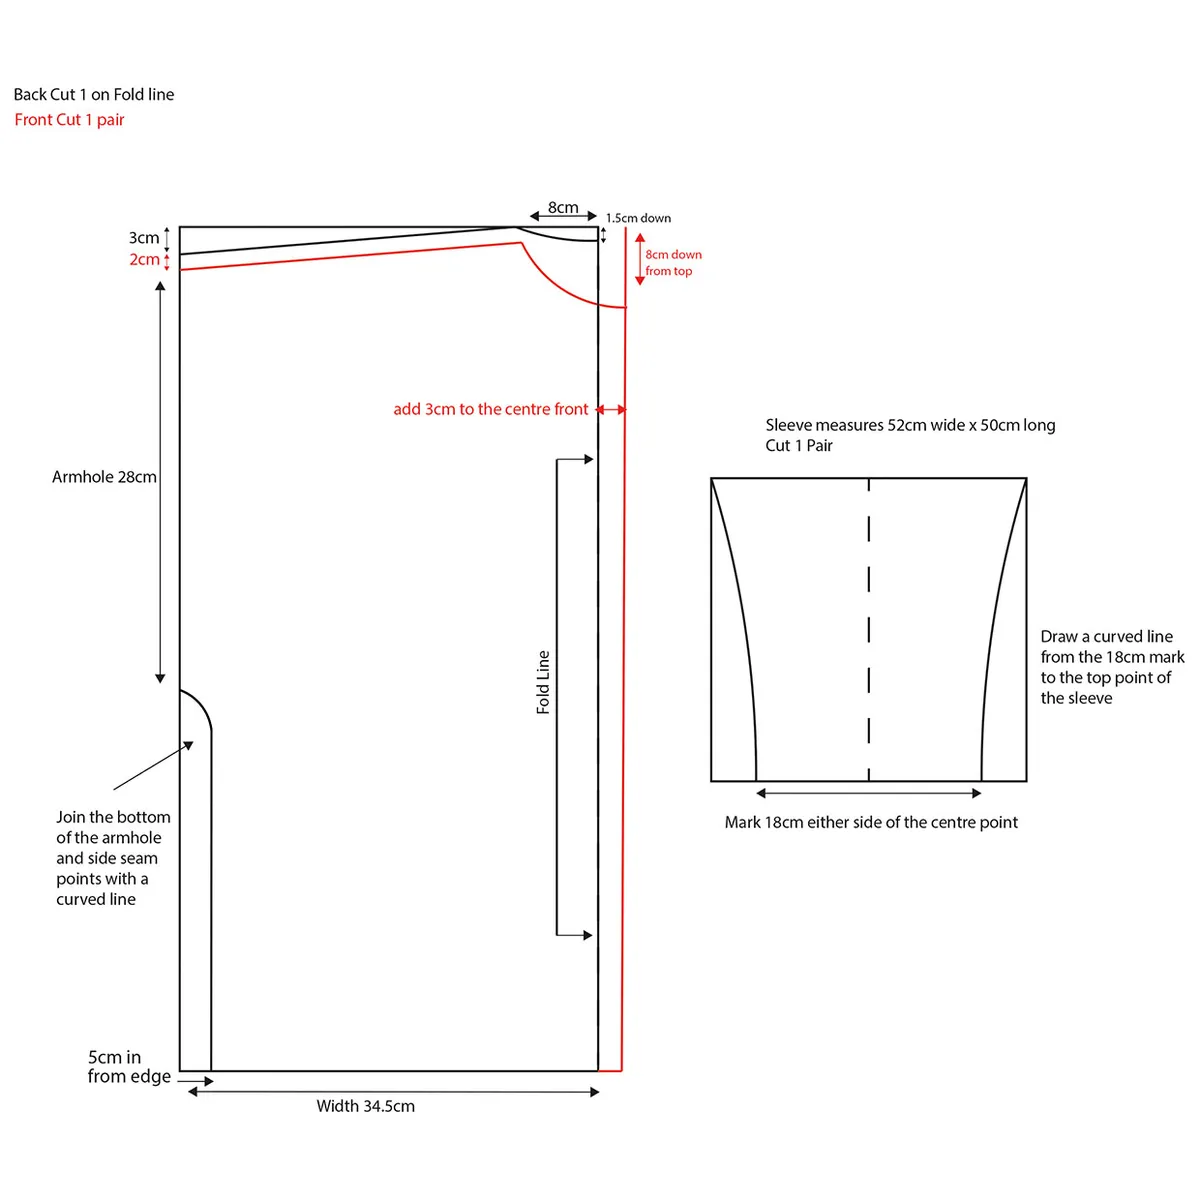
Drafting the paper pattern to your desired size
Step 1
Take your hip measurement and divide by 2, then multiply by 1.5 to get your total jacket width. Divide this number by 2 again and this will be the width of half the coat.
We will cut the back of the coat on the fold of the fabric for symmetry.
For example: Hip measurement = 92cm Divide by 2 = 46cm x 1.5 = 69cm total 69cm divided by 2 for the width of the pattern piece = 34.5cm
For this jacket we used a length of 60cm. Adjust this measurement accordingly depending on your desired length; you can always shorten the jacket!
Step 2
Draw out your measurements onto paper to make a rectangle for the Jacket Back. Based on the measurements above, our rectangle measured 34.5x60cm.
Place a pin at the top centre back of the Jacket Back and then mark 8cm out each way from this pin.
Then measure and mark 1.5cm down from the pin. Join these three marks with a curved line; this is your back neckline.
Step 3
On the left-hand side, measure 3cm down and join this line to the neckline edge (8cm from the centre back); this will give you your shoulder line.
Step 4
From the outer edge of the shoulder line measure down 28cm; this will be the arm hole.
Step 5
In the bottom corner (straight down from the armhole), measure 5cm in from the side and make a mark.
Continue this line upwards and curve it in to meet the armhole mark.
Step 6
Trace around this to make the Jacket Front pattern. On this pattern piece, we are going to lower the shoulder seam by 2cm and create a curved neckline at the front.
Step 7
Add 3cm to the centre front line.
Step 8
Make a front neckline by marking 8cm down from the top and join this with a curve to your new shoulder seam marking.
Measure the front and back shoulders and check they are the same length
Free quilt jacket sewing pattern

You will need
- Main fabric: 2mx140cm
- Lining fabric: 2mx140cm
- Lightweight Quilt Wadding: 2mx150cm (we've used Vlieseline low loft 249)
- Chalk/erasable fabric pen
- Safety pins
- Walking foot
- Matching thread
- Basic sewing kit
Cutting out
Fold the main fabric in half, bringing the selvedges together, then cut:
- Jacket Front: one pair
- Jacket Back: one
- Sleeve: two 52x50cm (WxH)
- Pockets (optional): two 16x17cm
Repeat to cut matching pieces in the lining fabric and the wadding.
For both Sleeve pieces: mark the centre point of the Sleeve along the bottom edge.
Measure and mark 18cm out from this mark on either side.
This will give you a finished cuff width of 36cm. Join these marks to the top of the sleeve with a curved line.
Assembling the jacket
Step 1
Pin the shoulder seams RS facing.

Step 2
Stitch and press the seams open.

Step 3
With the jacket laying flat, pin the Sleeve to the shoulder seams RS together and stitch in place, press the seam towards the sleeve. Repeat for the other side.

Step 4
Fold the jacket so the sleeves and side seams match, with RS together.
Pin and stitch all the way down the sleeve and seam. Repeat on the other side.

Step 5
Repeat these steps to assemble the jacket lining pieces.
Step 6
Press the bottom edge of the Pocket and pocket lining pieces to the WS by 1cm.
Pin the Pocket outer and lining together RS facing and stitch with a 1cm seam allowance, leaving the bottom folded edge open.

Step 7
Clip the top corners and turn RS out. Press and position on your jacket approximately 7cm in from the side seam and 6.5cm up from the hem. Edge stitch around the pocket.

Step 8
Turn the jacket outer WS out and, with the lining RS out, place the lining inside the jacket outer so RS are facing. Pin around the neckline, the centre front edges of the jacket and the hem.

Step 9
Stitch in place leaving a 20cm gap in the centre of the hem to pull the jacket through.
Step 10
Clip any curved edges so they will lay flat. Turn the jacket through the gap you left in the hem of the jacket, and press well.

Step 11
Stitch the gap in the hem closed.

Finishing
Step 12
Turn the Sleeve lining hem to the WS by 1cm and the Sleeve outer by 1cm and pin all the way around.
Step 13
Topstitch the sleeve in place. Repeat for the other sleeve.

You’ve finished! We hope you enjoyed making Debbie’s quilted jacket pattern.

How will you wear your quilted jacket?
We love the versatile nature of this quilted jacket. It's smart yet casual, perfect for a night out or just a walk in the park. However you wear your jacket, we know you'll look fabulous!
Complete your handmade outfit
Once you've made this jacket, why not add even more impressive makes to your wardrobe with these 20 gorgeous blouse patterns!