
How to read sewing patterns for beginners
Learning how to sew is exciting, and if you’re anything like us, you’ll be eager to jump on the sewing machine and get started. However, before you begin, it is essential to understand how to read sewing patterns.
Learning how to read sewing patterns is easy once you understand the basics. In this beginner’s guide, we will cover all the aspects of reading a sewing pattern, including opening the sewing pattern, understanding the layplan, pattern markings and more.
Be sure to also check out our beginner's guide to sewing, which covers all the basic tools, knowledge and techniques you need before you move on to sewing patterns.
Buying your sewing pattern
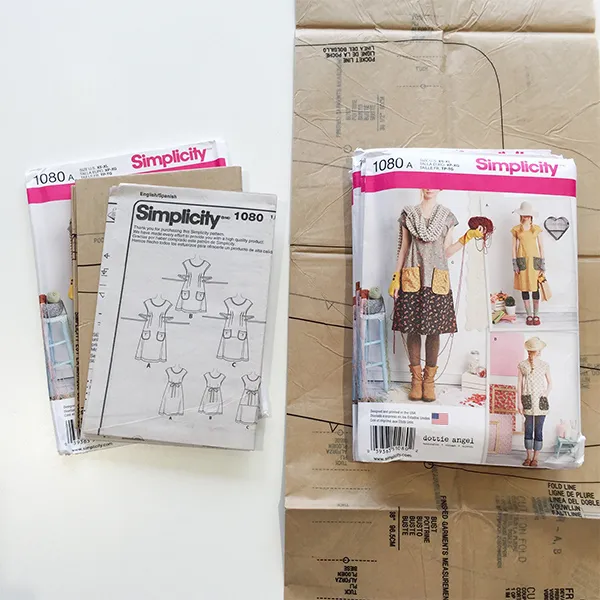
Learning how to read sewing patterns begins with buying the pattern itself. Most modern sewing patterns are available in both paper and PDF formats. If you have a physical sewing pattern, all your instructions, charts and templates should be inside the envelope. Open your packet and lay out all the pieces inside, reading the instruction booklet carefully.
Your instruction booklet will cover common terminology (which we will cover later in this article), step-by-step instructions for stitching your garment and a list of the pattern pieces inside the envelope. Before you begin, check the pattern pieces against the list to ensure you aren’t missing anything.
For those printing PDF sewing patterns, here’s how to print them, ready for use.

How to print PDF patterns out at home
You will need to print out the sewing pattern at 100% (or Actual Size). Check the test square to make sure the pattern has printed at the correct scale. Once you have printed the sheets, you will need to cut off one of the horizontal edges and one of the portrait edges on all sheets to help piece them together. Tape the edges together, aligning any markings. We recommend using clear tape so you can see through the tape if you tape across any pattern lines.
Once the grid of paper pieces has been taped together, you can either cut out the pieces or trace them onto pattern paper and save the original pattern. This would be handy if you plan to make the garment again in another size, to save printing and sticking it together more than once.
Are your paper patterns double-sided?
You’ll find some paper patterns are printed double-sided, and so require tracing. Follow our how to trace sewing patterns tutorial to learn how to create individual pattern pieces.

Looking to buy your own PDF sewing patterns?
Head over to the Gathered Shop where you’ll find beautiful PDF sewing patterns from all your favourite magazines, including Simply Sewing.
Looking at your pattern pieces
Aside from your instruction booklet, you’ll also have several sheets of paper depicting different pattern pieces. These are the pattern pieces you will use to pin to your fabric, trace around and cut out (we cover what fabrics to use in our how to use sewing patterns article), eventually creating your finished garment.
Your pattern pieces will most likely have different sizes indicated on the paper. Cut down each piece to fit your size (we will cover how to measure yourself later in this guide).
The pattern pieces (or the instructions provided) will give you all the vital information for constructing your garment. This will include how each piece should be cut out of the fabric.
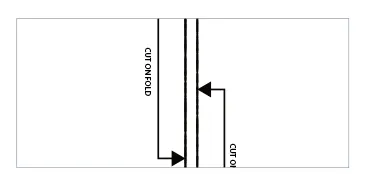
Most patterns require you to fold your fabric in half before you attach/trace your pattern pieces. This creates a double layer, giving you two attached, fabric cut-outs for each pattern piece. If your sewing pattern requires this, it will be indicated on your pattern pieces and will read ‘Cut on the Fold’.
If this is the case, ensure you place the foldline of the pattern piece right up against the fold of the fabric. If your pattern specifies to cut one pair, you can do this on your folded fabric, by placing the pattern piece elsewhere on the fabric and cutting two mirrored pieces at once. Do check the layplan in your instructions for guidance on how to place the pattern pieces on the fabric.
How to read sewing patterns: Understanding pattern markings
It’s likely your sewing pattern will have many markings on each piece and this can seem a little daunting at first. These marks and symbols are there to help you achieve a great fit and finish on your me-made garments.
Not all markings will be found on every project, as some are only used for specific details, like pleats and tucks. Markings such as cutting lines, grainlines and fold lines are used for positioning and cutting out the pattern on your fabric, while others, like the lengthen and shorten lines, are for adjusting the pattern pieces.
Some markings, including notches and darts, need to be transferred onto your fabric to help you construct your garment. Here we take you through the key markings to get you started.
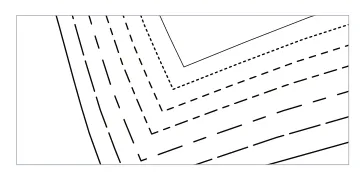
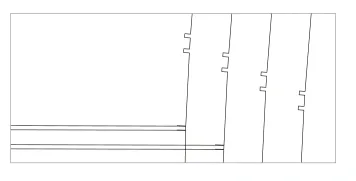
Cutting lines
These are the outer lines of the pattern. Multi-size patterns have different style lines for each of the sizes, such as dots and dashes or a combination of the two. Cut along the line that matches your size – it may help to mark this with a highlighter first, then pin the pattern to the fabric and cut it out.
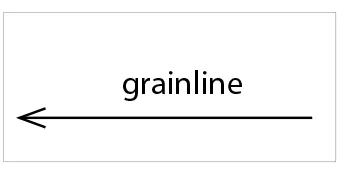
Grainline
Match up the direction the arrow is pointing with the grain on the fabric, which runs parallel to the selvedges. Measure the grainline on your pattern piece from the line to the selvedge at a couple of different points for accuracy.
On the fold
To cut a pattern piece on the fold, line up and pin this marking with the fold on the fabric then pin the rest of the pattern in place.
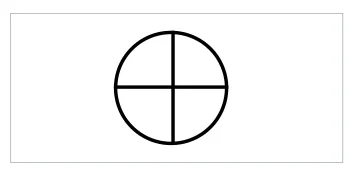
Bust and hip indicators
These indicate the bustline, waistline or hipline on the pattern and are a good way of checking if the pattern fits your shape.
Notches
These triangles or lines are marked on the edges of a pattern to indicate where to match up two pattern pieces and fit them together. Mark these by cutting a small 2-3mm notch in the edge of the pattern piece, where indicated.

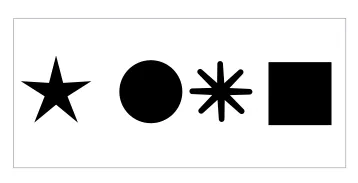
Other shapes
These are used to mark specific parts of the pattern, such as pocket placements, dart points, clipping, gathering and stay stitching. Mark these with a fabric marker on the wrong side of the fabric.
Lengthen and shorten lines
Two horizontal, parallel lines show the point on the pattern where you can lengthen or shorten it to suit your size.
Buttonholes and buttons
Buttonholes are usually represented by a horizontal or vertical line, and the button position is marked on this line with an X.

Understanding your sewing pattern: The layplan
In your instruction booklet, you’ll find the layplan. A lay plan is a diagram that shows you how to best lay out your pattern pieces, depending on the width of the fabric. Use the example below to understand the common layplan terms and their meanings.

How to read sewing patterns: choosing your size
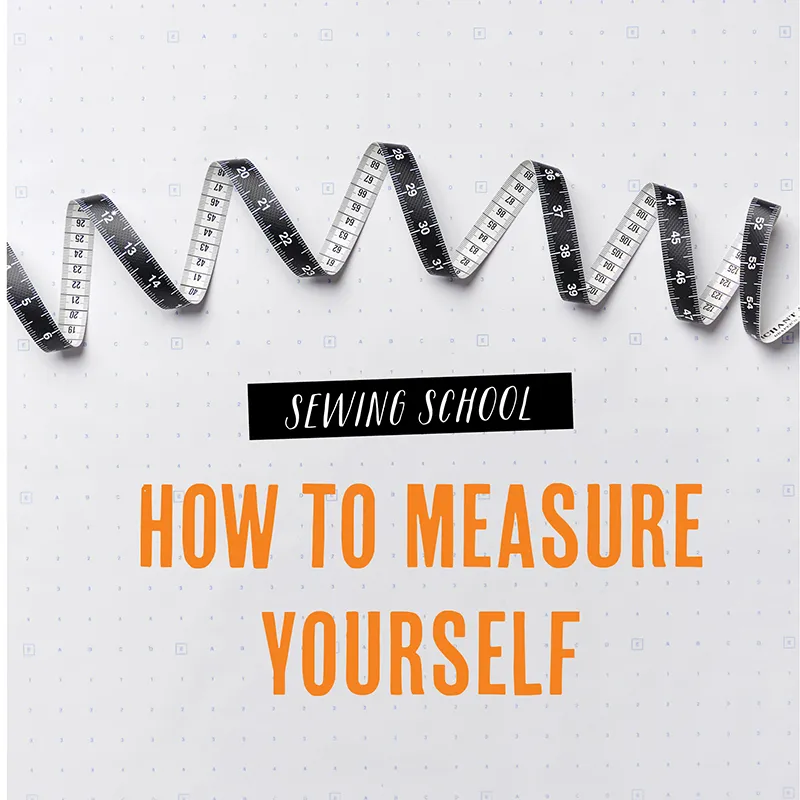
Now you understand the sewing pattern; it’s time to pick the size you want to make. First, learn how to measure yourself using our step-by-step guide. Make sure you have the tape measure taut but not tight and use a mirror to ensure it is level and not twisted.
We show you how to take every necessary measurement and even include a free printable ‘My Body Measurements’ table where you can record your details and use it every time you sew.
Once you’ve taken your measurements, you’ll need to read your sewing pattern and select the size for you. Use the pattern chart included in the packet, in the instructions or in the pattern templates and match your relevant sizing with those on the chart. For example, if you’re making a dress, you’ll need to match your bust, waist and hips with the sizes on the chart.
If you find you’re between two sizes, for example, your bust measurements fit a 10 but your waist a 12, you may need to grade between the 10 at the bust, blending out to the 12 at the waistline.
Use your new skills to make your first garment
See? Learning how to read a sewing pattern wasn’t so scary! Once you understand the basics of measuring yourself, printing patterns and understanding the pattern’s markings, you can move on to the fun part – selecting your fabric and constructing your garment.
Next up – how to use a sewing pattern
Now you know how to read a sewing pattern; it’s time to learn how to use a sewing pattern. It’s the next step in your sewing journey – you’ll be making handmade clothing before you know it.


