Both of these cheery designs were created by quilter, designer and teacher Jenny Woodward, who's based in Sydney, Australia. Follow her on Instagram @jacksroom or on her website jacksroomquilts.blogspot.com. Read on for her step by step tutorial to make this funky cushion and head to our Love Patchwork & Quilting mag page for more modern quilt inspo.
How to sew the Hi Hexie triangle cushion
You will need...
- Print fabrics: variety of strips measuring 3½in x at least 4½2in
- Background fabric (white): ½yd
- Backing fabric: 22in square
- Batting: 22in square
- Cushion back fabric: ½yd
- Binding: ¼yd
Finished size
19in square approx
Notes
- When we refer to fractions, due to font restraints on the blog we can’t display fractions clearly, so we use a space and italics to indicate where a fraction occurs – for example: 3½in = three and a half inches
- Seam allowances are ¼in, unless otherwise noted.
- Press seams open, unless instructed otherwise.
- WOF = width of fabric.
- WST = wrong sides together.
Cutting out
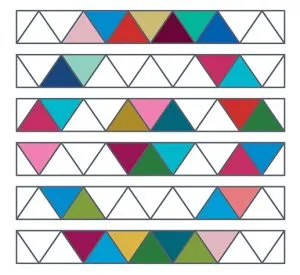
Step one: From the print fabrics cut a total of thirty-six (36) triangles, referring to Figs A–D.

Step two: From the background fabric cut one (1) 2¼in x WOF strip and three (3) 3½in x WOF strips. Subcut the 3½in strips to give forty-two (42) triangles.
Step three: From the cushion back fabric cut two (2) 20in x 15in rectangles.
Step four: From the binding fabric cut three (3) 2½in x WOF strips.
Assembling the cushion top
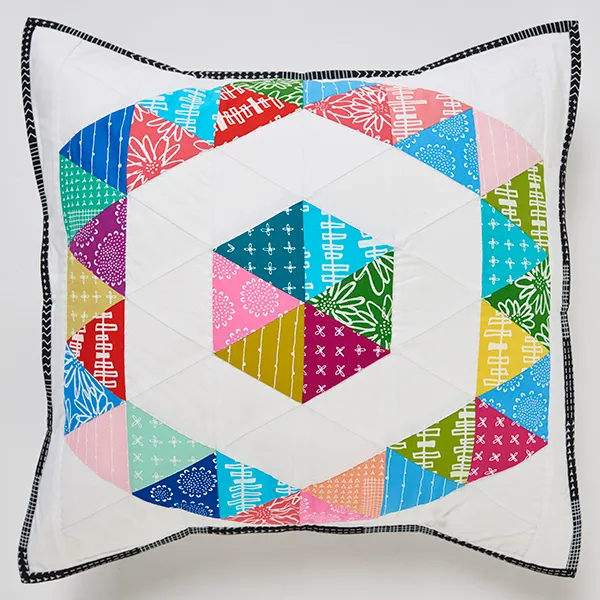
Step five: Arrange the print and white triangles into six rows of thirteen triangles each as shown (Fig 2). The print triangles are arranged into two concentric hexagons.
Step six: Sew the triangles into rows then join the rows, making sure to match the points.
Step seven: Square up the cushion top, cutting ¼in beyond the points of the triangles at the edges and taking care to create a 90-degree angle at each corner. The cushion top centre should measure approx 19in x 16½in.
Step eight: Take the 1¼in x WOF white strip. Measure the width of the cushion top and cut two (2) strips to this measurement. It should measure approx 19in wide. Sew a strip to the top and bottom of the cushion top.
Quilting and finishing
Step nine: Make a quilt sandwich using the 22in backing fabric square, the 22in batting square and the cushion top. The backing and batting are slightly larger than the cushion top. Baste using your preferred method.
Step ten: Quilt as desired. Jenny hand quilted around the outlines of each hexagon shape.
Step 11: Take the two 20in x 15in cushion back fabric rectangles. On one long edge of each rectangle turn over a ½in seam to the wrong side, then turn over another ½in and press. Topstitch to secure. These are the cushion back pieces.
Step 12: Place the cushion front right side down. WST, matching up the raw edges, place one cushion back on top with the neatened seam running across the centre of the cushion. Place the second cushion back in the same way – the cushion back pieces will overlap. Pin or clip all around to secure and then baste around the edge of the cushion with a scant ¼in seam.
Step 13: Sew the binding strips together end-to-end using diagonal seams. Press the seams open and trim away the dog ears. Fold in half lengthwise, WST, and press.
Step 14: Sew the binding to the right side of the quilt, folding a mitre at each corner, then fold the binding over to the back of the quilt and hand stitch in place to finish.