How to tie a quilt

Need a fast finish? Our Technical Editors Sarah Griffiths and Linda Clements take you through the basics of how to hand tie a quilt and shares some tips on how to pep up this traditional technique...

6 issues of Today's Quilter magazine for just £9.99|Save 76%

Published: October 1, 2020 at 7:47 am

How to tie a quilt

We're pulling together advice from the pros on our magazines Love Patchwork and Quilting and Today's Quilter to bring you this complete guide to how to tie quilts. Tied quilting can be used on any project and is useful on those that use thicker fabrics, or multiple layers. It’s a fun technique and can be creative too. Read on to find out how it's done, plus follow our instructions for how to make a bright and bold mini quilt project to try out what you've learnt.

What is tied quilting?

Tied quilting is a method of securing the layers of a quilt or project by tying them together. This can be achieved in various ways, which this article will explore. Machine and hand quilting are usually closely spaced, giving a flat appearance to a quilt, but tying the layers together is normally done at wider intervals, giving a puffier look. The knots can be tied on the front of the quilt or on the back and can be made in various ways, constructed to blend in or stand out as decorative features in their own right. Tying a quilt can also be done by machine.

Reasons to tie a quilt

There are various reasons why you might want to learn how to hand tie a quilt, including the following:

  • It creates a distinctive and charming look to a quilt, with a puffier appearance than normal machine quilting.
  • It’s an excellent method to use for a quilt with thicker layers, such as one made from wool tweeds or flannels (brushed cottons).
  • Tying can be done by hand or by machine.
  • A feature can be made of knots, for example, leaving long thread ends or tying in a bow.
  • Tying can incorporate buttons and beads.
  • Aesthetically, tying a quilt by hand gives it a different finish to machine quilting.

Which thread should you use to tie a quilt?

Threads that can be used for tied quilting can vary according to your project, your fabrics and the look you want to achieve. These might include standard hand or machine quilting threads, embroidery threads, wool or even ribbon. The material you use for tying will also depend on whether you are tying by hand or by machine, and both methods are described here. Whatever thread you use it must be strong enough to hold the quilt layers together without breaking. Thread colours can be matched to the colours used in your project or be chosen to contrast. Use a thread length sufficient to form a knot easily and also allow for a bow or long thread ends if desired.

How to hand tie a quilt tutorial

Where do you tie?

The positions where ties occur are up to you and will depend on your project and probably the blocks or the pattern of your patchwork. You also need to ensure that you are tying at the correct intervals for the wadding you are using. Seam junctions are useful places for ties, or in the centre of patchwork blocks or units. You could also aim to create patterns with ties, such as circles or on-point squares.

Take a look at your quilt top and decide where you would like the ties to go. It’s important to keep in mind how close your ties should be, based on the waadding or batting you’re using (check the label when you buy and make a note of the recommended quilting distance). If you’re not sure, it’s usually safe to place them about a hands width apart (4–5in).

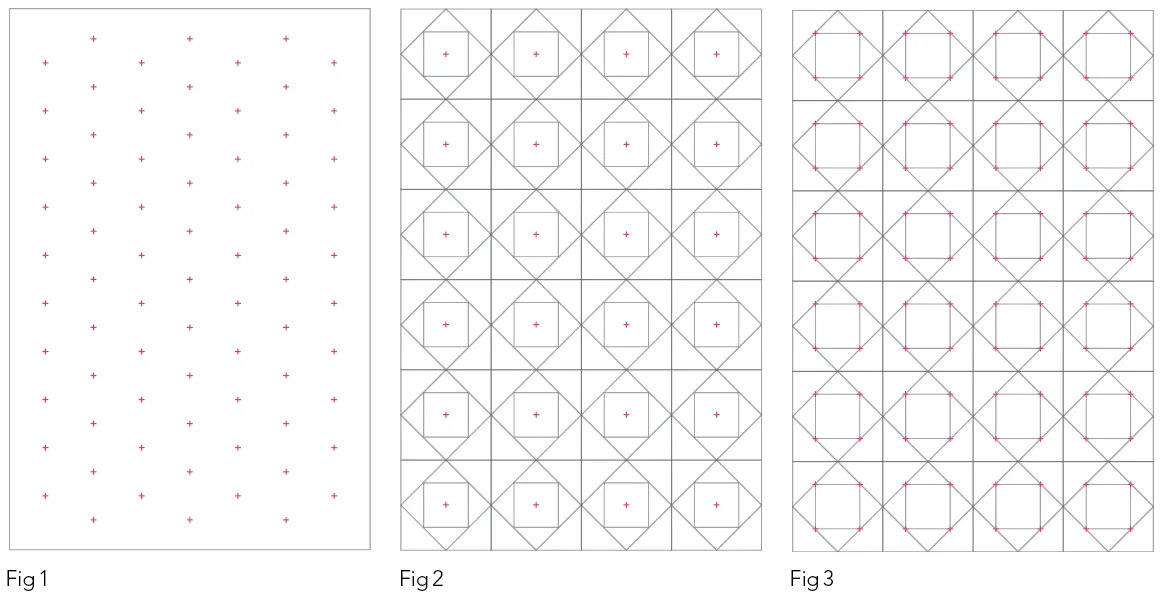
You can work in an offset grid pattern for even coverage (Fig 1 below). Or use your quilt design as a guide, placing ties in the centre of blocks (Fig 2) or at corners over seams (Fig 3). If you want precise placement, you can mark your quilt with a removable fabric pen or for a more freestyle look, just eyeball the placement!

diagram showing tied quilt patterns

What is the minimum distance apart that ties need to be?

The spacing distance between ties depends on the wadding you are using, so check the manufacturer’s recommendations. Generally, the distance is between 3in and 8in − the looser the wadding, the closer the quilting needs to be. For example, a 100% cotton wadding could be quilted at about 8in apart, while a wool one would need to be more like 3in. It’s advisable to quilt (or tie) a little closer than the recommended distances, as this puts less stress on each individual stitch or tie.

How to hand tie a quilt – 5 ways to try

  1. Using simple, discrete knots with hand sewing thread.
  2. Using embroidery thread for tying or forming bows.
  3. Tying with thicker threads, such as wool or ribbon.
  4. Tying through buttons.
  5. Tying through beads.

How to tie a quilt by hand: simple knots method

The basic method is to hand sew a thread through all layers of the quilt, tie it in a reef knot and then trim the ends. The knots can be tied from front to back of the work, or vice versa.

Step 1

Pencil mark the place where you want the knot to be. Prepare a needle and thread. A thread length of 7in−10in is a comfortable one to tie and make bows with. Pass the thread through the layers of the quilt, from the back through to the front (or vice versa). Return again to the back, spacing the stitches about 1/8in apart (Fig 1A). You can do this twice or more if desired. Both thread ends should end up at the back (or front) of the work.

Step 2

Pull the thread ends snug against the work and make a reef knot − right over left and then left over right (Fig 1B). Tie the knot tightly and trim the thread ends or leave them a little long if you prefer.

Top tip: If you wish, you could make a double knot. For extra security, add a drop of fabric glue over the knot.

How to hand tie a quilt with knots

You will need:

  • Needle
  • Thread
  • Quilt sandwich

Step 1

Lay your basted quilt out flat on a table top with a cutting mat underneath. Thread a large eyed sharp tapestry needle or curved needle with two long strands of yarn, perle cotton or embroidery floss. Starting from the centre of your quilt, make a double stitch through all layers of the quilt, leaving a 6in tail of thread at one end. Don’t cut the other end of the thread yet.

Curved needle and thread

Step 2

Work your way across the quilt, adding stitches at your chosen intervals. Work in a straight line toward one edge of your quilt. Make sure to leave at least 6in of thread between each stitch. If your stitches are closer together than this, just leave a little slack between them. When you reach the edge of your quilt, snip the thread, leaving a 6in tail at the end. Keep adding lines of stitches in this way, until your whole quilt is covered.

lines of stitching on a quilt

Step 3

Snip the threads between each set of stitches, leaving an equal length on each side. Tie a square knot (twist right over left, then left over right) at each stitch, using the long thread tails. Trim the thread tails to your desired length.

Three stages of tying and trimming thread for a tied quilt design

How to tie a quilt with buttons

Step 1

If you don’t like the look of knots, you could also finish your thread ends with buttons. Thread the ends through the buttonholes, and finish them off as you would on a garment. Alternatively, you can push the thread ends to the back of the quilt and knot off.

button sewn on to quilt

How to tie a quilt with bows

Step 1

Once a basic knot is formed, instead of being trimmed, the thread ends can be tied in a bow. This creates a lovely folk-art look and is particularly nice with decorative threads, wools or even thin ribbons. Fig 2 shows some examples. A drop of fabric glue can help prevent bows coming undone, or use the bow lengths to tie an extra knot.

How to tie a quilt by hand with bows

How to tie a quilt with buttons

Step 1

It’s great fun to add buttons as you tie a quilt or project. Buttons can be incorporated very easily by simply running your thread through the button holes as you make the knot. A spot of glue on the front and back will further secure the knot. Bear the following points in mind when using buttons.

  • Choose buttons that are sturdy and hardwearing and that will withstand laundering.
  • Use buttons that have holes in the button − the shank types are not really suitable.
  • Avoid delicate buttons such as mother-of-pearl, as these might break when put under tension by tightly tied threads.
  • For safety reasons it is best to avoid using buttons on projects for very young children.
How to tie a quilt with buttons
Examples of buttons used with tied quilting. The threads can be used decoratively as tails or bows, or be knotted on the back of the work so only the button shows on the front.

How to tie a quilt with beads

Step 1

As with using buttons, select your beads carefully to suit the use of your project. If the project will have daily use then choose beads that are strong and durable. If the project is a smaller one that will only get used occasionally, such as an evening bag, then more delicate beads can be used. It is best to match the thread weight to the size of the bead being used.

How to tie a quilt with beads

Examples of different beads used with tied quilting. More decorative beads would be useful for smaller projects, such as bags. You can also make a feature of the ties, placing them at the top of a bead or at both sides.

[pullquote quote="Choose beads carefully for tying a quilt or other project, choosing robust materials. Wooden and plastic beads would be the best choice for quilts that will get used often." /]

How to tie a quilt by machine

You can also use your sewing machine to make quilt ties in various ways.

  • You can create nearly invisible ties by using a machine sewing thread to sew through the layers of the quilt, sewing on the spot (setting the stitch length at zero) for several stitches and then trimming the threads off flush.
  • Rather than hand sewing thick thread through the quilt layers, you can use the machine to anchor the thread in place.
  • You can machine quilt ties in place and use buttons at the same time.

<POT HOLDER PICTURE>

A pot-holder, which needs layers of thick insulating wadding, is the perfect project for tied quilting.

How to tie quilt by machine: using thick thread

Pulling thick threads through a quilt sandwich can be hard on the fingers, so this method secures them by machine. You can do this with a zigzag stitch or a forwards and backwards straight stitch.

Step 1

Choose your thread or ribbon and position the centre of it over the spot you want the tie.

Step 2

Choose a thread colour to match the thread or ribbon you want to tie. Select a tight zigzag stitch on your machine in a width suitable for the thread to be tied. Position the machine foot over the thread and lower the needle in position to pierce the edge of the thread (Fig 3A).

Step 3

Now machine zigzag over the thread, piercing it several times to secure it (Fig 3B).

Step 4

Pull the machine thread ends through to the back (or front) of the work and tie off. Knot the thick thread, making a bow if you wish and then trim excess thread.

How to tie a quilt by machine

[pullquote quote="Top tip: You can also machine sew the thread in place by reducing the stitch length to about 1mm and sewing forwards for several stitches over the thread, and then backwards and forwards again." /]


Tying a quilt by machine: quick guide

If you don’t fancy all the hand work, you can tie your quilt by machine instead. Here are a few stitches you can use to finish your quilt. Simply work them over the quilt at intervals, snipping threads close to the quilt to finish each one.

Straight stitch

Lower your machine needle into your quilt. Stitch forward about 4 stitches, then in reverse for 4 stitches. Repeat one more time in the same spot before clipping threads.

Buttonhole stitch

Use a very short buttonhole stitch to make a thin ring. This is a little fancier than the straight stitches, but also more time consuming.

Embroidery stitches

If your machine has some embroidery stitches, you can experiment with using these for ties. We tried a small ring stitch and a satin stitch oval. Just make sure to lock your threads at the beginning and end of each stitch.


From left to right: 4 examples of machine-tied quilt stitches – straight stitch, buttonhole stitch, and two machine embroidery stitches.

Try it now: Neon Tied quilt pattern

Now you’ve learned the basics for how to tie a quilt from Love Patchwork & Quilting magazine, try it out with this mini quilt – we’ve gone for all-out colour clashing with pops of neon fabric and thread!

Tied quilt in various colours

You will need

  • Nine different fabrics each 812in square for quilt top
  • Solid fabric 18in square solid for centre back
  • Dotted fabric ¼yd for back sashing
  • Binding fabric ¼yd
  • Batting 25in square

Finished Size

24in square

Notes

All seam allowances are ¼in, unless noted otherwise.

Fabrics used

Riley Blake Neon Dots and Solids

Equipment

Curved needles: these make it easy to add stitches to a flat quilt without straining your fingers. You can use any type of thread to tie your quilt; just make sure it’s colourfast and washable. Larger size needles are perfect for yarn or thicker threads.

Cutting out

Step 1

From your dotted back sashing fabric cut two (2) 4in x WOF strips. Subcut each strip into one (1) 4in x 18in strip and one (1) 4in x 25in strip.

Step 2

Cut three (3) 212in x WOF strips for binding.

Step 3

Sew your 18in strips to the top and bottom of your 18in square of backing fabric, pressing the seams toward the sashing strips. Sew the 25in strips to the sides of the backing, again pressing seams toward the sashing strips.

Piecing the quilt top

Step 4

Piece the quilt top by sewing the 812in squares into three rows of three, referring to the quilt above, or arranging as you choose. Press seams in alternate directions between each row. Join the rows together, pressing the seams open or to one side as you prefer.

Quilting and finishing

Step 5

Make a quilt sandwich with your backing, batting and quilt top and baste together. Tie the quilt using the methods outlined in the technique focus. We used neon threads to tie our quilt, adding buttons in two corners. We also added some straight stitch machine ties in the other two corners.

Step 6

Sew your binding strips together end to end. Press in half lengthwise, wrong sides together and use to bind your quilt.