Discover the secret to tailored, professional-looking knitted garments: mattress stitch. This seaming technique takes a bit more effort than simple oversewing or backstitch, but it's absolutely worth the effort.
In this tutorial we'll show you three versions of mattress stitch that you can use to create beautiful, almost unnoticeable joins in your knitting.
What is mattress stitch?
Mattress stitch is a seaming method that enables you to create an invisible join between two pieces of knitting. It brings the stitches together to make your fabric look like a continuous piece of knitting. Done right, you’ll never know a seam was there!
If you're thinking this sounds familiar, there is another related technique that creates a similar effect.
Kitchener stitch can be used to graft live stitches together (ie stitches that are still on the needles), and is often recommended for the toes of socks.
Mattress stitch is used on stitches that have already been cast off, and is a popular choice for garment seams.
It's worth noting that while kitchener stitch leaves no obvious seam on the inside or outside of the work, mattress stitch does leave a fairly bulky seam on the inside.
This may be an issue if you're making a smaller or lightweight item such as a hat, or if you don't like the feeling of noticeable seams.
We'd recommend testing different seaming methods on a swatch first to see which one you prefer.
What tools do I need to do mattress stitch?
All you need for this tutorial is a tapestry or yarn needle and a pair of scissors to trim your yarn ends.
Generally it's best to seam using the same yarn you used for the rest of the project.
However, if the item was knitted in a fragile or novelty yarn you'd be better choosing something smooth and sturdy instead.
It's better to use a tapestry needle rather than a regular sewing needle for mattress stitch.
You need to make sure that you're moving the needle in between the stitches as you sew, rather than through them. A blunt tapestry needle is less likely to split your yarn than a sharp sewing needle.
Although you can use any scissors to cut your yarn, a sharp pair of embroidery scissors will give you more precision and a cleaner cut.
Here's your shopping list for mattress stitch tools:
- Buy Clover Chibi tapestry needles from Amazon
- Buy Fiskars Classic embroidery scissors from Amazon
Are there different versions of mattress stitch?
Yes! The technique varies according to whether you're joining your pieces at the row-end edges or at the cast on and cast off edges.
In other words, whether your stitches are side by side (for example on the sides of a jumper) or end to end (such as on the shoulders of a garment).
We'll also show you how to work mattress stitch on row-end ribbing. This will allow you to easily join cuffs and hems in a neat, concealed way that matches the rest of your seams.
We have tutorials for all three versions of mattress stitch (the first two from Jen Arnall-Culliford, and the last from Judy Furlong), but the basic techniques are the same.
The key to each method is catching the right number of stitches on each side of the knitted fabric. When you pull the seam tight the stitches line up and the seam becomes invisible.
Follow the links below to jump to the guide you need:
- Mattress stitch for joining row-end edges
- Mattress stitch for joining cast-off (or cast-on) edges
- Mattress stitch for joining ribbing
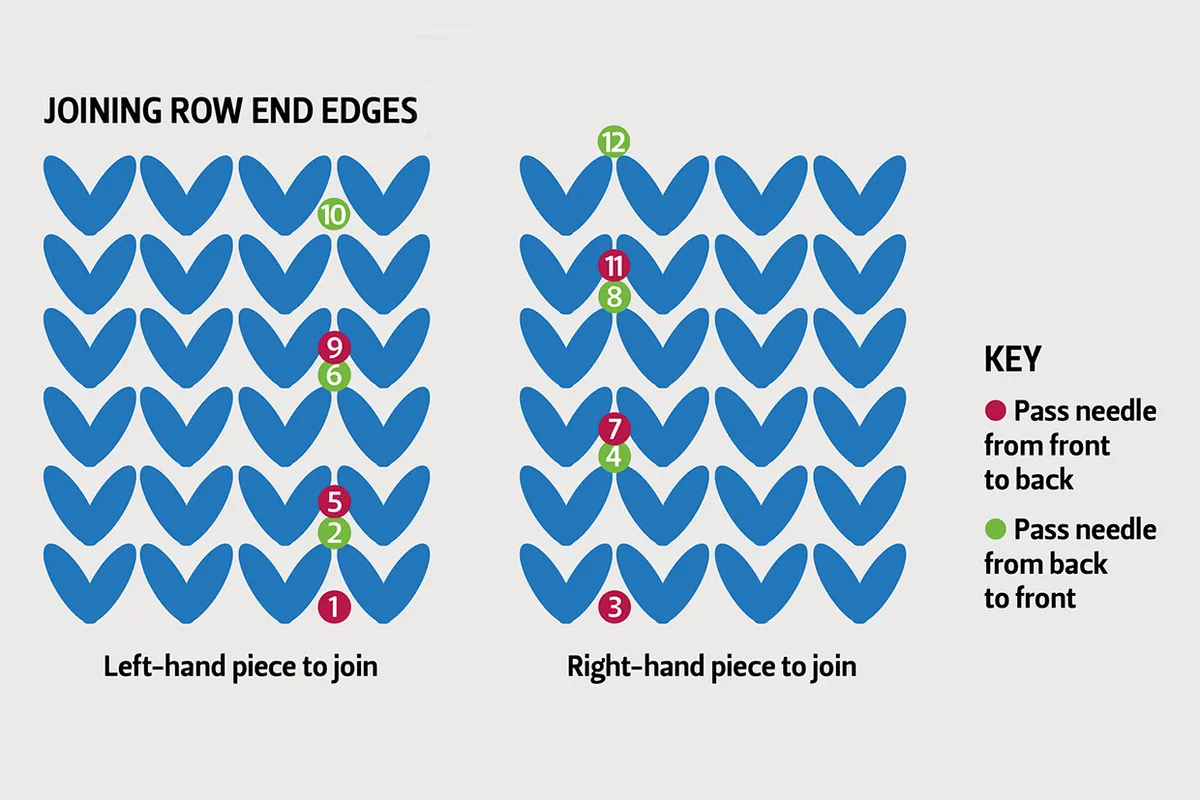
Mattress stitch for joining row-end edges