If you enjoy sewing along with us, don't forget to check out the rest of our free quilt patterns and follow designer Lynne Goldsworthy on Instagram @lilyquilts to catch up with her latest quilting adventures! For more quilt inspo, don't forget to check out the rest of our awesome quilt ideas from the Love Patchwork & Quilting team.
You will need
- Print fabrics: 25 fat eighths
- Solid fabrics: 25 fat eighths
- Background fabric: 1¼yds
- Backing fabric: 3¾yds
- Batting: 68in square
- Binding fabric: ½yd
Finished size
60in square approx
Notes
- Seam allowances are ¼in, unless otherwise noted.
- Press seams open after sewing each one, unless otherwise instructed.
- RST = right sides together.
- WOF = width of fabric.
- WST = wrong sides together.
Fabrics used
The fabrics used in our quilt were supplied by Duck Egg Threads – one of our fave places to go to indulge our Liberty lust! They have a huge range of the pretty prints and you can buy them in small cuts, which is ideal for topping up your stash without breaking the bank! If you’re a total Liberty addict then you can even sign up to their We Love Liberty club and receive their curated bundles of the cult fabric through your letterbox every month.
For this quilt, we've used:
- Print fabrics are all from collections by Liberty.
- Solid fabrics are from collections by Makower.
- Background fabric is from the Sunprints collection by Alison Glass for Andover Fabrics.
Top tip
Swap solids for low-volume prints to add even more print and pattern into your quilt!
Cutting out
Step one
From each of thirteen (13) of the print fat eighths cut four (4) 4½in x 5in rectangles for the Block A crosses. You will have thirteen (13) sets of Block A print rectangles in total.
Step two
From each of the twelve (12) remaining print fat eighths cut:
- One (1) 4½in square for the Block B centres.
- One (1) 5½in square. Subcut across both diagonals to give four triangles for the Block B corners.
You will have a total of twelve (12) sets of Block B print square and triangles.
Step three
From each of twelve (12) of the solid fat eighths cut four (4) 4½in x 5in rectangles for the Block B crosses. You will have a total of twelve (12) sets of Block B solid rectangles.
Step four
From each of the thirteen (13) remaining solid fat eighths cut:
- One (1) 4½in square for the Block A centres.
- One (1) 5½in square. Subcut across both diagonals to give four triangles for the Block A corners.
You will have a total of thirteen (13) sets of Block A solid square and triangles.
Top tip: Keep pieces cut from the same print or solid together in sets.
Step five
From the background fabric cut eight (8) 5½in x WOF strips. Subcut into fifty (50) 5½in squares. Cut each square in half diagonally to give a total of one hundred (100) triangles.
Step six
From the binding fabric cut seven (7) 2½in x WOF strips.
Piecing the blocks
Step seven
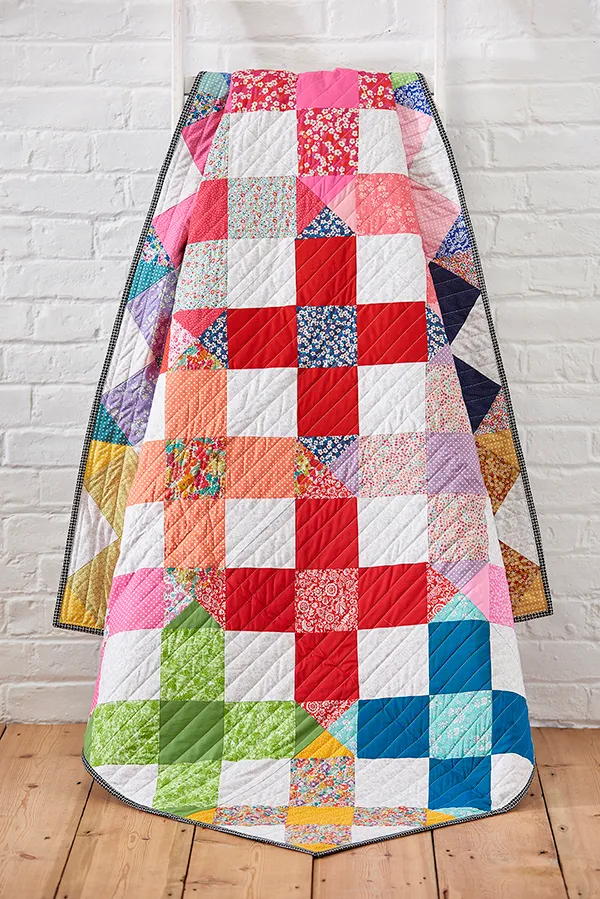
Take one set of Block A print rectangles, one set of Block A solid square and triangles and four background triangles. Arrange into five rows as shown.

Step eight
Join the pieces into rows. Press the seams away from the rectangles.

Step nine
Join the rows. Press and trim to 12½in square. This completes one Block A.
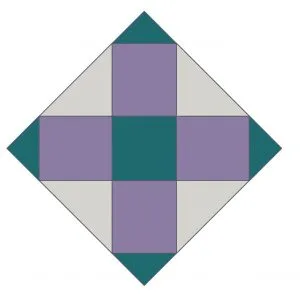
Step 10
Repeat steps 7–9 to make a total of thirteen of Block A.
Step 11
Take one set of Block B solid rectangles, one set of Block B print square and triangles, and four background triangles. Arrange into five rows as for Block A, but this time the positions of the print and solid pieces will be swapped. Repeat steps 8–9 to complete one Block B.
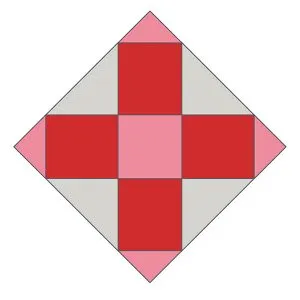
Step 12
Repeat step 11 to make a total of twelve of Block B.
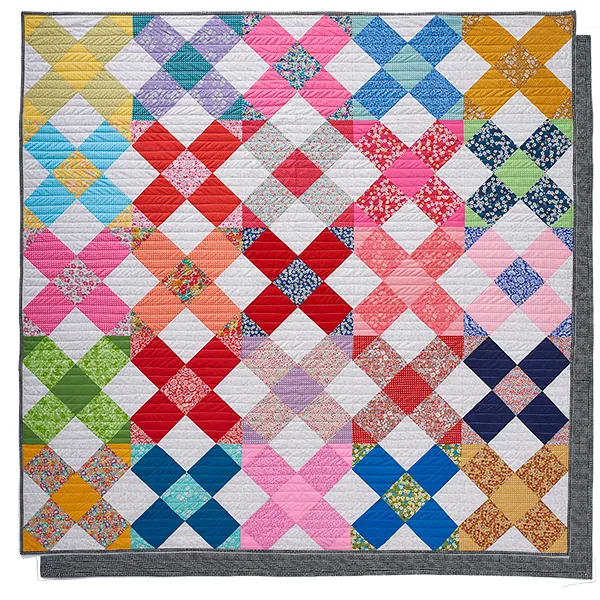
Assembling the quilt top
Step 13
Arrange the blocks into five rows of five blocks each as shown. Try to get a good balance of prints and solids, and colours, across the quilt top.
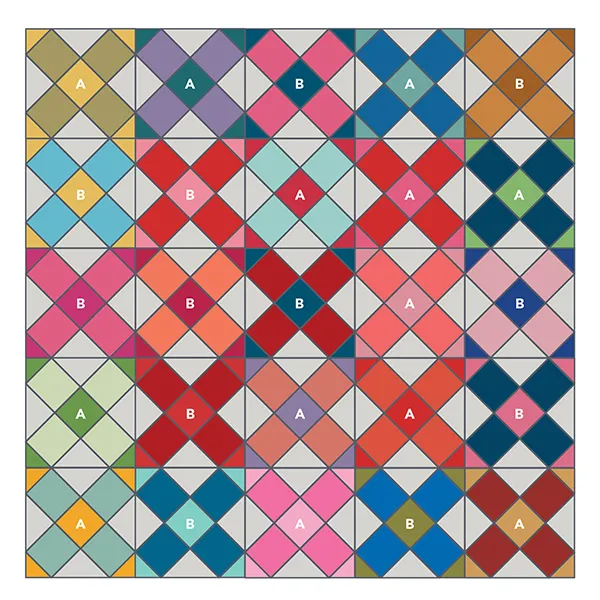
Step 14
Once you are happy with your layout, sew the blocks into rows and then sew the rows together to complete the quilt top.
Quilting and finishing
Step 15
Cut the backing fabric in half across the width. Remove the selvedges and re-join the pieces along the length with a ½in seam. Press the seam open.
Step 16
Press the quilt top and backing well. Make a quilt sandwich by placing the backing fabric right side down, the batting on top, then the quilt top centrally and right side up. The backing and batting are slightly larger than the quilt top. Baste the layers together using your preferred method.
Step 17
Quilt as desired. Lynne quilted straight horizontal lines, approximately 1in apart.
Step 18
Trim off excess batting and backing fabric and square up the quilt.
Step 19
Join the binding strips together end-to-end using diagonal seams. Press the seams open and trim away the dog ears. Fold in half lengthwise, WST, and press.
Step 20
Sew the binding to the right side of the quilt, folding a mitre at each corner, then fold the binding over to the back of the quilt and hand stitch in place to finish.
Do you have a quilt that you’re proud of? Why not enter it into the Festival of Quilts Virtual Competition 2020?