
Sashiko Quilting made easy
The beautiful form of Japanese folk embroidery called Sashiko uses a running stitch to create elegant patterns. If you want to give it a try, we've got you covered. Find everything from tools needed to how to do actual Sashiko stitching, plus there's a bonus Sashiko quilting project to make once you're ready to try something bigger!
Below, you'll find:
- Sashiko quilting tools and materials
- How to begin and end a thread in Sashiko quilting
- Sashiko quilts guide: handling your threads
- How to start Sashiko stitching
- How to make a Sashiko quilt
Sashiko quilting tools and materials

If you think you need special tools and materials to successfully sew sashiko, rest assured - you don't. Although it can be fun to quilt sashiko using genuine sashiko threads and needles, the quilting will also be fine with normal needles and embroidery threads. Purists might notice the difference, but I confess that I don’t, so don’t worry too much.
Sashiko threads
Sashiko can use the same types of threads as normal quilting, but because sashiko stitches tend to be bigger, you can use thicker threads, such as perle cotton No.5 or No.8. Stranded embroidery threads can also be used, with multiple strands selected to achieve different looks.
Three (3) or four (4) strands can mimic the thickness of sashiko threads. When stitching from a kit, make sure your thread is thick enough to cover the printed stitches. For an authentic look, specialist sashiko threads are available. These are thick and strong and come in different weights and colours, including variegated and metallic. The traditional colour combinations were white and indigo, but modern sashiko uses a much wider colour palette. Sashiko kits may be supplied with threads, too.
Sashiko Needles
Normal quilting needles can be used for sashiko, including Betweens or Embroidery types. Choose needles with a decent-sized eye for easy threading and long enough to feed several stitches onto the needle.
You can, of course, use special sashiko needles, which are very sharp, thick and rigid, so it’s worth giving these a try and seeing what you think. A sashiko kit may include a needle, but more often not, leaving the choice up to you.
Fabrics
Traditionally, sashiko was sewn on predominantly cotton and linen. Colours today vary from the original palette of mostly cream and indigo to include other ‘antique’ colours, such as red, tan, tobacco, turquoise, sage and slate.
If marking your own designs, patterned fabric can be used as long as it doesn’t obscure the sashiko.
Marking tools
When marking sashiko patterns, you can use the same tools as for normal quilting. However, the beauty of using a kit is that you won’t need to mark at all.
Quilting hoop
You could use a quilting hoop or frame to stabilise the fabric as you sew, but only if you plan to use a normal quilting action, where the needle is taken in and out of the fabric.
Traditionally, a sashiko sewing action is the opposite, meaning that the needle is held still while the fabric is fed onto it several stitches at a time in a pleating action.
How to begin and end a thread in Sashiko quilting
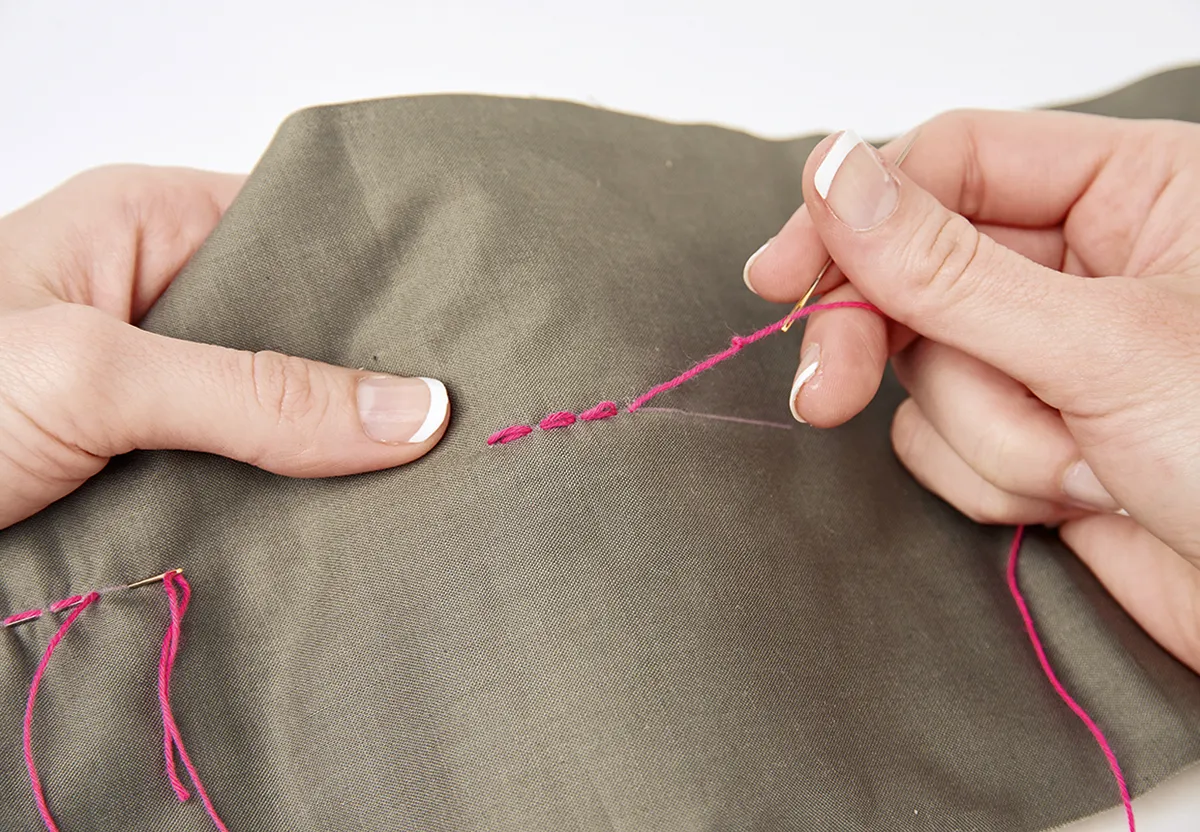
Step 1
To begin a thread, bring your needle up about 1½in in from the end of your stitching line. Take three small anchoring stitches back to the start of your line, working through the batting and top layer only. End with your needle going down and up at the start of the stitching line, only taking a couple of threads with this stitch. Make sure the tail of the thread is carefully pulled up between the layers of your quilt.

Step 2
Now begin stitching along the line, carefully covering your first three stitches. Try to use the same holes for the thread, or get as close as you can. Be careful not to split the thread of the anchor stitches, and leave the thread a little bit loose to help cover them.
Step 3
To end a thread, carefully make three stitches in reverse, this time taking small stitches beneath the previous stitches. Work these stitches through the top and batting layer only. Gently pull the thread end and clip close to the quilt top, allowing the raw end to slip back into the batting.

Sashiko quilts guide: handling your threads
- Remove the paper from your skein and pull apart, forming one continuous loop. Look for the end of the loop where it’s tied together and snip through all the threads. At the opposite end of the skein, use a bit of waste thread or yarn to tie the bundle together.
- Divide one side in half and then braid the threads together loosely. Tie off at the end with another bit of waste thread.
- You can now pull single strands from the top of the braid to use. Your waiting threads will stay untangled, and they’re each just the perfect length for working Sashiko.
How to start Sashiko stitching
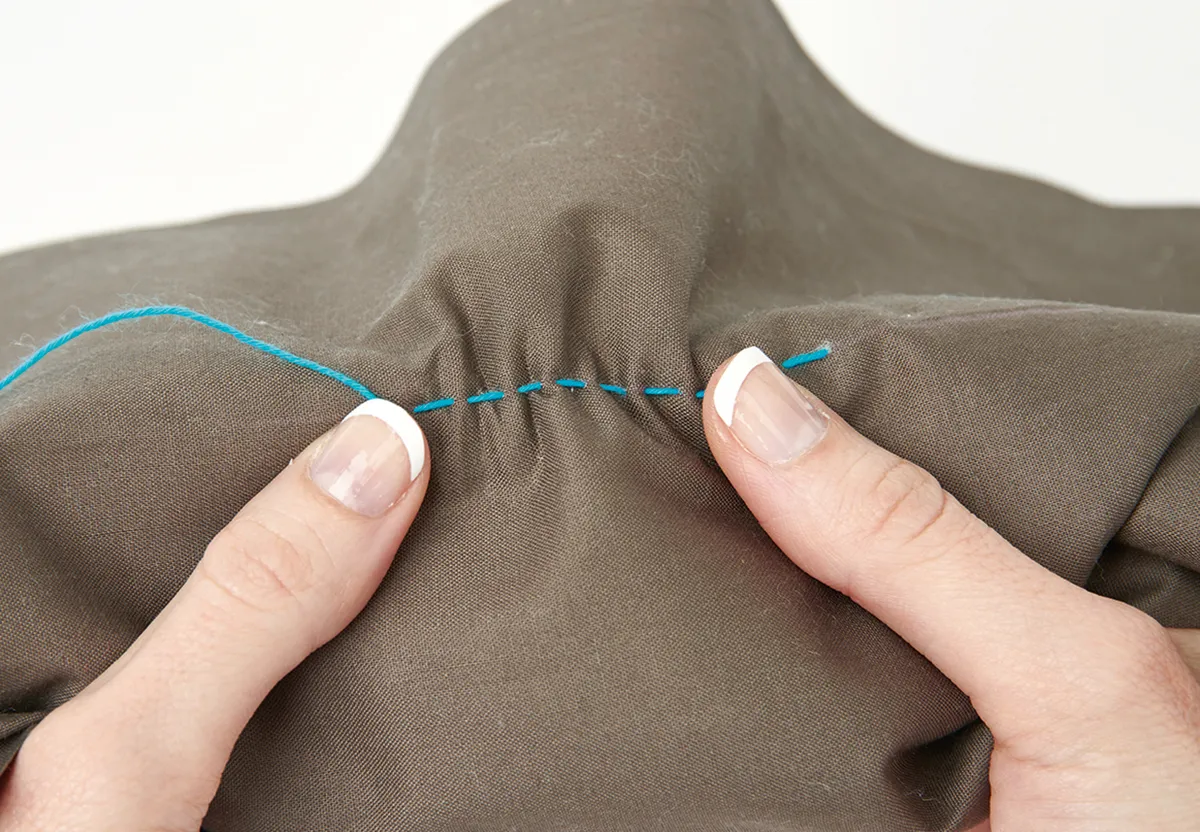
Step 1
Load your needle with several stitches. Sashiko needles are rigid, so you’ll need to move the fabric onto the needle, rather than the other way around. The stitches on the back should be about half the length of the stitches on the front, giving long stitches with small gaps between.
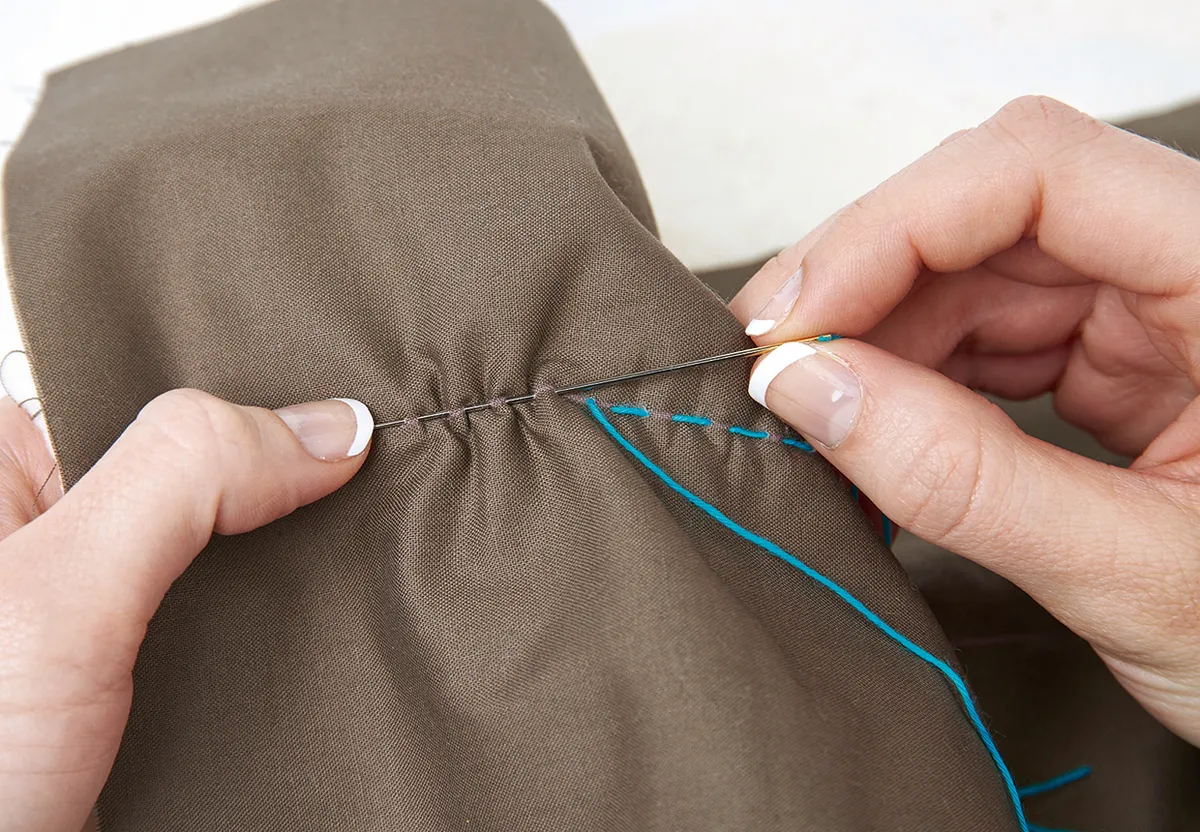
Step 2
Once you have a few stitches on the needle, push the needle through the fabric using a thimble. Pull the thread through, but don’t pull it tight. You’ll notice your fabric is slightly puckered. Use your thumbs to smooth the fabric over the thread, removing any puckers. If you still have thread left when you reach the end of a line, you can start a new line by running the thread a short distance through the batting layer. When you come up at the start of a new line, allow some slack in the thread to avoid puckering between the lines.
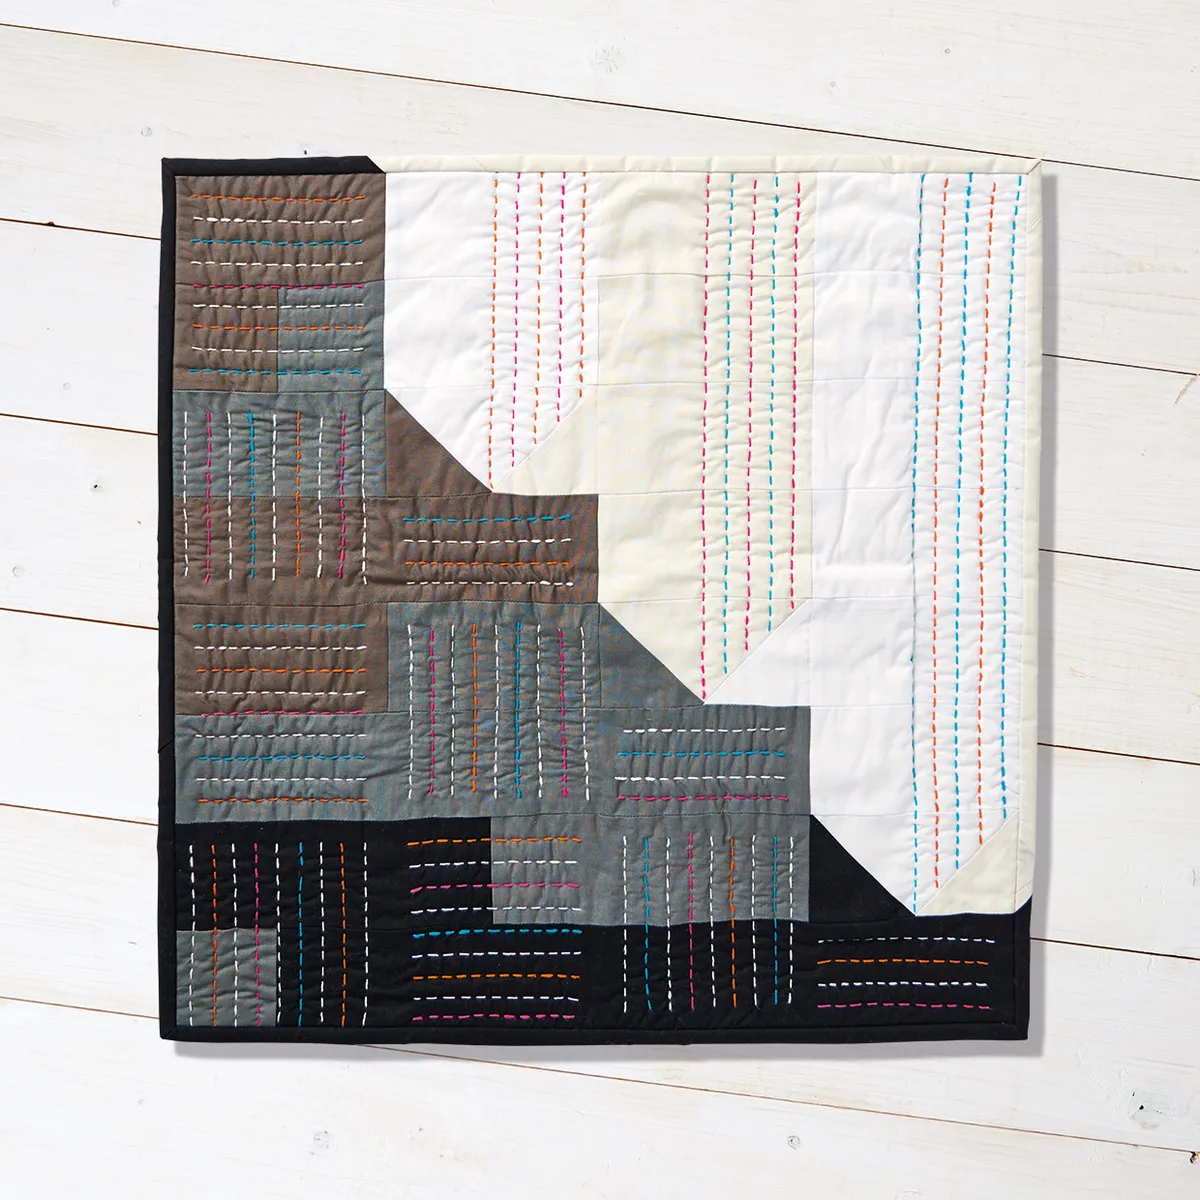
How to make a Sashiko quilt
Put your newfound Sashiko quilting skills to the test with our elegant mini quilt
You will need
- One (1) fat quarter each of white, cream, stone, charcoal and black fabric
- Backing fabric 24in square
- Batting 24in square
- Sashiko needle – this is a long, sharp and thick needle which helps you get straight, even lines of stitching.
- Thimble – makes it a lot easier to push the needles through the layers.
- Thread – traditionally white or black, but now there are bold colours too. Visit www.sewhot.co.uk for an amazing selection!
Notes
- Seam allowances are ¼in, unless otherwise noted.
- Binding fabric is included in the specified yardage.
- We've pieced our quilt top by machine, but if you want to make your quilt completely from scratch, see our guide to hand sewing patchwork.
Finished Size
This is a mini quilt and will measure 20in square

Cutting out
Step 1
From the white fabric, cut:
- Ten (10) 3in x 5½in pieces.
- One (1) 3in square.
Step 2
From the cream fabric, cut:
- Five (5) 3in x 5½in pieces.
- Two (2) 3in squares.
Step 3
From the stone fabric, cut:
- Two (2) 3in x 5½in pieces.
- Two (2) 3in squares.
- One (1) 3in x 10½in strip.
Step 4
From the charcoal fabric, cut:
- Two (2) 3in x 5½in pieces.
- Three (3) 3in squares.
- One (1) 3in x 8in piece.
- One (1) 3in x 15½in strip.
Step 5
From the black fabric, cut:
- One (1) 3in square.
- One (1) 3in x 8in piece.
- One (1) 3in x 18in strip.
Step 6
From your remaining scraps, cut 2½in strips and sew together to give about 95in of binding.
Make the quilt
Step 1
To make a Flying Geese unit, draw a diagonal line on the reverse of a stone 3in square. Place at one end of a white 3in x 5½in piece, RST. Stitch along the marked line, trim the seam allowance to ¼in and press open. Repeat with a cream square at the other end.
Step 2
Repeat this process to make two more Flying Geese, referring to the layout diagram for colour placement.
Step 3
Lay out your Flying Geese units with the rest of your pieces in rows, again referring to the layout diagram. Sew the pieces into rows, then sew the rows together.
Step 4
Make a quilt sandwich with your backing, batting and finished quilt top, and baste in place.
Step 5
Quilt using Sashiko stitches, as outlined in the introduction to this post, above. We used straight lines about ½in apart in the light section of the quilt, then added lines in a basket weave pattern to the dark section.
Step 6
Press your binding in half, wrong sides together, and use it to bind your quilt.
Sashiko quilting patterns to try
Stitching in straight lines is the easiest way to learn this technique, but that doesn’t mean your Sashiko quilting stitches have to be boring! Here are a few ideas on how to mix it up.

Try making a Flying Geese Quilt
If you’re on the hunt for more fun quilting tutorials, why not take a look at our Essential Guide to Flying Geese Quilts?


