How to make a Flying Geese quilt – Flying Geese pattern, tutorial & templates
Crisp Flying Geese are a must for any quilter's repertoire! Flying Geese patchwork is a favourite with quilters everywhere, and we're going to show you how it's done. With a few simple steps, you can turn rectangles and squares of fabric into these most versatile of quilt blocks. Flying Geese can be used as blocks in their own right, or as smaller units within larger blocks to make a range of exciting quilt patterns.
As you only need small pieces of fabric to make your geese, Flying Geese quilts make great scrap-busters to use up your fabric stash. Our step-by-step Flying Geese Tutorial below shows you two methods of making your geese – the traditional technique where you start out making one Flying Goose, and the No Waste Method, which makes 4 geese without wasting any fabric (it's really clever!).
Once you've learned the ropes, try our Free Flying Geese templates or practise your new skills on our Flying Geese Quilting Pattern. Let's begin!
This complete guide on how to make Flying Geese combines advice from Linda Clements, which was first published in Today's Quilter magazine, and a free Flying Geese Quilt Pattern from Love Patchwork & Quilting magazine.
Your guide to Flying Geese Quilts
- What are Flying Geese in quilting?
- How to make Flying Geese
- Flying Geese Quilting Pattern
- Free Flying Geese Templates
- How to sew Flying Geese Blocks together
- How to calculate the size of Flying Geese blocks
What are Flying Geese in quilting?
Flying Geese is a unit of patchwork (or a block of patchwork) which gets its name from the centre triangle, meant to represent a goose in flight, and the two smaller triangles on each side, representing the sky. Flying Geese quilt units are very popular in patchwork – both as blocks in their own right, and as part of larger blocks. They are also useful for borders due to the strong directional element in their design.
Flying Geese are invaluable for creating many well-known patchwork blocks and interesting borders. Here, we’ll explore how to make and use them...Linda Clements
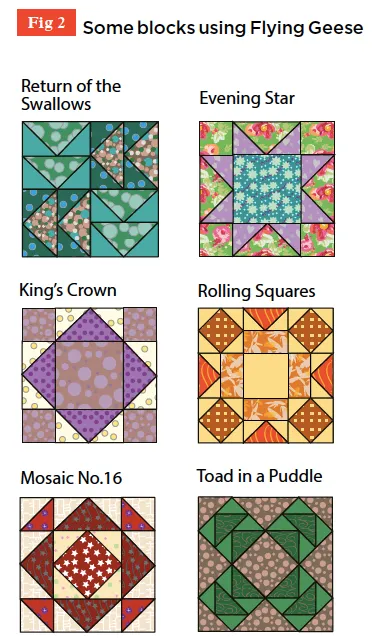
Many blocks use Flying Geese units in their construction – see Fig 2 for some examples – so being able to make them easily is a handy skill.
How to make Flying Geese: tutorial
In this Essential Guide, we will show three methods for how to make Flying Geese using your sewing machine. Make sure you also watch our video tutorial below to learn more.
Flying Geese method 1 – traditional method
This method uses one rectangle and two squares and makes one Flying Goose unit. It is the most common method for making Flying Geese, but not the most efficient. Sewing the corners from squares is a little wasteful, but it is a more stable method. See Maths Made Easy below for calculating the cut sizes of the rectangle and squares.
Flying Geese method 2 – no waste method
This popular way of making geese involves making four units at once from one large square and four smaller squares. We rarely need just the one Flying Geese unit − it’s far more likely that we will need lots of them, so this method, which makes four identical Flying Geese units, is very useful. It also means you don't waste a single scrap of fabric!

Flying Geese patchwork suits all fabric types, whether bold, subtle, modern or traditional and are an important part of many blocks
How to make Flying Geese – traditional method
You will need:
- Cotton fabric
- Sewing machine
- Pins
- Rotary cutter (optional)
- Cutting mat (optional)
- Quilting ruler (optional)
- Pencil
- Thread
Step 1
Cut your fabric. You’ll need to cut one triangle and two small squares. This tutorial will make one unit. Cut one 3×5½in solid fabric rectangle and two 3in squares from print fabric.
Once you’ve completed your unit, its “unfinished" Flying Geese size will measure 2½x5in, which will result in a “finished" size of 2×4½in once you’ve joined it to other units of your quilt (this allows for a ¼in seam on each edge).
To vary the size of your Flying Geese, head to the bottom of this post for our Maths Made Easy guide to How to calculate the size of Flying Geese.

Step 2
On the wrong side of the two small squares, draw or crease a diagonal line.
Step 3
Place the small squares right side down on the rectangle (right side up), aligning the corners as shown in Fig 4A. Pin together if needed.

Step 4
Sew along the line (or a fraction outside of the line). Trim excess fabric at the back 1⁄4in away from the stitching line and press.
Step 5
Sew the second square to the rectangle in the same way in the opposite corner (Fig 4B).
Step 6
Once sewn and pressed, this square will overlap the one already sewn in place. This will form the 1⁄4in seam allowance.
How to make Flying Geese – no waste method
Step 1
Cut one 61⁄4in square and four 33⁄8in squares of fabric (or see our Maths Made Easy guide below to make your geese other sizes). This will make four completed Flying Geese which each measuring 2½x5in. Once you have sewn them to other units of your patchwork with a ¼in seam, the “finished" block size (after seam allowances have been taken off) will be 2×4½in.
Step 2
Place two small squares right sides together with the large square, aligning them in the corners. Draw a line from corner to corner. Pin the pieces together and then sew 1⁄4in away from the line on both sides (Fig 6A). 
Step 3
Press to set the stitches, then cut apart along the line (Fig 6B) and press the triangles outwards (Fig 6C).
Step 4
Place one small square right sides together with one of the sewn units. Draw a line as before and sew 1⁄4in away from the line on both sides. Cut the units apart along the marked line and press (Fig 6D).
Step 5
Repeat this with the last small square and the other sewn unit (Fig 6E).
Step 6
You will now have four identical units (Fig 6F). Check they are the size required and trim off dog’s ears.
Free Flying Geese Quilting Pattern
Practise your piecing with a super-simple Flying Geese mini quilt and top it off with some textured quilting! You can easily adjust this pattern to make a bigger quilt by simply adding more Flying Geese to your quilt top to grow the size. You’ll just need to allow for more fabric, as we’ve listed the requirements for a mini quilt below.

You will need
- Fabric A (teal) – 7×6½in
- Fabric B (turquoise) – 7×6½in
- Fabric C (light blue) – 7×6½in
- Fabric D (grey) – 14×6½in
- Fabric E (background fabric) – ½yd
- Backing fabric – 22in x 20in
Cutting out
From each of Fabrics A, B and C cut:
- Two (2) 31⁄2in x 61⁄2in pieces.
- Wadding – 22in x 20in
- Fabric for binding – ¼yd
- Sewing machine
- Quilting stencil (optional)
From Fabric D cut:
- Four (4) 31⁄2in x 61⁄2in pieces.
From Fabric E cut:
- Twenty (20) 31⁄2in squares.
- Two (2) 151⁄2in x 31⁄4in strips.
- Two (2) 18in x 21⁄4in strips.
From the binding fabric cut:
- Two (2) 21⁄2in x WOF strips.
Piecing the flying geese
Step 1
Draw a diagonal line from corner to corner on the reverse of every background fabric 31⁄2in square.
Step 2
Arrange a background fabric 31⁄2in square at one end of a Fabric A 31⁄2in x 61⁄2in rectangle, right sides together. Sew along the drawn line, trim with a 1⁄4in seam allowance and press. Repeat on the opposite corner to make one Flying Geese unit (Fig 1).

Step 3
Repeat step 6 with each Fabric A, B, C and D 31⁄2in x 61⁄2in piece and all the background fabric 31⁄2in squares, to make ten Flying Geese units.
Assembling the quilt top
Step 4
Arrange the Flying Geese units in two columns of five, referring to the photography for colour placement. Sew the units into columns, then sew the columns together.
Step 5
Join the background 151⁄2in x 31⁄4in strips either side, press, then sew the background 18in x 21⁄4in strips at the top and bottom to finish the quilt top.
Quilting and finishing
Step 6
Press the quilt top and backing well. Make a quilt sandwich by placing the backing fabric right side down, the batting on top, then place the quilt top centrally and right side up. Baste the layers together using your preferred method.
Step 7
Quilt as desired. We used quilting templates to quilt a repeat free-motion design. To do this, place the stencil on top of your quilt sandwich in the position you want. We started in the bottom left hand corner.
Use a fabric marker to draw through the gaps in the stencil, making sure that your marks are clear. Move the stencil to the side of your markings, joining the lines to create one continuous design (the packaging shows how the stencils join together). Place it to finish.
Continue in this way, matching up the pattern until your quilt is covered. Use the lines as a guide while you quilt. We used a bright blue thread to make the quilting pop.
Step 8
Trim off the excess batting and backing fabric and square up the quilt.
Step 9
Bind the quilt. Sew the binding strips together end-to-end using diagonal seams. Press the seams open. Fold in half lengthways, wrong sides together, and press. Sew the binding to the right side of the quilt, creating a neat mitre at each corner.
Fold the binding over to the back of the quilt and hand stitch in place to finish. See our guide to how to bind a quilt for full instructions.
Free Flying Geese templates
Download our free Flying Geese Templates to whip up these essential units in no time.
Free Flying Geese Templates (PDF)
Print or trace onto acetate or vellum to create your own handy Flying Geese templates!

To use this template, choose your required finished size, and use the same coloured line on each template when cutting your pieces. Cut strips of fabric to size from the top of the ruler to your chosen size line.
Align the marked line with the bottom of your strips, and trim along both sides of the large triangle template (Fig 1). Turn your template around to cut the next piece, matching up the diagonal edges (Fig 2).

Keep working in this way until you have cut the required number of centre triangles for your project. Use the bottom corners of the template to cut the bottom corners for the large triangle pieces (Fig 3).
Fold a strip of fabric in half, and use the small template to cut pieces two at a time (Fig 4). Cutting the pieces on folded fabric will yield two mirror image pieces (Fig 5).
Trim the corners of the triangles as before. Place one small triangle right sides together with a large triangle. Sew along the edge and press open. Place the second triangle on the other side, sew, and press open to complete one Flying Geese unit (Fig 6).

How to sew Flying Geese together
Before you sew your Flying Geese together, here are some tips for making sure they look their best once they’re part of your quilt top.
As you trim your blocks, after they’ve been pieced, to neaten up the edges, pay attention to the seam allowance you leave, to ensure that when you sew them to other parts of your quilt top, the three “points” of a Flying Geese unit will still be visible, nice and crisp (especially the top centre point). You should aim to leave a ¼in seam allowance above the top, central point of the triangle (Fig 1).
We’ll show you more about how to calculate the size of your fabric pieces below, but as long as you leave a ¼ in seam allowance as you make your geese, you can pin and piece your Flying Geese together as you would sew any other two patchwork units together. Simply pin them together (right sides facing), then sew along the joining edge with a ¼ inch seam, then open out the newly joined pieces and press to finish.

One way to do this is to take care when you cut the fabric pieces to make your Flying Goose from. It’s important to get the height to width relationship right. Using the traditional method, and Fig 3, if your initial rectangle is too long then two smaller squares will not overlap at the centre to create a seam allowance. If the rectangle is too short then the squares will overlap too much and create an allowance more than a 1⁄4in.

How are Flying Geese blocks calculated?
In a nutshell, the width of the unit needs to be twice the height, minus 1⁄2in. For example, if you want the height of the unfinished unit to be 41⁄2in, then 41⁄2in x 2 = 9in minus 1⁄2in = 81⁄2in. So, the unfinished unit will be 41⁄2in high x 81⁄2in wide. The two squares need to be cut the same height as the rectangle, i.e., 41⁄2in.
Maths made easy
Single /Traditional Unit Flying Geese
Calculate the cut size of the rectangle and squares for this method as follows.
- To determine the size of the rectangle, first decide on the height you want your unfinished unit to be − for this example, let’s say 3in.
- The width of the unit needs to be twice the height, minus 1⁄2in. So, 3in x 2 = 6in, minus 1⁄2in = 51⁄2in. Therefore, the unfinished unit will be 3in x 51⁄2in. This is also the size that the cut rectangle needs to be.
- The two squares need to be cut to the same height as the rectangle, i.e., 3in. Once the Flying Geese unit is made and sewn into the quilt, it will measure 5in x 21⁄2in (finished).
Maths made easy: no waste method
Calculate the size of the starting squares for this method as follows.
- Decide what the finished size of the Flying Geese needs to be. Let’s use an example of 5in x 21⁄2in finished units (51⁄2inx3in unfinished).
- Cut one large square 11⁄4in larger than the longest side of the finished unit. So, 5in + 11⁄4in = 61⁄4in. Cut the large square 61⁄4in.
- Cut four smaller squares, each 7⁄8in larger than the shortest side of the finished unit. So, 21⁄2in + 7⁄8in = 33⁄8in. Cut four smaller squares 33⁄8in.
Have fun with Flying Geese!
Once you've mastered this technique, you'll be able to create incredible quilts that can be treasured for years to come. Use our free Flying Geese quilting pattern and templates to practice with, then move on to more ambitious patterns to test your new skills.
Discover more Flying Geese projects
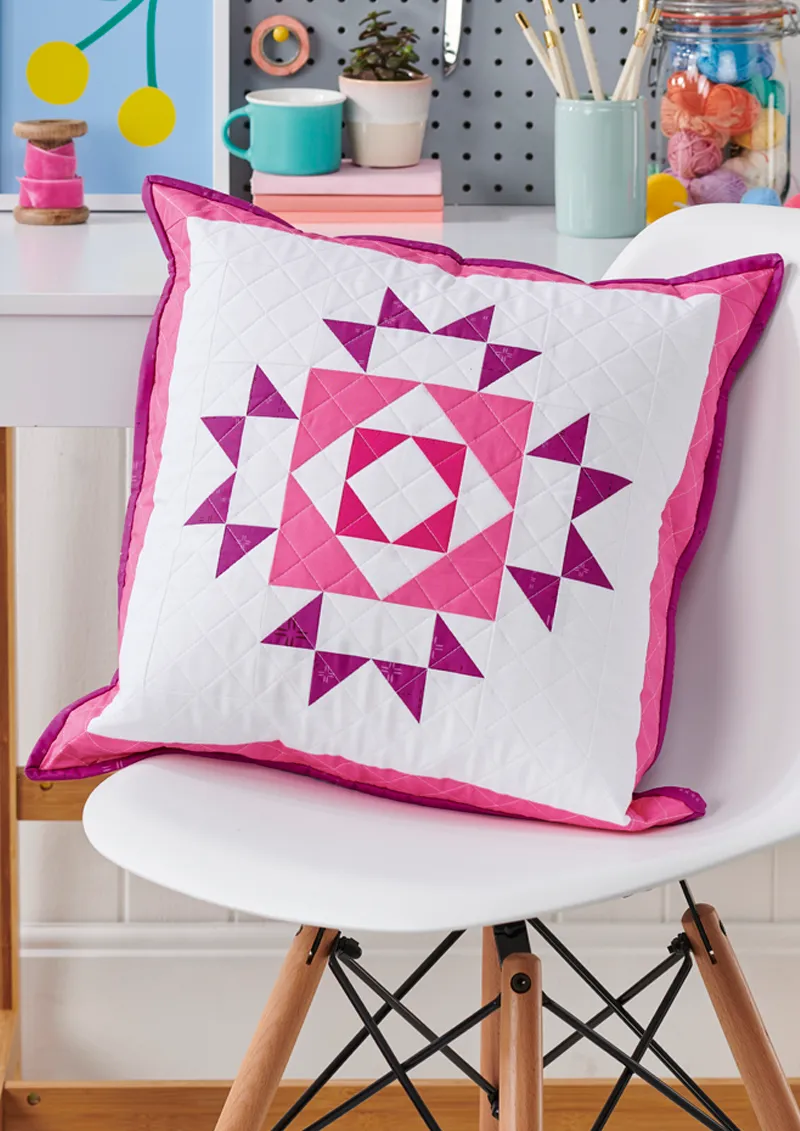
Now that you've stitched our mini quilt, learn how to make a Flying Geese cushion with our free pattern.