All products were chosen independently by our editorial team. This review contains affiliate links and we may receive a commission for purchases made. Please read our affiliates FAQ page to find out more.

Make your own macrame purse

Your love affair with colourful macramé starts here with Gem Tyler’s macrame purse tutorial.

Try 6 issues of your choice of craft magazine from just £9.99

Published: February 9, 2021 at 7:50 am

Beautifully textured wall hangings in soft cream shades have their place – preferably in our homes, surrounded by all our plant babies – but we know there’s more to macramé than that. 
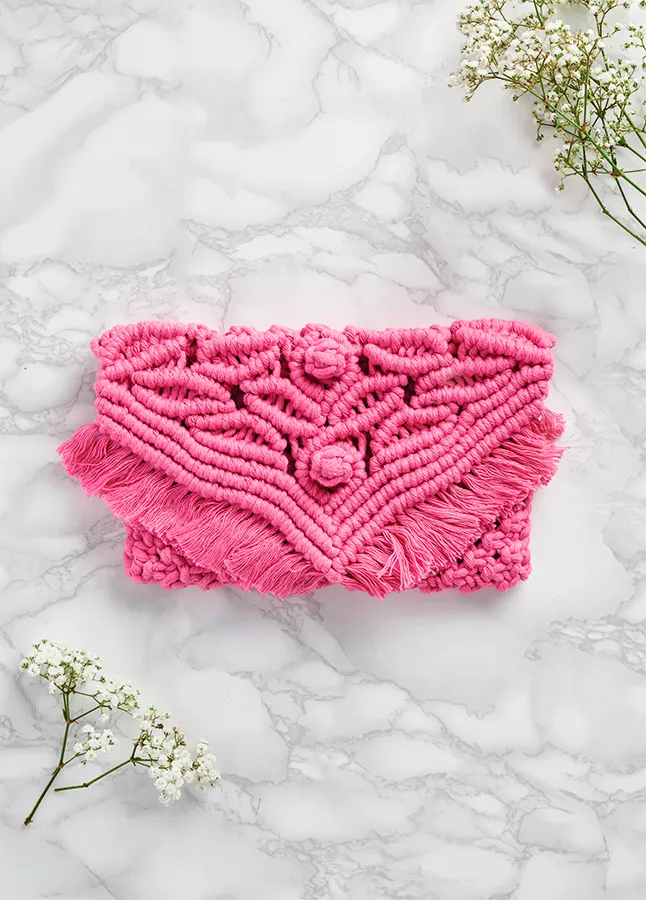
Branch out from macrame wall hangings with Gem Tyler's gorgeous macrame purse tutorial.

Why stop at neutrals? Find the boldest cord you can to create a divinely knotted macrame purse with fringing, leaves and satisfyingly knobbly berry details. To learn all the different knotting techniques used in Gemma's macrame purse tutorial check out our basic macrame knots guide. We also have a macrame for beginners blog post which is full of tips and tricks!

Looking for more macrame inspiration? Check out our pick of the best free macrame patterns.

Materials

Macrame purse tutorial

You will need:

  • Macrame cord
  • Bristle brush
  • Needle

Step 1

Macrame purse Step 1

Cut one 1m (393/8") length of cord and 22 4m (157​1⁄2") lengths of cord. Tie the 1m (393/8") length to a clothes rail or something similar by each of its ends so it resembles a clothesline. Now attach each of the 22 4m (157​1⁄2") lengths of cord to the middle of the ‘clothesline’ using lark’s head knot.

Step 2

Macrame purse Step 2a Macrame purse Step 2b

Starting on the left and working towards the right, tie a row of square knots. Begin the second row, skipping the first two cords and the last two, as shown. Repeat for a total of 31 rows so you have a rectangle of square knots, creating the body of the bag.

Step 3

Untie each end of the 1m (393/8") length of cord from the rail and lay the rectangle of square knots on a flat work surface. Fold it in half so the top and bottom rows meet.

Step 4

Macrame purse Step 3

Use the cords that were previously the ‘clothesline’ to sew each side together. Once the yarn needle has been threaded with the clothesline cord, begin on the left-hand side and weave it through the loops that run along the edge of the square knots, sewing both sides together and working towards the bottom of the bag. Once you reach the bottom, continue sewing the cord along the bottom edge – this adds strength and means the sewing cord is disguised among the square knots.

Step 5

Repeat Step 4 on the right-hand edge to complete the body of the bag, then tie the two loose ends in a knot where they meet inside the bag at the bottom for extra strength. Neatly trim the ends.

Step 6

Macrame purse Step 5

You should have a pouch with 44 long cords trailing from one edge – these will be used to make the flap of the bag. Use the two S-hooks to hang the bag upside- down from the bottom with the opening facing away. All the working cords should now be trailing down towards the floor. Starting on the left-hand side, count 10 cords in – this will be the lead cord. Using a clove hitch knot, one by one tie each of the nine working cords from right to left by looping them around the lead cord twice and pulling to tighten, creating a slight arch – this forms the top part of the first leaf.

Step 7

To close the leaf shape, select the 10th cord in from the left again. As per Step 6, this is now the lead cord. Tie each of the nine working cords on the left-hand side using a clove hitch knot, encouraging a slight curve to create the leaf shape. Using the next eight cords along, work another leaf shape in the same direction.

Step 8

Macrame purse Step 6

Next, you’ll create a diamond shape with a berry knot inside using the middle eight cords of the bag flap. To begin the diamond pattern, select the two most central cords – these will be the lead cords for working the three remaining cords that hang to the left and right of them. Starting on the left, hold the lead cord diagonally across the three working cords and tie each using a clove hitch knot. Repeat in reverse for the right-hand cords, creating an upside-down V shape.

Step 9

Following our basic macrame knots guide, tie a berry knot below the upside-down V shape using the six central cords. Use the two lead cords hanging freely on each side to close the diamond shape below the berry knot, repeating Step 8 and tying clove hitch knots to form a second V shape.

Step 10

Macrame purse Step 7

Continuing to work on the left-hand side, begin creating the two leaves that make up the second row of the pattern. Skip the first four cords, selecting the fifth cord as the lead cord. As per Steps 6-7, work a leaf in the reverse direction of those above using the next eight cords. Repeat to create another leaf in the same direction using the next seven cords.

Step 11

Repeat both the first and second rows of the leaf pattern on the right-hand side of the clutch bag flap, working in reverse to keep the design symmetrical.

Step 12

Macrame purse Step 8

Using the eight central cords, repeat Steps 8-9 to create another diamond shape containing a berry knot. This time, make sure to cross the two inner-most lead cords over one another, as shown, to avoid any gaps in the design of the flap.

Step 13

Macrame purse Step 9

To strengthen and close the leaf design on the bag flap, use the two outer cords as the lead cords and work a row of clove hitch knots towards the centre of the design in a V shape. Repeat twice more to create three rows on each side.

Step 14

Macrame purse Step 10

Now the bag flap design is complete, trim off the excess lengths of cord, either by eye, or using a ruler as a guide. Brush them out to create a fringe.

Step 15

Macrame purse Step 11

Once the fringe has been completely brushed out, you can trim it down further to your desired length. We trimmed ours to approximately 3cm (11⁄4").

Step 16

Macrame purse Step 12

Remove the bag from the S-hooks. To finish your macrame purse, use a sewing needle and matching thread to sew one side of the popper to the underside of the flap, and the other side onto the front of the bag underneath the flap.

Now you can take your macrame purse out and take it out on the town! If you’ve enjoyed our macrame purse tutorial then check out our macrame bunting and DIY garden chair projects. Then you can use our hashtags for macramé to show your creation to the world.