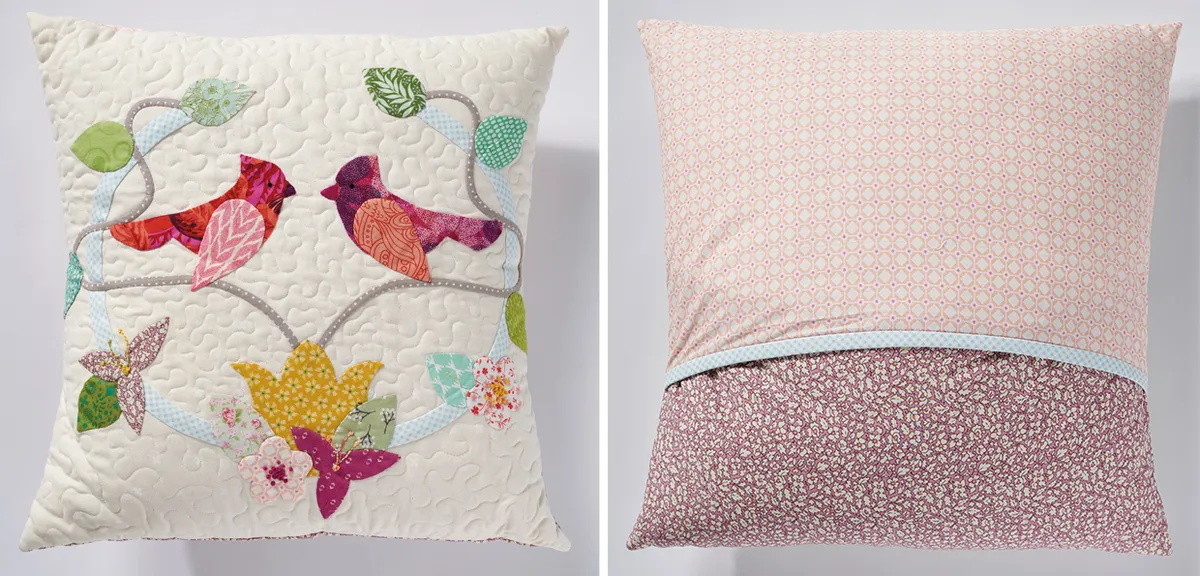
Get crafty and cosy with our delightful free appliqué birds cushion pattern
Adorn your home with this darling quilted cushion by Laura Pritchard and tell the story of the songbirds, perched neatly atop a colourful nest of delicate appliquéd flora.
If you're not confident with quilting you can always skip this step and just sew your appliqués onto the plain fabric – but if you do fancy some free-motion quilting you can get really creative and choose your own quilting pattern (or just freestyle it).
You will need
- Background fabric – 20in square
- Batting – 20in square
- Lining fabric – 20in square
- Fabric scraps in assorted colours
- Larger scrap pieces for stems (at least 15in and 20in long across the bias)
- Backing fabric – ½yd
- Thread to tone with fabrics
- Appliqué templates
- 18in cushion pad
Finished size
18in square
Notes
This cushion can be made using raw edge appliqué if you prefer.
You will need to download and print the appliqué templates here
Free appliqué birds cushion pattern
Step 1
Cutting out
On the back of each fabric scrap, draw around the template and cut out each shape 3∕16in-1⁄4in larger.
You will need the following shapes:
- Two (2) Bird Cs – one (1) and one (1) in reverse.
- Two (2) Wing As – one (1) and one (1) in reverse.
- Eight (8) Leaf Cs.
- Two (2) Leaf Ds.
- One (1) Flower F.
- Two (2) Flower Is.
- Two (2) Flower Gs.

Step 2
For the wide stem, cut two (2) pieces on the bias, 1¾in wide and approx. 15in long.
Step 3
For the narrow stem, cut two (2) pieces on the bias, 1in wide and approx. 20in long.
Step 4
From the backing fabric, cut two (2) 18½in x 12in pieces.
Step 5
Preparing the background
Trace the layout pattern onto the wrong side of the background fabric, using a pencil or removable pen. It may help to use a lightbox, or to trace against a window.
Step 6
Making the stems
To make the wide stem, fold the strip in half, wrong sides together. Stitch into a tube using a scant ¼in seam. Rotate the tube with your fingers so that the seam is sitting centrally on the back. Press well with the iron so that the seam is pressed open and the tube lies flat with raw edges contained on the back.
Step 7
For the narrow stem, make a tube as in step 6. Trim away the seam allowance to slightly less than 1⁄8in (as below), and rotate and press seams to one side. If the raw edges extend past the folded edges of the tube, you may need to trim it down further.

Step 8
Position the wide stem, with the raw edges underneath, in curving arcs on the background fabric following the pattern. Use an iron to help coax the bias strips into the curve if necessary. Pin and tack stitch in place. Trim length to size if necessary. Appliqué the stem to the background using an invisible slip stitch.

Step 9
Position the narrow stem as shown in the layout diagram, again using the heat of the iron to coax into place. Pin, tack and slip stitch into place as before.
Step 10
Adding the appliqué shapes
Place the first shape, right side up, on the right side of the fabric, covering the marked outline on the back with an even margin all around. Pin and tack in place with a large running stitch following the marked line on the wrong side, as shown in the images below.


Technical Tip
Use a larger needle and old thread to tack your appliqué shapes to the background fabric. This will leave small perforations, which will help you turn the raw edge under around the shape.
Step 11
Using a thread that tones with your appliqué fabric, needle-turn under the raw edges of the appliqué. Slip stitch in place, removing a few basting stitches ahead as you stitch. If you’ve used a larger needle and thread for basting, there will be small perforations to help you guide the edge of the shape. Your slip stitches should follow the marked line on the back of the work.
Step 12
Repeat to add all shapes to the design. Laura added the tulip first, then all the leaves and finally the smaller flowers on top.
Step 13
Add optional embellishments with embroidery stitches to the shape, as shown in the image below. Laura added colonial knots, back stitched stamen to the centre of some flowers, and added running stitches to some of the leaves. Colonial knots were also used for the birds’ eyes.

Step 14
Quilting and finishing
Layer the lining fabric, batting and cushion top together and baste using your preferred method.
Step 15
Quilt as you desire. Laura free-motion quilted a stippling design in the background of the cushion between the appliquéd shapes. Then trim the cushion to an 18½in square.
Step 16
Turn under a ¼in seam twice on the long side of each backing piece and top stitch in place. Alternatively, you can bind the edge of the top flap, as Laura has done.
Step 17
Place the cushion front on the desk, right side up. Place the two cushion backing pieces on top right sides down. The piece you place first will be the outermost top flap when turned right side out.

Step 18
Stitch all around the edge with a ¼in seam. Clip the bulk from the corners and turn the right side out. Fill with the cushion pad to finish.

Delight with even more avian appliqué with our fabulous free appliqué bird tote bag pattern.
Can't get enough of amazing appliqué
Craft even more superb soft furnishings for your handmade home with our free autumn appliqué cushion pattern on Gathered.