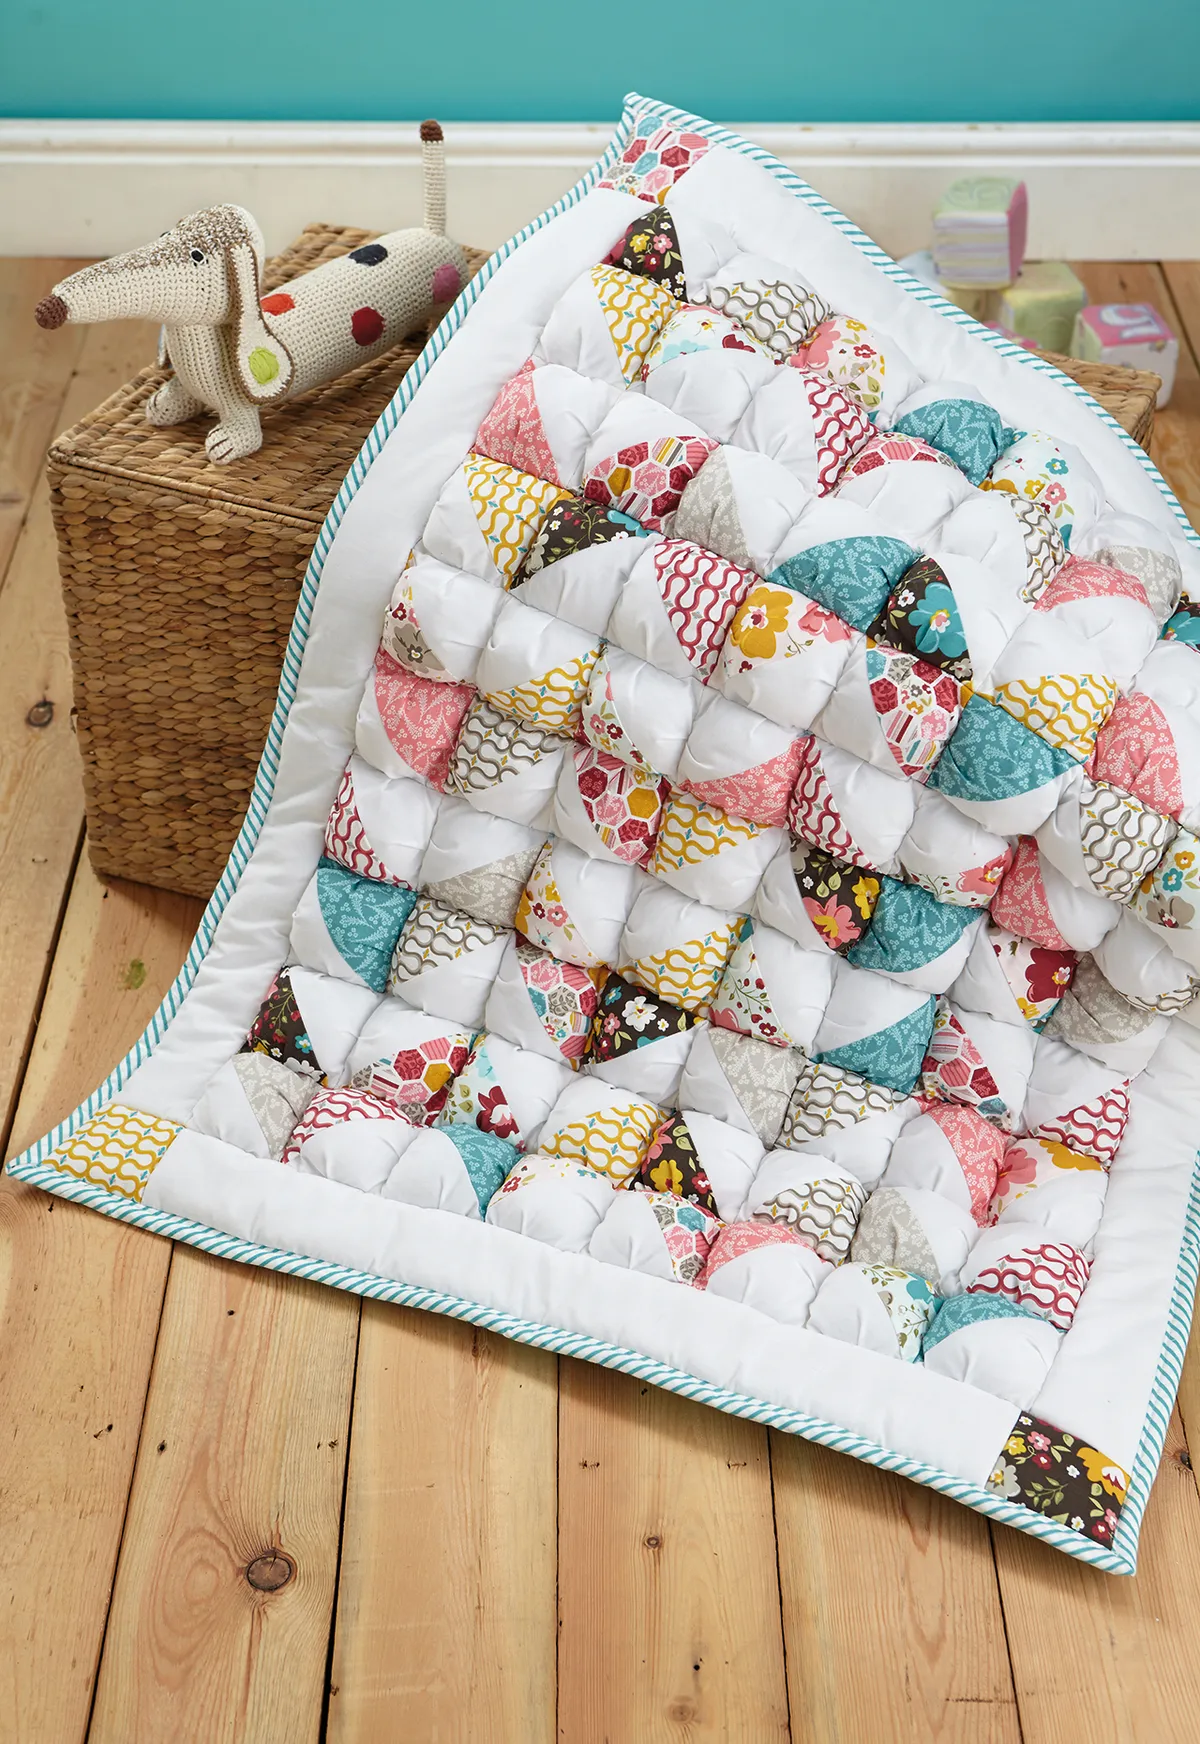
How to make a puff quilt: step by step
Find out how to make a puff quilt with our guide to sewing this cute chevron puff quilt pattern. Have fun mixing modern fabric prints set with cool white triangles, then opt for a soft and snuggly backing fabric and you'll stitch together light, puffy chevrons to make a lovely modern make for any nursery.
- Your complete guide to patchwork for quilting
- Free giant pencil pillow pattern
- Your guide to standard quilt sizes
You'll be making each individual "puff" square separately, then sewing them together, so while this puff quilt may take you a couple of days to make, it's also seriously soothing to piece together.
If you like this article, you might also like our essential guide to Flying Geese Quilts.
What is a puff quilt?
If you're wondering "what is a puff quilt", it's basically a quilt in which each block is filled with toy stuffing before the quilt is finished, giving it a puffy effect. Puff quilts are also sometimes known as biscuit quilts or bubble quilts.
It's made a little bit differently than a traditional quilt. Instead of sandwiching 3 layers together (the top fabric, backing fabric and wadding in the middle), you stuff and make each quilt block separately, then sew them together to make a bigger quilt.
Free puff quilt pattern
This pattern was first featured in Love Patchwork and Quilting magazine, issue 9.
You will need
- Fabric: White quilting cotton – 1 yard
- Fabric: Printed quilting cotton (for the quilt top) – 1yd (or at least four fat quarters of different fabrics - Use more fabric prints if you want more variety)
- Calico (UK) or Muslin (US) – 1½yd
- Fabric For the binding – ½yd
- Toy stuffing - 1 pack poly-fil toy stuffing (approx 250g)
- Wadding - High loft batting – ¾yd
- Wadding - Low loft batting – 1yd
- Fabric - For the backing – 1¼yds
Fabrics Used
Print fabrics pictured are from the Unforgettable collection by Riley Blake Designs.
Finished Size
36in x 31in approx.
Notes
- RST = right sides together.
- WOF = width of fabric.
- HST = half-square triangle.
- Seam allowances are all 3/8in, unless otherwise stated.
- Wash and press all fabrics well before cutting.
Cutting out
- From white quilting cotton cut:
- Forty 5in squares,
- Two 4in x 30in strips,
- Two 4in x 23½in strips,
- Four 4in squares.
- From printed quilting cotton cut:
- Forty 5in squares,
- Four 4in squares.
- From muslin cut:
- Eighty-four 4in squares,
- Two 4in x 30in strips,
- Two 4in x 23½in strips.
- From binding fabric cut:
- Four 4in x WOF strips.
- From high loft batting cut:
- Four 4in squares,
- Two 4in x 30in strips,
- Two 4in x 23½in strips.
Prepare the half square triangles
Step 1
Place one 5in square of white fabric to a 5in printed square RST. Using a ruler, mark a line down the diagonal. Then sew a ¼in seam allowance on either side of the line. Cut on the line and open to reveal your two half triangle squares (Fig a).

Iron towards the coloured fabric and trim the overhanging corners (Fig b). Repeat with all 40 of the white squares until you have 80 half square triangles.

Step 2
Place one HST on one 4in square muslin, wrong sides together. Line up the corners (Fig c).

You will see that since the top piece is larger you will have to make a crease in the top fabric (Fig d).

Sew with a 3/8in seam allowance down the edge, over the crease. Pivot at the corner and repeat with the next two sides. Leave the fourth edge open. Take a handful of the poly-fil and stuff it in the pocket. Then make your crease and sew the final side shut (Fig e).

Repeat until you have all 80 puffs sewn.
Assemble the quilt top
Step 3
Now the fun part! Arrange with the puffs until you get the pattern the way you like it. Rotate the HST puffs to achieve the chevron pattern (Fig f). Line up the puffs so you have eight puffs in a row and ten puffs in a column.

Step 4
Sew the puffs together one at a time, pushing the puffs RST and using a 5⁄8 seam allowance to ensure the puffs’ seams don’t show. Sew each puff together until you have ten rows of eight.
Step 5
Push two rows of puffs together and match up the seams of each row, placing a pin in each intersection. Then sew the rows together with a 5⁄8in seam allowance. It’s easiest to sew the rows together in sets of two, then in sets of four.
Step 6
Prepare a quilt sandwich with the remaining 4in squares of patterned fabric, high loft batting and white fabric (Fig g) to make the cornerstones.

Repeat with the two 4in x 30in strips and two 4in x 23½in strips of muslin, batting and white fabric to make the borders. Baste the edges of these sandwiches. Sew in the same direction down each set of long edges to avoid stretching the fabric diagonally.
Step 7
With RST sew the four squares to the ends of the long borders (Fig h).

Step 8
Turn the quilt over and pin one short border to the short side of the quilt, RST (Fig I). Sew with a 5⁄8in seam allowance. Repeat with the second short border. Then pin one long border to the long side of the quilt, lining up the end squares with the short borders. Sew with a 5⁄8in seam allowance. Repeat with the second long border.

Step 9
Cut a low loft batting a couple inches larger than your quilt top and a backing fabric (we used lovely soft minky fabric) a couple of inches larger than the batting. Layer these together with the batting in the middle. Smooth each layer thoroughly and then pin liberally each side of the quilt. Baste around the edges of the quilt using a 3⁄8in seam. Trim excess batting and backing.
Step 10
To bind, sew your fabric strips end to end on the bias. Press in half lengthwise and use to bind your quilt.
Step 11
Using a large embroidery needle and floss, tack down the quilt in the puff intersections—it is not necessary to tack every intersection, every set of two will be sufficient. Knot the floss on the top of the quilt and trim the ends close to the knot.
Your next must-make blanket
If you've enjoyed making this puff quilt, we think you'll also love trying our free weighted blanket pattern!