Sorting the fabric
Step 1
Choose four (4) fabrics for each block, referring to Fig 1. Sheila used a different coloured fabric for:
- each individual star (Fabric A)
- a star background (Fabric B)
- a light grey (Fabric C)
- a dark grey (Fabric D).

Cutting out
Step 1
From the background fabric, cut as follows:
- Twenty (20) 2½in squares for the 12in centre block.
- Four (4) 3½in x 6½in strips for the 6in blocks.
- Four (4) 2in x 9½in pieces for the 9in blocks.
- Four (4) 1½in x 12½in strips for the sashing.

Step 2
From each of your Fabric A choices, cut as follows:
- One (1) 4½in and eight (8) 2½in squares for the 12in centre block.
- One (1) 3½in and eight (8) 2in squares for the 9in blocks.
- One (1) 2½in and eight (8) 1½in squares for the 6in blocks.
Step 3
From the Fabric B, cut as follows:
- Eight (8) 2½in squares for the 12in centre block.
- Fifty-six (56) 2in squares for the 9in blocks.
- Fifty-six (56) 1½in squares for the 6in blocks.
Step 4
From Fabric C, cut as follows:
- Four (4) 4½in squares for 12in centre block.
- Eight (8) 3½in squares for 9in blocks.
- Eight (8) 2½in squares for 6in blocks.
Step 5
From Fabric D, cut as follows:
- Four (4) 4½in squares for 12in centre block.
- Eight (8) 3½in squares for 9in blocks.
- Eight (8) 2½in squares for 6in blocks.
- Two (2) 25in x 15in strips for the backing.
Step 6
Cut three (3) 1½in x WOF strips from Fabric D for the borders. Join and sub-cut, as follows
- Two (2) 1½in x 12½in strips for the side borders.
- Two (2) 1½in x 48½in strips for the top and bottom borders.
Making the snowball units
Step 1
For each Snowball unit, take one (1) 4½in square and four (4) 2½in squares. Refer to the fabric placement in Fig 1. Notice that different fabrics are used on different corners in each unit. It may help to lay out the full block and position the smaller squares before sewing. Draw a diagonal line from corner to corner on the back of each 2½in square.
Step 2
Position the small squares onto each corner of the larger square, starting with opposite corners (Fig 2). Stitch on the line and trim excess to a¼in seam allowance. Press gently towards corners (Fig 3). Repeat for the remaining two (2) corners.

Step 3
Repeat to make all nine (9) units, taking care to position the colours and diagonal lines. You should have the following (Fig 4):
- One (1) centre unit with a Fabric A square with Fabric B corners.
- Four (4) side units with Fabric C squares, two (2) Fabric A corners and two (2) background corners.
- Four (4) corner units with Fabric D squares, one (1) Fabric B corner and three (3) background corners.
Assembling the block
Step 1
Join the patches together in rows of three (3), using a ¼n seam allowance. Press row seams in opposite directions, and then, matching seams carefully, join the rows together (Fig 5). Press seams in one direction, or open, as preferred. The block should measure 12½in at this stage.

Step 2
Using the same technique described in steps 8-11, repeat to make two (2) 9½in blocks and two (2) 6½in blocks. Note: these blocks use B squares in place
of background squares.
Step 3
Using a ¼in seam allowance, add a 3½in x 6½in background piece to the top and bottom of the two (2) 6½in blocks. Press towards the background fabric.
Step 4
Using a ¼in seam allowance, add a 2in x 9½in background strip to the top and bottom of the 9½in blocks (Fig 6).

Step 5
Join the blocks together using the four (4) 1½in x 12½in background sashing strips between each block (Fig 7). Check the measurement of your joined blocks, it should be 46½in x 12½in. If not, adjust the borders to fit your own patchwork.
[pullquote quote="Tip: When adding unpieced strips of fabric, e.g. sashing or borders, to a pieced block or quilt, consider stitching with the pieced side of your work uppermost. At first, this may seem counter intuitive, but it will allow you to avoid cutting off points and twisting seams." /]

Step 6
Add the side border strips first and press towards borders (Fig 8). Measure the width and adjust the top and bottom strips if necessary. Stitch and press towards the border strips. Your top is now complete.

Quilting and binding your DIY table runner
Step 1
Cut a piece of batting a couple of inches bigger all around than your quilt top. Sheila chose to use an 80/20 batting but, if you prefer something a little more protective on your table, you may wish to use an insulated batting.
Step 2
Place your pieced top onto batting and smooth out flat. Decide whether to quilt through just two (2) layers or wait for the backing to go on. Sheila decided on a bit of both and started off quilting two (2) lines on each sashing strip.
Quilting Sheila's star pattern
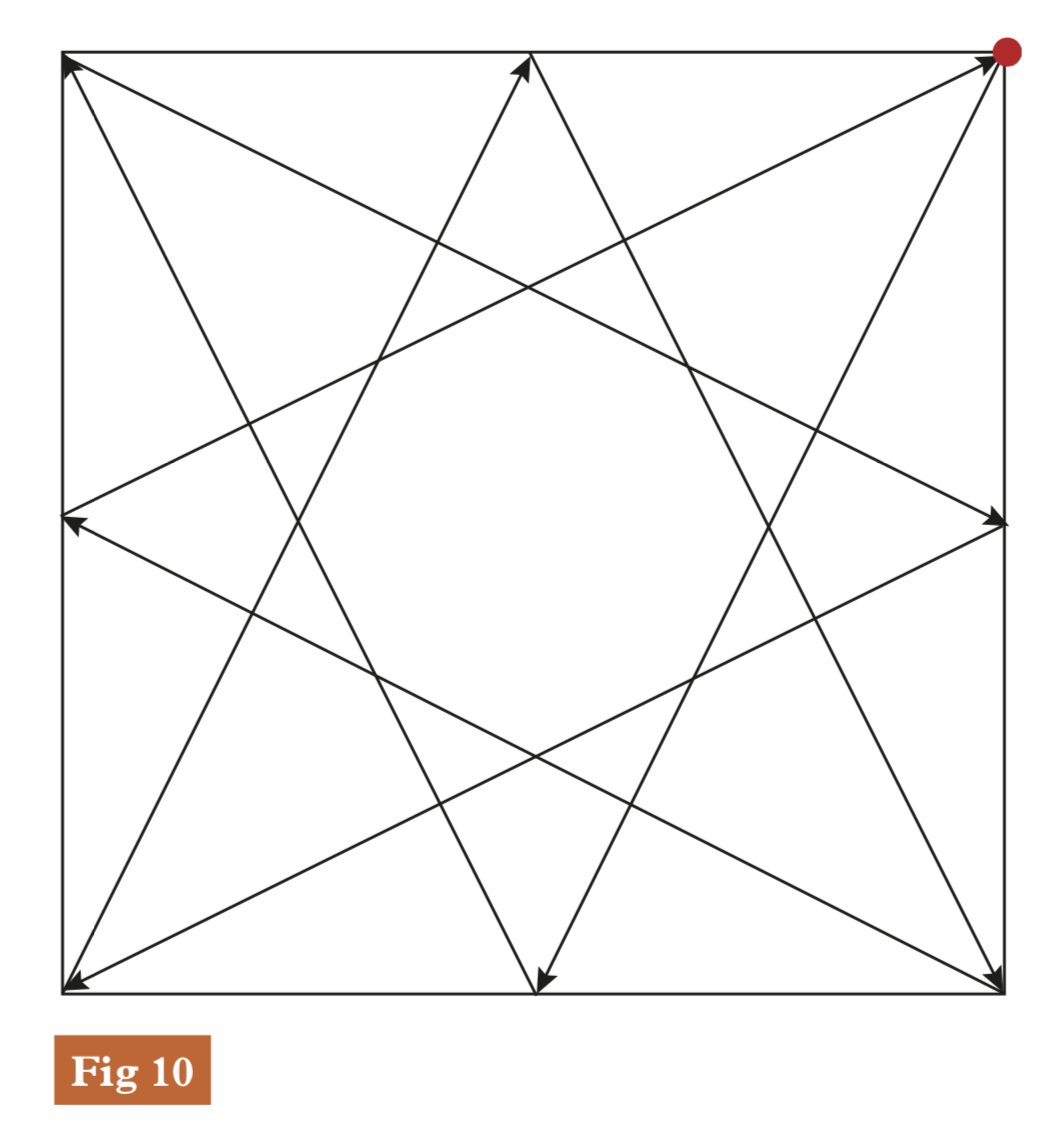
“Deciding on a quilting design can be tricky – I’m not a very adventurous quilter and years ago when I started teaching patchwork and quilting, I came up with a simple and quick design that lends itself to a pieced patchwork block. In class, it became known as ‘Sheila’s Star’ and featured in many of my students’ quilts. Fig 10 shows a diagram for the star, should you like to use it.
“Starting at the top right corner (indicated by the red dot), follow the arrows until you arrive back at the start. Mark in chalk or with a Hera marker and use a larger stitch than for piecing, say 3 to 3.5. (Repeat to yourself – corner to middle to corner to middle etc, until corner to start/finish!)
“Try drawing it a few times on paper – the repetition will cause muscle memory to kick in and will help you stitch in the correct sequence. This design works well in any area where you have a square or rectangle to quilt.”
Step 3
Secure the top to the batting by stitching all around the edges, 1⁄8in away from the raw edge of the pieced top. Stitch along each side separately. Sheila stitched each long side in two (2) stages, starting from the centre. These precautions ensure a nice, wrinkle-free finish.
Step 4
Prepare your backing by using the two (2) 25in x 15in pieces. Join together along the short edges, leaving a gap of about 4in in the centre of the seam (Fig 9). Sheila used a seam allowance of 3⁄8in and pressed to one side.

Step 5
Centre your backing, right side down, onto the right side of the quilt top. Smooth and pin. Turn over and sew with the batting side on top, using the stitch lines you made when you secured the top to the batting. Stitch a ¼in inside the previous stitch lines, completing one side at a time instead of pivoting at each corner.
[pullquote quote="Tip: Using the same fabric for borders and backing will result in a much tidier finish." /]
Step 6
Trim all around to a ¼in seam allowance and clip the corners at 45-degrees. Turn through the gap made in step 20 and hand stitch the gap closed.

Step 7
Press carefully, rolling the edges out as you go. Add some further quilting and you are done!