Half square triangles are probably one of the most popular and versatile units in patchwork and quilt making. This article focuses on some of the ways these units can be made. We'll also include advice on maths you can use to whip up a batch of HSTs or even create your foundation paper piecing templates if you're looking to level up your skills! This article was first featured in Today's Quilter magazine.
In this masterclass, for beginners and experienced quilters alike, we'll show you...
- What is a half square triangle?
- How to use half square triangles in your quilts
- 5 ways to make half square triangles
- Top tips for cutting half square triangles
- How to press the seams on your half square triangles
- How to trim finished half square triangle units
- Why are my HSTs going wrong? Troubleshooting advice
What is a half square triangle?
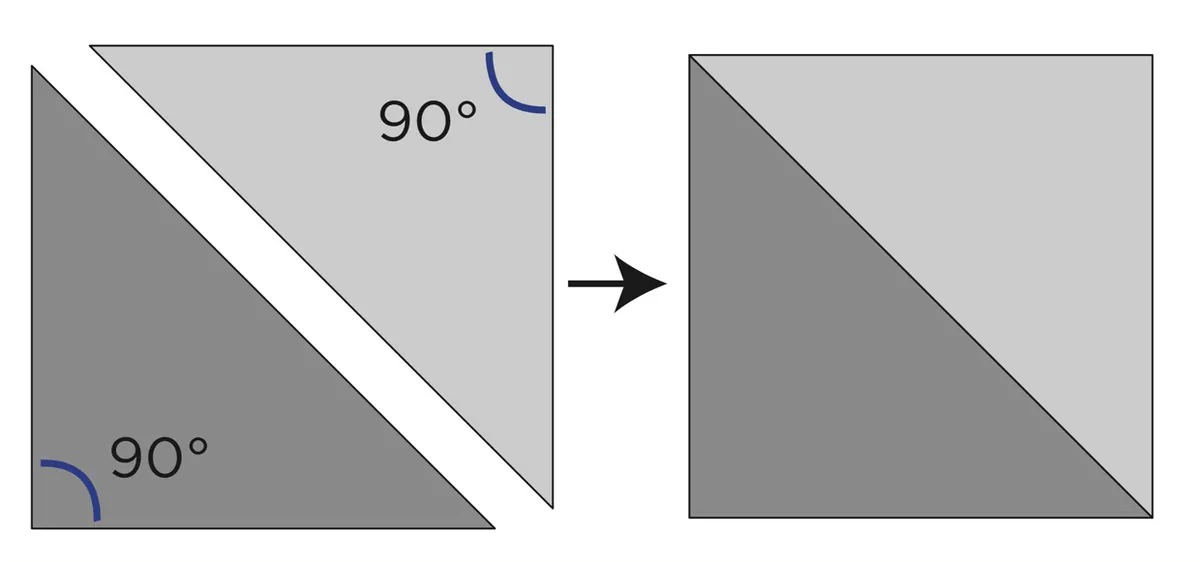
A half square triangle unit of fabric – often abbreviated to ‘HST’ – is simply two right-angled triangles sewn together. These triangles are usually made up of different fabrics that contrast each other in some way, such as light and dark, solid and patterned, or complementary colours. The unit is also known by other names, including pieced triangle squares, two-triangle squares, two- tone squares and bias squares. They're a favourite of quilters everywhere as they're easy to sew together and once you've mastered them, you can use them to make all sorts of clever half square triangle quilt patterns.
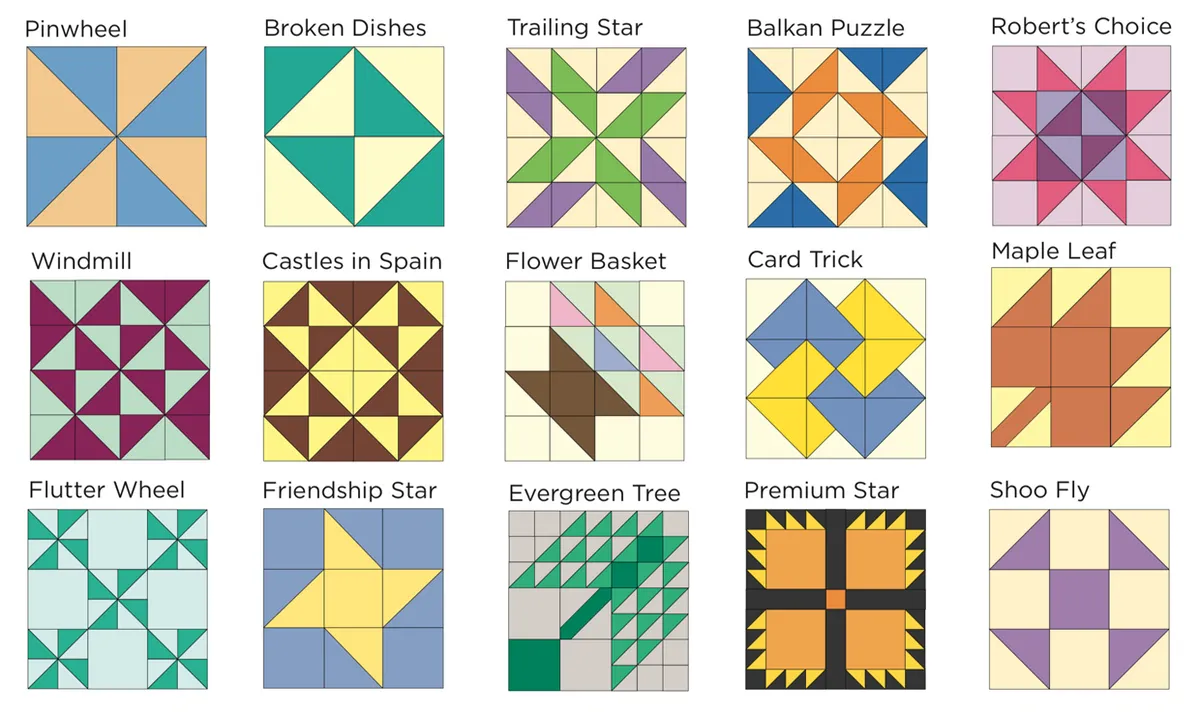
Dozens, if not hundreds of blocks use HSTs. Here are some you might like to try. Some blocks are made up of just HSTs, while others have the addition of other units.
What do we mean by "finished size"?
In quilting terms, the finished size of a block or unit is a term used to describe its size once it has been sewn into a project (so, minus seams). Its unfinished size is the size before it is sewn together with other units or blocks (and thus includes the outer seam allowance). So, a 2½in unfinished HST will be 2in finished and sewn into the quilt alongside other quilt blocks.
How to use Half square triangles in your quilts
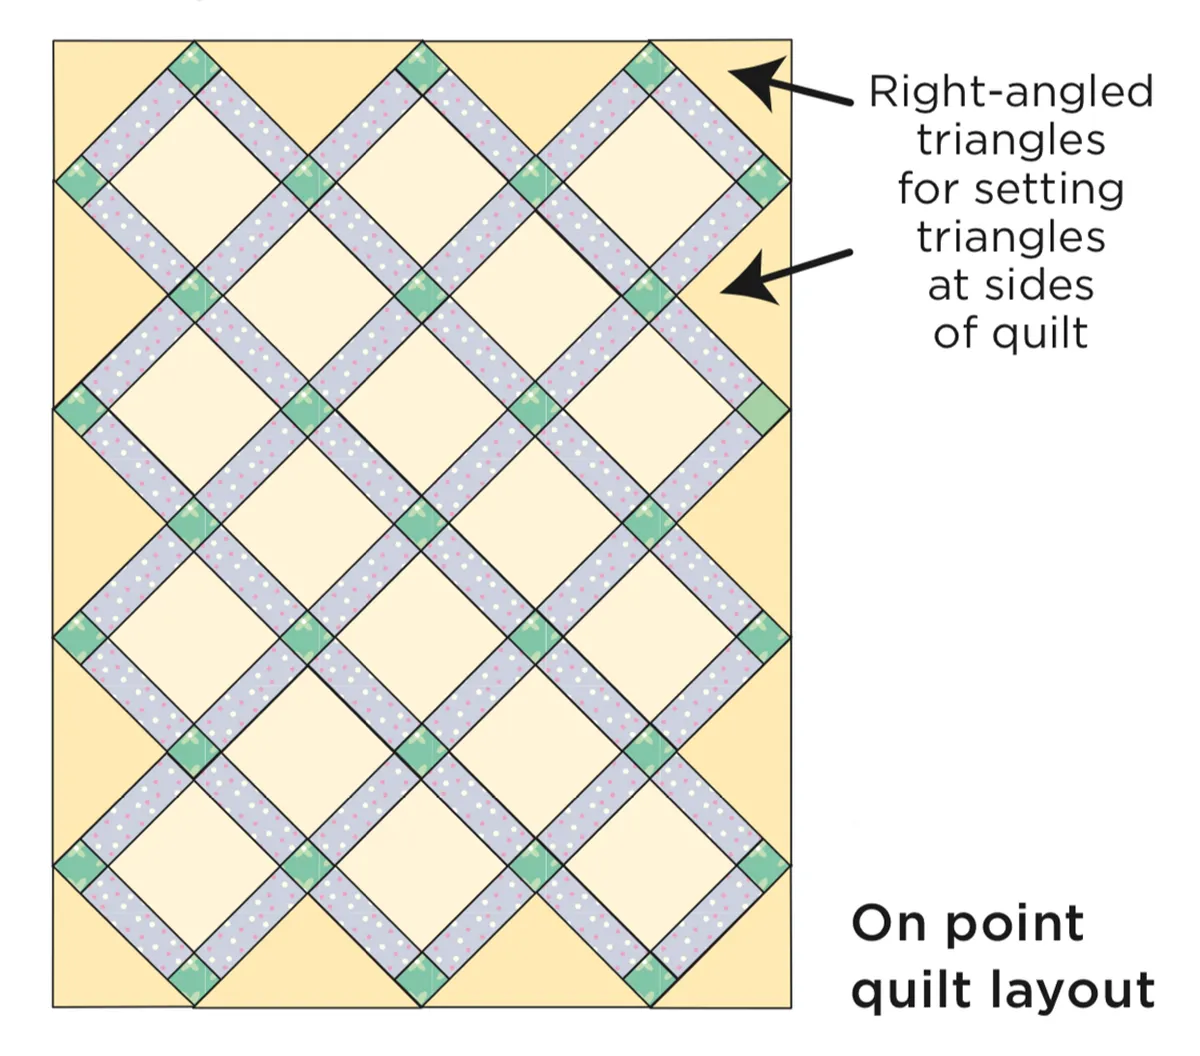
Right-angled triangles aren’t just used for making HST units but are also needed when setting a quilt layout on point. These triangles, needed on the sides of the quilt to produce a straight edge, are called setting triangles.
5 ways to make Half Square Triangles
Half-square triangles are hugely popular and extremely versatile, so it’s no surprise that quilters have found many ways to make them. This masterclass shows you five methods for making half square triangles (though there are more!). If you're a new quilter, start with the first method, then try a couple of the others to see which you prefer. If you're already an experienced quilter, you might prefer the Batch method or Foundation Paper Piecing method, depending on what you need your HSTs to do!
- Triangle method: How to make half square triangles from triangles – makes 1 unit.
- Square method: How to make half square triangles from squares – makes 2 units.
- Speedy method: How to make half square triangles from squares – to mak 4 units.
- Batch method: How to make half square triangles from squares – makes 16 units.
- Foundation paper piecing method: How to make half square triangles from foundation piecing – makes 12 units (or variable depending on foundation size).
Scroll down to find out more about each of these techniques.
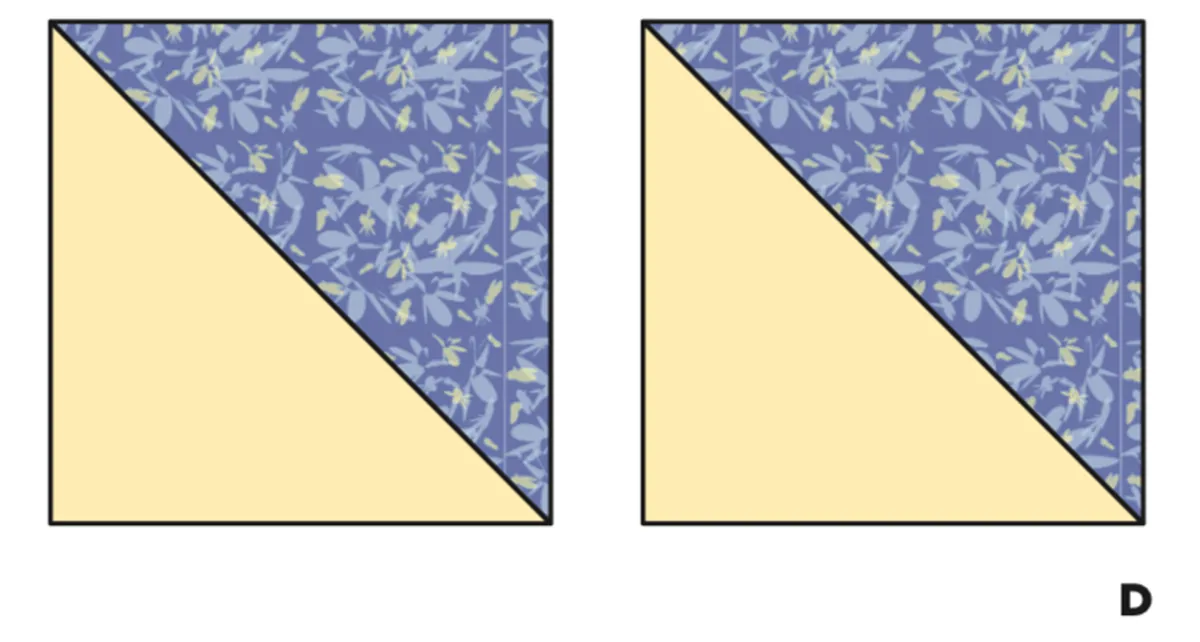
Method 1: Triangle method
Sew 2 triangles together – this makes 1 unit
The simplest way to make an HST is to sew two triangles together. It’s easy but not the most efficient or fastest way if you need to make multiple units (as we often do!).
How to make half square triangles (triangle method)
Step 1
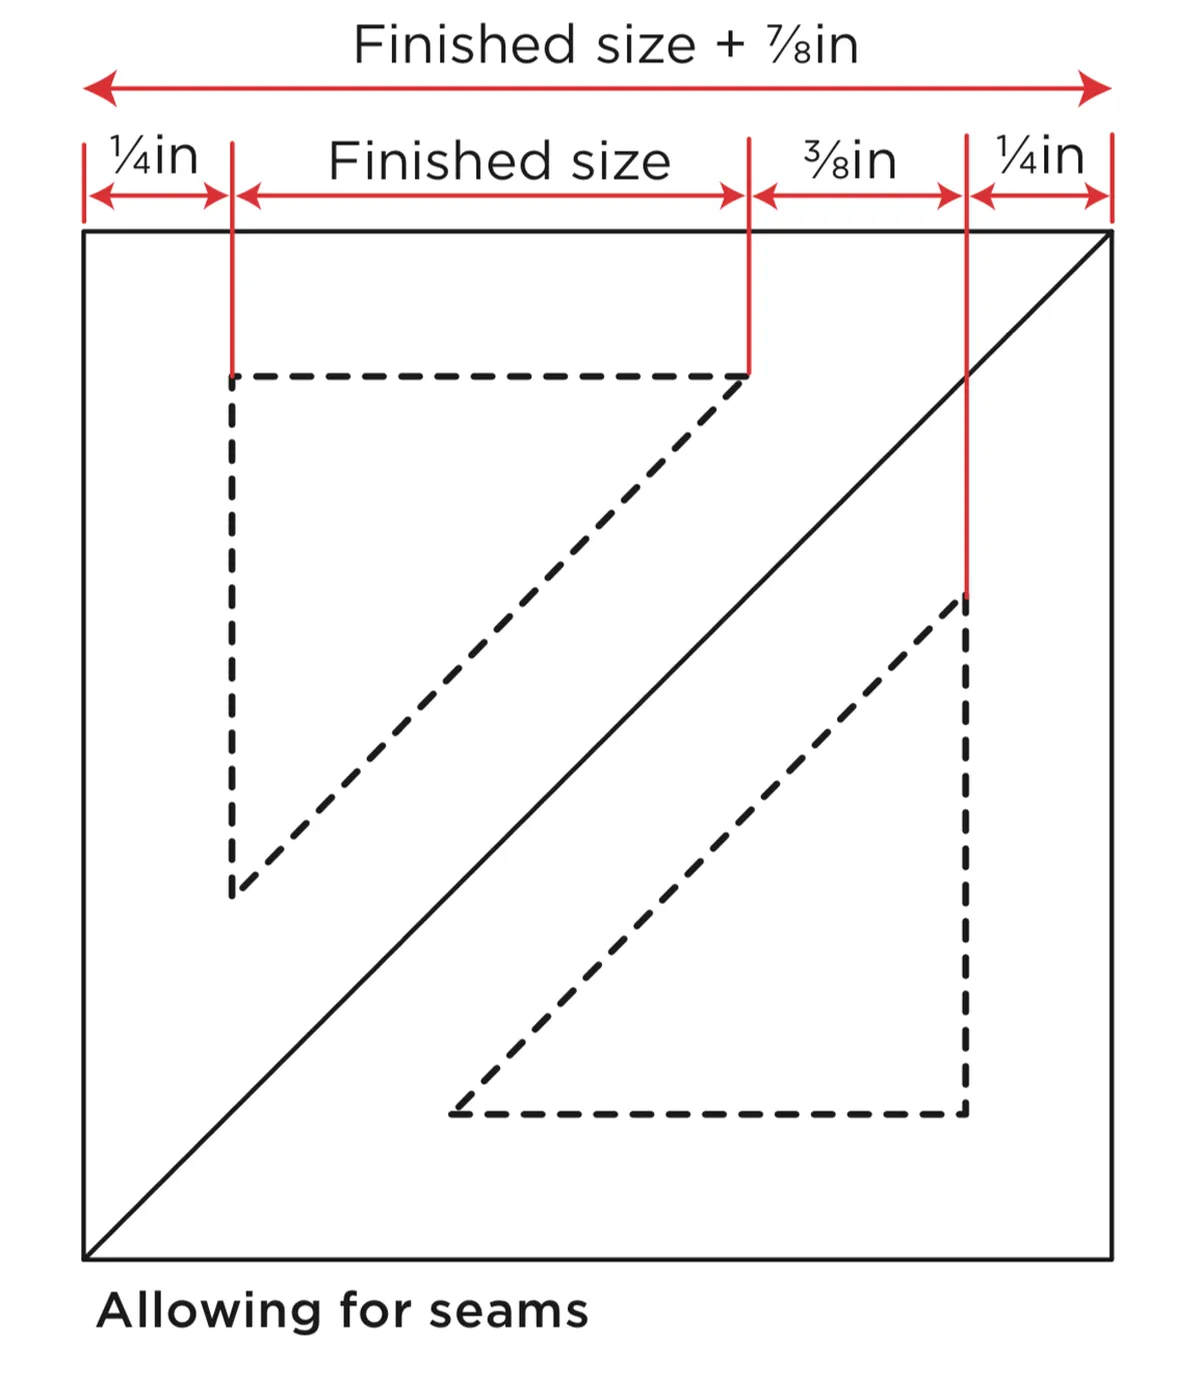
The triangles need to be cut 7⁄8 in larger than the desired finished size. This may seem like an odd fraction but Fig 1 shows why.
Step 2
Cut a right-angled triangle from two different fabrics, cutting each triangle the finished size you want plus 7⁄8in. (Alternatively, cut a square and sub-cut it into triangles.) You can pre-trim the points at this stage if desired (see below).
Step 3
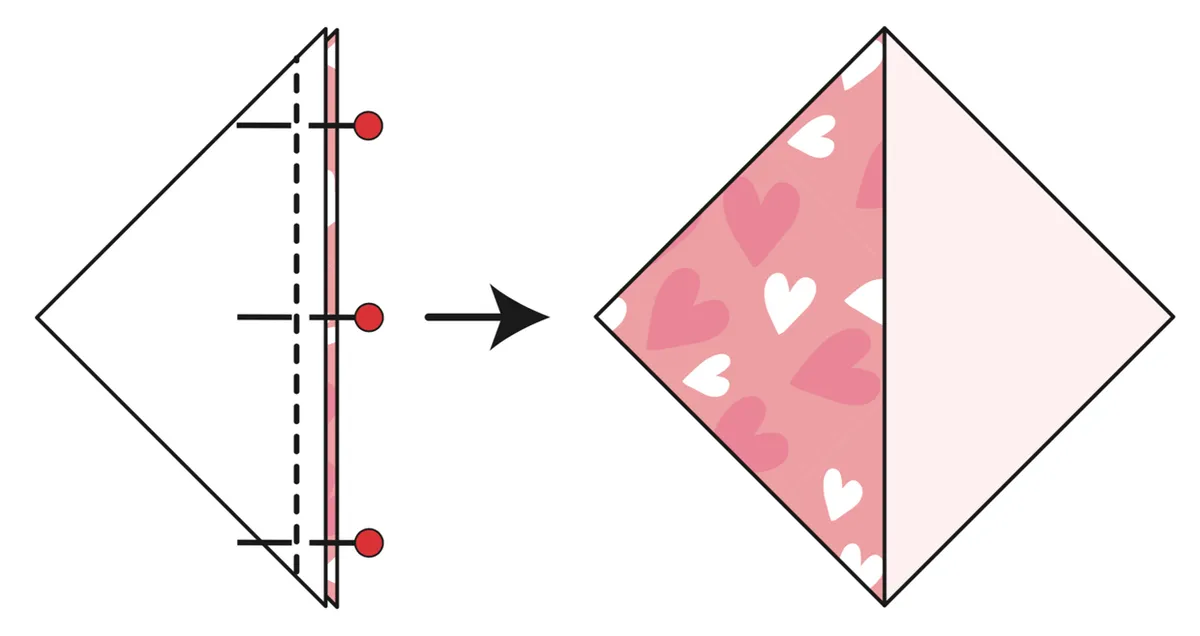
Place the triangles right sides together, aligning the long edges, and then pin. Sew the seam ¼in from the edge
Step 4
Open out the unit and press the seam (open or to one side as preferred). Check the size of the unit and make sure it is the size needed and also square.
Pre-trimming points
Before sewing triangles together you can use a Point Trimmer gadget to trim off the points, to save removing the dog ears later. This produces fat corners on the triangle, which makes the seam easier to sew. However, on smaller triangles such gadgets may trim of too much and lead to inaccuracies, so use with caution.
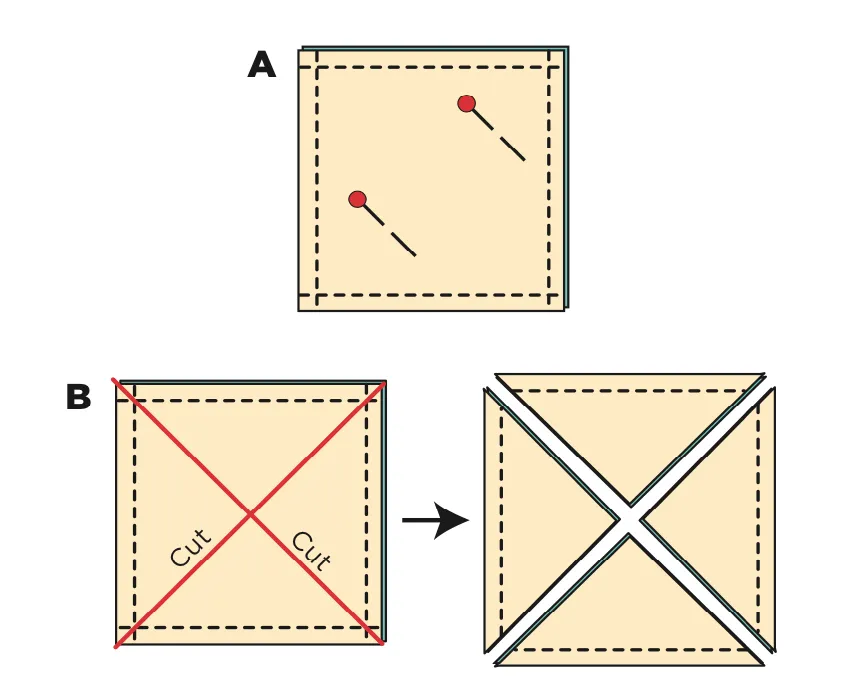
Method 2: Square method
Make by sewing squares together – this makes 2 units
One of the most popular ways to make half square triangles is with two squares, which makes two identical units. These can be chain-pieced for speed if you need many units.
How to make half square triangles: square method
Step 1
The squares need to be cut the size that you want your sewn unit to be (i.e., the unfinished size), plus 7⁄8in. So, for a 2½in unfinished HST cut the starting squares at 3 3⁄8in or round up to 3½in. The sewn unit can then be trimmed down to an exact 2½in
Step 2
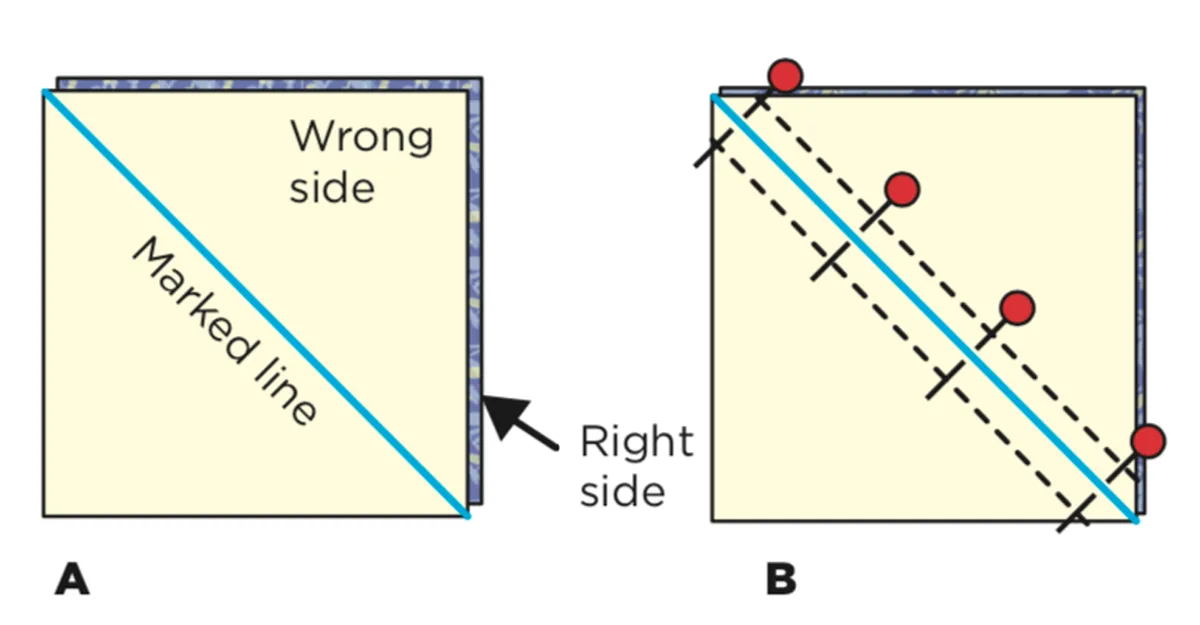
Cut one square from two different fabrics. Pencil mark the diagonal line on the wrong side of the lightest square. Place or press the two squares right- sides together, with all outer edges aligned (Fig A below).
Step 3
Pin the squares together and sew ¼in away from the marked line on each side (Fig B above).
Step 4
Press the stitching and then cut the units apart on the marked line.

Step 5
Open out each unit and press the seam (open or to one side as preferred). Check the size of each unit and make sure it is the size needed and is also square (right angled).
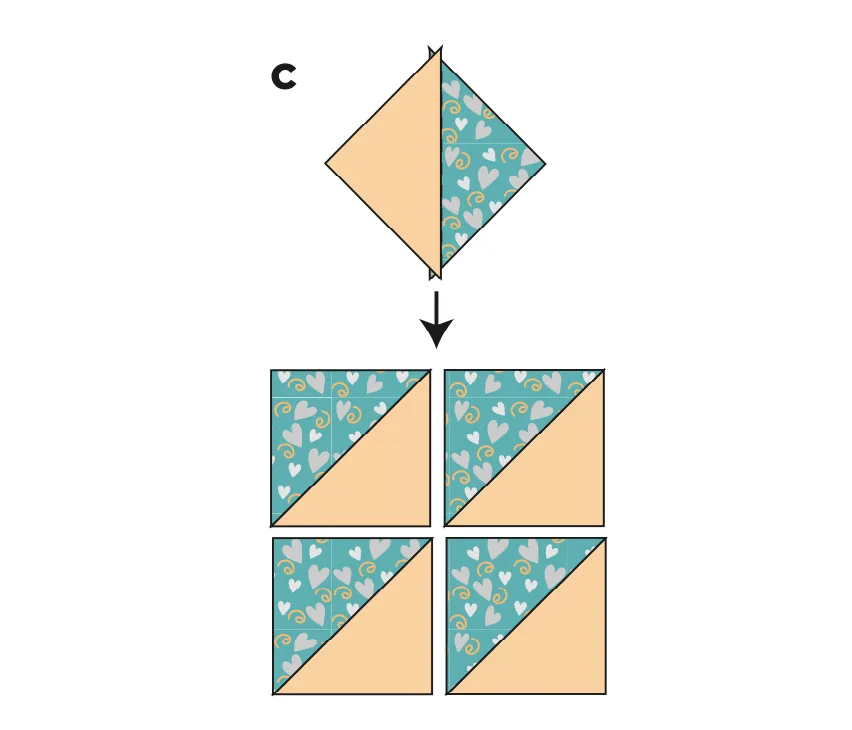
Method 3: Speedy method
Squares are sewn together – this makes 4 unites at once
If you have quite a few HST units to make, then making four at once is quicker. All units are identical and start off as squares. The squares are cut slightly over size and then the sewn units are trimmed down to the exact size needed.
How to make half square triangles: the speedy method
Step 1
Calculate what size of squares you need to cut (see the Maths Made Easy box at the bottom of this section). Cut a square from two different fabrics. Place them right-sides together, matching all edges exactly and pin.
Step 2
Sew around all four sides of the square ¼in away from the edge
Step 3
Carefully cut the sewn squares into quarters along the diagonals (marked in red lines on the diagram above), so you end up with four triangles.
Step 4
Take each unit, open it up and press the seam open or to one side. Check the size of each HST, trimming as needed.
Maths made easy
For Method 3, you can use the following formula to calculate what size squares to cut:
Size of cut square = size of HST unit needed (unfnished size) + ¾in (for seams) x 1.414.
For example, if 31⁄2in HSTs are needed: 3½in + ¾in = 4¼in x 1.414 = 6in. So, cut two 6in squares to begin with.
For example, if 21⁄2in HSTs are needed: 2½in + ¾in = 3¼in x 1.414 = 4.59in (rounded up to 4¾in). So, cut two 4¾in squares to begin with.
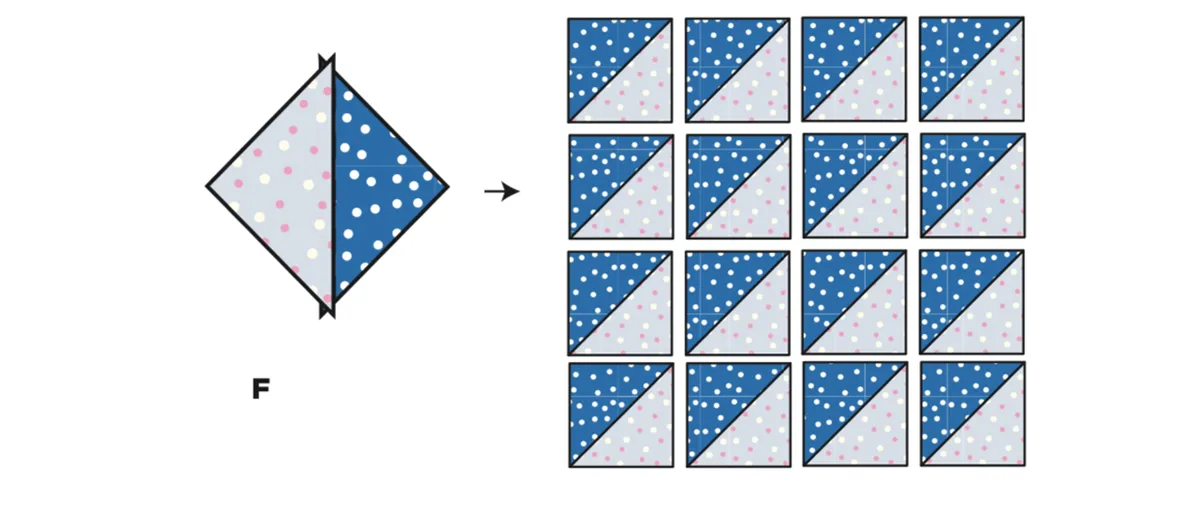
Method 4: batch method
Squares sewn together – makes 16 units at once
If you have lots of HST units to make, then making them sixteen at once is faster and more efficient. All units are identical and start of as squares. Final trimming is required.
Making
Step 1
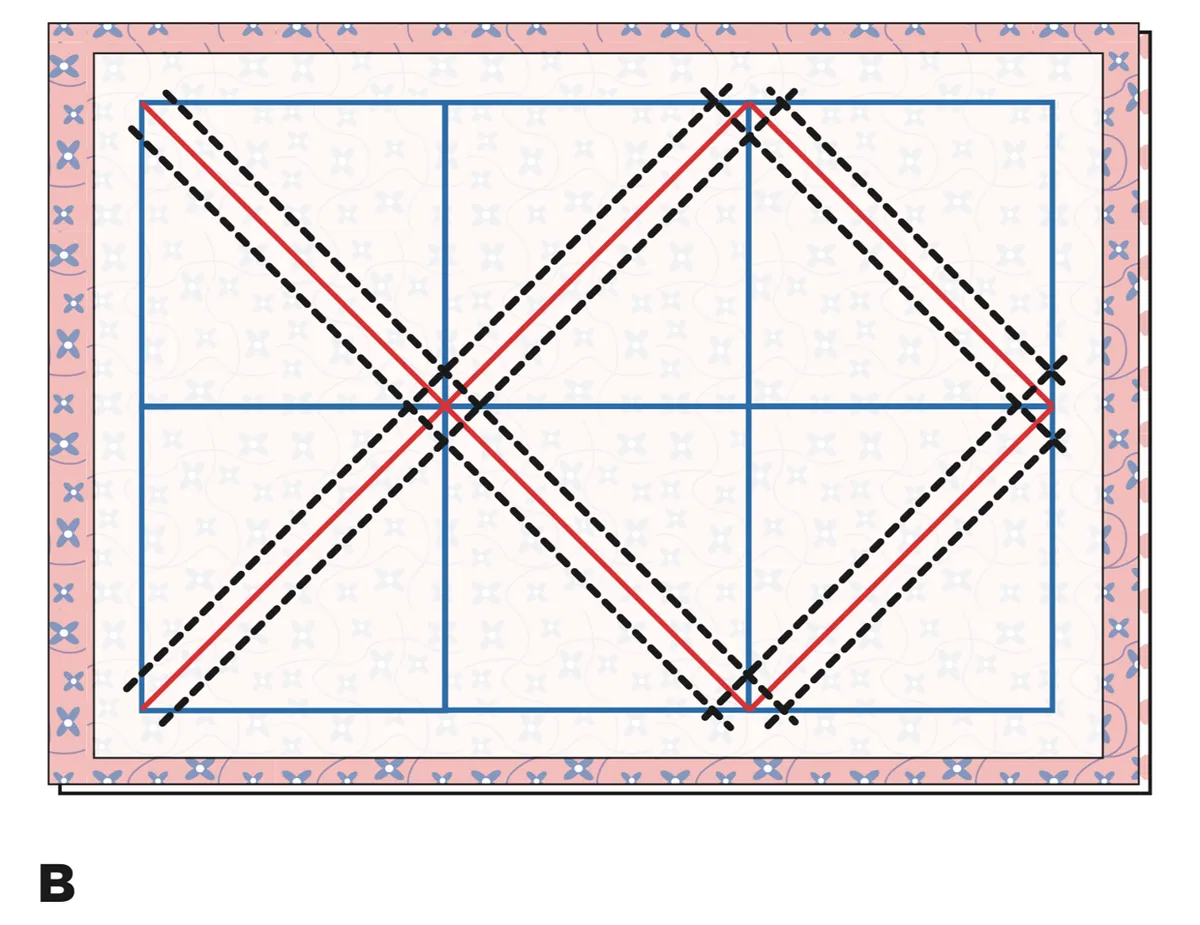
Calculate what size of squares you need to cut (see Maths Made Easy at the bottom of this section). Cut a square from two different fabrics and place them right sides together, matching all edges exactly. Place the lighter square on top if you can.
Step 2
Find the exact centre of each side of the top square and mark a line in pencil from side to side and top to bottom, as shown by blue lines in Figure A below. Pin the squares together.
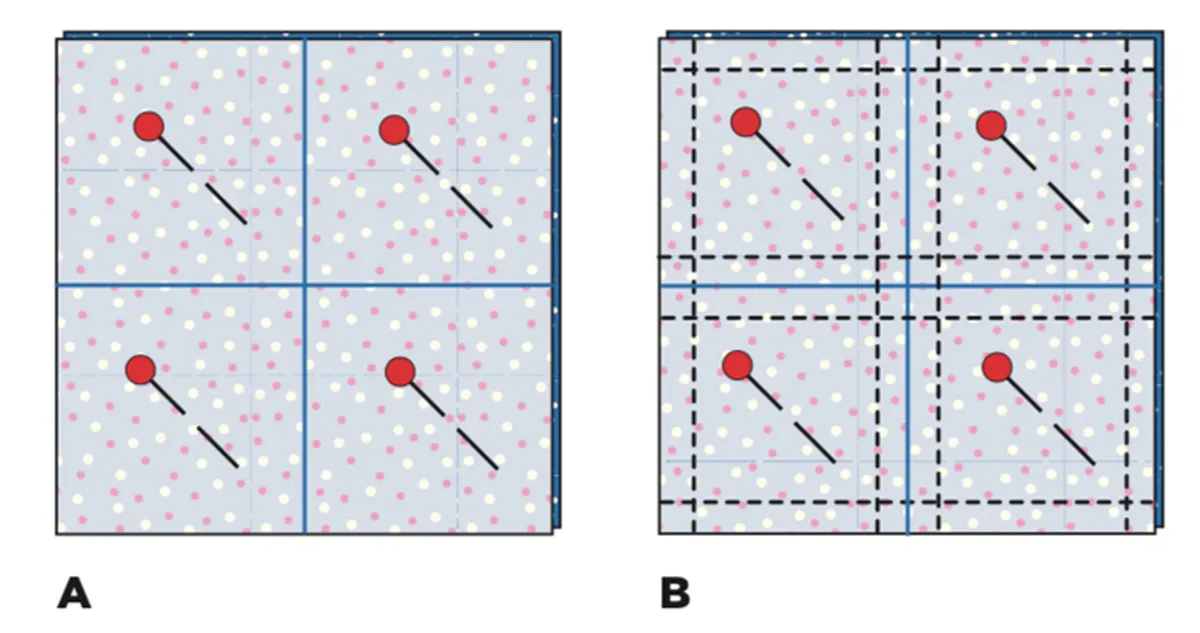
Step 3
Sew around all four sides 1⁄4in away from the edge, and then sew ¼in from both sides of the marked lines (Fig B above).
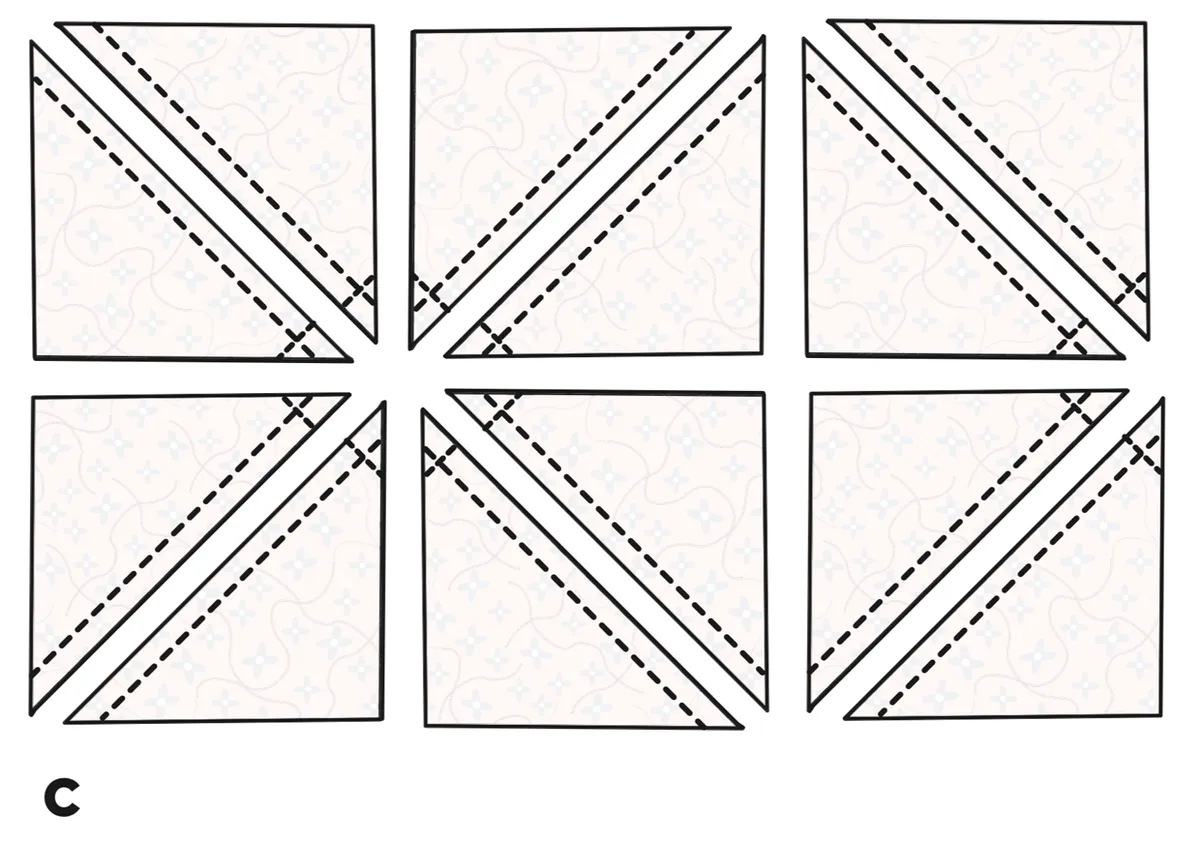
Step 4
Now cut the sewn unit apart on the marked vertical and horizontal lines and also along the diagonal lines shown in Fig C and D. You can make all of the cuts in eight stages if you keep the unit very still as you cut. If it does move, just put it carefully back into place (or cut each square separately if you prefer). When making the diagonal cuts, make sure that your ruler bisects the corners of the squares (Fig E).
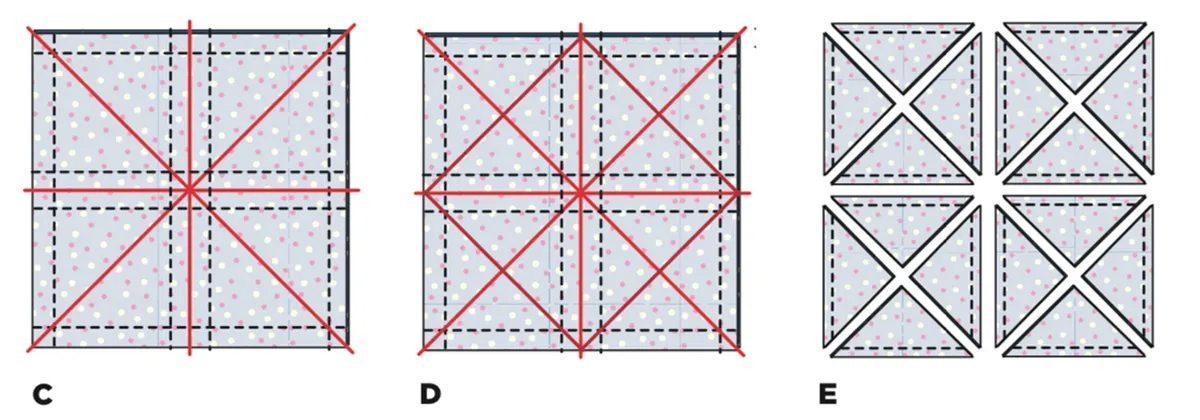
Step 5
Take each unit, open it up and then press the seam open or to one side (Fig F). Check the size of each HST, trimming as needed.
Maths made easy
For Method 4, you can use the following formula to calculate what size squares to cut:
Size of HST unit needed (unfnished size) x 1.414 + ¾in (for seams) x 2.
For example, if 3in HSTs are needed: 3in x 1.414 = 4.24in (41⁄4in)+¾=5in x 2=10in. So, cut two 10in squares to begin with.
For example, if 2in HSTs are needed: 2in x 1.414 = 2.8in (rounded up to 3in) + ¾in = 3¾in x 2 = 7½in. So, cut two 7½in squares to begin with.
Method 5: Foundation piecing method
Makes multiple units, depending on your template
Foundation paper piecing can be used for really accurate piecing where no trimming is needed. All units are identical. A template for making 2½in (unfinished) HSTs is available (see Templates section), or you could make your own, as described in Creating a Foundation Paper Piecing Template.
How to Foundation Paper Piece half square triangles
Step 1
Print or copy the full-size template (or as many as needed) onto printer paper, tracing paper or foundation paper.
Step 2
Cut pairs of fabric rectangles large enough to cover the template with about ½in extra all round. Press the fabric rectangles right-sides together. Put the template on top of the fabrics, right-side up (lines showing). Pin in place
Shorten your machine stitch length to about 1mm and sew along all of the black lines on the template, stitching one or two stitches beyond the lines
Step 3
Once sewn, remove the pins and press from the fabric side. Using a quilter’s ruler and rotary cutter, cut along all of the blue lines and then all the red lines
Step 4
On each unit tease away the short line of stitching at the corner and tear away the paper. Press the seam open or to one side. Trim dog’s ears and check the unit is the correct size.

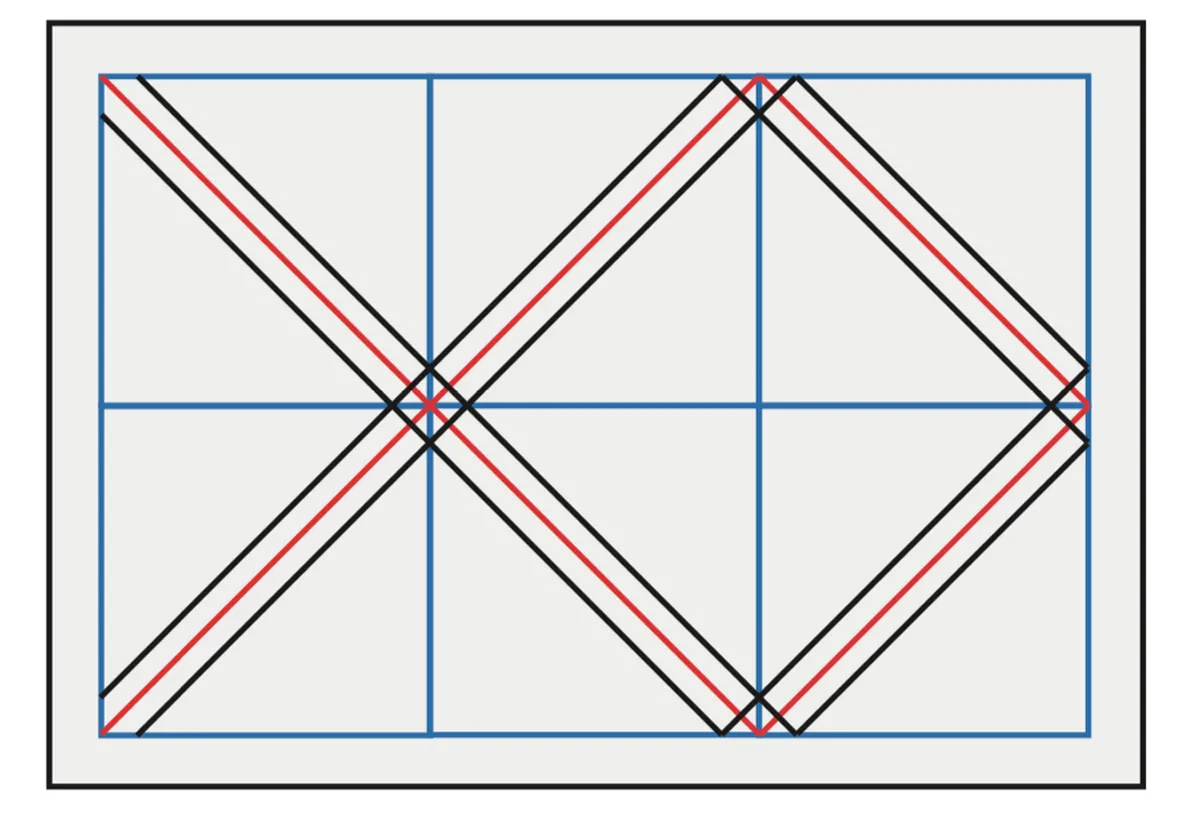
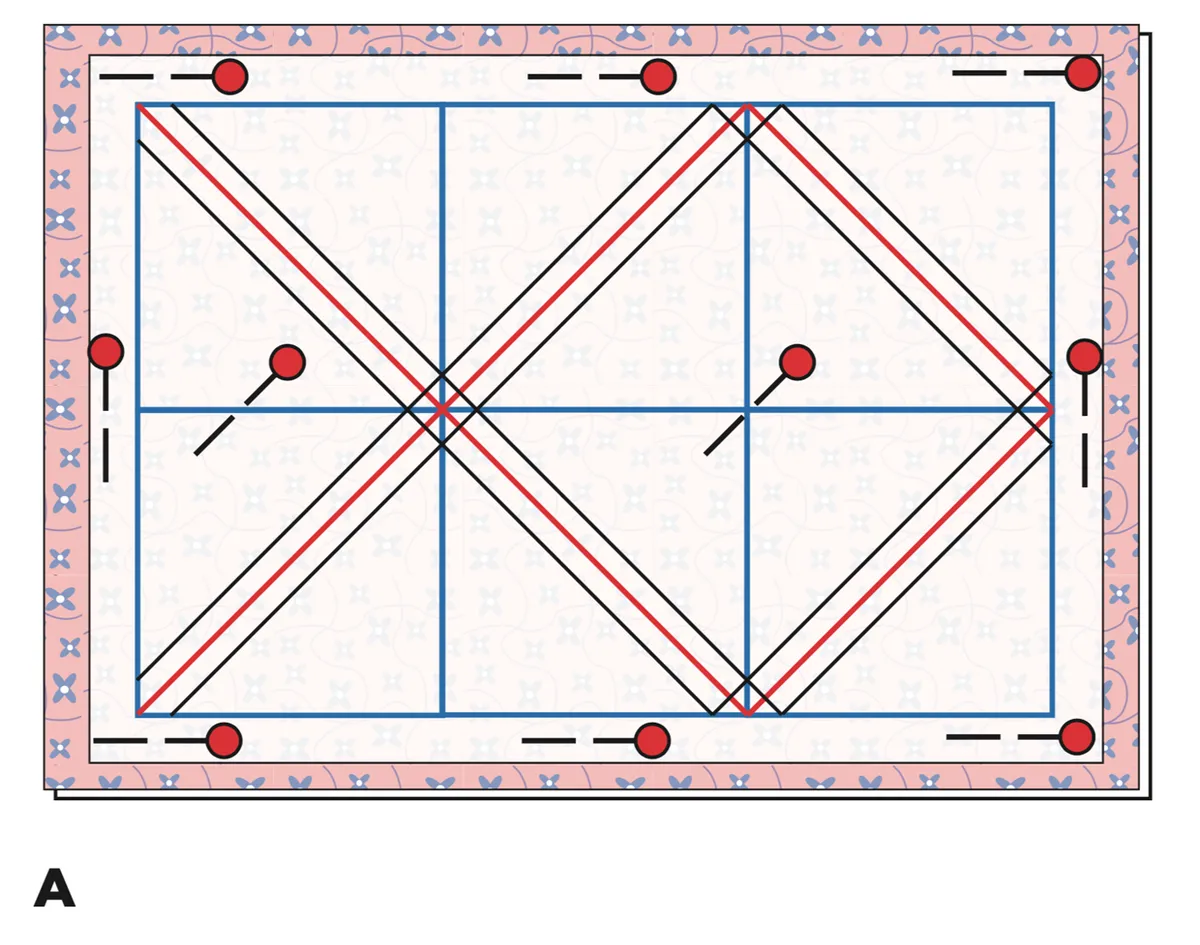
How to create a foundation paper piecing template for half square triangles
You can create your own foundation paper piecing (FPP) template to make any size of HST you like. The following example shows a 2¾in square HST unit (unfinished), creating twelve HSTs at once from one sheet of A4 paper. It helps to have fine felt-tip pens in blue, red and black. For this size of HST, six squares will ft on an A4 sheet, which will yield twelve HSTs.
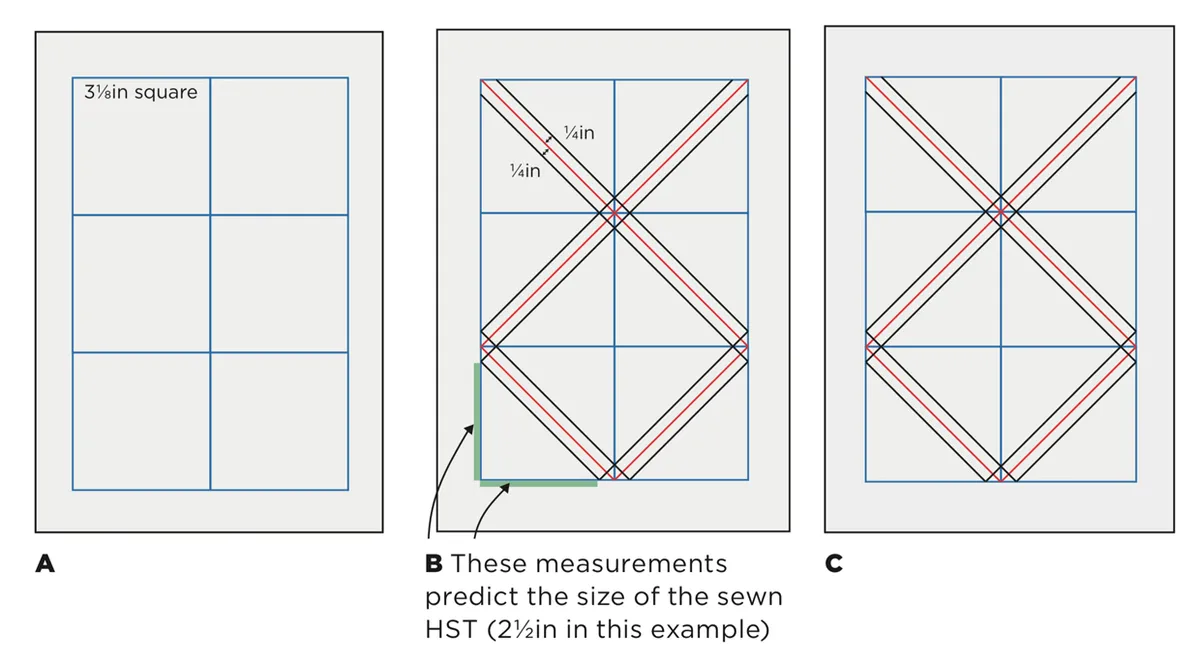
Step 1
On an A4 sheet of paper draw six squares in a 2 x 3 layout using a blue pen (Fig A above). The size of the squares needs to be the size of the sewn (unfinished) HST you want plus 3⁄8in. So an HST 2¾in + 3⁄8in = 31⁄8in square.
Step 2
Draw diagonal lines with red pen through the squares following the directions in Fig B above. These red lines and the blue lines will be the cutting lines later. Drawing the lines this way will allow you to sew and cut in the most efficient way (i.e., in long lines).
Step 3
Draw a second set of diagonal lines this time in black pen 1⁄4in away from the red lines. Note that the 1⁄4in measurement needs to be parallel to the lines, as shown by the little arrows in Fig B above. These lines will be your sewing lines.
Step 4
When the lines are drawn check that the HSTs will be 2¾in by measuring across the dimensions shown by green lines in Fig B above. Check this in several places. If this measurement is not 2¾in then some of your ¼in sewing lines have not been marked correctly, so check them all again. You will notice that your lines should cross at certain centre points, so check this too.
Step 5
Trim the sheet down so it is ½in bigger all round than the grouping of squares (Fig C above). Label the template with the size of the HSTs. The template is now ready to be used as a foundation paper piecing template (see Method 5).
Step 6
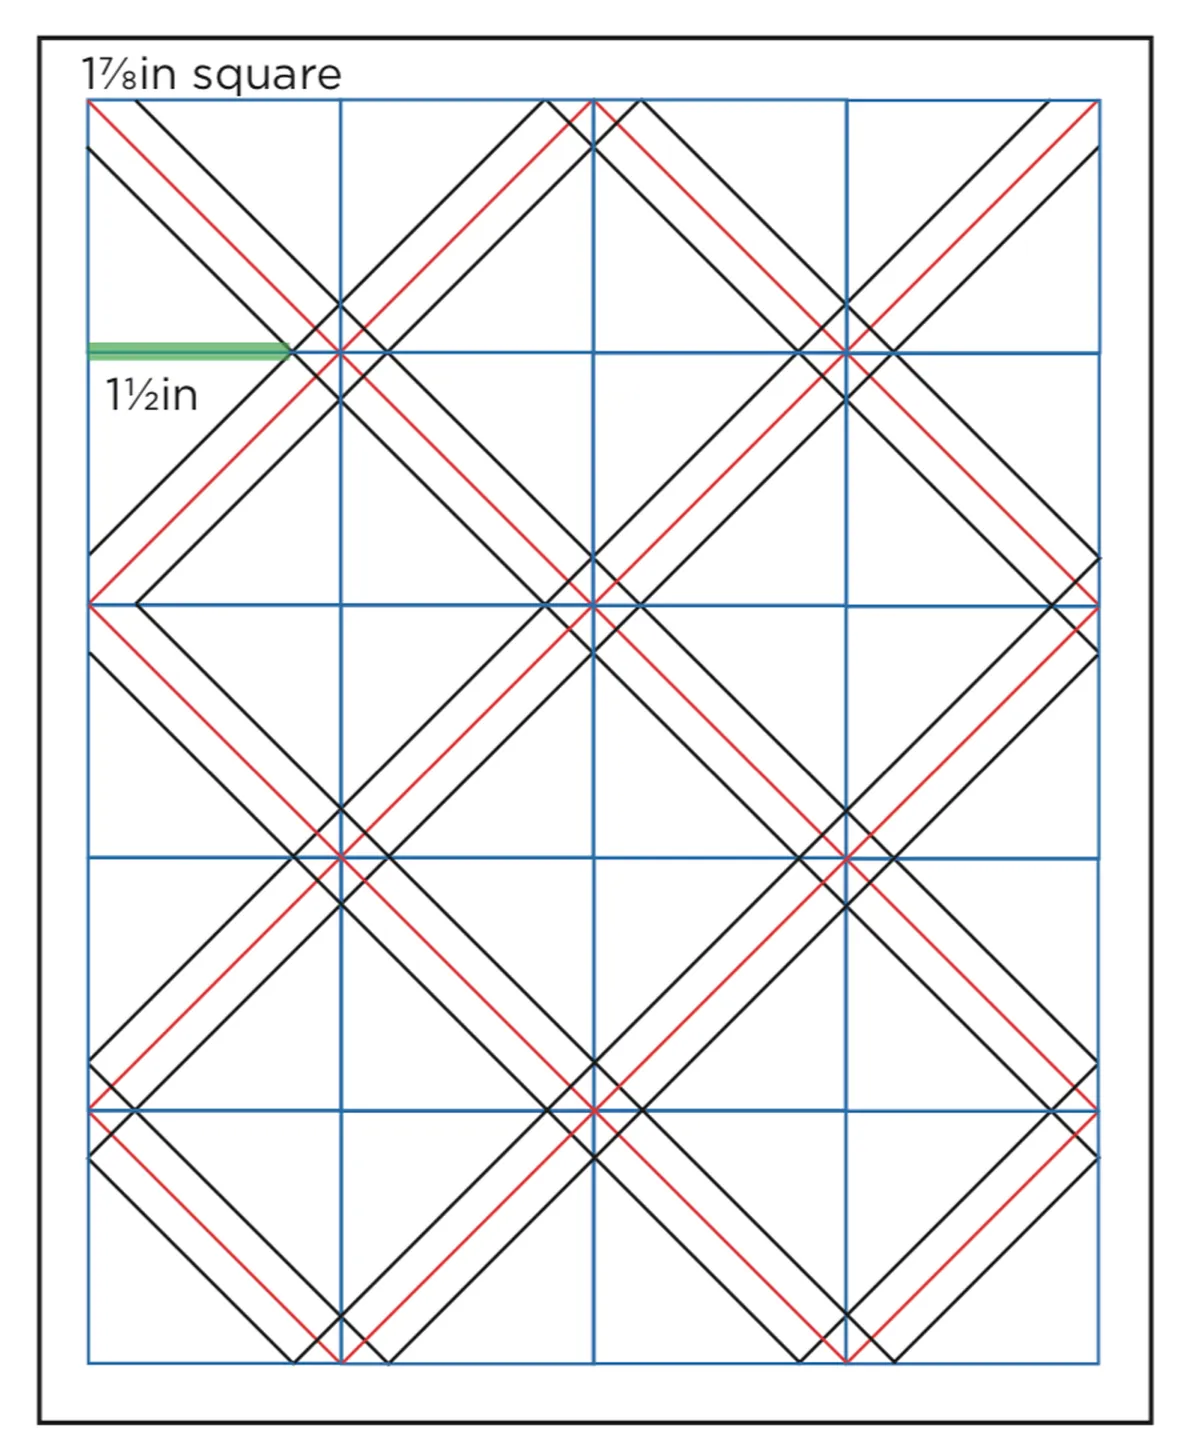
Always test a template first on actual fabric before proceeding with a project. If you scan your template into a computer and save the file you will be able to print out as many as you like. This same principle can be used to create templates for smaller sizes of HSTs, varying the directions of the drawn lines as necessary. The figure below shows an example of a template for 1½in (unfinished) HSTs, where the initial squares are drawn at 1 7⁄8in, i.e., the size of unfinished HST needed (1½in) + 3⁄8in.
Top tips for cutting half square triangles
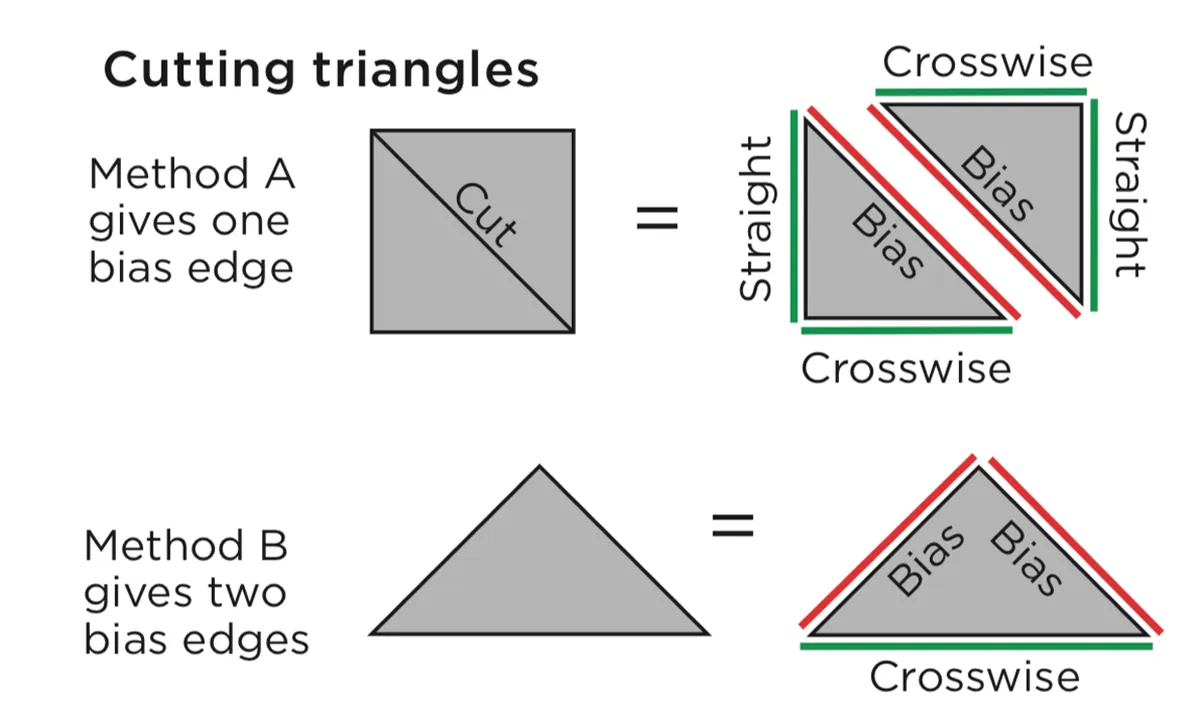
When cutting triangles for half square triangles or setting triangles it is preferable to cut a square first, and then cut this into two (or four) triangles, rather than cutting separate triangles on a fabric strip. This is because sub-cutting a square into two triangles results in only one bias edge per triangle, whereas cutting separate triangles results in two bias edges per triangle
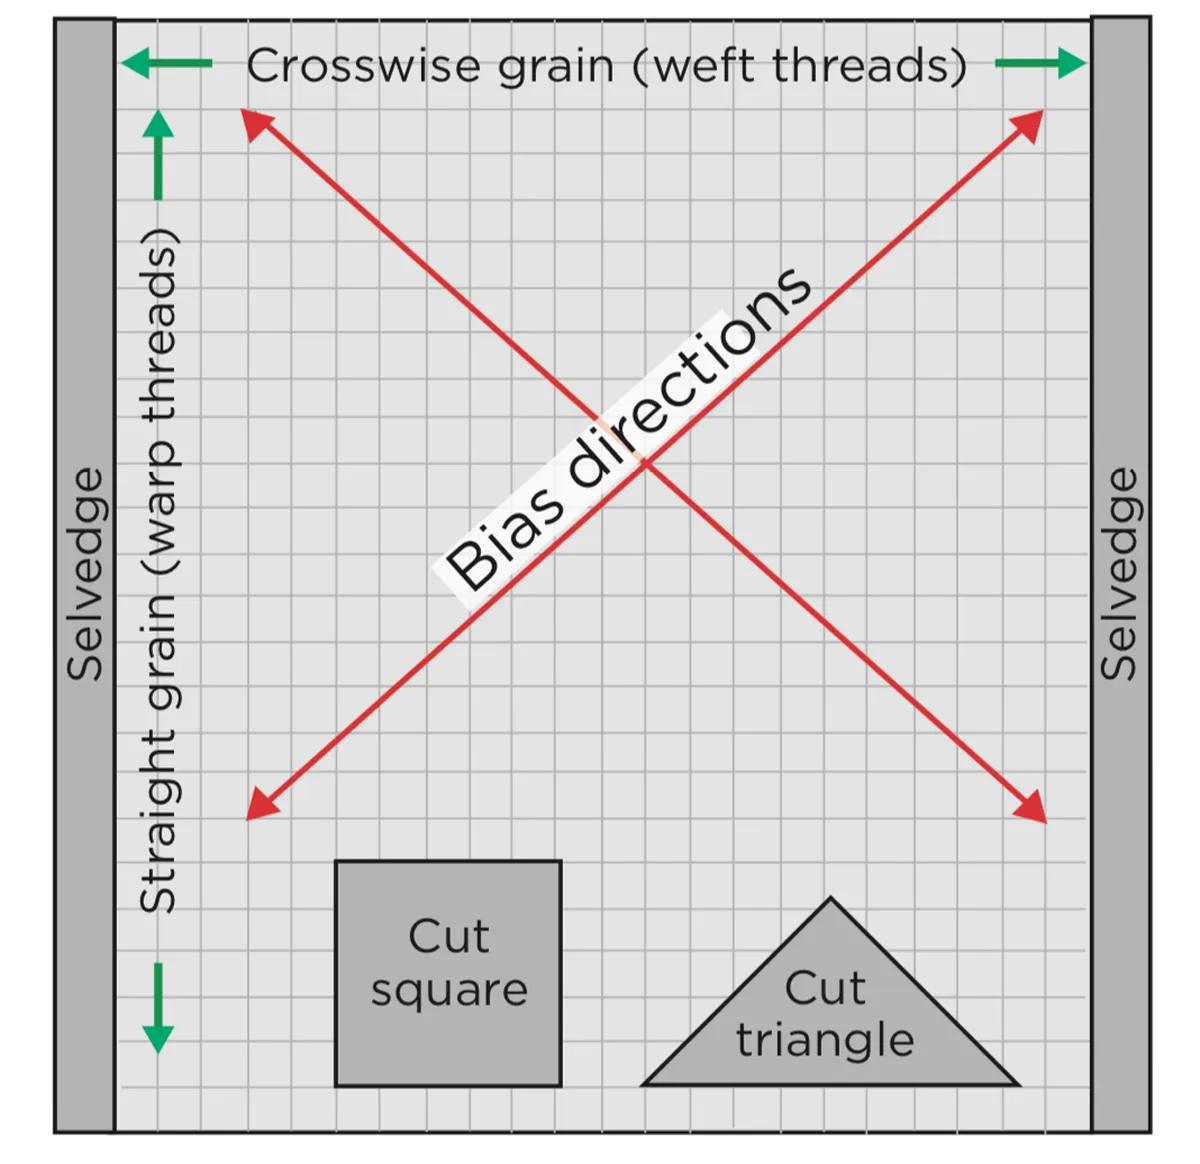
Bias edges are best avoided, as a fabric’s straight grain and crosswise grain are more stable than the bias directions and so less likely to stretch and distort.
Cutting triangles with rulers
If you do need to cut triangles, there are quilting rulers available that you can use. The most important thing to remember is to read the instructions carefully, as some rulers give measurements for the unfinished size, while others have markings for the finished size. Rulers for half-square triangles are usually triangle shaped. They normally give instructions for cutting triangles from long strips, with two fabric strips placed right sides together. Some rulers tell you to rotate the ruler alternately along the strip as you cut, while others instruct you to flip the ruler over alternately. The triangles cut in pairs in this way are then sewn together along the long diagonal (bias) edge.
How to press the seams on your Half square triangles
Seams on sewn HST units can be pressed to one side or open.
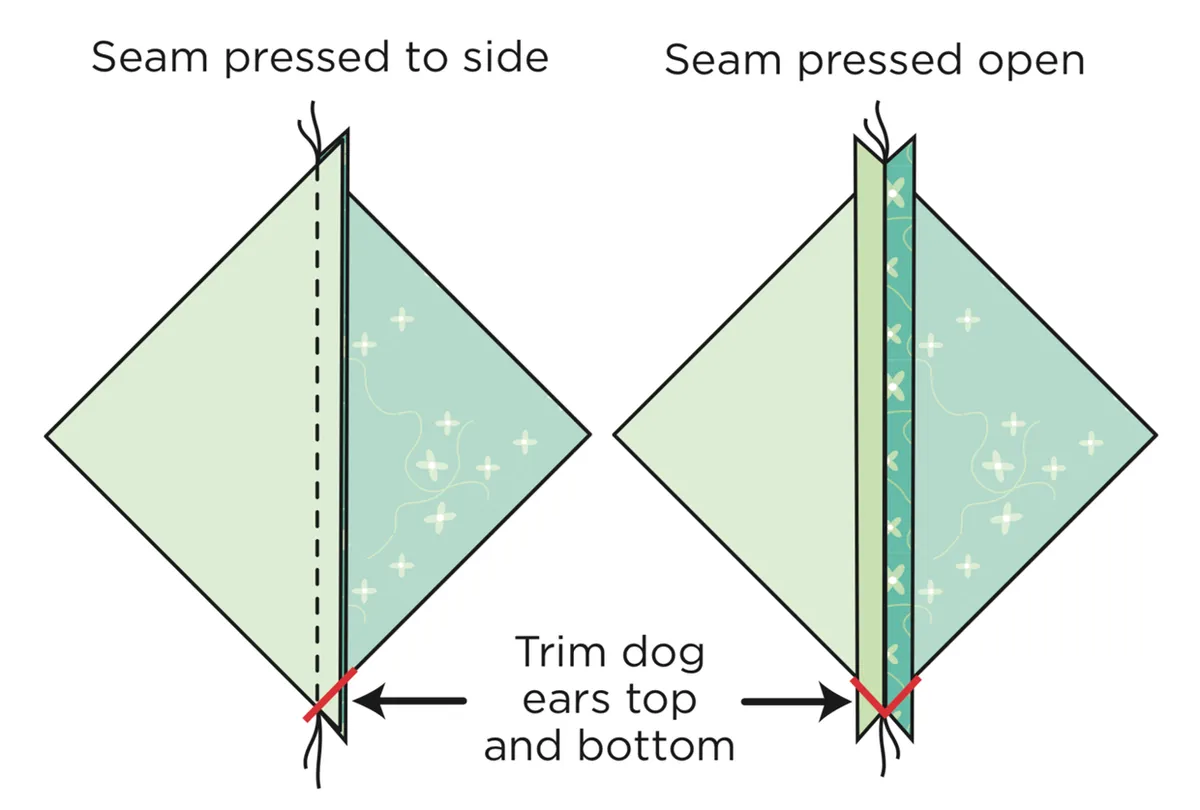
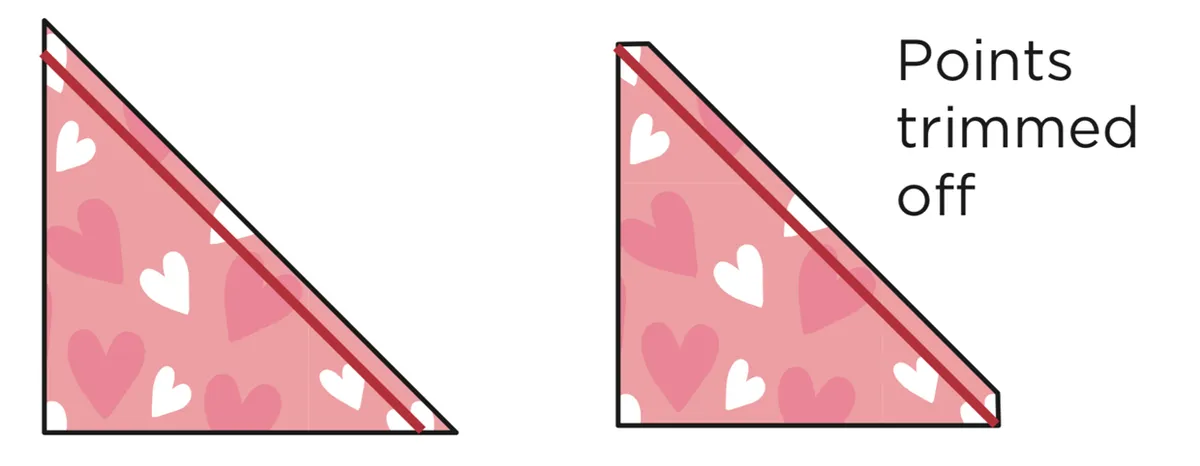
If pressed to one side the seam is usually pressed towards the darker fabric each time (because HSTs are often paired light/dark). This means that when HSTs are sewn together the seams will then face in opposite directions, making it easier to ‘nest’ seams neatly. If seams are pressed open you don’t have to worry about subsequent seam directions, but quilting in the ditch later may not be as effective. In either case, once an HST is sewn, trim off the ‘dog ears’ to make it easier to sew units together.
How to trim Half Square triangles
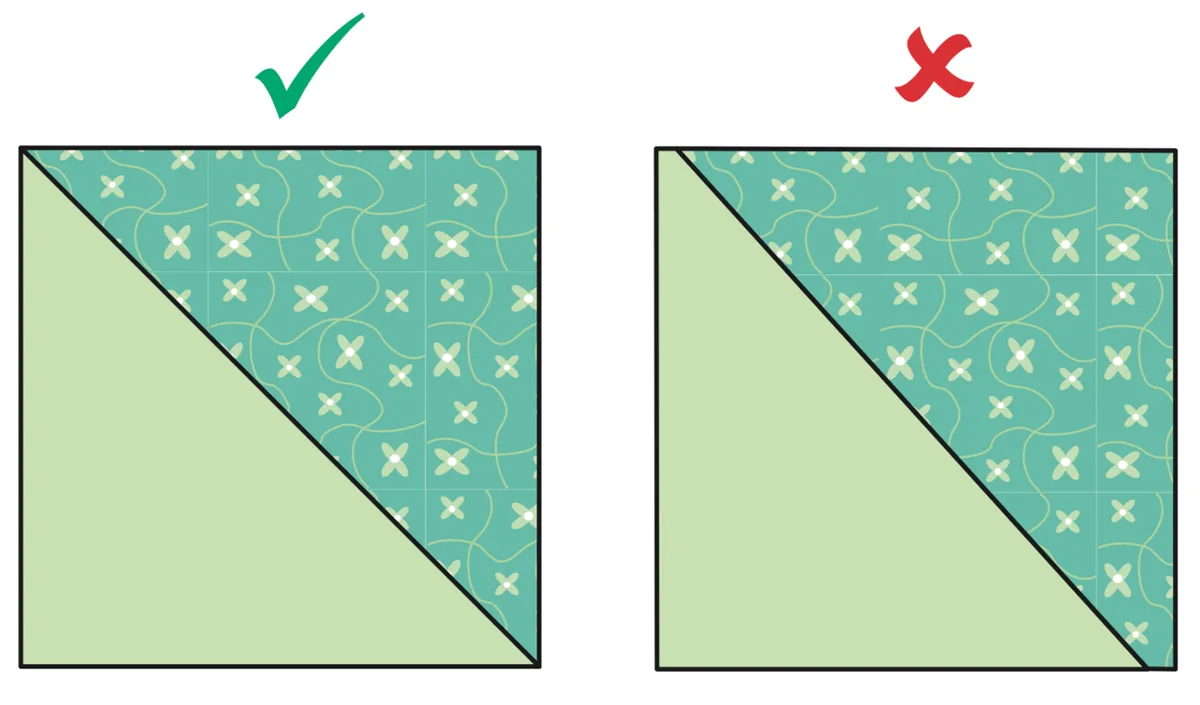
Many quilters prefer making half square triangles slightly larger than needed and then trim them down to the correct size once pressed. This does entail a little more work but there’s nothing more frustrating than making an HST slightly too small. You end up distorting it by over-zealous pressing and then having to discard the work because bias edges have stretched! The important thing to remember when trimming HSTs is to keep the diagonal seam across the centre of the unit, so it bisects the corners. The easiest way to do this is to use a square ruler.
Step 1
Place the HST on a cutting mat and the ruler on the HST, selecting the correct size marking on the ruler (6in square is shown in Fig A below), and with the 45-degree line on the ruler aligned with the seam. Trim excess fabric from the right- hand side, as shown.
Step 2
Now turn the unit and ruler and trim of the excess on the other side, still keeping the 45-degree line along the seam (Fig B below). (You may not need to turn the unit if you have access to your cutting mat from two or more sides.)

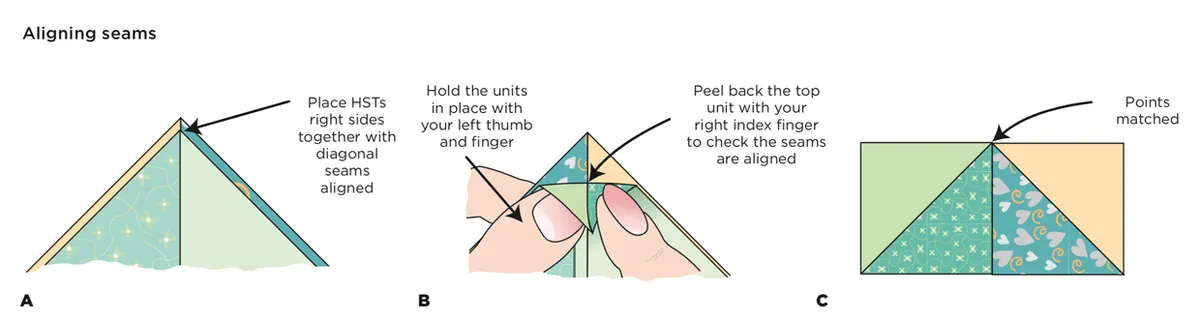
How to sew half square triangles together
Most of the methods for sewing HSTs are straightforward. When sewing these units together the three most important things with any method you use are as follows.
- Trim individual units accurately (as already described).
- Match diagonal seams accurately when sewing two units together.
- Maintain a ¼in seam allowance, to avoid cutting off triangle points (see Troubleshooting at the bottom of this post for more information on this).