How to make a felt hot water bottle cover
The nights are long and chilly, so it’s time to put the kettle on and cuddle up under your favourite blanket, in front of a roaring fire, with a hot water bottle in a handmade cosy.
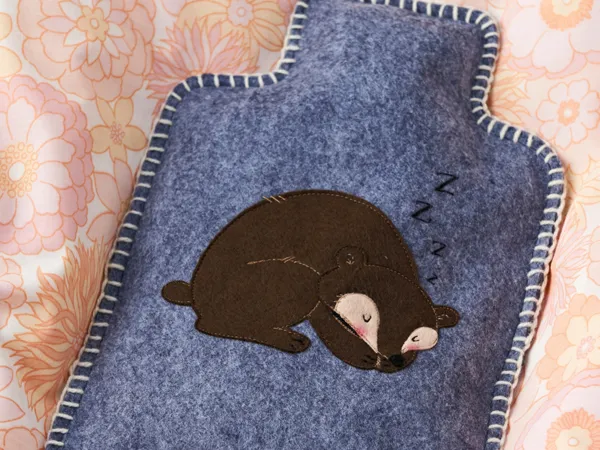
The lovely Samantha Stas taught us how to make a hot water bottle cover and we think her little sleepy bear makes this project extra special. It's also a great beginner sewing project because it's both simple and can be created entirely by hand.
Grab felt in your favourite colour (or the one which fits your bedroom's colour scheme), download our free template and learn how to make a hot water bottle cover. Over to you, Samantha!
How to make a hot water bottle cover
You will need:
- Thick grey felt for front cover, 38x26cm
- Thick grey felt for back top cover, 25x26cm
- Thick grey felt for back bottom cover, 22x26cm
- Piece of dark brown felt, 20x14cm
- Scraps of peach or beige felt
- Scrap of black felt
- Piece of cotton ribbon, 50cm
- Cream wool
- Water soluble pen
- Black thread
- Light brown thread
- Grey thread
- Needle
- Pink chalk
- Template
If you are new to sewing, don't worry. Not only is Samantha's tutorial super easy to follow but we also have a sewing for beginners guide right here to help you.
Make sure you check out our round-up of sewing kits for beginners for other simple projects.
Step 1

Cut out your hot water bottle cover and appliqué pieces using the template.
Step 2

Lay the front piece of the cover place the bear shapes roughly in the middle. Pin just the bear's body in place. Sew around the bear in light brown cotton, adding detail to his leg.
Use the template as a guide. Give it a light iron, using a pressing cloth.

From hand to machine!
When you feel confident enough to move from hand sewing to sewing machines then use our how to use a sewing machine tutorial along with our best sewing machines for beginners guide to understand your new machine!
Step 3

Fabric glue the peach or beige felt pieces on the head shape. Arrange the bear’s head in place and pin it. Sew around the head and the face pieces. Give it a light iron, using a pressing cloth.
Step 4

Hand sew some fur details on the leg, back and ears with light brown thread. Using black thread, add his eyes and claws. We also used the black thread to create a shadow between his face and paw.
Step 5

Use a water-soluble marker to mark out some Zs on the cover. These can be sewn by hand or machine. Lightly spray off any pen marks and add some rosy little cheeks, using some pink chalk.
Wait for any dampness to dry and give it a final press. Water can distort the felt if you iron when it’s damp.
Step 6

The back of the hot water bottle cover is made up of two pieces, top and bottom. Hem the edges which form the envelope opening using a 6mm seam allowance.
Cut the ribbon in half, turn the raw edge under and sew to the inside of the top cover piece (along the hem stitch).
Step 7

Stitch the other half of the ribbon to the right side of the cover, 1.2cm from the bottom.
Step 8

Place the front appliquéd cover wrong side up. Align the back bottom piece in place, right side up, then lay the back top piece over it, right side up. You should have created an envelope opening.
Pin and sew with matching thread using a 7mm seam allowance. Keep the ribbons clear from the path as you sew (we’re sewing this on the right side!). Trim if necessary.

Step 9

Finish with a blanket stitch. Start your stitching at the envelope opening. Use your stitch line as a guide for the depth of each stitch.
Stitch your own felt hot water bottle cover
Make this quick-stitch hot water bottle cover as a little gift for friends born in winter, or as a mini heater to cuddle at bedtime. Coupled with a fresh, cool pillow, and you’re in for a good night’s sleep.
On to the next cosy sewing project!
Once you've learned how to make this hot water bottle cover, make sure you check out Samatha's other felt projects, like her mug cosy pattern.