Your complete guide to trapunto quilting
Boost your confidence with trapunto quilting using our ultimate guide! It’s an easy technique to master, and a great way to add extra texture and detail to your quilted projects.
- Free Dresden quilt pattern and templates
- How to make a quilt by hand – your guide to quilting without a sewing machine
- Essential guide to how to make a Bargello quilt
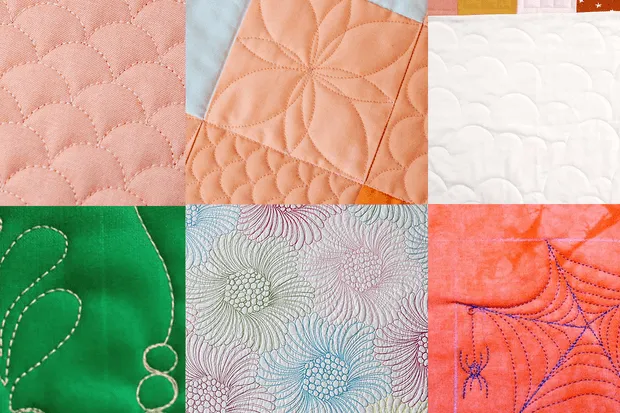
Highlight your print fabrics or use different shapes to create stylish machine-quilted designs with ease. Find out how to make one with Kate Webber’s in-depth tutorial.
A beginner’s guide to trapunto quilting
What is trapunto quilting?
‘Trapunto’ is from the Italian ‘trapuntare’, meaning ‘to quilt’, and dates back to the 14th century! It’s also sometimes referred to as the ‘stuffed technique’, as it involves adding extra stuffing or batting to make a raised, three-dimensional effect.

Tools and materials
Together with your usual quilting tools, you will need:
Batting: There are many types of batting. To get an effective plump trapunto look, go for a high loft batting such as Hobbs Poly-down polyester batting for the trapunto areas. You can then use a regular cotton batting for the rest of the project.
Fabric: The fabric on the front of your project could be a normal quilting weight cotton or even a lightweight linen. Lighter colours show off the embossed look best as the shadows created by the motif show better on paler colours. Textured, heavy weight and highly patterned fabrics will not work well as the design will not stand out.
How to quilt using the trapunto technique
It’s easy to learn the basics of trapunto with Kate’s expert step-by-step guide – let her show you how to transfer your new skills and make a modern and minimal cushion .
- Download the trapunto cushion template
You can use this simple trapunto technique on any size or shape of fabric. For this project, Kate used an 18in square of fabric, which she then turned into a cushion cover.
Step 1
Trace your design onto the right side of the fabric using your preferred method. Kate used a mechanical pencil but you could also use removable ink or tailor’s chalk.
Step 2
Kate marked a pair of lines 3in apart on the fabric. Then she marked another pair of lines ½in away from the first, and continued with this pattern right across the fabric. Kate marked between these sets of lines using the oval template.

Step 3
Place your marked fabric on top of a square of high loft batting, slightly larger than the fabric. Tack or pin baste in place.

Step 4
Stitch along the marked lines, making sure to close shapes completely by overlapping the stitch line for each shape.

Step 5
Draw all thread ends to the batting side, and securely knot. Remove your basting thread or pins.
Step 6
Cut away the excess batting from outside the stitched shapes. Take care that you don’t cut into the fabric on the front.

Step 7
Trim as close to your stitch lines as possible, without cutting into the stitching.

Step 8
Lay your work on top of your usual batting. Baste with your preferred method (spray baste can be used at this stage).
Step 9
Carefully stitch around your shapes, close to the original stitch line in a thread that matches the front fabric or original stitches. At this stage the shaped sections will look quite puffy.

Step 10
Continue to quilt as desired around your motif, leaving the shapes with extra batting unquilted. The more you quilt between the trapunto sections, the more contrast there will be with the raised areas.

How to sew your trapunto panel into a cushion

Step 1
Trim your panel to your desired size. Kate trimmed hers to 17in square.
Step 2
Add a matching or contrasting cushion backing, in your preferred style, using a ½in seam allowance.
Step 3
Add tassels to the corners of your cushion, if desired. Kate used a DK cotton yarn wrapped 80 times around a 3½in width piece of card. (Find out how to make a tassel here).
Trapunto quilted pouch: Step-by-step tutorial

You will need:
- Print fabrics: Two (2) 10in x 7½in
- Lining fabric: Two (2) 9in x 6½in
- High loft batting: Two (2) 10in x 7½in
- Cotton batting: Two (2) 10in x 7½
- One (1) 8in zip
Step 1
Lay the outer fabric on top of the high loft batting and tack or pin baste.
Step 2
Choose which parts of the design you would want to raise and carefully stitch around them. Kate stitched around the large moons of one panel and the flower shapes on the other.
Step 3
Continue preparing your panels as described in steps 6-8 of the technique instructions.


Step 4
Place one outer panel right side up. Place the zip right side down, centring along the top edge.
Step 5
Layer one lining piece right side down on top. Sew into position using a zipper foot. Press away from the zip.
Step 6
Repeat the process in steps 4-5 to sew the remaining outer panel and lining piece to the other side of the zip.
Step 7
Topstitch neatly along each side of the zip.

Step 8
Open the zip at least halfway. Refold the panels so the two outer panels are RST, and the two lining panels are RST. Pin or clip around the outer edge.
Step 9
Sew all the way around the outer edge, leaving a turning gap in the bottom of the lining, backstitching at each end.
Step 10
Turn the pouch right side out through the gap in the lining.
Step 11
Hand stitch the gap closed and push down inside the pouch to finish.

Want to take your trapunto sewing skills a step further? The Daisy Eiderdown by Jo Colwill is a delightful quilt – each flower head is appliqued and padded out with trapunto for a buoyant, sumptuous feel. Find both in Today’s Quilter issue 52 which can still be bought as a digital edition.
Add texture to your projects with trapunto quilting
Trapunto quilting is a brilliant way to draw attention to elements of your favourite print fabrics, or add texture and interest to a solid background fabric. It’s also perfect for making a wholecloth quilt with a twist. Our tutorial makes it super easy to get to grips with the technique so you can make it your own!
Try more quilting techniques like trapunto
If you’re feeling confident with trapunto quilting and are looking to grow your machine quilting skills, try our complete guide to free motion quilting – you’ll be finishing your quilts like a true pro before you know it!