Beginners Guide to English Paper Piecing Diamonds
Join us for a new class of Quilt School, our blog series featuring our favourite essential techniques to brush up on your patchwork skills. This week, we're in the mood for a spot of English Paper Piecing. Come join us! Our in-house technical expert, Sarah Griffiths, has all the basics for you paper-piecing newbies, plus top tips and tricks for more experienced EPPers...
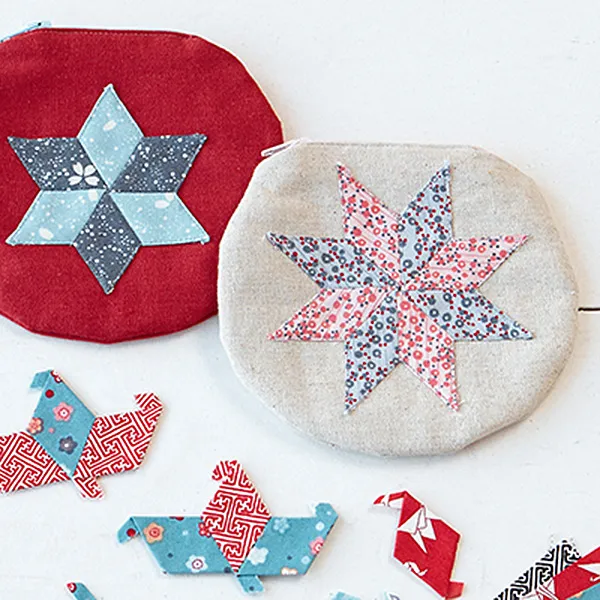
We'll show you how to sew a simple paper-pieced star from diamond shapes, then practise your new piecing skills and make a simple star coin purse. You'll soon be hooked on this easy method of piecing kaleidoscopic quilt tops, and if you're already a fan of English Paper Piecing, be sure to download our free hexagon templates too.
How to create English Paper Piecing Diamonds
Step 1
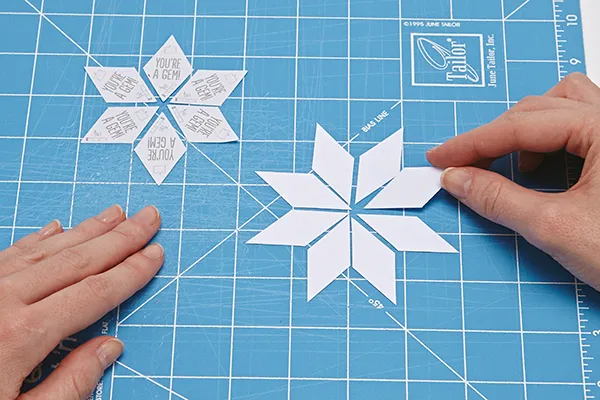
EPP Diamond pieces are measured not only by their side size, but also by the degree of the angle (in the pointy part of the diamond). Sometimes they are also referred to by the number of diamonds it takes to complete a star. The diamonds we’ve provided with this issue are all 60-degree diamonds, which go together to make a six-point star. The other most common shape in EPP is the 45-degree (eight-point) diamond.
You can also find other variations, including 30-degree (twelve-point) and 72-degree (five-point) diamonds.Whichever size you choose to work with, the method for using them is just the same.

Preparing diamond shapes
Step 1
Diamonds are one of my favourite shapes to cut out for EPP, because you can batch cut lots of pieces using a rotary cutter. Line up one side of your diamond with the edge of your ruler to measure the width of your pieces and add in to this measurement to get your strip size.
Cut several strips and stack them on top of each other. Line up your diamond in the centre of the strips and trim the fabric ¼in from the edge, using your quilting ruler.
Get basting!
Step 1

Using a washable glue pen is a very quick way to baste the fabric around the shape. Simply swipe your glue pen along one edge of the paper and fold the fabric down over it. Continue until all sides are attached. Leave the fabric ‘dog-ears’ that form at the points in place.
When it comes time to remove the paper, press your piece well, then unfold one glued edge and gently tug the template free. If you’re careful, you should be able to reuse your glued templates a few times.

Perfect points: To prevent your star from having a big bulky centre, baste all your diamonds in the same manner. I like to move in a clockwise direction, so the dog-ears will all be facing the same way. This ensures that the dog-ears will all nest nicely in a circle, reducing the centre bulk.
Assembling pieced diamonds
Step 1

You can also baste the fabric around the shape using thread to corner tack your fabric. With your template centred on the fabric, fold one edge over the template. I like to secure this first edge with a binding clip, but you could also pin in place. Fold the next side down and secure with a small stitch in the corner, going through the fabric only. Move to the next side and repeat. Keep going until you get back to your first corner. Stitch through this corner again and knot off your thread.
It may be time-consuming, but the paper pieces will easily pop out once you’ve sewn all the edges.

Step 2
Once your pieces are basted, start sewing them together one pair at a time. With two diamonds held right sides together, stitch along one matching edge. I like to start from the centre (non-dog-eared corner) of the diamond and stitch down to the point. When you reach the extra dog ears, push them away from the side you’re stitching to finish the point.
TOP TIP: Try to break up any design into sections instead of always stitching single pieces. This will help to remove difficult seams as well as letting you sew longer sections before knotting off your thread.
Step 3
To stitch a star, sew your diamonds into two halves. Then join the halves together, matching the centres. This will save you from having to tackle a difficult inset seam, causing a small hole in the centre.
I like to secure my two halves with some binding clips so they don’t move around too much while I’m sewing across the seam. Make sure you are only sewing through two diamonds at any one point, and push the dog-ears out of the way while you navigate the seam.
Step 4
Once all four edges of a diamond have been sewn, you can remove that paper piece. Once you’ve finished sewing all your shapes, you can remove the outer pieces as well. Give your piece a good press before removing the outer papers so that your seam allowances remain folded under. When appliquéing pieced diamonds, keep the dog-ears in tact. As you reach an outer point, trim away a bit of excess, then fold the remaining ear under the point. Stitch down the outer edge to secure.
Get the hang of English Paper Piecing Diamonds
Mastering English Paper Piecing Diamonds is easier than you think, and this tutorial will help you create perfectly precise, beautiful quilt pieces every time.
Make an EPP coin purse
Now you’ve got to grips with the basics, read our next step guide to use your new skills to make these sweet coin purses. Head to our Easy coin purse tutorial to find free English Paper Piecing templates for you to download and get started today.