How to sew patchwork squares together: speedy method
How to sew patchwork squares together: speedy method
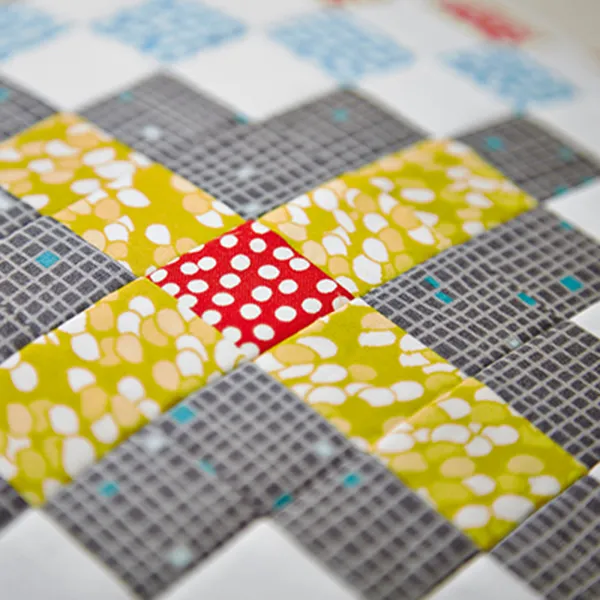
Want to sew patchwork but short of time? Our nifty method is the perfect time saver – we'll show you how to piece patchwork squares together quickly and accurately.
Welcome to the latest in our series of Quilt School free patchwork tutorials! Have you ever fallen in love with a pattern pieced from an intricate arrangement of squares, but were put off by all the seams? Try our speed-piecing technique.
This method is really handy for smaller patchwork pieces, making it a great timesaver if you're looking to use up pretty scraps from your stash. Scroll down and let's get started...
Discover more tutorials in our Quilt School series
In EPP, your seam allowances don't have to be perfect. Just make sure you have enough fabric to turn over the edges of your paper pieces.
How to speed-piece patchwork squares
Step 1
First, work out the size of your piece
Before we begin, you’ll some lightweight fusible interfacing, and to prepare a batch of fabric squares, all cut to the same size. Now take this square size and multiply by the number of rows to get the height of your piece. Multiply your square size by the number of columns to get the width of your piece. Use these measurements to cut a piece of lightweight fusible interfacing. For example, if you are working with 21⁄2in squares in a 6×4 grid, you would cut a 15in x 10in piece of interfacing. When sewn, this will give you a final size of 12in x 8in with 2in finished squares.
Step 2
Arrange your squares
With the sticky side of your interfacing up, lay your squares out on top. Try to make your rows and columns as neat as possible, making sure your fabric edges are just touching without overlapping. It’s best to do this step on top of your ironing board. If your piece is too big for the ironing board, just lay out the bottom section of your squares at this point.
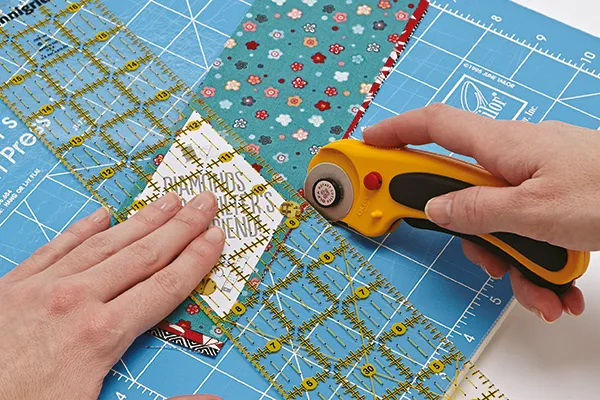
Step 3
Reach for your iron!
Using a pressing sheet, fuse your squares to the interfacing, following the manufacturer’s instructions. The pressing sheet will protect your iron, in case there are any bits of uncovered interfacing, while also keeping your fabrics from being scorched. Once this section of squares is in place, move your interfacing along to add squares to the next section. Work until your entire sheet is covered with rows of squares fused to the interfacing.
Step 4
Time for some speedy seam sewing
Fold the right hand row of squares down, right sides together. Sew along the fold using a 1⁄4in seam. Finger press the seam to one side, then press with the iron from the front. Fold the next row over, sew and press the seam to one side. Keep working until you have sewn all the rows in one direction. Give a final press from the front, making sure to get the seams as flat as possible.
Step 5
Now give it a go horizontally
Turn your piece so the sewn seams all run horizontally. Fold down the first row, sew and press as you did before, being careful to keep the horizontal seams all running in their pressed direction. Work across the piece until all seams are sewn. Press from the front working the seams flat and your piecing is complete!
[pullquote quote="Tip: This technique adds the interfacing as an extra layer to your piecing, so be sure to use a lightweight variety to avoid a stiff finish." /]
Try it now: How to sew a Fair Isle Squared cushion
Give a classic knitting style a patchwork twist using your new speed piecing skills. We’ll show you how with this free patchwork tutorial…
Practise your new speed-piecing skills with this patchwork squares cushion
You will need
Lightweight interfacing
251⁄2in square
Three hundred and seven (307) 1½in squares (see below for details)
Backing fabric, two (2) 17½in x 12in pieces
Cushion pad 18in square
Finished size
17in square
Notes
Seam allowances are ¼in throughout, unless otherwise noted.
Grey print is from the Indelible collection and the green print is from Chic Flora, both for Art Gallery Fabrics.
Cutting out
Step 1
For the cushion front cut your squares as follows:
One hundred twenty (120) white
Forty nine (49) red
Forty four (44) grey
Forty four (44) green
Thirty two (32) blue
Step 2
Cut an additional eighteen (18) squares in a random assortment. These will be used later for your binding strip.
Piecing the cushion front
Step 3
Create the cushion front using your squares and interfacing as described in the technique focus and referring to the layout diagram below.
Layout diagram: Fair Isle Squared cushion top. Arrange your fabrics row by row to keep track of colour placement.
Binding and finishing
Step 4
Sew your remaining squares into a long strip. Fold in half lengthwise, wrong sides together, to form a binding strip. Use this strip to bind one long edge of one backing piece, trimming any excess at the sides. Hem one long edge of the remaining backing piece.
Step 5
With your cushion top facing up, lay your bound backing piece right side down, aligning raw edges at the top with the bound edge in the middle. Layer your hemmed backing piece right side down, aligning raw edges at the bottom with the hem overlapping in the centre. Pin in place.
[pullquote quote="TIP: Colour placement. Experiment with colour before you commit! Use graph paper and coloured pencils to test out different designs before you start. You can also use knitting or cross stitch charts for inspiration." /]
Step 6
Sew all the way around your cushion. You may find it easier to use a walking foot to sew through all the layers. Trim your corners and turn right side out. Give a good press and pop over your cushion pad.
Senior Technical Editor, Love Patchwork & Quilting magazine
Sarah is our resident tech-expert, as at home whipping up quilt samples as she is tackling complex quilt-math with the aid of her trusty calculator, so she’s an essential part of Love Patchwork & Quilting team! She’s got a fabric stash that any quilter would envy (and yes, it’s a stash – not a hoard!) and an almost indecent number of projects on the go at any one time. She’ll often bring finished projects into work and wow the team with her sewing skills. Sarah’s our in-house American, originally from Ohio, she loves a good cup of tea (spearmint’s her favourite) and comes from a long tradition of family quilters. Find her on Instagram @spindleandshears
This website is owned and published by Our Media Ltd. www.ourmedia.co.uk