Create amazing ceramics using the easy coil pottery technique

Learn all about the coil pottery technique and find inspiration for pottery coiling projects.

Try our magazines – get 6 issues from just £9.99!

Published: April 12, 2024 at 2:19 pm

Coil pottery is one of the three main hand-building techniques used for making pots in ceramics – the other two being pinch pots and slab building, which you can find out more about in our beginners guide to pottery.

Pottery coiling is particularly good for those who like to take their time or don’t have access to a pottery wheel yet. But it’s not just for beginners. It’s a way to create interesting shapes and structural forms as well as being capable of making much larger pots.

undefined

What is coil pottery?

You can make pots of various shapes and sizes with pottery coiling and they’re all made via the same process. Clay is rolled into long cylindrical coils, which are then laid on top of a shaped base slab. You then continue adding more coils on top of the previous one, building up the walls of your pot one coil layer at a time.

While this approach requires more joins and blending, which can create an increased risk of cracks or fissures, coil pottery has many advantages over wheel-thrown pottery.

Due to the nature of arranging each coil one at a time, you can work more slowly, giving you more control when building and shaping your pot. It also allows you to create stronger and thicker walls, meaning you can make much bigger pots than you could make on a wheel.

It’s also a fun technique for getting kids into pottery too, as they’ll love rolling all of those sausage/snake-like coils. Plus you don’t need to have the full setup of a wheel and kiln – you can use pottery coiling techniques with air dry clay, practice with childrens modelling clay, or you could even try it with homemade salt dough.

We’ll now take a look at the basic steps for pottery coiling, followed by some interesting ideas and alternative approaches to this fun technique.

You will need:

  • Clay
  • Rolling pin or clay slab maker
  • Modelling tool or fork for scoring
  • Modelling tool or knife for cutting
  • Potters Rib tool (Optional)

How to make coil pottery

Step 1

Roll out the clay

Start by preparing a slab base. This is where you will need to make your first major decision – how big you want your pot to be! You want to roll out your slab to be roughly the same thickness as your coiled wall (or preferably a little bit thicker), so you’ll need a thicker slab for thicker walls and vice versa.

Once you’re happy with the thickness of your slab, use a round object like a plate to cut around with a knife to make a perfect circle (or alternative shape).

How to coil pottery step 1

Step 2

Prepare your clay coils

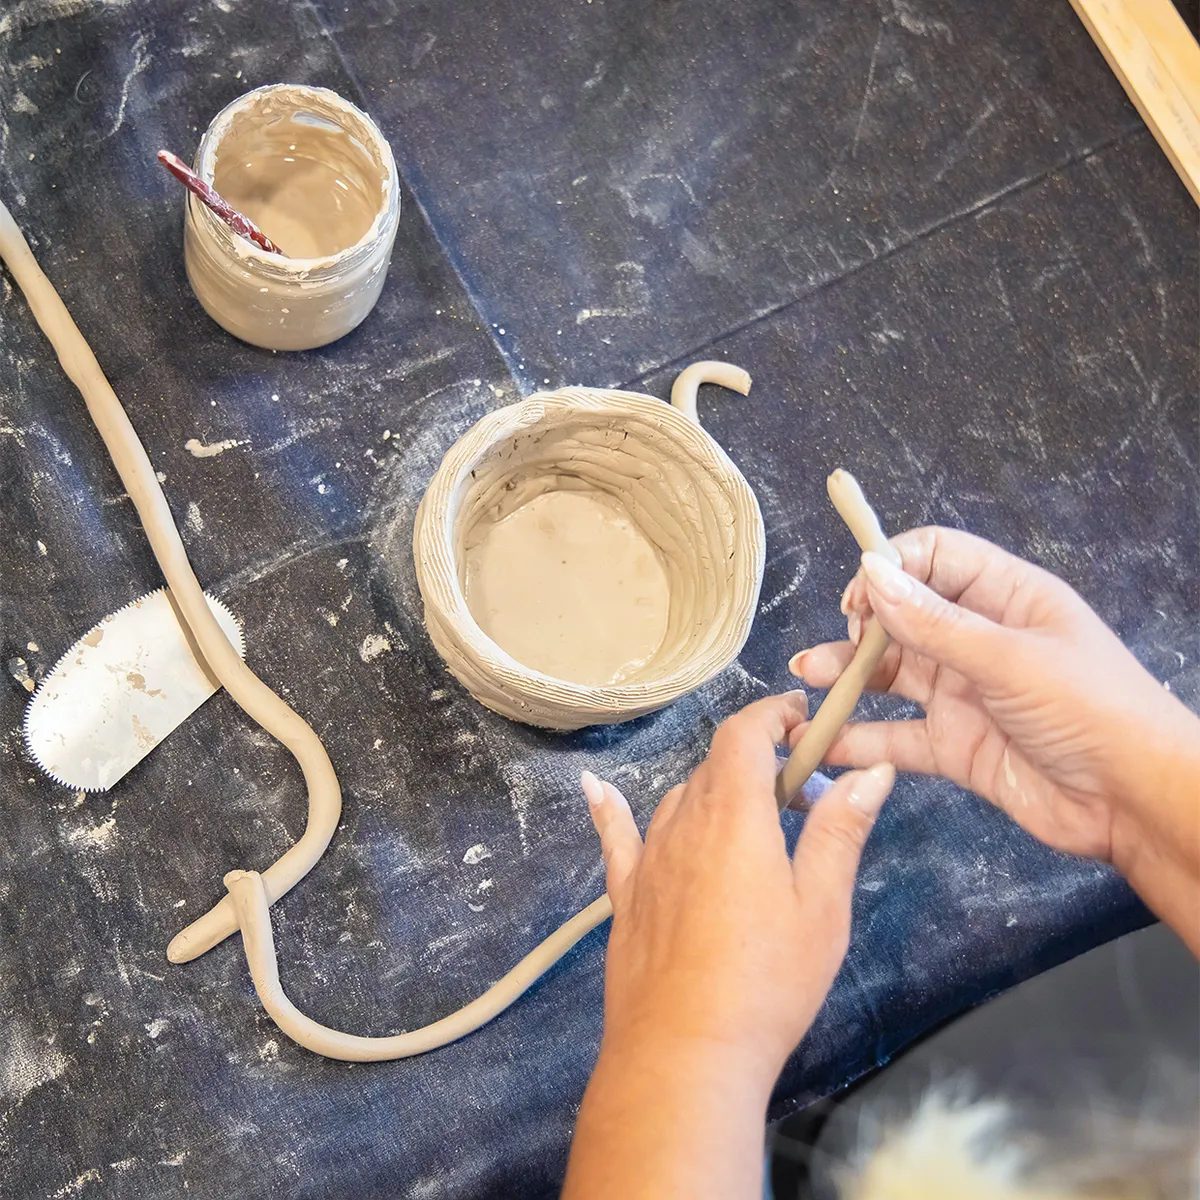
Next you need to roll out your coils. It is important that your clay is the right consistency – you want it to be soft and pliable without being wet or sticky.

Start by moulding your clay into a cylindrical sausage shape, then roll the shape on a lightly damped surface with both hands to create an even coil. If you’re lucky enough to have access to a pottery studio, clay coils can also be made with a clay extruder (a device that squeezes clay through a die/hole to create an even and consistent coil) . We’ve included a handy video below with tips on making perfect clay coils.

Coils will dry out quickly so it’s best to cover with a plastic bag/cling film once made. It’s also wise to put your base on a wooden surface that you are able to move about, as you may need to make the pot in stages.

https://www.youtube.com/watch?v=x1gVp7knw2Y

Step 3

Scoring the base to secure the coil

Next you need to ‘slip and score’ your base. Essentially, you’re creating texture by scoring around the outer edge of your base, and adding clay slip onto this texture will help to glue your coil to it when you join the two together.

You can use a modelling tool to create your scoring, or any other tool that will create a scratched effect on the surface such as a metal fork. If you’re using a particularly damp clay or air dry clay, you can sometimes just use a bit of water instead of slip to create your join.

How to coil pottery step 3

Step 4

Adding the first coil

Now arrange your first coil onto your base. You will want your coil to be long enough to go around the circumference of your base, so that you can cut off any excess and create a smooth join. If your coil is too short, it’s better to roll a more suitable one rather than trying to make it fit.

Arrange your coil and then overlay the excess on top or to the side, then remove enough excess so that your coil ends join while being lined up correctly on the base. Score the end of the coil and add a little slip to join the two ends together, then use your fingers to gently blend the clay together.

You want to press the coil onto your base so that it attaches to the slip and score, but not so much that you squash or flatten the coil.

How to coil pottery step 4

Step 5

Blending the coils to the base

Next you need to blend the inside of your coil to your base. It’s important to do this with the first coil to ensure that the base and coils have a decent join and don’t separate when drying.

You can use a modelling tool or a finger/thumb to pinch down and blend the coil into the base slab, then smooth off with your fingers or a rib tool. With this first coil, we’d advise blending on the outside too just to give you that extra join to the base.

How to coil pottery step 5

Step 6

Building up layers of coils

Now you just need to add more coils and build up the walls of your pot. Score and slip on top of the first coil and add the second coil on top. Remember to press down enough to get a good join, just don’t squash the coil or warp the shape of your pot.

How to coil pottery step 6A

If you want to keep your coils visible as part of your design you don’t have to blend from this point on. However, you will need to make sure that you’re very thorough with your slip and scoring to ensure you have an adequate join. Even if you want your coils to be visible on the outside, it’s still worth blending the inside if you intend on using it as any kind of vessel as it will help to give it a better seal.

How to coil pottery step 6B

Step 7

Layering your coils gradually to prevent sagging

Continue the process of adding an extra coil one layer at a time. You should try to join your coil ends at different positions around your pot, as if you join them all in the same location you create more risk of cracking or the coils prising apart.

Once you’ve added a few layers, it’s worth taking a break and giving the clay a little time to dry before adding more. The more layers you add the more weight and stress your coils will be under, so more chance of sagging. This is particularly important for larger and taller pots, which could collapse under too much weight.

You can also shape your pot as you go by gradually using longer coils to make it wider, or shorter coils to bring your pot inwards.Try not to change your shape too suddenly or dramatically as your joins may not hold.

How to coil pottery step 7

Step 8

Dry your pot ready for firing

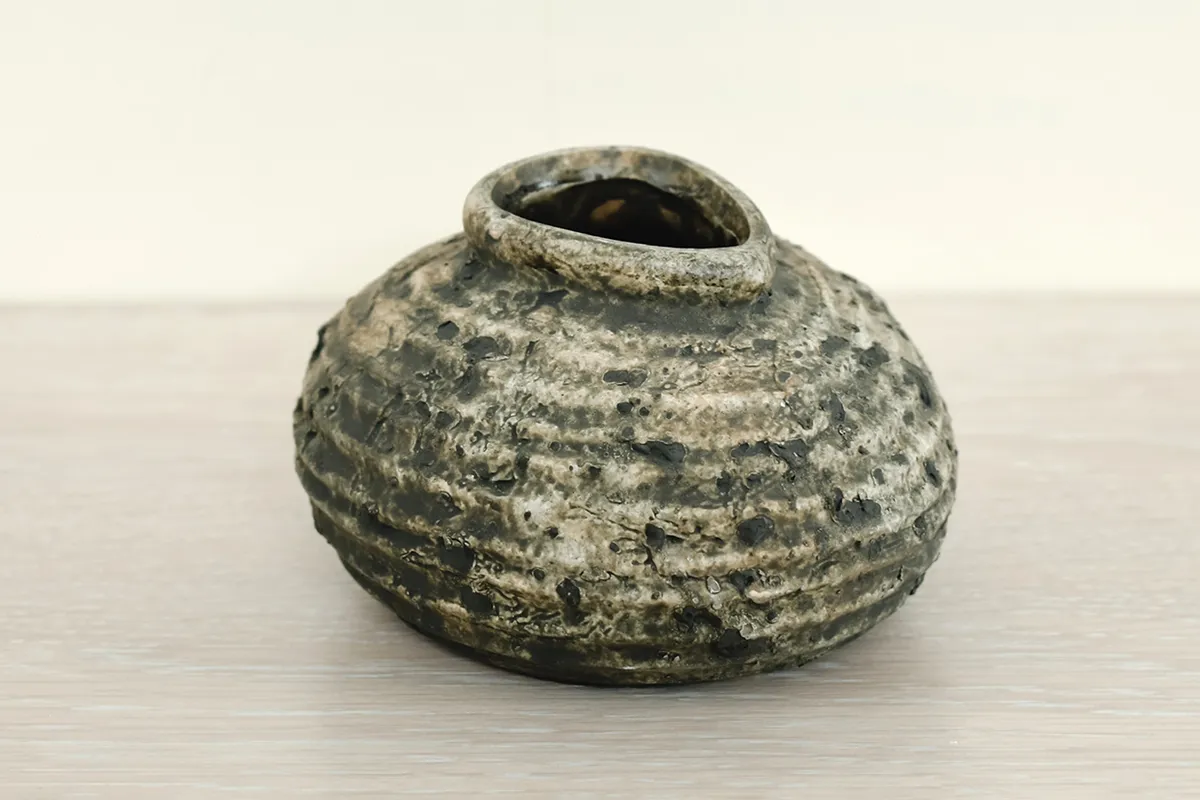
Once your pot is complete, dry slowly before bisque firing.

How to coil pottery step 8


Perfecting your coil pot

Once you’ve finished your pottery coiling, it’s time to add those finishing touches. Find plenty of inspiration for adding colour to your creations with these pottery painting ideas from Gathered


Coil pottery ideas

Now that you know the basics of how pottery coiling works, let’s take a look at some of the other variations and stylish ways to use this fun technique.

Making a coil pot using a mould

If you fancy creating a coil pot with more graduated angled walls, then the best way is to use a former or mould. As mentioned previously the weight of your coils combined with gravity can lead to your freestanding pot collapsing if you try to change angles too quickly.

However, if you use an object such as a bowl, you have a lot more scope to create interesting shapes and angles. As there is a support in place, you also won’t need to spend as long waiting for your clay to dry in between layer sections.

When making coiled pottery with a mould, you can either create your pot upside down on the outside of the mould, or the right way up by arranging the clay inside the mould. However you decide to make it, remember to cover your bowl in cling film or a similar material so that the clay doesn’t stick to the bowl.

coil pottery with a mould

Create interesting designs with your coils

As well as using a mould to create angled walls and give your pot support, it also gives you the ability to get decorative with your coils. Once you’ve got your base and first coil in place, you can start getting creative with your coil layout – they don’t have to just go round and round the circumference.

You can try rolling coils into spirals and then create a whole layer of them. Or you can even get rid of the idea of round layers completely and just freestyle your arrangement of coils – as long as you slip and score thoroughly enough then you can join a whole range of coil shapes together.

Coil pottery with a mould designs

Go large with flat coils

If you’re looking to make really large pots, then as we’ve discussed coil pottery is your best option. But layering all those coils is still going to be time consuming if you’re going really big!

That’s where using flat coils comes in handy. It still gives you that structural integrity that you get with regular coils, but as your flat coils will be wider you can build height much more quickly. It also gives you the potential for making more dramatic angles and shape changes by allowing your flat coils to dry to a leather-like consistency while building.

Flat coil pottery construction

Create your own custom shapes

There’s no rule to say that your coiled pottery has to be circular, so get creative with your shapes! Pottery coiling is just as suitable for square and rectangular shapes, for example, you could practise making a small butter dish or go even bigger and make a bread bin.

Similarly, there’s no reason why your pot has to be just a single vessel either! You can use coils to make walls or compartments within your pot, or even to divide one pot into several like in this amazing artwork by Rebekka Guenther.

custom shapes pottery coiling

Mind the gap

You may have seen examples of pottery with decorative holes, and while this is generally done in the later stages via clay piercing, you can also achieve a similar effect with your pottery coils.

It’s important to give your coils that bit of extra time to dry when creating shapes that will be structural or load bearing, but as long as you don’t get too greedy with your gaps it can create a lovely effect – especially when used as a tea-light holder.

Pottery coiling with gaps

When to spin and when to use coil pottery

While both methods can be used to produce similar results, the main deciding factor over which technique to choose is the size of your pots. It’s tricky (although not impossible) to make particularly big pots on a potter’s wheel, as it can be difficult to spin walls thick enough to support the size. However, if you’re only making small pots then both methods have their own individual charms, and ultimately it’s down to personal preference which method you prefer.

Choosing a potter’s wheel

If you’re looking to go beyond coil pottery and take your ceramic skills to the next level, then make sure to check out the best pottery wheels with Gathered.