How to make a paper mache pumpkins
Create gorgeous autumnal pumpkins to spice up your Halloween decor this spooky season. Find out how to make a paper mache pumpkins.

Published:
Autumn is rolling in fast and we’re here for it! There’s nothing better than filling your home with gorgeous autumnal decor just in time for the Halloween season. 
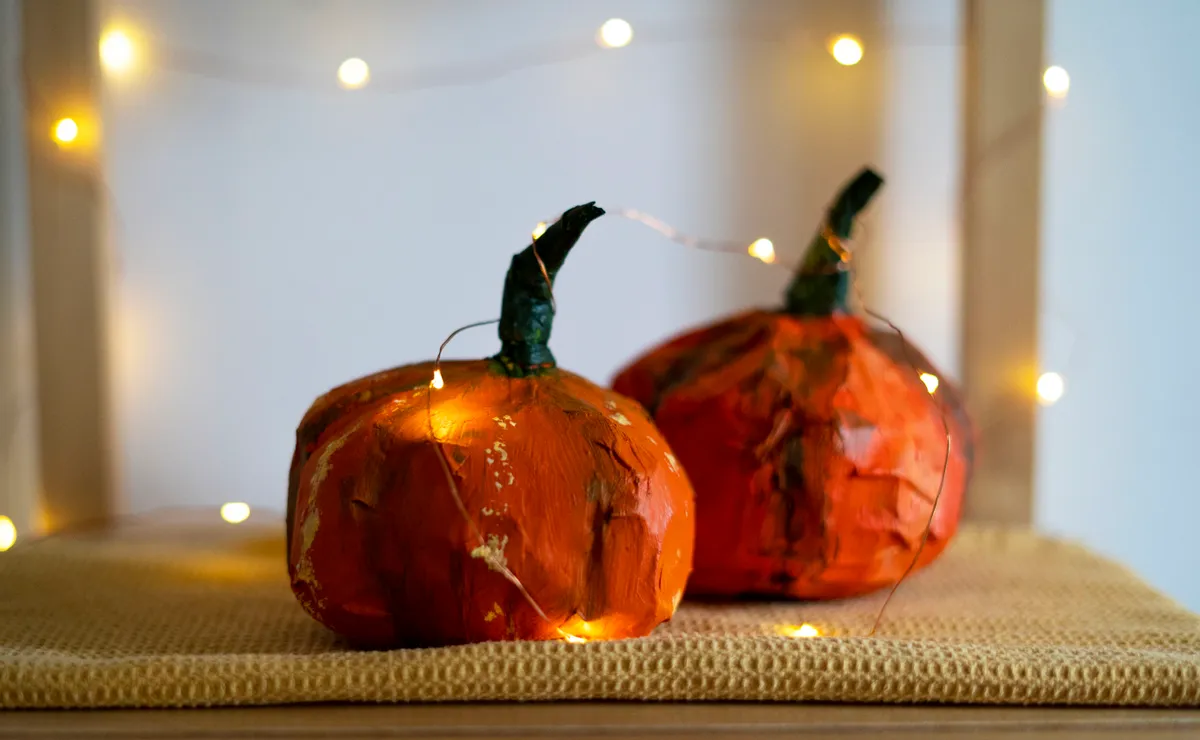
Learn how to make paper mache pumpkins with our easy video tutorial and step-by-step guide. Paper mache pumpkins are a fabulous project for all types of creators: the messy, the meticulous, and the bold. They come in all shapes and sizes, and they don’t have to be perfect – that’s their beauty, they are naturally quirky.
When first attempting to make our paper mache pumpkins, we tried with a balloon, but it become apparent that was too complicated and we ended up with a lot of burst balloons, not good! Instead, we decided to make this guide on how to make paper mache pumpkins without a balloon! We opted for some scrunched-up newspaper inside a plastic bag shaped with string. Then we covered the bag in paper mache and voila – a pumpkin ready to decorate. It is such an easy method and you can do it without the constant fear your balloon will pop at any second.
When it comes to decorating, we went for the original orange hues, but don’t forget pumpkins and squashes do come in all sorts of colours and styles, so you can make them as spooky or as cute as you like. You might even want to make a pink glittery paper mache pumpkin, it would certainly add a touch of whimsy to your Halloween display.
How to make a paper mache pumpkins video tutorial
If you love Halloween and need more DIY projects like this guide on how to make a paper mache pumpkin, we have plenty of crafts you can try like the easy DIY Halloween costumes, particularly helpful if you need a last-minute costume or our handy guide on how to make slime, create your spooky slimes. If you want to get the little ones involved try these amazing Halloween crafts for kids.

How to make a paper mache pumpkins step-by-step (with pictures)
You Will Need
- Newspaper
- PVA glue
- Water
- Acrylic paint
- String
- Sticky tape
- Plastic bags
- Paintbrush
Total time:
24hr drying time for paper mache
Step 1
Create a ball shape by wrapping 4-5 layers of newspaper on top of each other. You can create any size you’d like your paper mache pumpkins to be, ours are quite small in size!

Step 2
Use some sticky tape to stick the finish paper ball together, just to stop it unfolding.

Step 3
Pop the ball into a plastic bag of any kind and tie the top tightly, make sure you release any air trapped in the bag before it is tied.

Step 4
Trim the bag on the knot, leave a few inches which will be used to create the paper mache pumpkins stalk later.

Step 5
Cut a length of string (about half a metre) and tie the middle of the string onto the centre of the pumpkin.

Step 6
Wrap it around the body of the pumpkin as if you were tieing a ribbon of a gift. Pull tightly each time.

Step 7
Keep wrapping the string in opposite directions until you have 8 segments, then pull tightly to create the pumpkin shape.

Step 8
Tie the string at the base of the stalk to secure. Once secure, you can squeeze and move the pumpkin segments around to achieve your desired shape.

Step 9
Paper mache pumpkins time! To create the paper mache mixture we used 2 parts water to 1 part pva glue (it doesn’t have to be perfect). Then grab an old paintbrush and start layering your strips of newspaper.

Step 10
Keep laying newspaper until you are satisfied with the shape and all the plastic bag is covered. If needed you can leave to dry overnight and add another layer of paper mache (we only did the one layer though and it worked well).

Step 11
Wrap thin bits of glue covered newspaper around the stalk to give it shape.
Leave to dry overnight. Or if you don’t want to wait, you can speed it up the drying process with a hairdryer on low heat.

Â
Step 12
Grab your paints. You are going to want to mix up yellow paint with 1-2 drops of red paint (depending on the shade of orange you want) or any other colour you decide to use. Why not do a bit of experimenting with your colours before you get started?

Step 13
Add any paint details you like. We added darker green lines to accentuate the indents on the pumpkin and lighter yellow to brighten the outer edges.

Â
Step 14
Paint the stalk green, we went back later and painted a darker green than the one in the photo which we think works better. And that’s it! You’ve created your first pumpkin.


We hope you loved our guide on how to make paper mache pumpkins and were inspired by this spooky season. If you’re a sucker for Halloween like we are, you could try out these DIY Halloween decorations, if you want to truly give your home a creepy makeover! If you loved these paper mache pumpkins but want more of the real thing, we’ve included this fabulous guide on how to carve a pumpkin, which shows you how the pros do it. There are lots more you can get the little monsters involved in also, try these Halloween papercrafts where you’ll find loads of projects to start today. If you want to try a new craft, now is the time, we have lots of beginner crochet patterns available for Halloween, try these cute crochet spider web pattern, or the amazing free crochet bat pattern.