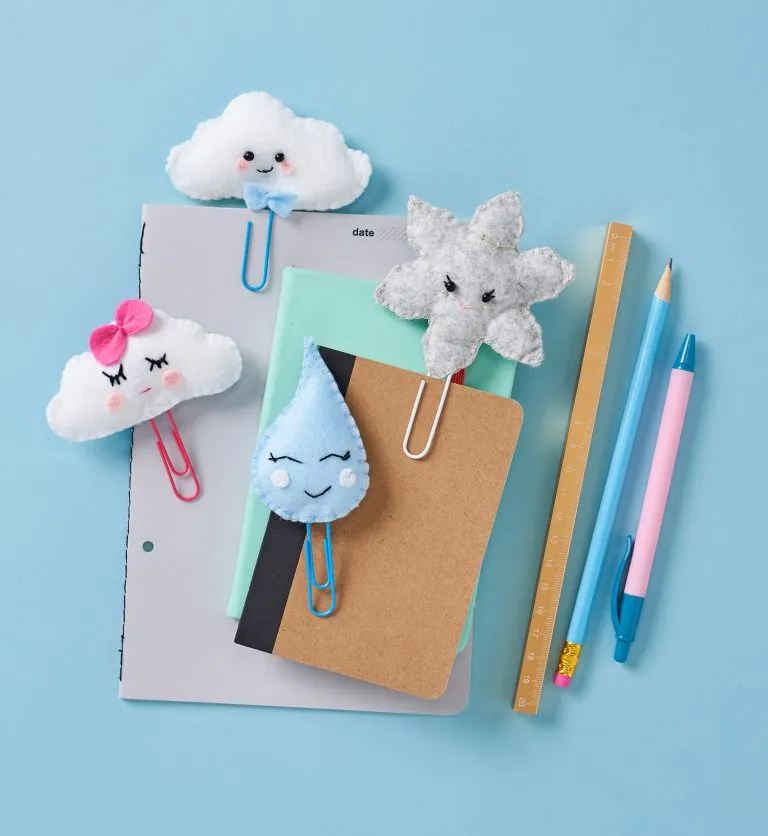
How to make the raindrop paperclip
Step 1

Print out the templates. Cut out the main template piece and both of the cheek templates.
Step 2

Place the main template piece onto the light blue felt, pin it in place and cut around it to create a raindrop piece. Do this twice to create two raindrops.
Step 3
Place the circle templates onto the white fabric, pin them in place and cut around them to create two cheek pieces.
Step 4

Take three strands of black embroidery thread and embroider the face onto one raindrop piece. Use backstitch to create a mouth.
Step 5

Place the white circle pieces of felt on the same side of the raindrop piece, pin them in place and secure them in position using a straight stitch with the white embroidery thread.
Step 6

Add a dab of glue to the paperclip and stick it to the back of the raindrop piece you’ve just added a face to.
Step 7
Place both raindrop pieces wrong sides (WS) together, secure them in place with some pins, and blanket stitch around the edges with the light blue embroidery thread to secure them together. Leave a 2.5cm (1″) opening on one side to insert the polyester filling.
Step 8
Stuff the raindrop with polyester filling and use blanket stitch to sew up the hole.
Snowflake paperclip
Step 1

Print out the templates. Cut out the snowflake template piece, place it onto the grey felt, secure it with pins, and cut it out. Do this twice to create two snowflakes. Then cut out the circle templates, place them on the white wool felt, pin them in place, and cut out two cheek pieces.
Step 2

Use the black embroidery thread to secure the eyes onto one of the grey snowflake pieces. Use three strands of black embroidery thread to embroider eyelashes onto the felt.
Step 3

Take three strands of light pink embroidery thread and backstitch a mouth onto the right side (RS) of the same piece. Take three strands of silver embroidery thread and straight stitch two cheeks onto the RS of the piece. Then take another length of silver embroidery thread and create a straight stitch, looping back across it with another straight stitch, and securing these in place with couching stitches to create a crown.
Step 4
Use glue to secure the paperclip to the wrong side (WS) of the piece of felt.
Step 5
Place both pieces of felt WS together, pin together and blanket stitch around the edges, leaving a 2.5cm (1″) opening to add filling.
Step 6
Stuff the snowflake with polyester filling and blanket stitch to close.

Cloud paperclips
Step 1

Blue cloud
Print out the templates. Cut out the cloud template, plus the bow tie if you’re making the blue cloud. Cut out two of the circle templates as well. Place the bow tie template onto the light blue felt, pin it in place and cut out a piece from the felt.
Pink cloud
Print out the templates. Cut out the cloud template, plus the bow if you’re making the pink cloud. Cut out two of the circle templates as well. Place the bow template on the bright pin felt, secure it in place with a pin and cut around it.
Step 2
Place the cloud template on the white felt, pin it in place and cut around it. Do this twice to create two cloud pieces. Place the circle templates onto the light pink felt, pin in place and cut out two circles.
Step 3
Place the circles on a white cloud piece, pin in place and use straight stitch to secure them.
Step 4
Blue cloud
Use black embroidery thread to secure the eyes in place on the same cloud piece. Take three strands of black embroidery thread and use backstitch to create a mouth.
Pink cloud
For the pink cloud, use there strands of bright pink embroidery thread to create a mouth with a straight stitch, and use three strands of black embroidery thread to create eyes.
Step 5

Blue cloud
Take the blue bow tie piece and tie it in the middle with light blue embroidery thread to form a bow tie shape. Sew it onto the cloud piece you’ve added the face to.

Pink cloud
Take the pink bow piece and tie it in the middle with bright pink embroidery thread to form a bow shape. Sew it onto the cloud piece you’ve added the face to.
Step 6

If you’re making the blue cloud, place a dab of glue on the blue paperclip and press it onto the wrong side (WS) of one of the cloud pieces. Do the same for the pink cloud, but using a pink paperclip.
Step 7
Place both cloud pieces WS together, pin in place and blanket stitch around the edges using white thread. Leave a 2.5cm (1″) opening. Fill the cloud with polyester filling and blanket stitch to close.