DIY felt Christmas decorations

Sprinkle some magic on your tree with Sabina Gibson’s DIY felt Christmas decorations.

Try 6 issues of your choice of craft magazine from just £9.99

Published: November 8, 2021 at 1:00 pm

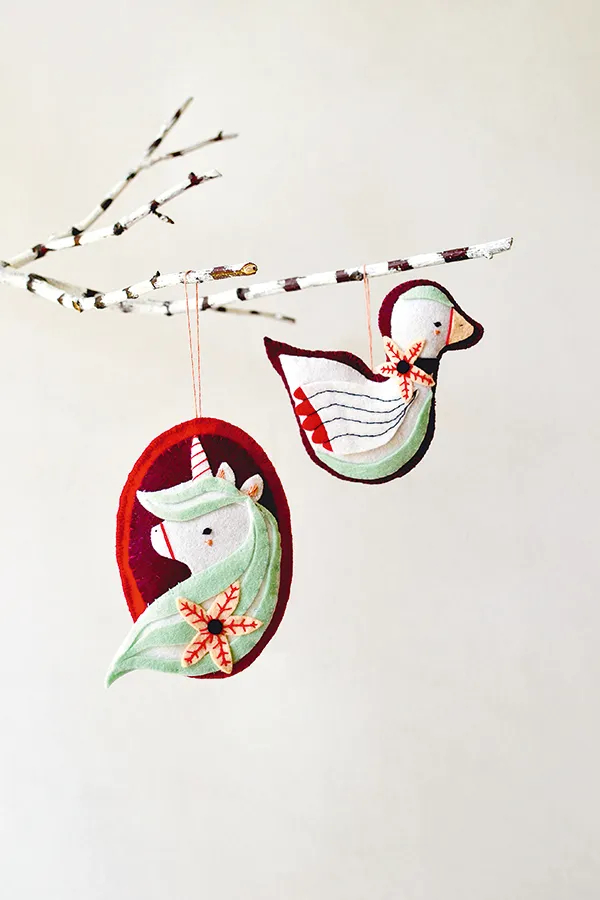
Here’s an unlikely alliance of characters come to spread the Christmas cheer – a traditionalist goose, and a unicorn for those who fancy a bit of extra magic! DIY felt Christmas decorations have never been so cute and it's all thanks to Sabina Gibson! For our DIY felt Christmas decorations we used an unexpected combination of fresh pastels and deep plummy tones which really bought creatures to life, but of course, you can switch the palette up how you wish, and add whatever stitches or accessories you fancy. Make yours in felt which matches your Christmas decor or fits in with this year's Christmas trends. We can imagine these nestles on the tree among all your other handmade embroidered Christmas decorations or adorning the front of your own DIY Christmas cards. Top tip: the flower template is a little large, making it easier to cut – we made a smaller version for the goose and a larger one for his legendary buddy. If you need a little help sewing you're DIY felt Christmas decorations head to our sewing for beginners and library of embroidery stitches. Now it's over to Sabina and her DIY felt Christmas decorations.

Materials

  • Wool felt in white, red, mint, plum, peach and navy
  • Embroidery floss in white, red, mint, plum, navy and black
  • Yarn or cotton cord
  • SuperGlue or fabric glue
  • Polyester stuffing
  • Templates from Mollie Makes issue 59

DIY felt Christmas decorations

You will need:

  • Felt
  • Thread
  • Stuffing

Step 1

diy felt christmas decorations step1b_retouch

Trace and cut the templates, starting with your white pieces. These will serve as the base for both the unicorn and the goose. Layer them as shown in the photo, starting with the body, then the smaller parts over the top.

Trace the pattern onto the fabric facing in the opposite direction to how you’d like your character. This way, your pencil won’t be visible.

Step 2

diy felt christmas decorations step2ab_retouch

Now add your secondary, coloured shapes – the mint mane and peach flower for the unicorn, and the mint head and chest, red wing accent and peach flower for the goose.

When adding the mane, first cut the full shape then cut contouring strips into it as shown, to create waves. For your goose, tuck the red wing detail under the main wing, then layer the mint parts, beak and neck. Finally, add the flower shapes to both animals.

Step 3

diy felt christmas decorations

Time to secure all your felt pieces. Pin them in place, then apply a very small amount of glue under each piece to secure each layer together. A good trick here is to take a pin and dip it into your tube of glue, then brush it underneath each piece to avoid disrupting your pattern.

Step 4

diy felt christmas decorations step4ab_retouch

Now the main form of your characters are bonded you’re ready to apply them to the backing. Place your unicorn head over the plum oval. Her hair should flow off the edge.

The goose requires an additional step. Place it on the plum felt and trace around the shape, leaving 3 about a 1cm border. Don’t worry about being perfect – you can always go a little bigger and trim down if needed. cut this shape out twice. Now place your goose character over just one of the plum pieces.

Step 5

diy felt christmas decorations step5_retouch

Next, stitch your animal form to the purple backing using white embroidery thread.

When you arrive at the mint portion of either animal (the goose’s chest for example, or the unicorn’s mane) you may wish to switch your thread colour to make the stitches less visible. Follow up by stitching around any of the coloured layers you feel need extra securing.

Step 6

diy felt christmas decorations step6bb_retouch diy felt christmas decorations step6c_retouch diy felt christmas decorations step6cc_retouchNow you’re ready to start embroidering. For the unicorn, add a red, diagonal stripe to her horn, resembling a candy cane. For the goose, add the wing detail using navy thread. Start your line between each scallop and follow the contour of the wing in a curved line that ends at the base of the wing. For the flowers, start from the centre and work your way out, creating lines in each petal. Next, stitch in the ‘arrows’, starting at the base of each line and working your way out, as before. Finally, create almond-shaped eyes on both creatures using black thread. Finish by adding a little blush to the cheeks, some pink in the unicorn’s ears and a red stripe to the base of the goose’s beak and unicorn’s snout.

Step 7

diy felt christmas decorations step7_retouch

Now your main work is finished, it’s time to create the base for your ornaments. Place your unicorn piece over the large red oval. Stitch together using matching plum thread. Switch up your colours when you arrive at the mint portion of the hair.

Step 8

Cut the coloured yarn or cord of your choice to your desired length then create a loop, tying it off with a knot at the bottom. Turn your ornament over and sew it to the back. This will be to hang your ornament from.

Step 9

diy felt christmas decorations step8

Now you need to create a little ‘pocket’ to stuff. Take your final backing pieces (the purple goose shape and the unicorn’s red oval), layer them together and start stitching, beginning at the top and working your way around. Be sure to leave a little gap for stuffing.

Step 10

diy felt christmas decorations step9

Now you’re ready to stuff your ornaments. Gently put just a small amount of stuffing into the pocket you’ve created. Try to avoid over-stuffing, as this can create a buckling effect at the seam. Once you’re done, slipstitch the opening closed and hang your new ornaments from your tree.

We hope you enjoyed making Sabina’s project. Share a picture of your DIY felt Christmas decorations with us on Instagram using #molliemakers, and don’t forget to subscribe to Mollie Makes to get creative inspiration delivered to your door every month! For more fun Christmassy projects check out our crochet Christmas decorations and free Christmas knitting patterns.