Make our free mountain quilt pattern
Get straight to the point with Gracey Larson's bold, free mountain quilt pattern. This beautiful mountain sunset design is made up of bright solids, geometric shapes, and plenty of easy Corner-square Triangles!
This project is great because no templates are needed. Simply sew your mountains using traditional piecing. Keep scrolling for this mountain quilt tutorial...

What you need to make our free mountain quilt pattern
Materials
- Light aqua fabric (Bleached Denim): ¾yd
- Light pink fabric (Ballerina): ½yd
- Light yellow fabric (Sunshine): 1yd (1⅝yds if K is cut as one piece)
- White fabric (Riley White): 1yd
- Dark yellow fabric (Honey): one (1) fat quarter
- Darkest blue fabric (Denim): ¾yd
- Second darkest blue fabric (Cadet): one (1) fat quarter
- Dark teal fabric (Cornflower): 1½yds
- Periwinkle fabric (Periwinkle): ½yd
- Light periwinkle fabric (Boy Blue): 1yd
- Batting: 62in square
- Binding fabric: ½yd
- Backing fabric: 3½yds
If you're new to the world of quilting don't worry. We have a beginners guide to quilting as well as a how to use a sewing machine tutorial.
Finished Size 54in square
Notes Seam allowances are ¼ in throughout, unless otherwise noted. Press seams open throughout. CST = Corner-square Triangle. WOF = width of fabric. RST = right sides together. Quilted by Annie Seaboch ( Annie Leigh’s Sew Happy on Facebook)
Fabrics Used Solid fabrics are all from the Confetti Cotton collection by Riley Blake Designs
Head over to our quilting tips for more expert advice.

How to make a mountain quilt
Cutting out your free mountain quilt pattern
Step 1
From the light aqua fabric cut:
- One (1) 7¼in x 9½in (A).
- Two (2) 5in squares (B).
- One (1) 2¾in x 11¾in (C).
- Four (4) 2¾in squares (D).
- One (1) 9½in x 27½in (E).
Step 2
From the light pink fabric cut:
- One (1) 7¼in x 32in (F).
- (1) 2¾in x 9½in (G).
- Four (4) 2¾in squares (H).
- One (1) 2¾in x 5in (I).
- One (1) 2¾in x 7¼in (J).
Step 3
From the light yellow fabric cut:
- One (1) 7¼in x 54½in (K)
Note: Can be cut as a single strip or pieced to save yardage.
- One (1) 5in x 14in (L).
- Seven (7) 5in squares (M).
- Two (2) 9½in squares (N).
Step 4
From the white fabric cut:
- One (1) 7¼in x 11¾in (O).
- Six (6) 5in squares (P).
- One (1) 7¼in square (Q).
- Two (2) 5in x 9½in (R).
- One (1) 5in x 14in (S).
- Two (2) 2¾in x 9½in (T).
- Two (2) 9½in squares (U).
Step 5
From the dark yellow fabric cut:
- One (1) 9½in x 18½in (V).
- Two (2) 5in squares (W).
Step 6
From the darkest blue fabric cut:
- One (1) 9½in x 20¾in (X).
- One (1) 2¾in square (Y).
- One (1) 9½in x 23in (Z).
Step 7
From the second darkest blue fabric cut:
- One (1) 9½in x 16¼in (AA).
- One (1) 2¾in square (BB).
- One (1) 5in x 18½in (CC).
Step 8
From the dark teal fabric cut:
- One (1) 9½in x 14in (DD).
- One (1) 9½in square (EE).
- One (1) 14in square (FF).
- One (1) 9½in x 23in (GG).
- One (1) 18½in square (HH).
Step 9
From the periwinkle fabric cut
- One (1) 14in square (II).
- One (1) 14in x 18½in (JJ).
Step 10
From the light periwinkle fabric cut:
- One (1) 18½in square (KK).
- One (1) 5in x 14in (LL).
- One (1) 14in square (MM).
- One (1) 5in square (NN).
Step 11
From the binding fabric cut:
- Seven (7) 2¼in x WOF.
Piecing the top section
Step 1
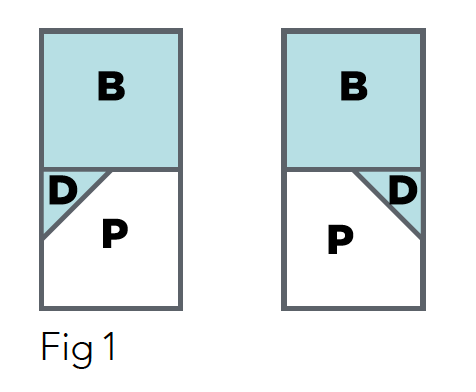
Join a D CST to the top left corner of P. Join B on top. Repeat to make a second unit, with the D CST in the top right corner of P (Fig 1).

To sew a Corner-square Triangle (CST), place a square in the corner of a fabric piece, RST. Draw a diagonal line on the wrong side of the square, referring carefully to figures for direction. Sew along the diagonal line. Trim the seam allowance to ¼in and press the piece open to complete.
Step 2

Join a D CST to both top corners of O. Join C to the top (Fig 2). Join the two units from step 12 to either side.
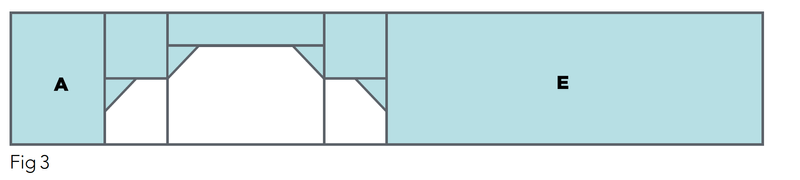
Then join A to the left and E to the right to make the top row (Fig 3).
Step 3

Join an H CST to the top left corner of R, then join G to the top (Fig 4). Join an H CST to both top corners of Q (Fig 5). Join an H CST to the top right of P, then join I to the top (Fig 6).
Step 4

Join together the three completed units from step 14. Then join F to the left and J to the right to make the centre row (Fig 7).
Step 5

Join the top row above the centre row. Then join K to the bottom to complete the top section of the quilt (Fig 8).
Piecing the bottom left section
Step 1

Join an M CST to both top corners of R. Join M to the left, then join L to the top of this section (Fig 9).
Step 2

Join an M CST to both top corners of V. Then join a U CST to the bottom right corner (Fig 10).
Step 3


Join an N CST to the top right corner of U (Fig 11). Join this together with the units from steps 17–18 to create the sun unit (Fig 12).
Step 4

Join a Y CST to the bottom left corner of T. Join X to the bottom, then Z to the left side. Add an M CST to the top left corner, and a W CST to the top right corner. Then join a HH CST to the bottom right (Fig 13).
Step 5
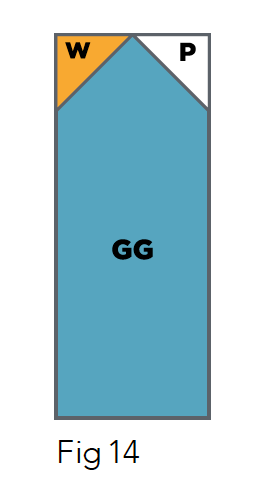
Join a W CST to the top left corner of GG, then join a P CST to the top righthand corner (Fig 14). Join this to the left side of the unit from step 20 above.

Then add a KK CST to the bottom right corner. This now completes the mountain peak unit (Fig 15).
Step 6

Join a P CST to the top left corner of JJ, then add an EE CST to the top right corner. Join an MM CST to the bottom left corner, then join LL to the bottom (Fig 16).

Join this to the left of the mountain unit from step 21. Then join the sun unit to the top to complete the bottom left section of the quilt (Fig 17).
Piecing the bottom right section
Step 1

Join a BB CST to the bottom right corner of T, then join AA to the bottom. Join CC to the right side and S to the top. Working one at a time, add an M CST to the top right corner, an N CST to the top left corner and an FF CST to the bottom left corner (Fig 18).
Step 2

Join DD to the bottom of the unit from the last step. Join an II CST to the bottom left corner. Then, add an NN CST, also to the bottom left corner to complete the bottom right section of the quilt as in Fig 19.
Finishing the quilt top
Step 1

Referring to the quilt Layout Diagram, join the bottom left and bottom right sections of the quilt, carefully matching seams. Then join the top section of the quilt to finish the quilt top.
Quilting and finishing your free mountain quilt pattern
Step 1
Cut the backing fabric in half across the width. Remove the selvedges and sew the two pieces together using a ½in seam. Press the seam open.
Step 2
Press the quilt top and backing well. Make a quilt sandwich by placing the backing fabric right side down, the batting on top, then place the quilt top centrally and right side up. Baste the layers together using your preferred method.
Step 3
Quilt as desired. Annie Seaboch quilted geometric lines in a repeating triangular pattern, to echo the sharp points of the mountain peaks. Trim off the excess batting and backing fabric and square up the quilt.
Step 4
Sew the binding strips together end-to-end using diagonal seams. Press the seams open and trim away the dog ears. Fold in half lengthways, wrong sides together, and press.
Step 5
Sew the joined binding strip to the right side of the quilt, creating a neat mitre at each corner. Fold the binding over to the back of the quilt and secure temporarily with pins or binding clips. Hand stitch or machine stitch in place around the edge to finish.
Use our free mountain quilt pattern to create striking bedding
Gracey Larson's gorgeous free mountain quilt pattern is a real showstopper and can easily become the focal point in any room. Whether you use it as a hanging tapestry, spread it across your bed as a standout quilt or hang it over the back of your sofa, its striking design is sure to impress all your friends and family.
Find your next quilting project
For more fun quilting projects, check out our best fabric panels for quilting round-up and our best Christmas quilt patterns.