Boost your sewing skills with these top tips for how to up your quilting game from our experts. In this post, Today's Quilter magazine share a few insider secrets for clever ways to speed up your quilting and avoid some common mishaps that happen to us all.
We've also included a section below these tips that's packed with some starter guides totechniques for cutting and sewing common patchwork shapes, from triangles to trapezoids. In this section you will learn more about...
- How to cut degree 45° angles
- How to cut diamonds
- How to cut trapeziods
- Half square triangle units
- Piecing triangles
- Dot to dot seams
- Y Seams
- Setting blocks on point.
Read on and let us know how you get on. We hope you find this article a useful resource for your quilt making. Have we missed a trick that you find really useful in your quilting? Leave a comment or tip at the bottom of this post and let us know.
8 Top tips for quilt making
Add a little extra to your quilt blocks
Instructions for cutting squares for triangles generally tell you to add 7/8in to the finished unit size. This does not leave any margin for error, so if you’re not confident in your ¼in seam or just like a little more breathing room when you work, try adding a whole 1in to the finished size, then trim to the correct unfinished size afterwards. It takes a little more time but can be worth the extra effort for accurate blocks. It makes the maths easier too!
Start smoothly & put those scraps to good use
Use small fabric offcuts folded in half as ‘leaders’ when starting a seam. Nudge your patchwork up against it as you would if you were chain piecing, and then continue to sew – this will prevent fabric corners getting chewed up and thread ‘bird nests’ at the start of the seam. End on a scrap too to help conserve thread – the same piece can be used over and over.
1. Pressing matters
Blocks with lots of seams or curves sometimes need a little extra help to make them lie flat. Pressing with starch can help, as well as using something heavy to make the fabric behave. Find a large heavy book and put it on top of your block immediately after pressing, while it is still hot. Leave to cool then remove the book for perfectly flat blocks.
2. Use graph paper to plan your quilts
Use graph paper not only to plan blocks and quilt designs, but to work out fabric quantities too. Take the usable width of fabric (WOF) – minus selvedges – and draw a rectangle to scale i.e 42 squares wide, for 42in for each fabric used. Physically draw in all the squares, rectangles and triangles needed for your blocks and then see at a glance how much yardage you need.
3. Hold off on your borders fabric!
Choose border fabrics after your patchwork is finished, especially when creating a scrappy quilt. Once all your blocks are made you may find the fabric you originally had in mind no longer works. Audition different options to find the best match. Don’t cut border strips until everything else is assembled, as this means you can measure your own patchwork and cut them the exact size you need, avoiding any discrepancies.
4. Speed up bulk cutting
When cutting lots of shapes the same size, try using masking, washi or ruler tape to highlight the appropriate markings on your ruler for quick identification.
5. Keep track of your foundation paper piecing
It is easy to get mixed up with fabric placement when foundation paper piecing, due to the back-to-front way of working. Writing fabric colour ie ‘background’ or ‘blue’ onto the paper can help ensure you place pieces in the right sections.
6. Joining rows? Start in the middle
When sewing long rows it is easy to create bowed seams. One way to keep these straight is by starting to sew from the middle of the seam to the edge, then rotating and sewing the other side from the middle out. Check seams are straight at regular intervals with your quilting ruler.
7. Get your log cabin in order!
When making Log-cabin blocks, it is useful to stack matching strips in piles laid out around the centre square as they appear in the block. This will help you make sure everything appears in sequence as expects and it is then easy to work around the block, picking the right-sized strip each time.
8. One block at a time
Quilts with lots of different units, such as frame or sampler quilts, can benefit from cutting and piecing one block at a time and keeping units in labelled piles for easy identification. This also gives you an opportunity to audition fabric combinations and check block sizes as you work.
Useful techniques for cutting patchwork
Add these essential skills to your quilting repertoire and you'll be making beautiful quilts for years to come.
Cutting 45º angles and shapes
Step 1
If you have a special template, tool or ruler for rotary cutting 45º angles, you can use that for cutting your strips and pieced panels accurately. If you only have a rectangular ruler check that it has 45º angle lines marked. Most rulers include 45º lines but if yours doesn’t, I recommend looking at a different brand.
Step 2
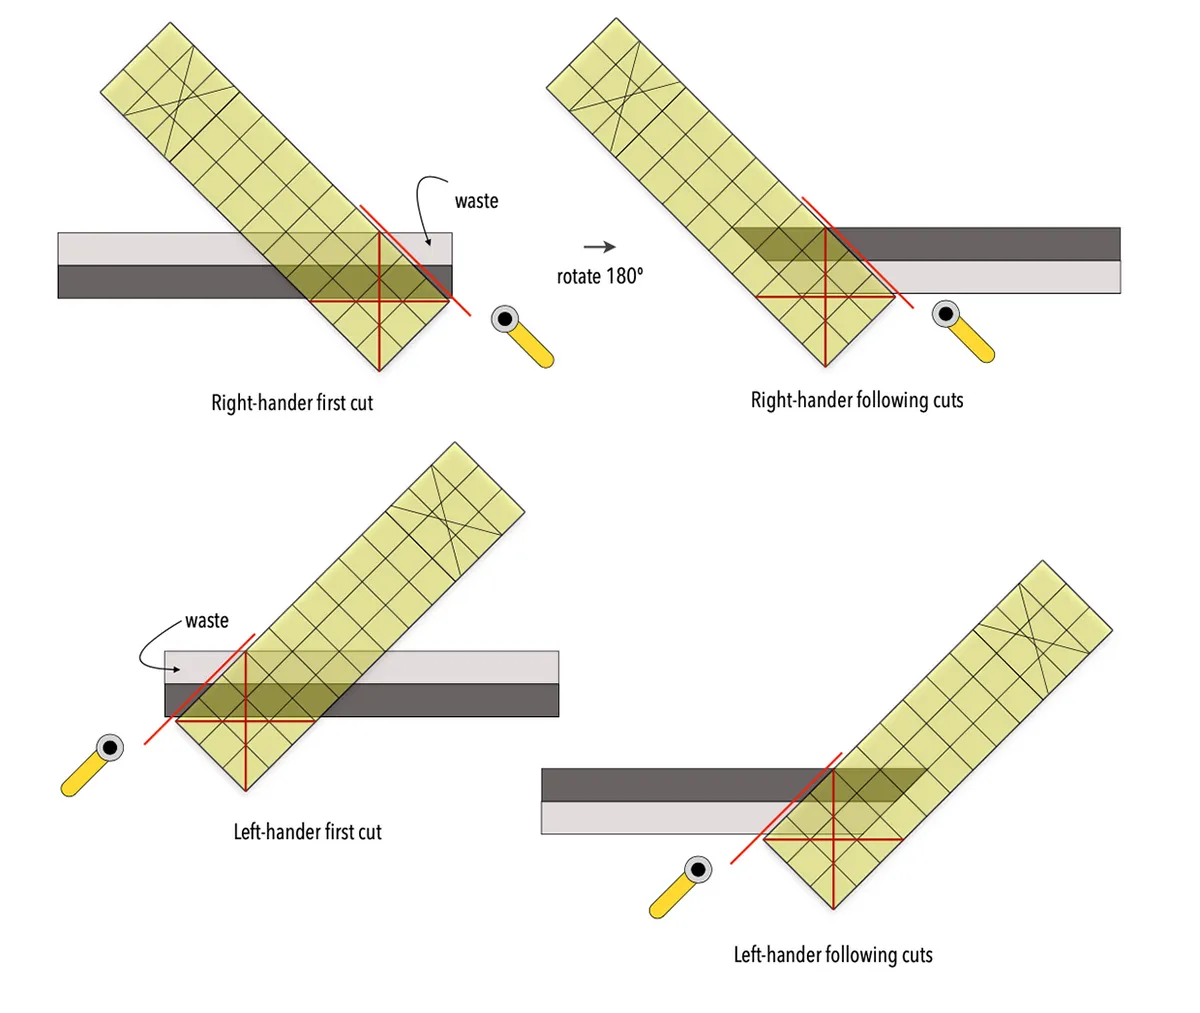
To make a 45º cut, align the strip (or strip panel) horizontally on your cutting mat.
Step 3
If you are right handed, tilt the top of the ruler to the left until the marked 45º line is aligned with the long edge of your strip (or a seam if cutting a panel). Left-handers need to tilt the top to the right.
Step 4
Slide the ruler along the strip until the cutting edge just clears the ends and cut off the waste triangle to make the first cut.
Step 5
Rotate the mat so that the freshly cut angle is now at the left for right-handers or at the right for left-handers.
Step 6
Tilt the ruler and again, align the 45º line with the long edge/seams and the correct width marking with the cut edge. You can now cut 45º shapes.
Cutting Diamonds
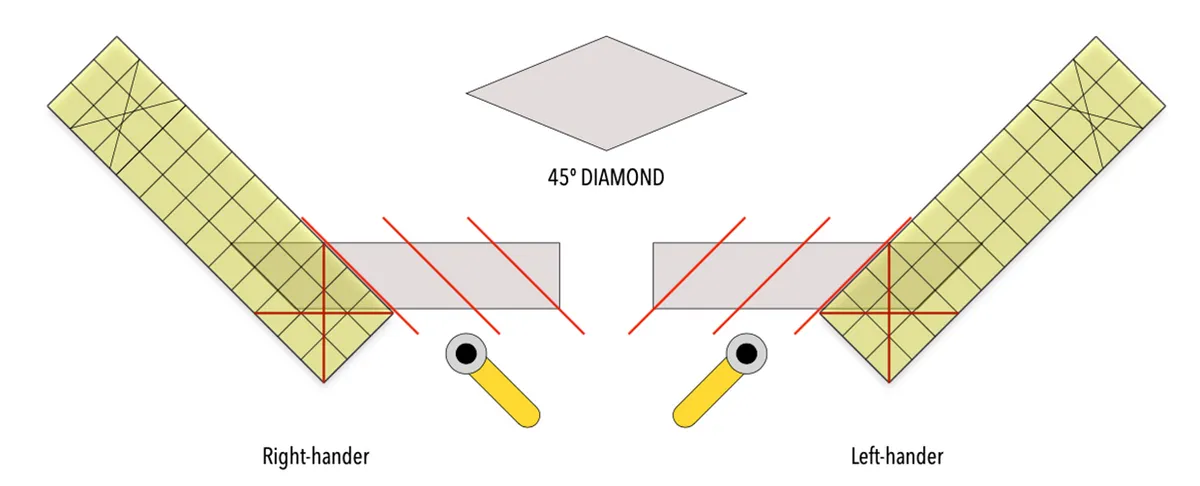
Diamonds have two pairs of sides that are parallel and all four sides are the same length. Diamonds are not ‘handed’ and are the same when flipped. For diamonds, the strip width will be the same as the cutting measurement.
Step 1
To cut 45º diamonds, make the first cut to the strip (or panel) as above and rotate so the cut edge is to the left for right-handers and to the right for left-handers.
Step 2
Align the 45º line with the long edge (or seam) and slide the ruler until the original cut edge is aligned with the correct measurement on the ruler, ie, for a 3” diamond, the first cut edge should be aligned with the 3in line on the ruler.
Step 3
Hold the ruler firmly and cut.
Step 4
Repeat until you run out of strip on the bottom edge.
You might also like: our guide to how to sew diamonds with English Paper Piecing.
Cutting trapezoids
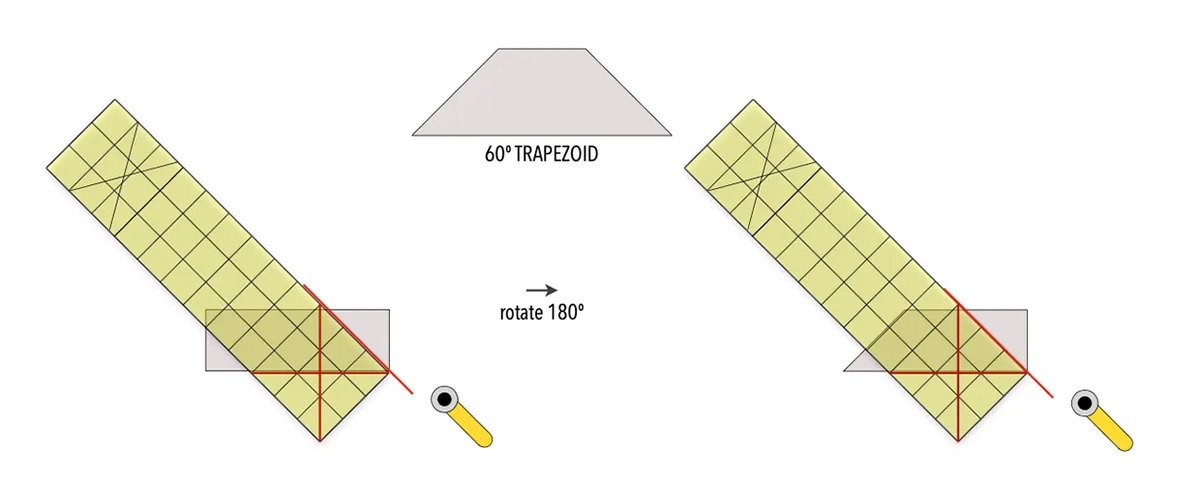
Trapezoids are four-sided shapes that look like triangles with one corner cut off; the trapezoids in this design have 45º angles at the bottom.
Step 1
The easiest way to cut them is to cut ordinary rectangles and then cut two facing corners off at a 45º angle. (You will have some waste triangles.)
Step 2
Be sure to mirror the cut corners or you will have a parallelogram!
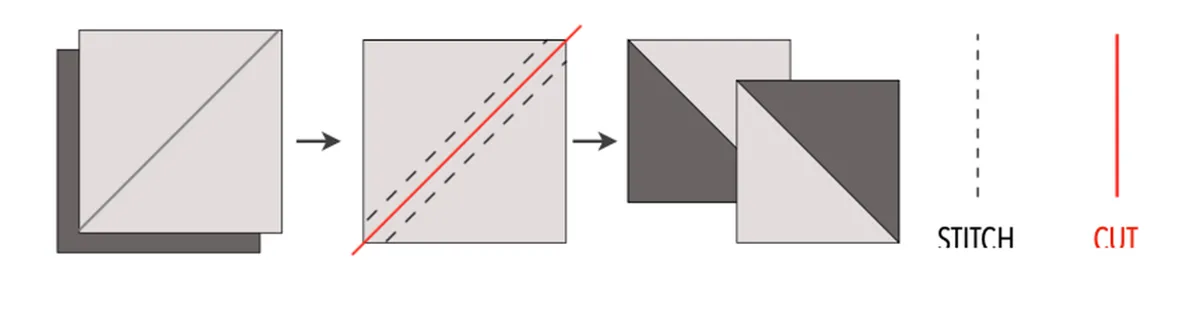
Making Half-Square Triangle (HST) units two at a time
For more detail on this technique, see our guide to complete step by step guide with photos of how to sew half square triangles.
Step 1
Take two squares and align them right sides together.
Step 2
On the lighter fabric square, mark a line diagonally once.
Step 3
Stitch a scant ¼in from this line on both sides. Cut apart on the line.
Step 4
Press seam towards the darker fabric, then trim and square up units if necessary.
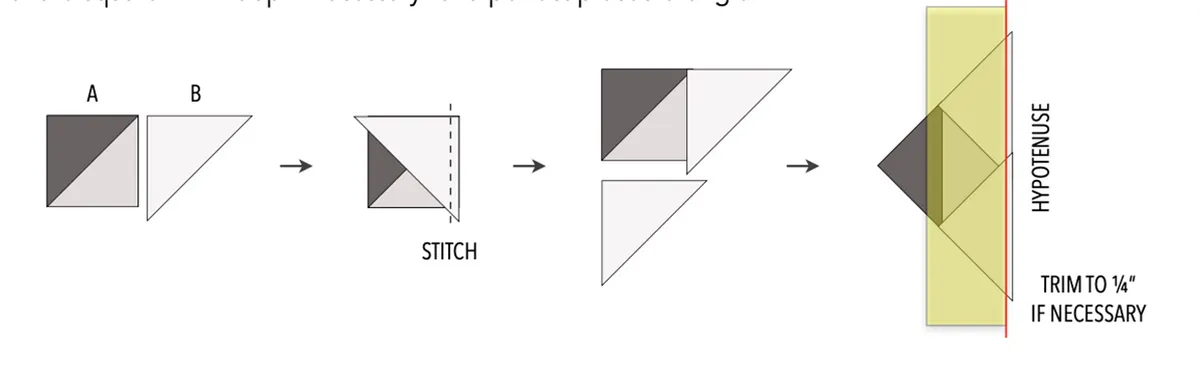
Pieced triangles
Using slightly oversized half-square triangles helps with accuracy when making pieced triangles, but also means it’s important to align them correctly when stitching the cut pieces together.
Step 1
Align the top edge of the square or square unit (A) with the top edge of the right angle on the cut triangle (B). The bottom corner will overhang the bottom edge.
Step 2
Flip the triangle over onto the square and stitch a scant ¼in seam.
Step 3
Press seam towards the triangle taking care to avoid stretching the bias edge.
Step 4
Repeat with the second cut triangle, again aligning the edge of the right angle on the triangle with the edge of the square.
Step 5
Flip over, stitch and press towards the triangle.
Step 6
Lay a ruler along the new hypotenuse (the bias edge opposite the square) – it should be straight and fall ¼in away from the point of the square. Trim it up if necessary for a perfect pieced triangle.
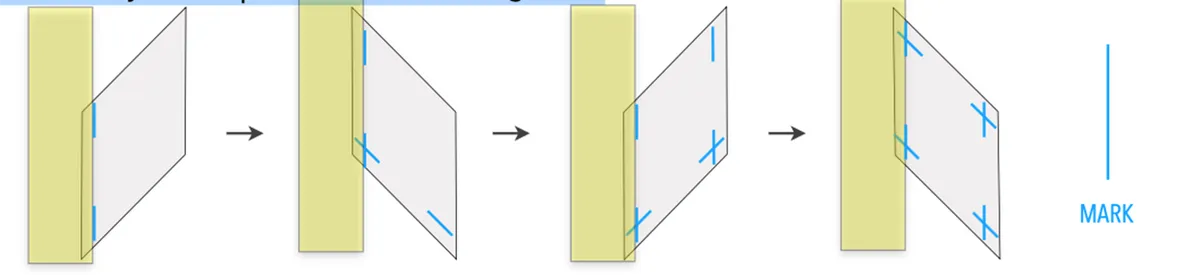
Dot-to-Dot Seams
Dot-to-Dot seams are used when sewing all the way to the edges of the seam would prevent proper stitching of the adjacent seams (as in Y-seams).
Step 1
For Dot-to-Dot seams, first mark the “dots” – the points at which the two seams will intersect – then stitch the seam, starting and stopping at the marked point, backstitching at both ends to secure.
Step 2
If you have a template or marking tool with holes to mark the dots for 45º angles, use that to mark the corner dots.
Step 3
If not, you can either make your own with template plastic, or use a small rotary ruler as shown. Mark accurately or the pieces will not fit together!
Y-seams (Set-In seams)
Y-seams are used to set a third patch into the acute angle where two other patches are sewn together. For full detail on this technique, please see our essential guide to how to sew set in seams.
Step 1
Mark the dots on all three pieces. Take the two patches that will create the acute angle (A & B) and pin directly through the dots, checking both sides are accurately aligned. Pin again through the centre of the seam.
Step 2
Stitch the seam: turn the flywheel to insert the needle exactly through the starting dot; stitch two stitches forward, then reverse for two stitches to secure.
Step 3
Stitch the rest of the seam, removing pins, and stop on the end dot (slow down and use the fly wheel or adjust stitch length as necessary so you end exactly on the dot).
Step 4
Backstitch two stitches and remove the pieces from the machine. Press the seam open. (You can press these seams to the side but this is one time when I prefer open as I find it makes inserting the third piece easier.)
Step 5
Turn the work so the right side is up and the acute angle is at bottom right. Fold and pin the top patch (B) out of the way.
Step 6
Place the piece to be set in (C, shown translucent in diagram) on the inner edge of the bottom patch with raw edges aligned and sweep the seam allowances of the previous seam up and out of the way.
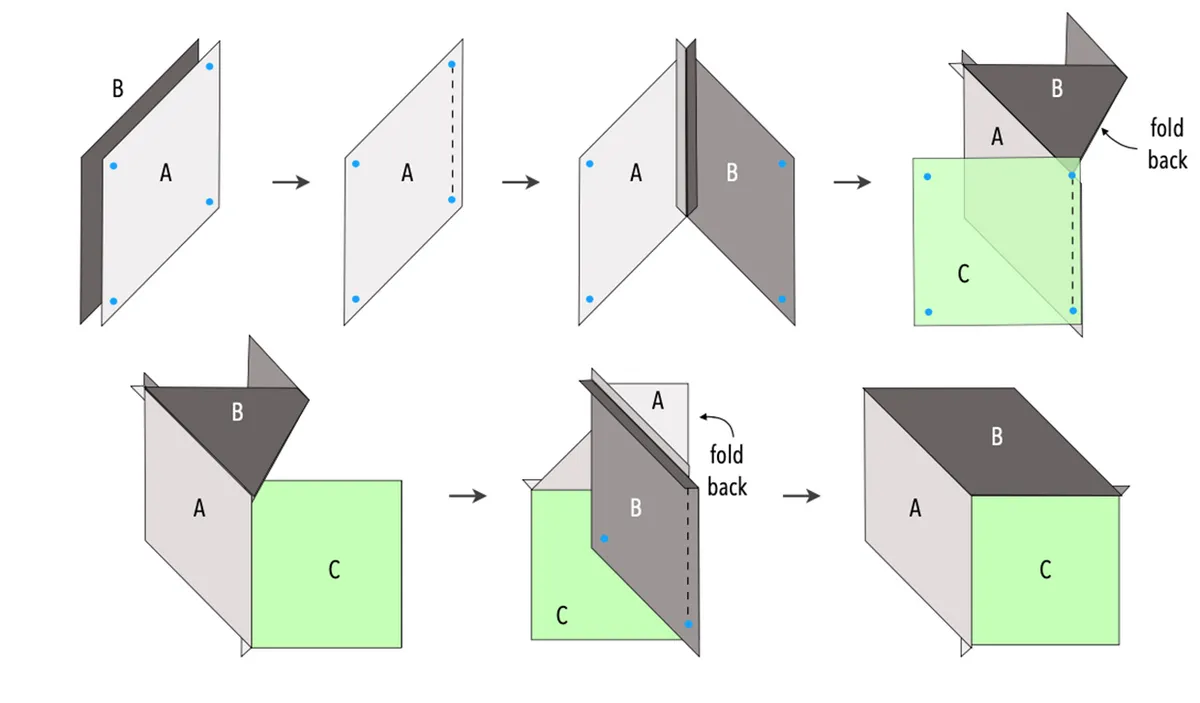
Step 7
Pin the seam as before, matching the inner dot to the end of the previous seam. Starting from the inner corner, stitch seam as before, backstitching to secure.
Step 8
Turn the work over and finger-press the angled piece (A) away from the inset patch (C). Rotate one quarter turn to the right so the seam just sewn is at the top. Remove the pin and turn the second angled piece (B) until it aligns with the raw edge of the inset patch (C) – you will need to fold the piece already stitched (A) and manipulate the fabric and seam allowances until it sits flat and even.
Step 9
Pin and check the dots are aligned before stitching the seam as before, starting from the inner corner. Press seams away from the inset piece (C). (It is also possible to stitch the inset seam in one pass, starting at the outer edge and pivoting at the centre point, manipulating the fabric as you go, but for most people, the two-pass method is easier.)
Setting blocks on point
Step 1
Check that you have the correct triangles for each part: side setting triangles (A) are quarter-square triangles (i.e. with the straight grain on the long side) while end setting triangles (B) are half-square triangles (i.e with the straight grain on the short sides).
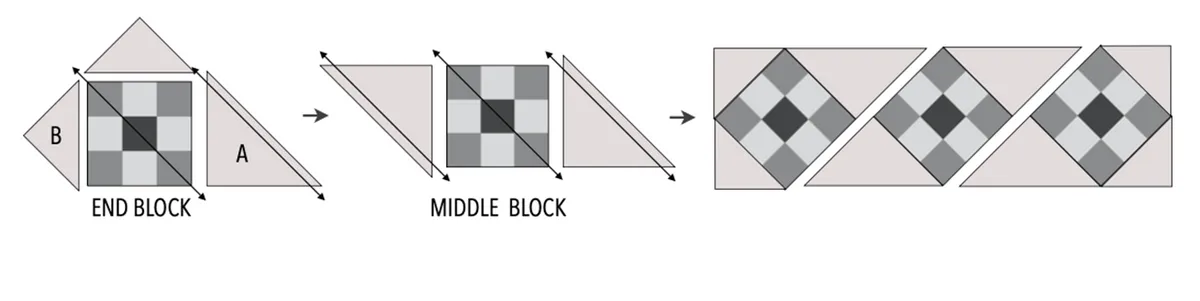
Step 2
Stitch two end triangles to two adjacent sides of each block that will be at the end of the row, then add a side triangle to each; make sure they are all oriented the same way.
Step 3
Stitch two side triangles to opposite sides of each block that will be in the middle of a row, making sure they are all oriented the same way.
Step 4
Press all seams away from the blocks. Rotate the end and middle blocks to form the row. Match seams at the points and stitch together.