
How to do the invisible crochet join!
There's nothing wrong with a good old-fashioned slip stitch join, but an invisible crochet join produces a much more polished and professional looking result - just take a look at the difference below!

With an 'invisible crochet join' the circle has a consistent look with no bump, which mimics your other stitches and make your join...well, invisible!
Most people will only use the invisible crochet join at the end of a project to get that final round looking perfect.
This crochet invisible join technique is also great for finishing off Granny Squares as well as circular motifs, or pretty much any project that requires you to join in the round, and once you've mastered it we think it'll be your favourite way to finish your stitches!
A perfect circle
If you've came across this invisible crochet join tutorial but are still quite new to crochet circles, you might find our how to crochet in the round tutorial helpful.
How to make a crochet invisible join
To try a crochet invisible join in the round, just grab any yarn (you’ll find that a smooth yarn will be easier to practise with), a suitably sized hook for the yarn weight and a tapestry needle.
If you’re not familiar with any of the abbreviations used in the tutorial, you can find everything you need to know in our Crochet Abbreviations and UK/US conversion guide
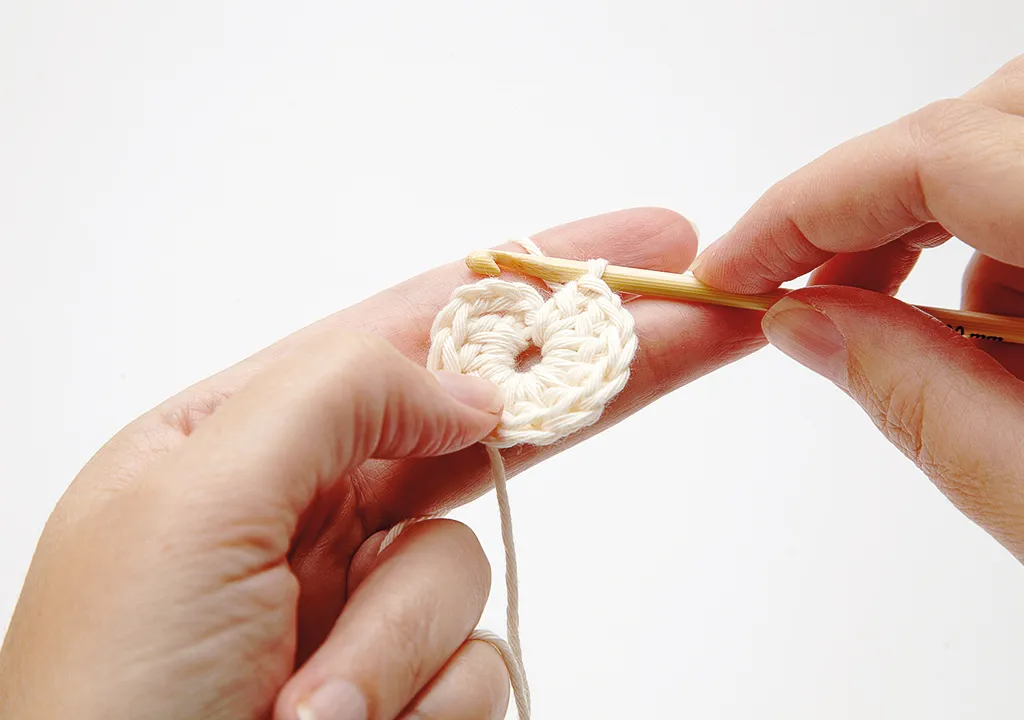
Start by making a round of trebles, but don’t join them. We used a DK yarn and a 4mm hook to work a magic loop (check out our guide on how to make a crochet magic loop), ch3, 11tr into the loop.
Step 1
Cut the yarn leaving a 10cm tail, but keep your hook in the working loop. Use the hook to pull the loop until the tail comes all the way through. Don’t worry, your work won’t unravel!

Step 2
Your final stitch should now look like this, with the tail end emerging from the centre of the top loop of the last stitch.

Step 3
Next, thread that tail onto a tapestry needle.

Step 4
Locate the first two stitches at the beginning of the round. Skip the top of the first stitch – in our example, that’s the top of the ch-3 turning chain.
Insert the tapestry needle into the second stitch, under the top two strands, in the same way as you’d normally insert the hook to work into that stitch.

Step 5
Pull the tapestry needle and yarn all the way through, but don’t pull tightly.
You will have made a small strand between the last stitch and the second stitch, which runs over the top of the first stitch.

Step 6
Keeping the tail end of yarn on the tapestry needle, insert it into the last stitch, in the same place as it emerged in Step 2 – this is the centre of the top loop of the last stitch. Don’t push it all the way through yet.

Step 7
Flip the work over so you can see the back of the stitch.
You should be able to see that the stitch has an extra horizontal strand of yarn at the back, parallel with the top strands of the stitch.
Make sure the tapestry needle goes under this extra horizontal strand at the back of the stitch.

Step 8
Pull the needle and yarn all the way through (don’t pull the tail end too tight) and flip back to the front of the work.
You will have made a loop between the last stitch and the second stitch that looks like the top loop of all the other stitches – it should sit over the first stitch and be the same size as each of your crocheted stitch loops.
Now weave in the tail end at the back, once again taking care not to pull your carefully worked stitch too tightly.

And that’s how you make an invisible crochet join. It can take a bit of practice to get them perfect, but once you’ve got the hang of it your finished items will look so much neater!
What's the problem?
Wobbly edges? Twisted chains? Find a whole range of solutions and pro tricks with our crochet troubleshooting tips.
Will you use the invisible crochet join?
The invisible crochet join is a must for getting the final round looking perfect, but they can also be used for joining rounds mid-project too. If you're making a project with striped rounds (or perhaps putting a project down for a while), then using an invisible crochet join will also make your stitches easier to count and easier to work into on the next round.
However, this is for the more confident crocheter, as if you've made a mistake in a previous round it's a lot harder to undo an invisible crochet join than undoing a standard slip stitch.
Create seamless seams with these crochet joins
There are a few basic techniques in crochet that have alternative methods to achieve neater results. In fact, we've included five different techniques for how to join granny squares (or any other crochet pieces) to help you get your finished projects looking perfect!


