How to crochet in the round

Learn how to crochet a circle, which will help with many projects that start off using crochet the round - we show you everything you need to know!

6 issues of Simply Crochet magazine for £14.99|Save 72%

Published: April 4, 2023 at 8:00 am

If you've ever wondered how to crochet a circle, then you'll need to know how to crochet in the round. It can seem a bit challenging at first, but once you've mastered crocheting in the round there's a whole new world of crochet projects open to you!

How to crochet a circle

There are two main ways of crocheting in the round

How to crochet in the round - joined rounds method

How to crochet in the round - spiral method

See below for our step-by-step picture tutorials, or check out our handy video which covers everything you need to know about how to crochet a circle.

We'll start off with the basic joined rounds method to get you started, then we'll cover spiral rounds which are often used when making amigurumi (New to amigurumi? Then check out our 'What is Amigurumi' guide!)

Whichever method you're using to crochet a circle, they both need to start with a foundation ring.

Making a foundation ring (used for both methods)

Step 1

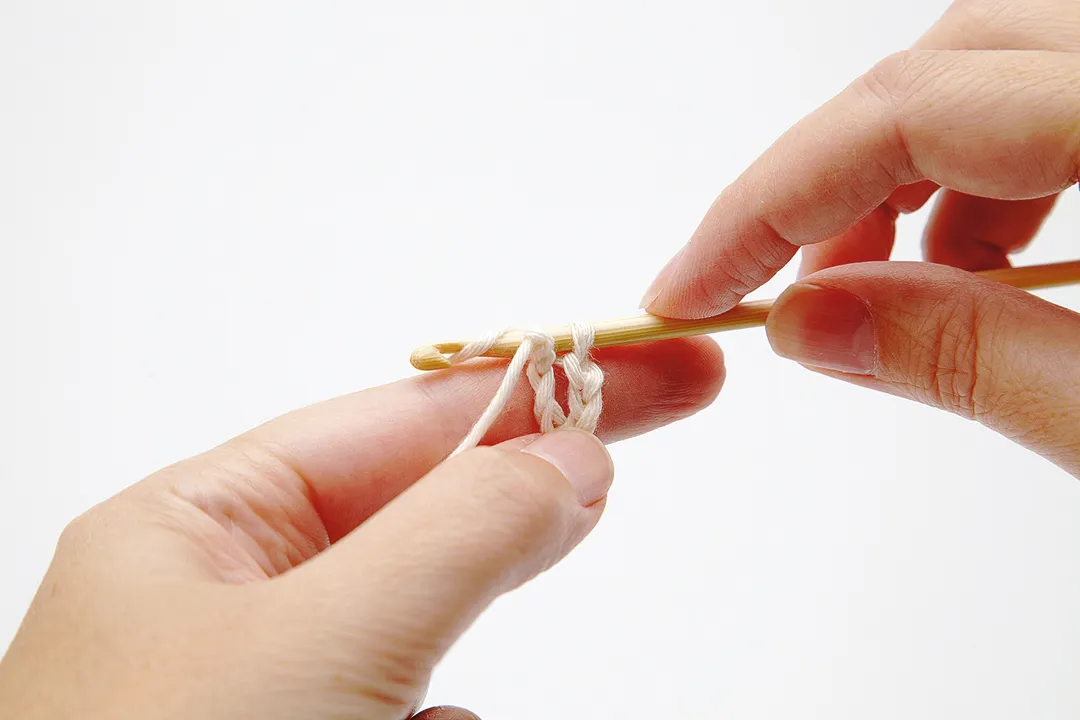
Make a chain the length stated in the pattern instructions. This is usually 4 chains for double crochet stitches or 6 chains for treble crochet stitches, but the number can vary depending on the project.

Next, insert the crochet hook into the first chain. Close the ring with a slip stitch, working yarn round hook (yrh)...
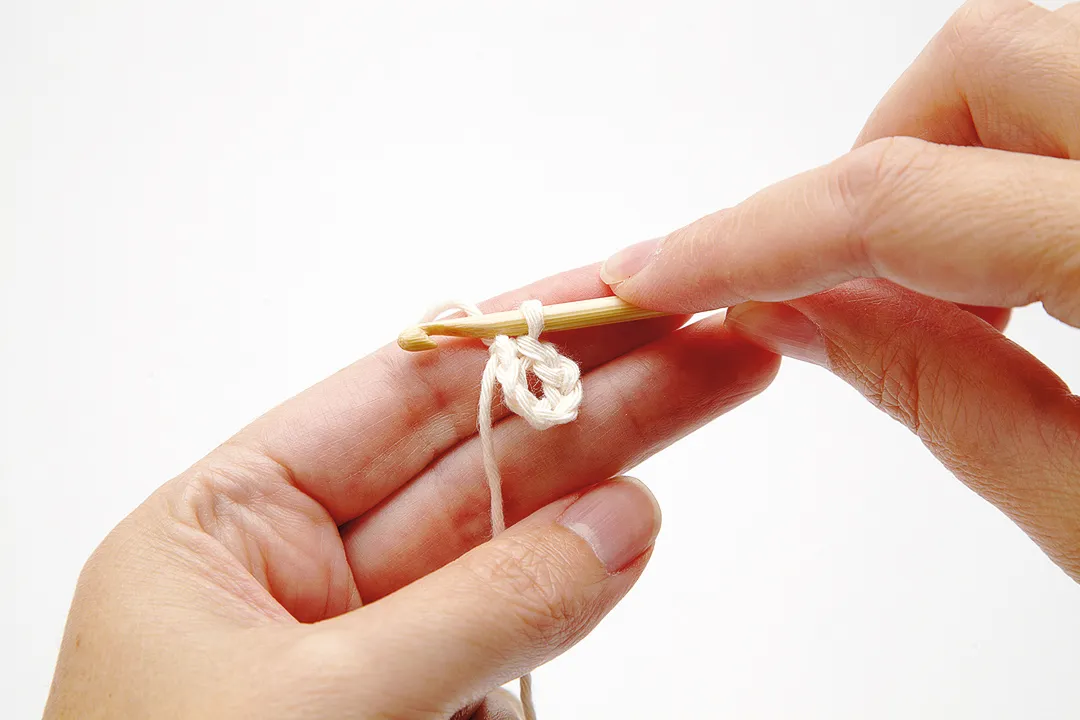
Step 2

...and pull yarn through 2 loops on hook. Now you’re ready to start crocheting in the round!

A popular alternative to the foundation ring is the magic loop (or sometimes called a magic ring or magic circle). This is a technique that creates a similar starting point as the foundation ring, but the beauty of the magic loop is that you can pull the tail tightly to close up the gap in the centre of the ring - making it a brilliant technique for amigurumi and toys that need to be stuffed.

It can be a bit tricky for complete beginners but once you've got the basics of how to crochet a circle down you'll definitely want to check it out - You can find our magic ring tutorial here!

How to crochet a circle - joined rounds method

In the tutorial below we will be showing you how to crochet in the round using UK treble stitches (these will be called double crochet stitches in US terminology), although the principles are the same regardless of the stitch you're using.

You can see how to do this with UK double crochet stitches in our 'how to crochet in the round' video above, but we've also included this 'how to crochet a circle' video which shows how to crochet in the round with treble stitches.

Step 1

Make a foundation ring and work the turning-chain (you’ll be instructed on how many to do, for this example we’ll use ch3 for treble stitches). Work a treble stitch as usual, but insert your hook into the centre of the ring.

For treble stitchess, yrh, insert hook into ring…

How to crochet a circle Step1

Step 2

…then finish the treble as usual – yrh, pull yarn through ring, yrh, pull yarn through first 2 loops, yrh, pull yarn through 2 loops. Work more stitches into the ring as needed.

How to crochet a circle Step2

Step 3

Once you have worked the required number of stitches in to the ring, you will need to close the round of stitches.

To do this, work a slip stitch into the top of the ch3 turning chain. To do this, insert the hook into the top stitch of the turning chain…

How to crochet a circle_Step1

Step 4

…then place the yarn round the hook, pull the yarn through both the turning chain and through the original stitch on your hook.

How to crochet a circle Step2

Step 5

You’ve slip stitched the round together! Before working another round, be sure to make the required turning chain. Always work in the same direction so that your rounds are on the right side, unless your pattern instructs you otherwise.

How to crochet a circle Step3

And that’s basically all you need to know to crochet in the round. When you’re working in the round, you will never need to turn the work as you would with rows (unless you’re specifically told to in a pattern)


How to crochet a circle like a pro!

When you’re finishing off your final round of your crochet circle, there’s a pro technique to get a really neat result! Check out our How to do the invisible crochet join to find out more!


How to crochet in the round – spiral method.

The other way to crochet in the round is with the spiral method, which is almost exclusively used with double crochet (dc) stitches only. Your stitches are worked in a spiral so you don’t need to join the rounds at the end, instead you just keep going, working into the next stitch on the previous row.

This creates a neater finish as you won’t have any visible joins, but it does make it harder to keep track of your stitches. If you’re learning how to crochet a circle using the spiral method. it’s a good idea to use a stitch marker to keep track of your stitches (we’ll cover this in more detail below).

Amigurumi toys are often worked in a spiral like this, and may differ in the way they start. You can work the spiral method with a starting ring, but you’ll often be instructed to start with a magic loop, or you may be instructed to ch2 and work your stitches in the second chain from hook instead of in a ring, as we’ll show you in the steps below.

Step 1

Start with a ch2 (or a magic loop). The stitches of your first round are all going to go into the first chain you’ve made – this may be referred to as the chain furthest from your hook.

How_to_spiral_crochet_in_the_round_step_01

Step 2

Work 6 double crochet stitches into that first chain, working all of the stitches in exactly the same place.

How_to_spiral_crochet_in_the_round_step_02

Step 3

Now rather than joining your first round with a slip stitch, you’re going to go straight onto the second round by making your next double crochet stitch into the very first dc that you made on the first round. If you’ve lost track or are struggling to identify your first dc stitch, simply count back 6 stitches from the last stitch you made.

How_to_spiral_crochet_in_the_round_step_02 copy

Once you’ve done your first stitch of the second round, it will look like this.

How_to_spiral_crochet_in_the_round_step_03a

Now mark that first stitch of the second round with a stitch marker – this will help you to keep track of your stitches as well as marking the start of each round.

How_to_spiral_crochet_in_the_round_step_03b

Step 4

For your second round, you’re going to work 2dc into every stitch (remember that we’ve just made our first stitch which is marked, so we’ll need to do another dc stitch in the same place). This will give you a total of 12dc stitches. As you can see in the picture below, after completing all 12dc we’ll be back around to our marked first stitch.

How_to_spiral_crochet_in_the_round_step_04

And that’s how to crochet in the round using the spiral method. For round 3, you would just remove the marker, then make your first dc of round 3 in the next stitch (which was the first dc of round 2), then place your marker in the first stitch of round 3.

How to crochet a circle to different sizes

If you’re following a pattern, you’ll be given instructions on how many stitches and increases (2dc) you need to work in each round, and the amount of rounds you do determines the size of your crochet circle. As a rule of thumb, simple amigurumi patterns tend to follow the same basic mathematics.

  • Round 1 – 6dc into ring/loop
  • Round 2 – 2dc in each stitch (12sts)
  • Round 3 – *dc, 2dc in each st* repeat 6 times (18sts)
  • Round 4 – *dc in next 2 sts, 2dc in each st* repeat 6 times (24sts)
  • Round 5 – *dc in next 3 sts, 2dc in each st* repeat 6 times (30sts)
  • …and so on, increasing the amount of dc stitches by one before the 2dc on each round

If you were to crochet in the round without increasing at all, your crochet would from into a tubular shape. This is often used to make things like arms and legs on amigurumi toys. For example, you might crochet the above to complete round 2 (12 stitches), and then you would just dc into each stitch around. This will make your circle turn into a semi-sphere and then continue in a tube shape. We’ll cover more on tubular shaping in a future tutorial.

What next now that you know how to crochet in the round?

Learning how to crochet a circle is just the beginning, as being able to crochet in the round is the key to a whole range of crochet projects. You can use your newly learnt knowledge to make everything from granny squares (yes, a crochet square starts with a circle) to hats, toys and so much more!

Practice your new crochet skill

By far the best way to get the hang of crocheting in the round is to try it out with a simple project. We’ve included some crochet in the round projects in our list of easy crochet patterns for beginners so you can master this essential technique with Gathered.