All products were chosen independently by our editorial team. This review contains affiliate links and we may receive a commission for purchases made. Please read our affiliates FAQ page to find out more.

Make an epic Tunisian crochet blanket

Combine gorgeous colours with geometric style in this amazing Tunisian crochet blanket pattern

6 issues of Simply Crochet magazine for £14.99|Save 72%

Published: June 12, 2023 at 8:30 am

If you’ve recently learnt how to do Tunisian crochet and have fallen in love with this fun craft, then here’s a project to really put your newfound skills to the test.

This amazing free Tunisian crochet blanket pattern by Poppy and Bliss uses the basic Tunisian simple stitch with clever colour changes. This cool design is achieved by following colourwork charts to create this amazing geometric design.

The design is also made up in four separate strips, which are joined together as you progress. It’s a pattern that has a lot of technical interest and may seem a bit complicated to start with, but don’t panic! Once you’ve read all the notes and got started you’ll quickly get into the swing of things and can follow the chart at your own pace.

We’ve listed the yarn and materials required below, but if you need to stock up on supplies we’ve included a handy shopping list with links where you can buy products in both the UK and US.

Treat yourself to a new Tunisian hook

Before starting on such an epic project, you want to make sure you have the right tools for the job. Check out our pick of the best Tunisian crochet hooks and find the right one for you!

Important information about this Tunisian crochet blanket pattern

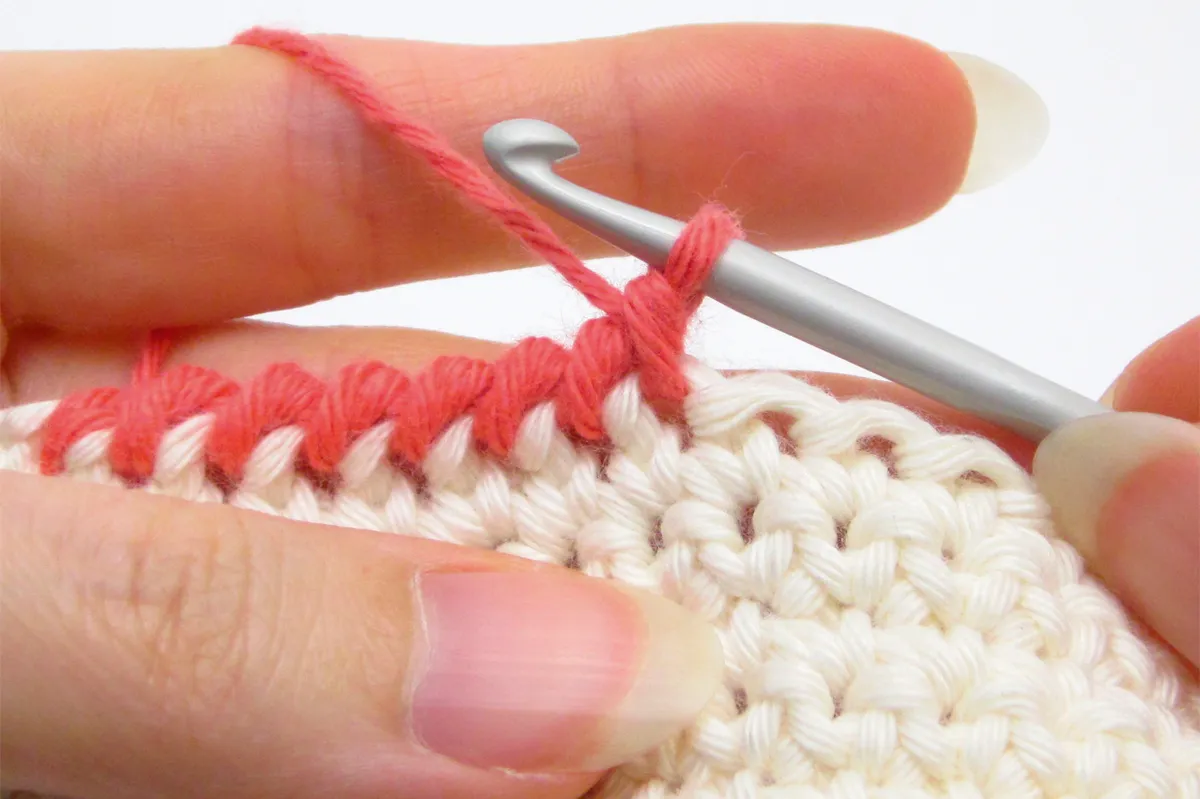
Each row of Tunisian Crochet is made up of a Forward Pass (FwdP) and Return Pass (RetP). You do not turn the work at all in this pattern, so you will be working from the RS throughout.

Tension and measurements

17 stitches and 16 rows measure 10x10cm (4x4in) using Tunisian Simple Stitch and a 6mm hook or size required to achieve stated tension.

Exact tension is not critical but will affect yarn quantities and finished measurements.

Finished Blanket measures approx 96x100cm (37¾x39¼in)

Free-tunisian-crochet-blanket-pattern_flat

Abbreviations

You can find a full list of all standard crochet abbreviations we use in our abbreviations and conversions guide. We have included instructions and abbreviations for each of the Tunisian crochet stitches used below.


Stitches used in this Tunisian crochet blanket pattern

Tunisian Simple Stitch (Tss)

Tunisian_crochet_tutorial_step_9

Forward Pass (FwdP) The loop on your hook counts as first st, do not work into the vertical bar on edge of work.

*With yarn at back, insert hook from side to side behind next vertical bar, yarn round hook (yrh) and pull up loop and leave loop on hook (1 stitch complete); repeat from * until the last vertical bar at edge, insert hook under vertical bar and loop on outside edge, pull up loop.


Return Pass (RetP) Yrh and draw through first loop on hook, *yrh and draw through 2 loops on hook; repeat from * until 1 loop remains on hook. The Return Pass remains the same regardless of which stitch you are working.


Changing colour on a Forward Pass

Insert the hook in the stitch where you want to change colour, yrh in the new colour, twisting the ends of the yarn together to avoid a hole in the work.

Try to keep the tension consistent and pull the yarn a bit tighter at the change.


Changing colour on a Return Pass

When working Tunisian crochet with more than one shade within a row, you will have already established the pattern of which stitches are worked in which shades on the Forward Pass of that row.

Always match the colours on the Return Pass to those of the Forward Pass, unless otherwise stated.

To do this, work the Return Pass as usual until you have one loop on the hook of the old colour. The next yrh will be in the new colour.

If only the first loop on the hook is in the old colour, use that colour to do the (yrh and draw through first loop) at the beginning of the Return Pass, then change to the new colour thereafter.

If you need to change colour for the first stitch on the Forward Pass of the next row, the pick up the new colour on the last yrh of the Return Pass.

Always twist the ends of the yarn together at each colour change.


Reverse dc

How to crochet crab stitch

Work each dc st in the st to right of the previous one (or to the left if left handed). For a step-by-step tutorial check out our how to do reverse crochet guide (also known as crab stitch).


How to read Tunisian colour charts

To follow this Tunisian crochet blanket pattern, you will need to download the chart pdf.

Chart-preview-image

When reading a Chart for Tunisian colourwork, read each row of the Chart from right to left for the Forward Pass – then read the same row of the Chart from left to right for the Return Pass.

Each square on the Chart counts as one stitch, and each line as one row.

On the Forward Pass, skip the first square on the right of the Chart because the loop on the hook counts as the first st and is not worked.

On the Return Pass, the first square on the left of the Chart represents the first (yrh and draw through first loop). After that, each square on the Chart represents one (yrh and draw through 2 loops) of the Return Pass, working in the appropriate colour.


Free Tunisian crochet blanket pattern

Free-tunisian-crochet-blanket-pattern_square

Notes

The blanket is made in Tunisian Simple Stitch (Tss) with 4 separate strips of Tunisian Crochet, each with a different colour pattern.

The strip on the left side of the blanket is worked first, then as each following strip is worked it is joined to the right-hand edge of the previous strip at the end of each Forward Pass.

A border is worked in standard crochet around the entire blanket afterwards.

Yarn A is used for the foundation ch of each strip. Thereafter, follow the charts for each strip for the colour changes. See notes above for how to follow a Tunisian colourwork chart.

The first 2 rows of the pattern are written out in full below to help you follow the Chart.

Free-tunisian-crochet-blanket-pattern_flat_closeup

You will need:

  • Yarn A Ecru (711) (2 balls)
  • Yarn B Mint (715) (2 balls)
  • Yarn E Coral (1574) (2 balls)
  • Yarn C Rose (712) (1 ball)
  • Yarn D Jade (781) (1 ball)
  • Yarn F Buttercup (1600) (1 ball)
  • A 6mm (US J/10) Tunisian hook
  • A 4mm (US G/6) standard hook
  • 4 stitch holders

Step 1

Making strip 1

Using Yarn A and a 6mm Tunisian hook, ch40 loosely.

Row 1 (Foundation Row) Insert hook in 2nd ch from hook (first square of Row 1 in the Chart counts as the first loop on the hook), yrh in Yarn B and pull up loop, leaving loop on hook, *insert hook in next ch, yrh with Yarn B and pull up loop, leaving loop on hook; repeat from * a further 23 times with Yarn B, once with Yarn C, and 13 times with Yarn D. [1 loop on hook in Yarn A, 25 in Yarn B, 1 in Yarn C, 13 in Yarn D] – RetP, matching the colours of the FwdP as explained above, so that you change to the next colour when there is only 1 loop on the hook of the old colour.

Row 2 Tss FwdP, following the colour changes on Row 2 of the Chart as follows:

Skip square at right of Row 2 on Chart, insert hook in next st and yrh with Yarn A and pull through to correspond to second square on Chart. *Insert hook, yrh with Yarn B and pull through, repeat from * a further 22 times with Yarn B, 3 times with Yarn C and 12 times with Yarn D. [2 loops in Yarn A, 23 loops in Yarn B, 3 loops in Yarn C, 12 loops in Yarn D] – RetP, matching the colours of the FwdP.

Rows 3-156 Tss FwdP; RetP, following the colour changes in the Chart.

Place the loop on the hook onto a stitch holder and cut the yarn.

Terrific Tunisian

For even more amazing Tunisian crochet patterns by this amazing designer, check out the Poppy and Bliss Etsy Store.

Step 2

Making strip 2

Join Yarn A to the bottom-right corner of the previous strip with a ss.

With a 6mm Tunisian hook, ch39 loosely, working last ch in the colour of the first st of Row 1 (Yarn F for Strip 2).

Row 1 (Foundation Row) The loop on the hook counts as the first square on the Chart of Row 1.

Work a foundation row by inserting the hook into each ch and pulling up a loop, following the colour changes in the Chart. [13 loops in Yarn F, 1 loop in Yarn B, 25 loops in Yarn C].

Now join to the right-hand edge of Row 1 of the previous strip by inserting the hook into the ‘V’ edge stitch of Row 1 and the loop behind it. Begin the RetP with yrh and draw through the loop just made. This loop for the joining stitch is not counted as a stitch in the pattern and is not included on the Chart, so the next (yrh and pull through 2 loops) will correspond to the first square on the left-hand side of Row 1 on the Chart. Complete the RetP, following the rule of working until you have one loop of the old colour on the hook before changing colour.

Rows 2-156 Tss FwdP, join to edge of previous strip as in Row 1; RetP, following the colour changes in the Chart.

Place the loop on the hook onto a stitch holder and cut the yarn.


Step 3

Making strips 3 and 4

Work as for Strip 2, following the appropriate Chart.

Finishing Row With Yarn A, skip vertical bar on edge of work, (insert hook under next vertical bar, yrh and draw through both loops on hook to make a ss) repeat for each st across all 4 strips to end.

Fasten off and fasten off the ends of each strip.


Step 4

Making the border

Free-tunisian-crochet-blanket-pattern-border

The border is worked in the round in standard crochet around the edge of the entire blanket.

When working into the row ends, insert the hook as you did for joining the strips, inserting the hook under two strands each time to avoid holes at the edge.

Change to a 4mm standard hook.

Round 1 (RS) With Yarn A, dc in each st and row end around, working 3dc in each corner st, ss to first dc.
Fasten off.

Round 2 Join Yarn E into first dc of corner sts, ch1 (does not count as st), dc into same st, ch2, skip next st, dc into next st (corner made), ch1, skip next st, *dc into next st, ch1, skip next st; repeat from * around working (dc in next st, ch2, skip 1 st, dc into next st) at each corner, ss to first dc.
Fasten off.

Round 3 Join Yarn A into first ch-2 corner sp, (dc, ch2, dc, ch1) into same sp, (dc into next ch-sp, ch1) around with (dc, ch2, dc, ch1) in each corner sp, ss to first dc.
Fasten off.

Round 4 Work as Round 3 with Yarn F.

Round 5 Work as Round 3 with Yarn A.

Round 6 Work as Round 3 with Yarn B, do not fasten off.

Round 7 Dc in each st and sp around, with 3dc in each corner sp, ss to first dc.

Round 8 Ch1 (does not count as st), reverse dc in each st around, ss to first dc.

Fasten off.

Weave in ends and block if desired.


Shopping list for UK makers

Shopping list for US makers

Enjoy your Tunisian crochet time

This Tunisian crochet blanket pattern is going to look amazing in your home, but it is a project that will take time.

Try keeping it in a dedicated project bag that you can pick up and put down when you feel like working on it. Or you could always make a quarter of the blanket and use it as a cute baby blanket!

Find even more Tunisian crochet patterns

If you’re looking for some more fun projects to test your skills, check out this list of the top Tunisian crochet patterns.

Tunisian crochet patterns Breton top