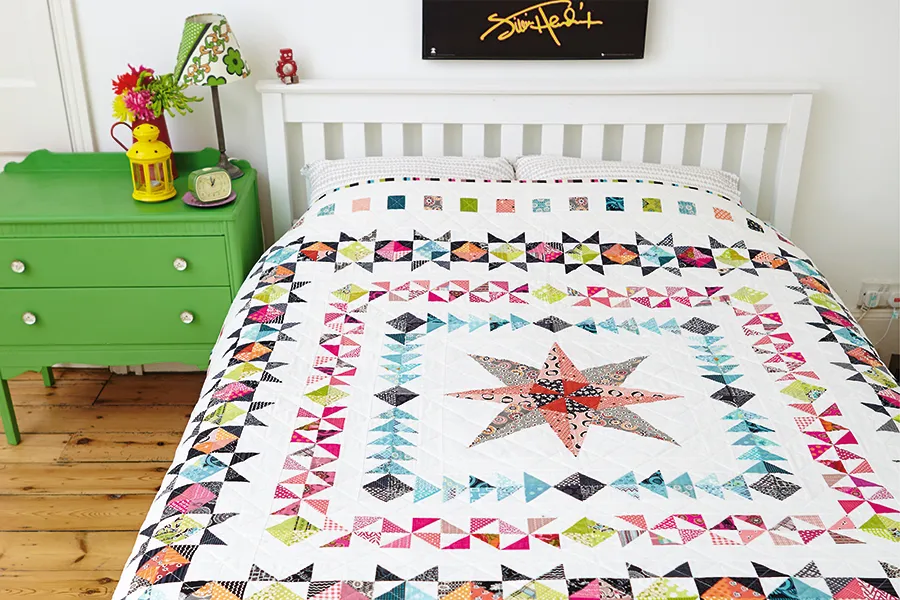
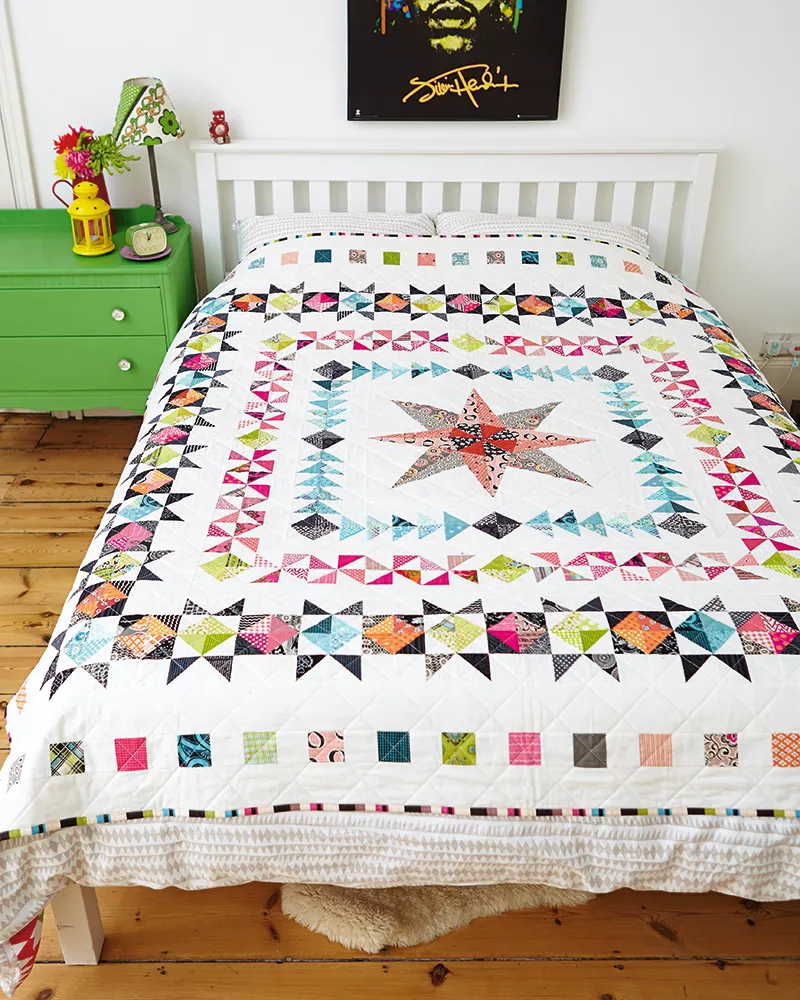
Free Medallion Quilt Pattern
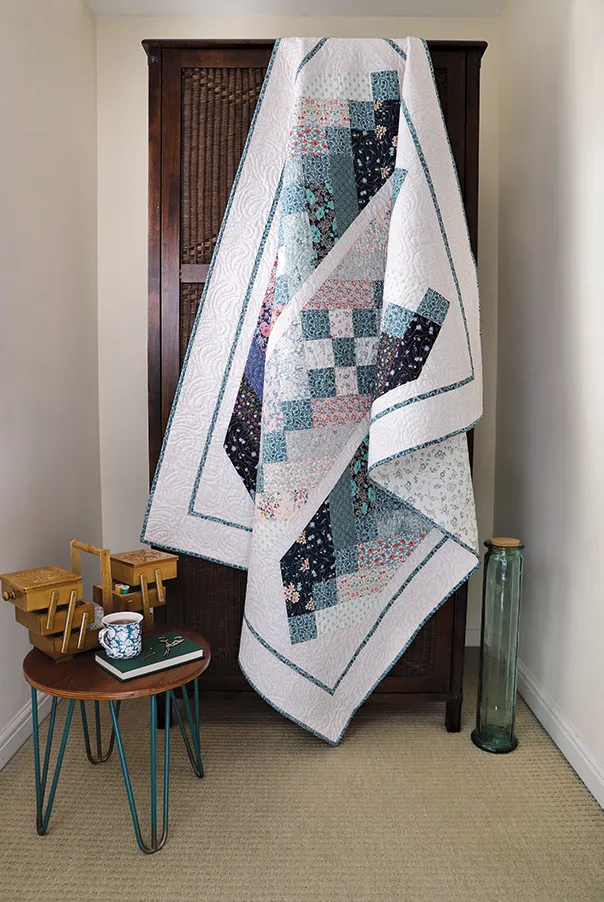
Medallion quilts are undoubtedly having a bit of a moment in the world of modern quilting. Based on the simple premise of a central motif surrounded by multiple borders, they’re a great platform for mixing print and colour, as well as stretching your skills! Lynne’s fresh take on a classic medallion quilt pairs contemporary prints with solids to make a design that you’ll soon be adding to your to-do lists.
If you enjoy sewing this Medallion quilt, then check out our log cabin quilt pattern and easy patchwork cushion cover pattern too.
Free Medallion Quilt Pattern
You will need
- Cream fabric 5yds
- Black prints 1yd total
- Grey prints ¼yd total
- Orange prints ½yd total
- Blue prints ½yd total
- Pink prints ¾yd total
- Green prints ½yd total
- Backing fabric 5yds
- Batting 86in square
- Binding fabric ¾yd
If you’re new to the world of quilting don’t worry. We have a beginners guide to quilting!
Download the pattern here
Finished Size
80in square approx
Notes
- The quilt is made using scraps but rough amounts of each colour are listed in the You Will Need section above.
- All seam allowances are ¼in, unless otherwise noted.
- Press seams open, unless otherwise instructed.
- Templates include seam allowances, where necessary.
- FQ = fat quarter.
- RST = right sides together.
- WOF = width of fabric.
- HST = half-square triangle.
- RST = right sides together.
- WOF = width of fabric.
- HST = half-square triangle.
Fabric used
- Fat quarter bundles of Florence and Ansonia by Denyse Schmidt from the Fat Quarter Shop were used, with co-ordinating scraps.
- The cream background fabric is Kona Snow from Sew Fresh Fabrics.

Free Medallion Quilt Pattern: step by step
Cutting out
Step one
From the cream fabric cut one (1) 13in x WOF strip and sub-cut this into four (4) 8in x 13in. Sub-cut these on the diagonal (for medallion centre).
Step two
From cream fabric cut twenty-two (22) 2½in x WOF strips and sub-cut each as follows, sewing strips together as necessary.
- Two (2) 2½in x 20½in and two (2) 2½in x 24½in (for Border 1).
- Two (2) 2½in x 32½in and two (2) 2½in x 36½in (for Border 3).
- Two (2) 2½in x 44½in and two (2) 2½in x 48½in (for Border 5).
- One hundred and twelve (112) 2½in squares (for Border 6).
- Seventy-two (72) 2½in squares (for Border 8).
Step three
From cream fabric cut eighteen (18) 3in x WOF strips and sub-cut each as follows (for HSTs).
- Fifty-six (56) 3in squares (for Border 2).
- Eighty (80) 3in squares (for Border 4).
- One hundred and twelve (112) 3in squares (for Border 6).
Step four
From cream fabric cut fifteen (15) 3½in x WOF strips. Sew end to end and sub-cut as follows.
- Two (2) 3½in x 64½in and two (2) 3½in x 70½in (for Border 7).
- Two (2) 3½in x 74½in and two (2) 3½in x 80½in (for Border 9).
Step five
From grey prints, cut the following.
- One (1) 5in x WOF strip. Sub-cut this into four (4) 5in x 10in. Sub-cut these rectangles on the diagonal (for medallion centre).
- One (1) 2½in x WOF strip. Sub-cut this into twelve (12) 2½in squares (for Border 8).
Step six
From black prints cut ten (10) 3in x WOF strips and sub-cut these as follows.
- Four (4) 3in x 4in (for medallion centre).
- Sixteen (16) 3in squares (for Border 2).
- One hundred and twelve (112) 3in squares (for Border 6).
Step seven
From black prints cut one (1) 2½in x WOF strip. Sub-cut into twelve (12) 2½in squares (for Border 8).
Step eight
From orange prints cut one (1) 5in x WOF strip. Sub-cut into four (4) 5in x 10in. Sub-cut these rectangles on the diagonal (for medallion centre). Cut one (1) 2½in x WOF strip and from this cut twelve (12) 2½in squares (for Border 8).
Step nine
From orange prints cut three (3) 3in x WOF. Sub-cut these as follows.
- Four (4) 3in x 4in (for medallion centre).
- Thirty-two (32) 3in squares (for Border 6).
Step 10
From blue prints cut five (5) 3in x WOF. Sub-cut these as follows.
- Forty (40) 3in squares (for Border 2).
- Twenty-four (24) 3in squares (for Border 6).
Step 11
From blue prints, cut one (1) 2½in x WOF strip. Sub-cut into twelve (12) 2½in squares (for Border 8).
Step 12
From pink prints, cut one 2½in x WOF strip. Sub-cut into twelve (12) 2½in squares (Border 8). Cut seven (7) 3in x WOF strips. Sub-cut these as follows.
- Sixty-four (64) 3in squares (for Border 4).
- Twenty-four (24) 3in squares (for Border 6).
Step 13
From green prints, cut four (4) 3in x WOF strips. Sub-cut these as follows.
- Sixteen (16) 3in squares (for Border 4).
- Thirty-two (32) 3in squares (for Border 6).
Step 14
From green prints cut one (1) 2½in x WOF strip. Sub-cut into twelve (12) 2½in squares (for Border 8).
Making the medallion centre
Step 15
You will need four (4) copies of Template A and four (4) copies of Template B to make the medallion centre. You can download the full-size medallion quilt templates here.
Step 16
Lay the eight templates out in position on a surface and mark in each section of each template which fabric you will put where, so that you do not lose track once you start piecing.
Step 17
Foundation paper piece the templates, trimming the seams to ¼in as you go. Click here for an in-depth tutorial on foundation paper piecing.
Step 18
Sew the A and B triangles together along the diagonal (Fig 1). Sew those squares into pairs and then sew the two halves of the block together to make the quilt centre. This will give you a 20in square block (once pieced into the quilt top).

Adding border 1
Step 19
Sash the top and bottom of the centre block using the 2½in x 20½in cream fabric strips (Fig 2). Press seams outwards.
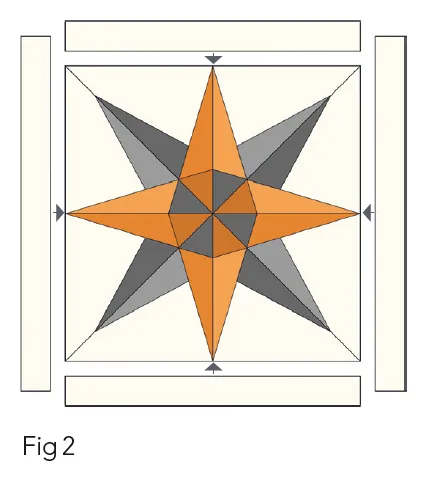
Step 20
Now, sash the two sides of the block using the 2½in x 24½in cream fabric strips. Press seams after the addition of each round of sashing/border.
Adding border 2
Step 21
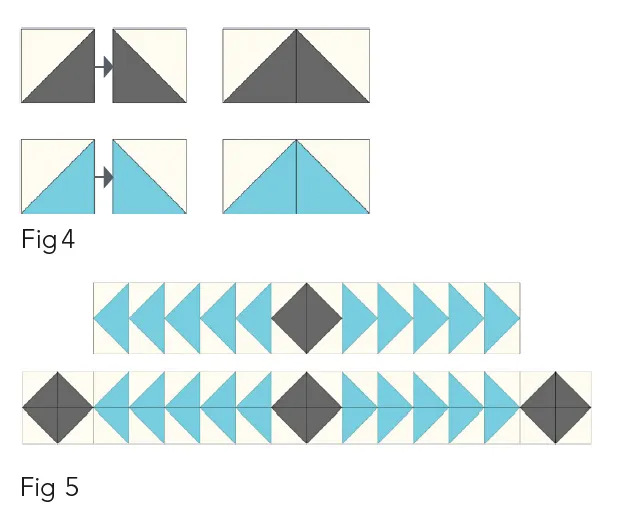
For Border 2, make eighty (80)blue/cream and thirty-two (32) black/cream HST units. To make the HSTs you will need one coloured 3in square and one cream 3in square placed RST. Draw a diagonal line on the back of one of the squares and sew two seam lines ¼in either side of that line. Cut into two units along the drawn line and press both units open (Fig 3). Trim each to 2½in square.

Step 22
Sew the HST units into pairs and press the seams (Fig 4). Sew the pairs of units into four strips – two of each of those shown in Fig 5 – and then press seams.
Step 23
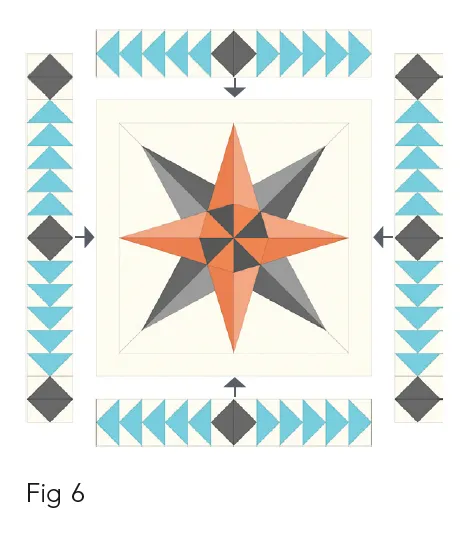
Border the medallion centre with the two shorter strips and then add the two longer strips to finish Border 2 (Fig 6). Press seams after addition of each round of sashing/border. Press seams.
Adding border 3
Step 24
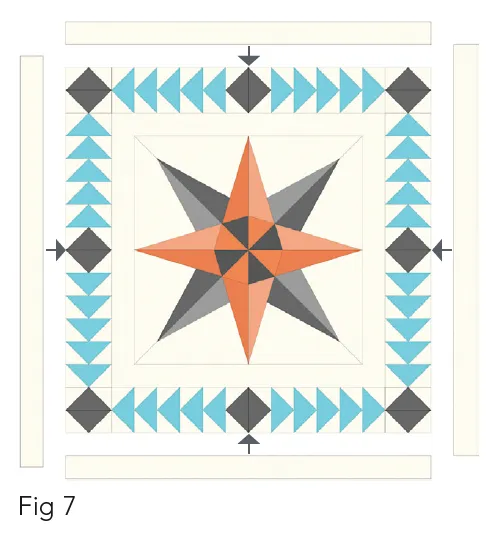
Sash the two sides of the medallion using the 2½in x 32½in cream fabric strips (Fig 7). Press the seams. Sash the top and bottom of the medallion using the 2½in x 36½in cream fabric strips. Press the seams.
Adding border 4
Step 25
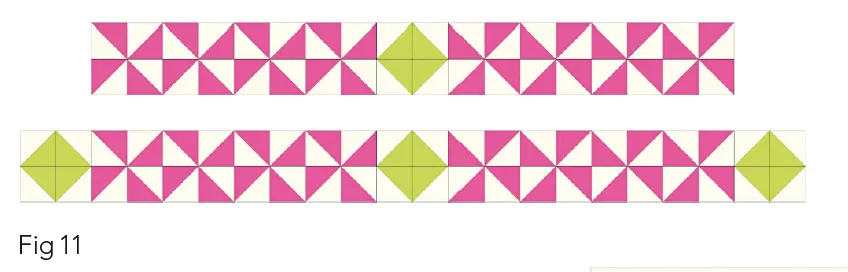
For Border 4, make one hundred and twenty-eight (128) pink/cream and thirty-two (32) green/cream HST units. Sew the HST units into pairs as described below.
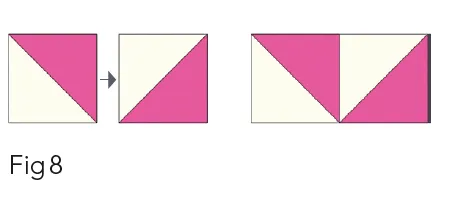
The pink/cream pinwheel blocks are ‘turning’ in different directions on either side of the green/cream units, so half of the pink units should be oriented as in Fig 8 and half as in Fig 9.
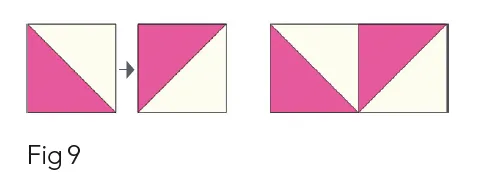
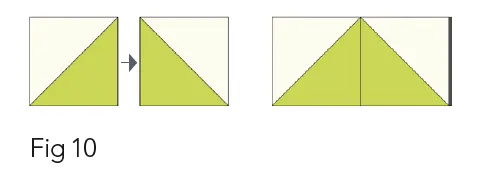
Fig 10 shows the green/cream units.
Step 26
Sew the pairs of units into four strips – two of each of those shown in Fig 11. Press seams.
Step 27
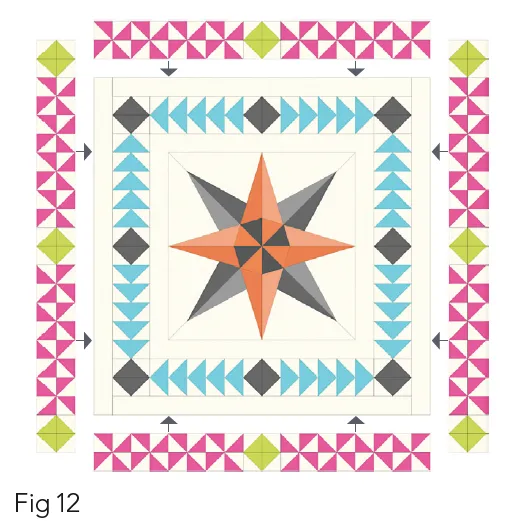
Sash the medallion with the two shorter strips then use the two longer strips to finish Border 4 (Fig 12). Press seams.
Adding border 5
Step 28
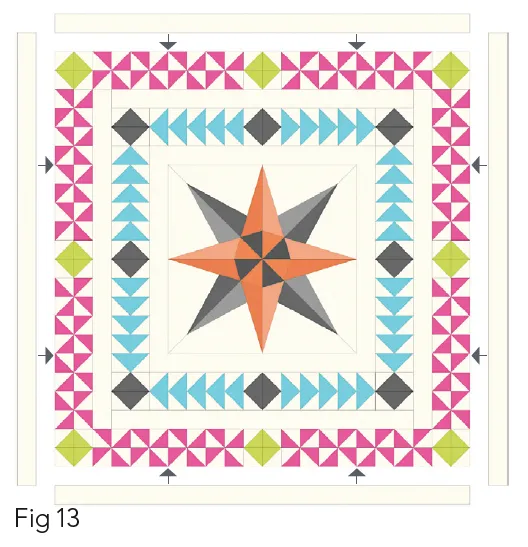
Sash the two sides of the medallion using the 2½in x 44½in cream fabric strips (Fig 13). Sash the top and bottom of the medallion using the 2½in x 48½in cream fabric strips. Press seams.
Adding border 6
Step 29
For Border 6, make the following HST units: sixty-four (64) black/orange, forty-eight (48) black/pink, one hundred and twelve (112) black/cream, forty-eight (48) blue/cream and sixty-four (64) green/cream.
Step 30
Using one hundred and twelve (112) 2½in cream squares, sew the squares and HST units into rows as shown in Fig 14 and then sew those rows together to make the A, B and C blocks.
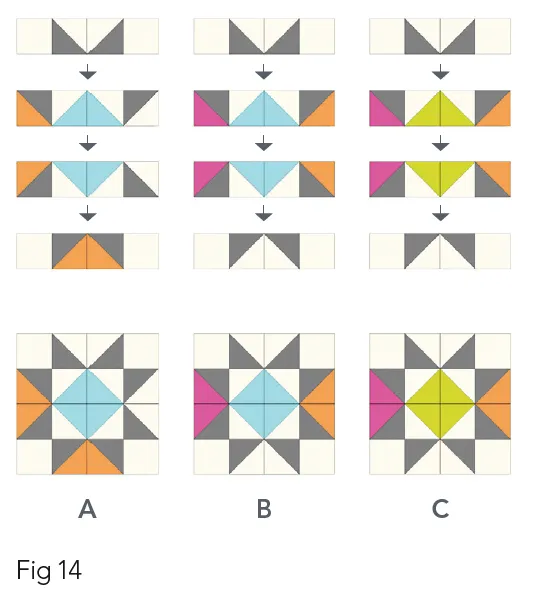
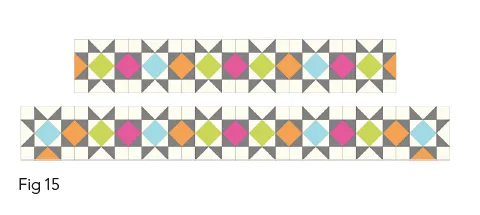
Make four (4) A blocks, eight (8) B blocks and sixteen (16) C blocks. Sew the A, B and C blocks into four strips – two of each of those shown in Fig 15, making sure you place the blocks the correct way. Press seams.
Step 31
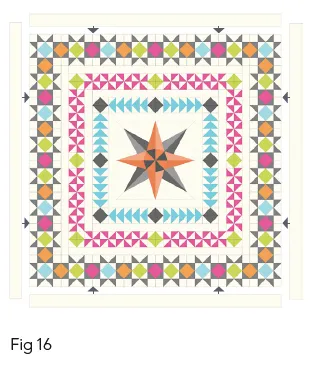
Sew the two shorter strips to the sides of the quilt, and then the two longer strips to the top and bottom to finish Border 6 (Fig 16). Press seams after each round of sashing.
Adding border 7
Step 32
Sash the two sides of the medallion using the 3½in x 64½in cream fabric (Fig 16). Sash the top and bottom of the medallion using the 3½in x 70½in cream fabric strips. Press seams.
Adding border 8
Step 33
Sew all the 2½in squares for Border 8 into four strips, with the coloured squares placed randomly and alternating with the cream squares. Fig 17 shows one short strip and one long – you need to make two of each.
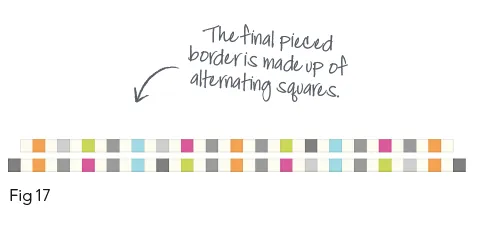
Two of the strips should have cream squares at each end and two should have coloured (we chose black) squares at each end. The two shorter strips should have seventeen (17) coloured squares and eighteen (18) cream squares. The two longer strips should have nineteen (19) coloured squares and eighteen (18) cream squares.
Step 34
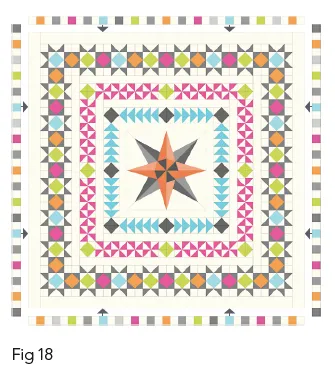
Sash the medallion with the two shorter strips and then the two longer strips to finish Border 8 (Fig 18). Press seams.
Adding border 9
Step 35
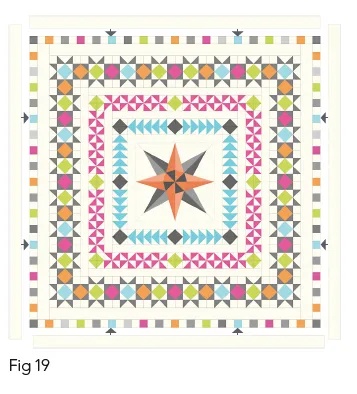
Sash the two sides of the medallion using the 3½in x 74½in cream fabric strips (Fig 19). Press seams. Sash the top and bottom of the medallion using the 3½in x 80½in cream fabric strips. Press seams.
Quilting and Finishing
Step 36
Cut the backing fabric into two equal lengths. Sew together using a ½in seam and press the seam open.
Step 37
Baste together the quilt backing, batting and top. Quilt as desired.
Step 38
Cut the binding fabric into nine (9) 2½in x WOF strips and use to bind the quilt.
Celebrate the beauty of a Medallion quilt
Medallion quilts are a gorgeous way of showcasing your favourite fabrics and turning them into something beautiful. This star design is timeless and will add a pop of colour to your bedroom!
Move on to your next quilting project
Your medallion quilt is now complete! We have plenty of quilt patterns here on Gathered for you to get stuck into next. Why not make our free friendship braid quilt pattern?