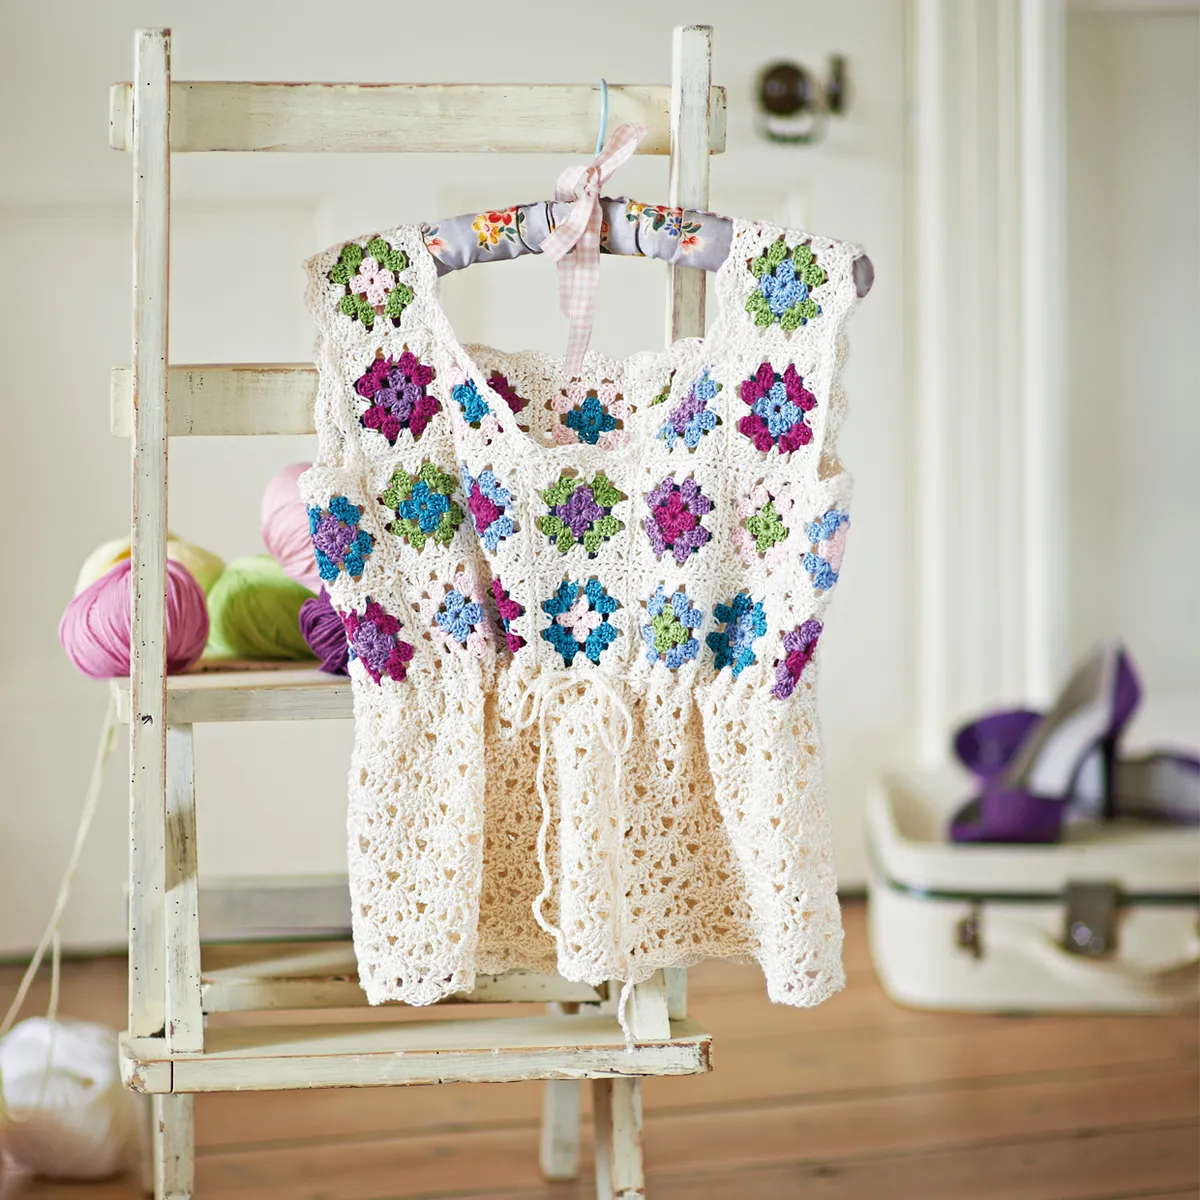
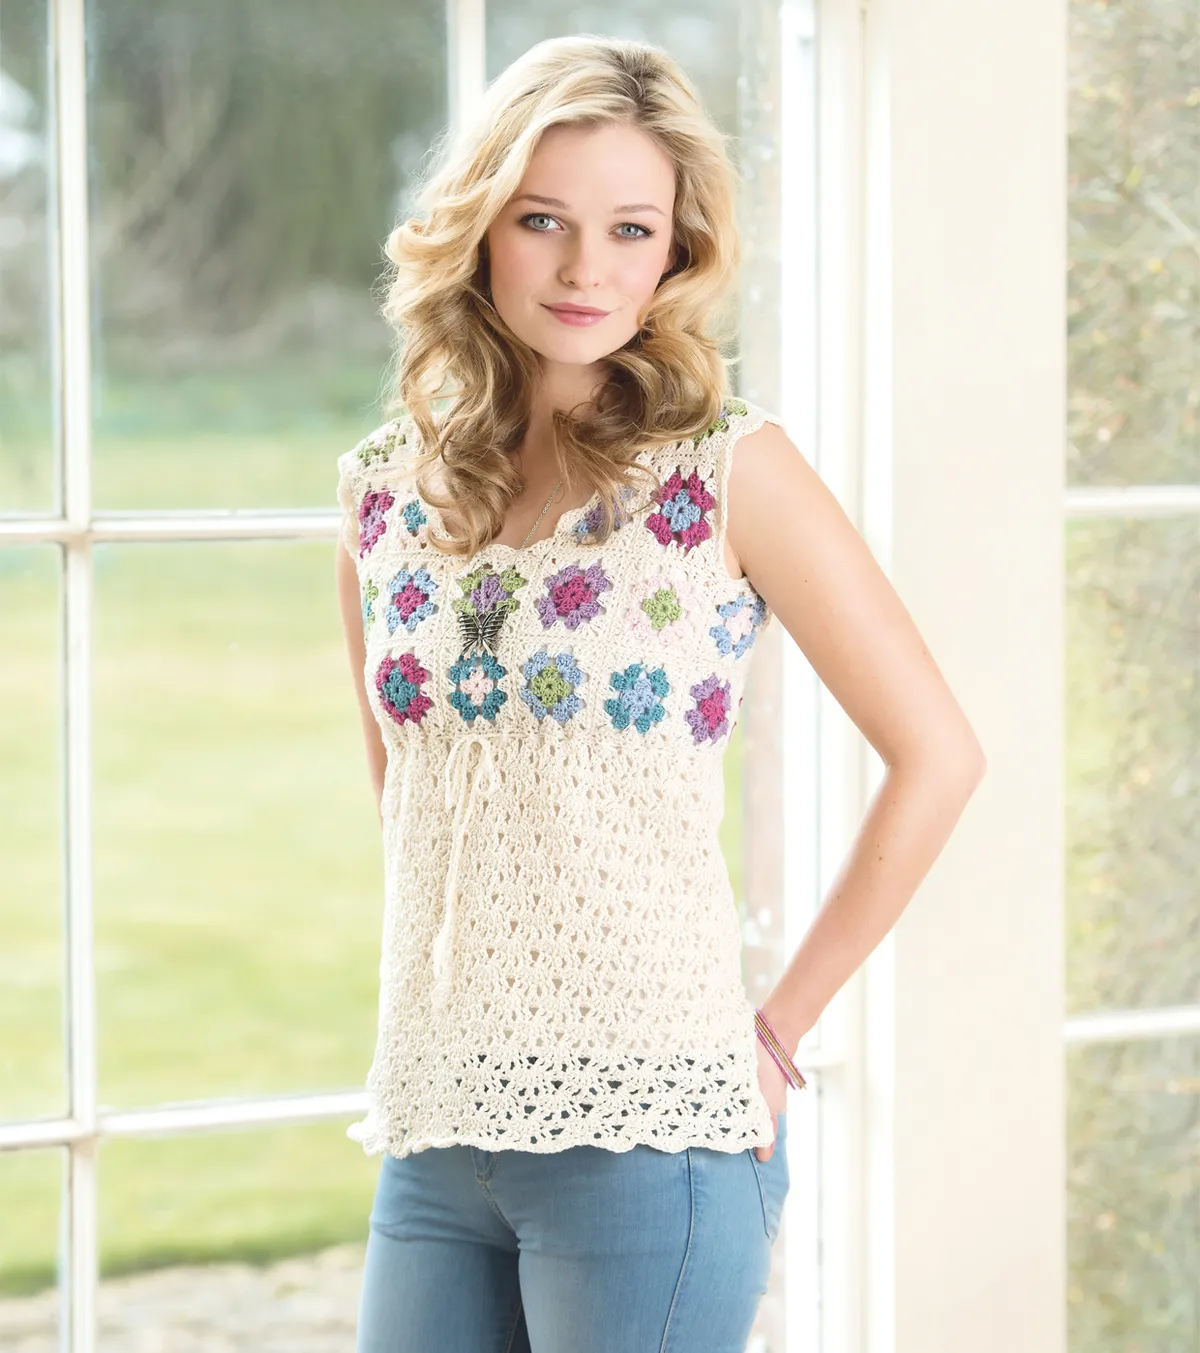
Hook a delicate top that’s perfect for the summer with this pretty crochet granny square vest pattern by Anne Egan that brings granny squares up-to-date. The dainty edging and super-flattering empire line waist make for an easy-to-wear vest. This crochet granny square vest pattern is worked pretty shades of luxurious Egyptian cotton, which will also keep you nice and cool. It's also easy to customise the length of your granny square vest, as the top of the vest is made from granny square panels, and then the bottom is extended with a skirt section that you can make to your desired length. And if you can't get enough of good 'ol granny squares, don't forget to check out Granny Square Day!
You will need
Paintbox Yarns Cotton DK (100% cotton, 50g/155m), 6 (7: 8) balls of Paper White (401) - alternatively you could use the Vanilla Cream (408) shade is you're not a fan of the paper white.
1 ball of each:
- Ballet Pink (453)
- Dusty Lilac (447)
- Lime Green (429)
- Kingfisher Blue (435)
- Raspberry Pink (444)
- Summer Sky Blue (463)
A 3.75mm (F/5) or 3.5mm(E/4) hook (see sizing notes)
Please note - this granny square vest pattern was originally designed in Sublime Egyptian Cotton DK, which has since been discontinued. We have substituted it for a similar yarn with the same length and thickness, however you should still check your tension with any substitutes and the colours may appear different to those pictured.
Measurements
Small (Medium: Large) To fit bust: 86cm/34in (100cm/39½in: 114cm/45in)
Sizing
Sizes are determined by the number of squares in the top. To make a size in between the sizes given, use a smaller hook (3.5mm or 3.75mm), checking the measurements of one square and multiplying it by 12 (14: 16) to give you the finished bust size, adding an extra 2cm to allow for seaming the squares.
Tension
Each square measures 7cm (2¾in) using a 4mm hook. Measure your squares accurately and change hook size if needed – an extra 0.5cm on each square will add 6cm to the bust of the smallest size!
Abbreviations
5-tr fan Work 5tr in stitch indicated by pattern. (Similarly 3-tr fan and 4-tr fan.)
If you’re not familiar with any of the abbreviations used check out our full abbreviations and conversions guide. This crochet granny square vest pattern is written in UK terminology but you can easily convert it to US terms using the guide.
Free granny square crochet vest top pattern
Squares
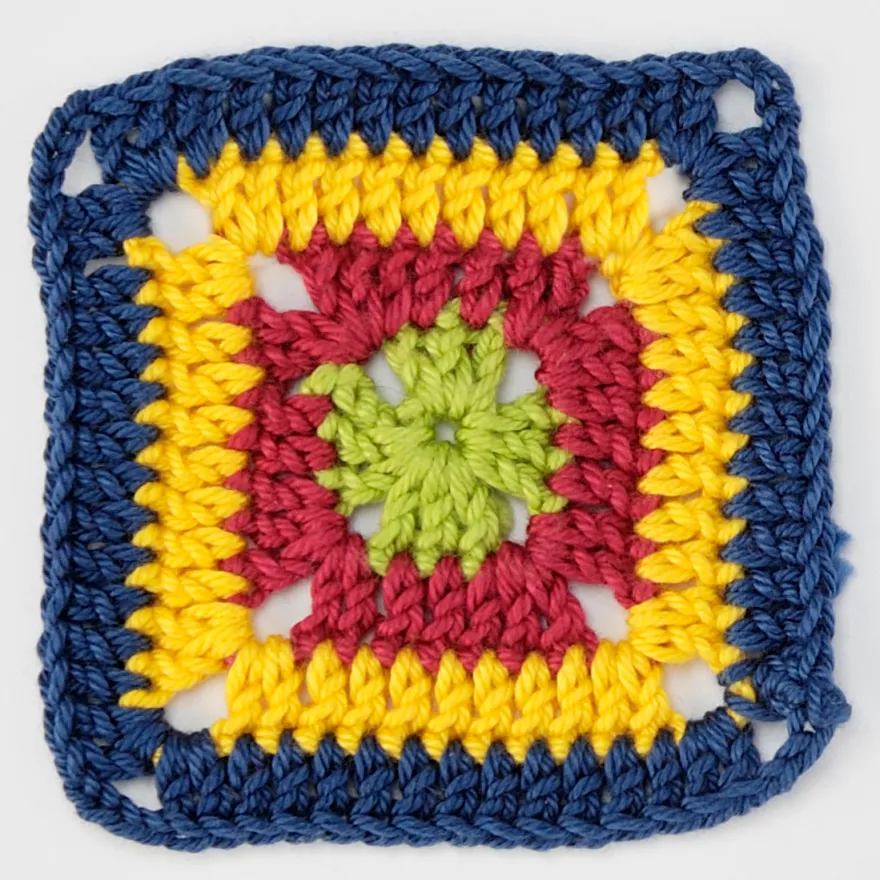
Make 35 (44: 49) squares. Every square has the final round worked in Frothy, and uses a different colour (referred to as Yarns A and B) for each of the first two rounds. You can use random colour combinations for the first 2 rounds until the yarn is used up. Change yarn on the last yrh of the previous round, and weave in ends as you work.
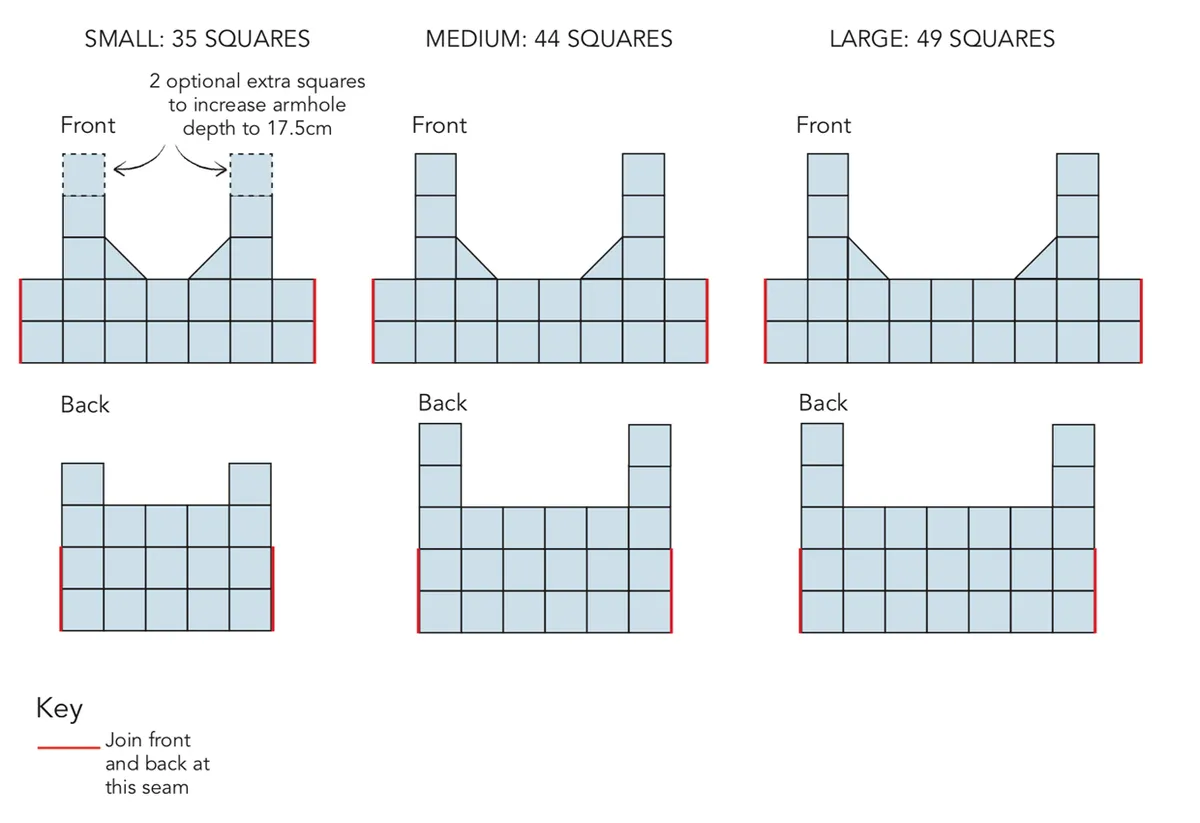
The picture above shows the small size, made with 35 squares. For the small size, you may find that you need to add an extra 2 squares (shown by dotted lines on the diagram below) to increase the armhole depth to approx 17.5cm.
With Yarn A, ch4, ss in first ch to form ring.
Round 1 (RS) Ch5 (counts as tr and ch2), working into ring, (3tr, ch2) 3 times, 2tr, ss in third ch of beg ch-5. [4 3-tr groups, 4 corner ch-2 sp] Fasten off.
Round 2 With Yarn B, ss into first corner ch-sp, ch5 (counts as tr and ch2), 3tr in same place as ss, *ch1, (3tr, ch2, 3tr) in next corner ch-sp; rep from * twice more, ch1, 2tr in same place as first ss, ss in 3rd ch of beg ch-5. [8 3-tr groups, 4 corner ch-2 sp, 4 side ch-1 sp] Fasten off.
Round 3 With Pure White, ss into first corner ch-sp, ch5 (counts as tr and ch2), 3tr in same place as ss, *ch1, 3tr in next side ch-sp, ch1, (3tr, ch2, 3tr) in corner ch-sp; rep from * twice more, ch1, 3tr in next side ch-sp, ch1, 2tr in corner ch-sp, ss in third ch of beg ch-5. [12 3-tr groups, 4 corner ch-2 sp, 8 side ch-1 sp] Fasten off.
If you fancy getting really creative with this granny square vest pattern, then why not try mixing up your squares! We've got loads of free granny square patterns that you can try - just make sure your squares meet the same measurements as the ones in this pattern!
Triangles
With Yarn A, ch3, ss into first ch to make a ring.
Round 1 (RS) Ch4 (counts as tr and ch1 throughout), working into ring, 3tr, ch2, 3tr, ch1, tr. Fasten off, turn.
Round 2 With Yarn B, ch4, 3tr in ch-1 sp, ch1, (3tr, ch2, 3tr) in ch-2 sp, ch1, 3tr in next ch-sp, ch1, tr in 3rd ch of beg ch-4. Fasten off, turn.
Round 3 With White, ch4, 3tr in ch-1 sp, ch1, 3tr in next ch-1 sp, ch1, (3tr, ch2, 3tr) in ch-2 sp, (ch1, 3tr in next ch-1 sp) twice, ch1, tr in 3rd ch of beg ch-4.
Fasten off and weave in ends.
To make up bodice
Following the diagram for your size, join squares with White as follows: With RS tog, pin edges of all squares, and sew tog on WS through the back loops of each tr and ch on each square.
Skirt
There will be two 5-tr fans per square. With RS facing, join White with a ss at a seam at the side of the garment.
Round 1 Dc around (1 dc in each tr, ch- sp and seam), ss into beg dc. [168 (196: 224) dc]
Round 2 Ch1 (does not count as st), (dc, skip 2 sts, 5-tr fan, skip 2 sts, dc) around, ss in beg dc. [24 (28: 32) 5-tr fans]
Round 3 Ss in next dc, ss in next tr, ch3, tr in next tr, ch3, dc in next tr, ch3, tr in each of next 2 tr, (tr in each of next 2 tr, ch3, dc in next tr, ch3, tr in each of next 2 tr) in each fan around, ss in top of beg ch-3.
Round 4 Ch3, 2tr in st at base of ch, (dc in next ch-3 sp, ch1, dc in next ch-3 sp, skip tr, 5-tr fan in next tr) around, ending with 2tr in base of beg ch-3, ss in top of beg ch-3.
Round 5 Ch1 (does not count as st), dc in st at base of ch, ch3, 2tr, (tr in each of next 2tr, ch3, dc in next tr, ch3, tr in each of next 2 tr) in each fan around, ending with tr in each of next 2 tr, ch3, ss in first dc.
Round 6 Ss into ch-3 sp, dc in same ch- sp, (skip tr, 5-tr fan in next tr, dc in next ch- sp, ch1, dc in next ch-sp) around until last ch-3 sp, dc in ch-3 sp, ch1, ss to beg dc.
Round 7 Ss in next tr, ch3, tr in next tr, ch3, dc in next tr, ch3, tr in each of next 2 tr, (tr in each of next 2 tr, ch3, dc in next tr, ch3, tr in each of next 2 tr) in each fan around, ss in top of beg ch-3.
Repeat Rounds 4-7 until vest measures 60 (60: 65)cm or desired length, ending with Row 4 or 6.
Neck trim
With RS facing, join White at back in the corner, ready to work over first shoulder.
Round 1 Ch1 (does not count as st), dc evenly around with 1dc in each st, ch-sp, seam or corner, and with 17dc across the diagonal of each triangle, ss to first dc. For the following round, the aim is to have a 5-tr fan in the middle of each square, and a 5-tr fan at each square seam. In each corner there is a 3-tr fan and at the wider angled corners of the neck (where the triangles join) a 4-tr fan. Between each fan there are 2 dc. To ensure the fans are always evenly placed, adjust by occasionally using 1 instead of 2 dc between fans or skip 1 when the pattern says skip 2.
Round 2 Ch3, tr in st at base of ch (counts as part of 3-tr fan), (skip 2 dc, dc in next 2 dc, skip 2 dc, 5-tr fan) worked evenly around with a 3-tr fan in each corner and a 4-tr fan at each triangle join, ending with tr in base of beg ch-3 to complete fan, ss to beg ch-3. Fasten off.
Armhole trim
For each armhole, with RS facing, join White at back corner ready to work over the shoulder. Work Rounds 1 & 2 as for Neck Trim, with a 5-tr fan in the centre and at the seam of each square, and a 3-tr fan in each corner. Fasten off.
To Finish
Make a chain in White long enough to go around the bodice and leave 23cm tails on both sides. Thread this tie evenly in and out around the top, just under the bodice, making sure that both tails come out to RS, close to centre front.
Fasten off and weave in loose ends back up the chain.
Check out some of our other free granny square patterns:
We hope you’ve enjoyed this free granny square vest pattern, don’t forget if you need any help with your crochet stitches you can always check out our crochet for beginners guide. And if you’re looking to treat yourself, check out our list of the best crochet hooks and the best crochet kits for beginners.