How to embroider Converse and give your trainers a unique twist
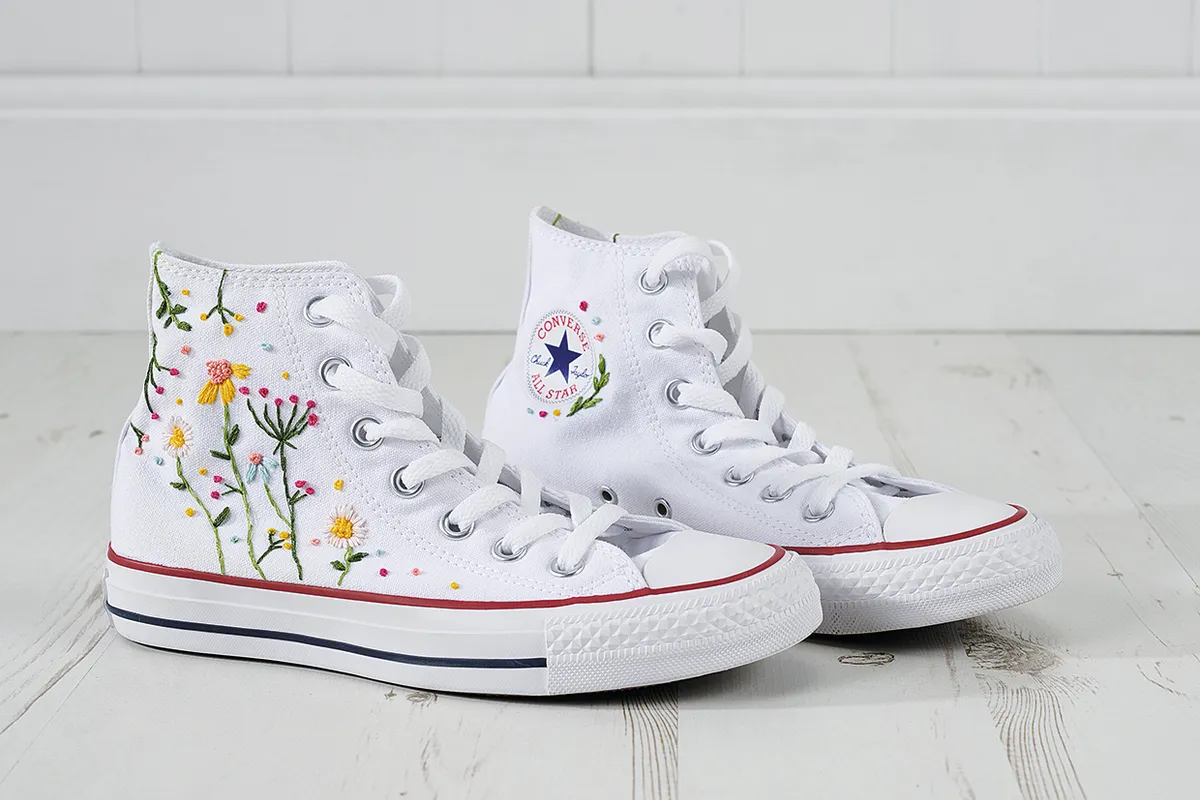
Have you always dreamed of having embroidered Converse? So have we! That's why we want to give you this brilliant project from Louise Newton. With dreamy florals and winding stems, this beautiful pattern will add a whole new dimension to your plain Converse.
We'll show you how to embroider Converse and add florals to your high tops! We will take you step-by-step through the process, from how to transfer the design to the different stitch types you'll need to use. You'll also find some handy tips and tricks along the way.
You don't have to follow the colours or stitches that are suggested here; you are totally free to customise your own signature pair of embroidered Converse to suit your personal style.
Are you new to embroidery on clothes? Find all of our top tips in our embroidery on clothes guide.
You will need:
- High top Converse
- Thread 1 skien each of:
- Blue
- Light green
- Dark green
- Orange
- Light pink
- Dark pink
- Yellow
- Stranded cotton
- Heat-erasable pen
- Embroidery transfer paper
- Basic embroidery kit
Embroidered Converse template
Download the free Converse embroidery floral template and continue below for the full tutorial.
How to embroider Converse
Step 1
Add guidelines to your Converse
There is a semicircle shape on the side of each shoe that is thicker than the rest and is too stiff to pull the needle through to stitch on. To avoid going into this area, trace over the outline of this with your heat-erasable pen or very lightly with a pencil.
This will help to guide you when you place the pattern onto the Converse.

Step 2
Transferring the designs to your Converse
There are two motifs on the embroidery stitches flowers templates: the main one is for the outer side of the shoes and the small template is used to go around the shoe’s logo on the inner side of the shoes.
The templates which are provided will fit onto the right shoe, so you need to flip it to transfer the design in reverse onto the left shoe. To do this, trace over the template on tracing paper, turn it over and draw over the lines in a dark pen on the back.
You now need to transfer the embroidery design onto your shoes. This can be tricky as the fabric is thick and floppy but there are several methods you can use:
Heat erasable pen: Draw the pattern onto the shoe using a heat erasable pen – you’ll be able to erase the lines with ease using heat or friction when you’ve finished the embroidery. This may be easier for the simple design around the shoe logo.
Embroidery transfer paper: To do this, first, trace the template onto the white side of the transfer paper using a dark ballpoint pen. Press the paper, coloured side down, onto the shoe in your chosen position and retrace the lines with a dark pen. Your pattern should transfer onto the shoe, ready for you to stitch over.
Iron-on pencil: Use a pencil in a colour that will show up on the shoe using the same technique as the transfer paper.
Trace over the embroidery template onto paper in reverse with the pencil, then place the paper, pencil side down, in the correct position on the shoe.
Trace over the lines to transfer them.

Step 3
Stitching the stems
Start off by working the stems in Split Stitch. Take three strands of dark green and light green to differentiate between the stems with French Knot buds and those with petals.
If you used light green for the stem, use dark green for the leaves and vice versa. Work the leaves with two or three Straight Stitches using all six strands of thread.

Step 4
Create the colourful flowers
Fill the daisy centres with French Knots using six strands of yellow, winding the needle round the thread one or two times. If you struggle with French Knots or are new to embroidery, you can fill in the flower centres with Satin Stitch.
In the same way, fill the centres of the two flowers in the middle of the design with orange French Knots.
Add a French Knot to the end of each stem to create the buds using a mixture of six strands of dark pink and yellow.
Fill the daisy petals with Straight Stitches using three strands of light pink.

Step 5
Add Straight Stitches for the middle
Fill the middle flowers with three or four Straight Stitches using three strands of yellow or blue thread.

Step 6
Add the smaller design to the inner shoe
The smaller design on the inside of the shoe is worked in a similar way to the main design. Work the stems in Split Stitch using three strands of dark green. Add five leaves to the stem, working each leaf as two or three Straight Stitches using six strands of light green.
Use the same blue, pink and yellow as the main design to create three French Knots on either side of the logo circle.

Step 7
Erase your lines
When you have finished stitching, it’s time to erase any lines. If you’ve used a heat-erasable pen, a low heat setting on your hairdryer or iron will remove any visible lines.
If you’ve used embroidery transfer paper, wipe gently with a damp cloth. If, after that, any stubborn transfer lines do show through and you find you can’t remove them, then simply embroider over them.

Step 8
Secure the ends of your threads
It’s important to firmly secure both ends of your threads as they will have a lot of wear inside your shoes.
To do this, weave them in and out of worked stitches several times. When starting off, leave a length of thread, then go back and secure it later.
Making your shoes the star of the show with embroidery!
You’ve discovered how to embroider Converse! By adding embroidery, you can take your Converse to a whole new level and breathe new life back into an unloved pair.
Embroidery isn’t just for Converse – update your wardrobe!
Embroidery can be utilised on pretty much any garment, and it will add a whole new dimension to your plain clothes. Try out this beautiful embroidered denim jacket for summer.

You might also like
- How to embroider socks
- Cat embroidery tutorial
- Update a faded denim jacket with these gorgeous embroidery flowers
- Kids will love this cheery embroidery animal