Learning how to crochet a hat is an important stage in your crochet journey. It’s often the first project crocheters make that they can actually wear themselves (beyond the classic starting scarf). It’s a great accessory to crochet as it teaches you many important techniques that will come in handy for future projects.
There are many different types and styles of crochet hats that you can make. From basic beanies to cool cowboy hats, you can find loads of designs in our collection of crochet hat patterns!
When it comes to learning how to crochet a hat for beginners, we would always recommend starting off with a simple bobble hat.
Read on for some helpful crochet hat advice, or if you’re ready to get stuck in you can go straight to the pattern!
How to crochet a hat for beginners
Crochet hats are almost always made by using the crochet in the round technique. This is what produces your circular shape and gives you the ability to adjust the shape and size of your hat.
Crocheting in the round can be done in two ways. The first is where you work in a spiral without joining at the end of each round, often referred to as the amigurumi method and most commonly used with UK double crochet (US single crochet) stitches.
The second method is where you join each round with a slip stitch. This creates a joining seam and is far easier for beginners to keep track of their stitches with. This is the method we will use in this pattern.
There are two main approaches to constructing a crochet hat. The most common is where you work in the round, using increase stitches (commonly two stitches worked into one stitch) to shape your hat into a semi-sphere shape. Occasionally a pattern might instead use decrease stitches if it’s worked from the bottom of the hat upwards.
Alternatively, some patterns don’t use shaping stitches.Instead you create a consistent tube of crochet fabric which is gathered at the top to close the tube, like in our alternative cosy crochet bobble hat pattern.
Once you’ve mastered these basic principles of how to make a crochet hat, there are lots of fun features you can add on to your hat! Top your hat off with a pompom, add a ribbed edging or create a shallow or wide brim.
How to adjust the size of crochet hats
The size of your crochet hat can be a bit of a confusing factor for many beginners. Crochet hat patterns will normally state the final size or circumference of your hat, however most patterns come with a ‘one size fits most’ approach.
The reality is that there are various factors that can contribute to the size of your hat.The thickness of your yarn, the size of your hook, your stitch tension and how much you increase/shape your hat all make a difference to the final outcome. If you’re following a pattern, you should always check your tension to ensure you’re working at the same scale as the intended design.
Most adult sized crochet hat patterns have a circumference of between 20-24 inches, with the smaller sizes being more common for women and teens and the larger sizes for men. However, we’re all unique, so you can always measure your own (or your intended recipient’s) head size to ensure you’re getting the best fit.
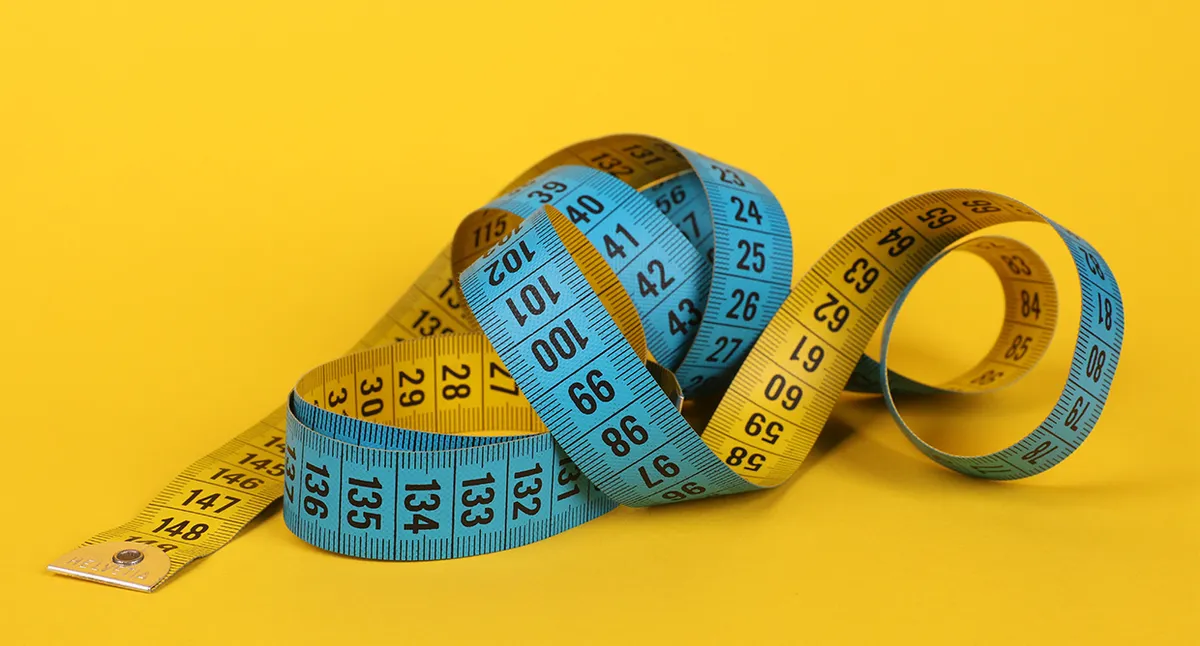
To measure your head size, simply take a tape measure and wrap it around your head so that it’s in the centre of your forehead and remains straight the entire way around, recording the point at which the tape measure meets. You want it to fit comfortably around your head – it shouldn’t be too tight but equally shouldn’t be sagging.
If you don’t have a tape measure to hand (for example, if you’re visiting a relative you’d like to make a hat for), you can take the same measurement with a piece of string, marking the joining points which you can measure later on.
This measurement is your head circumference, however, it’s worth noting that this is different from your hat circumference. You will want your hat to fit snugly on your head, so most hats will be made to be approximately an inch or two smaller than the head circumference (depending on the stretchiness of the yarn).This is called ‘negative ease’, and is essentially allowing for the stretch in your yarn. If you make a hat to exactly the same size as your head circumference, it is likely to slip off and be too large. You can find a list of average head circumferences in this handy crochet hat size chart from the Craft Yarn Council website.
You can make relatively small alterations to hat sizes by changing the hook size you’re using, or by using a slightly thicker or thinner yarn. As most hats also start by making a circle, you can also choose to omit or add more increase rounds to produce more significant size alterations.
Finally, the length of your crochet hat is also an important measurement to be aware of. This affects the appearance of your hat as well as how well it fits on your head. A longer/taller hat is more likely to stay gripped onto your head, whereas a shorter/shallower hat would be more prone to fall off.
Best yarn for crochet hats
While you can make crochet hats with all sorts of different yarns, we would definitely recommend that beginners start with a DK, Aran or chunky yarn. We would also advise starting off with an acrylic or cotton yarn, as yarns with wool fibres can felt together – making it harder to undo if you make a mistake.

It’s also wise to choose a lighter colour when making your first crochet hat, because it’s much harder to see your stitches and keep count when using dark or black yarn. Don’t worry though, after a bit of practice making crochet hats you’ll quickly gain confidence and can start making those trendy black beanies!
Free crochet bobble hat pattern
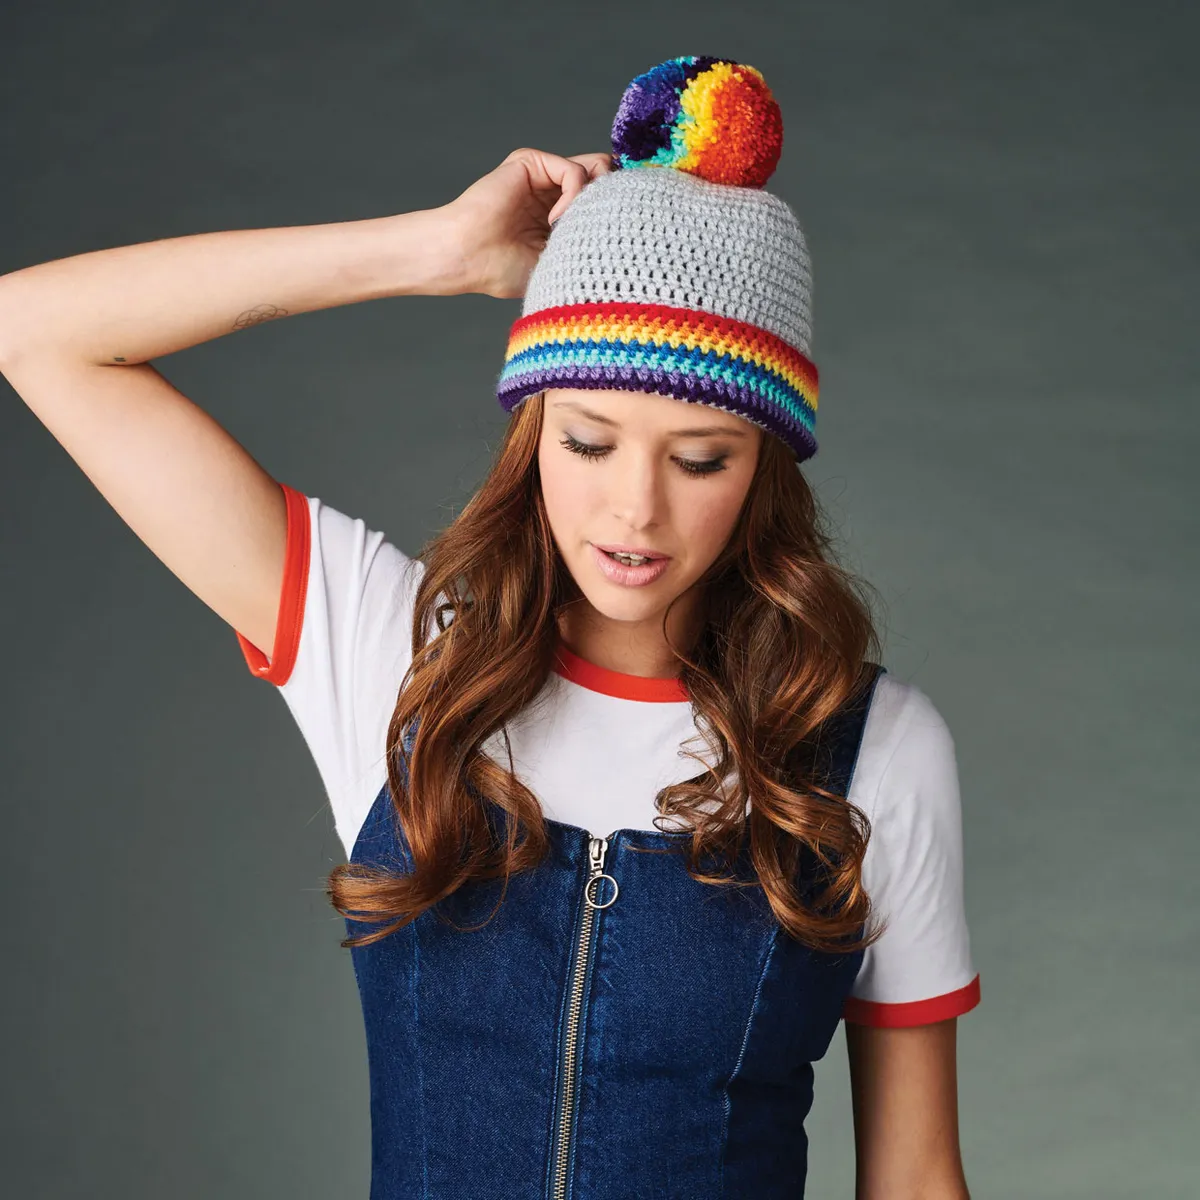
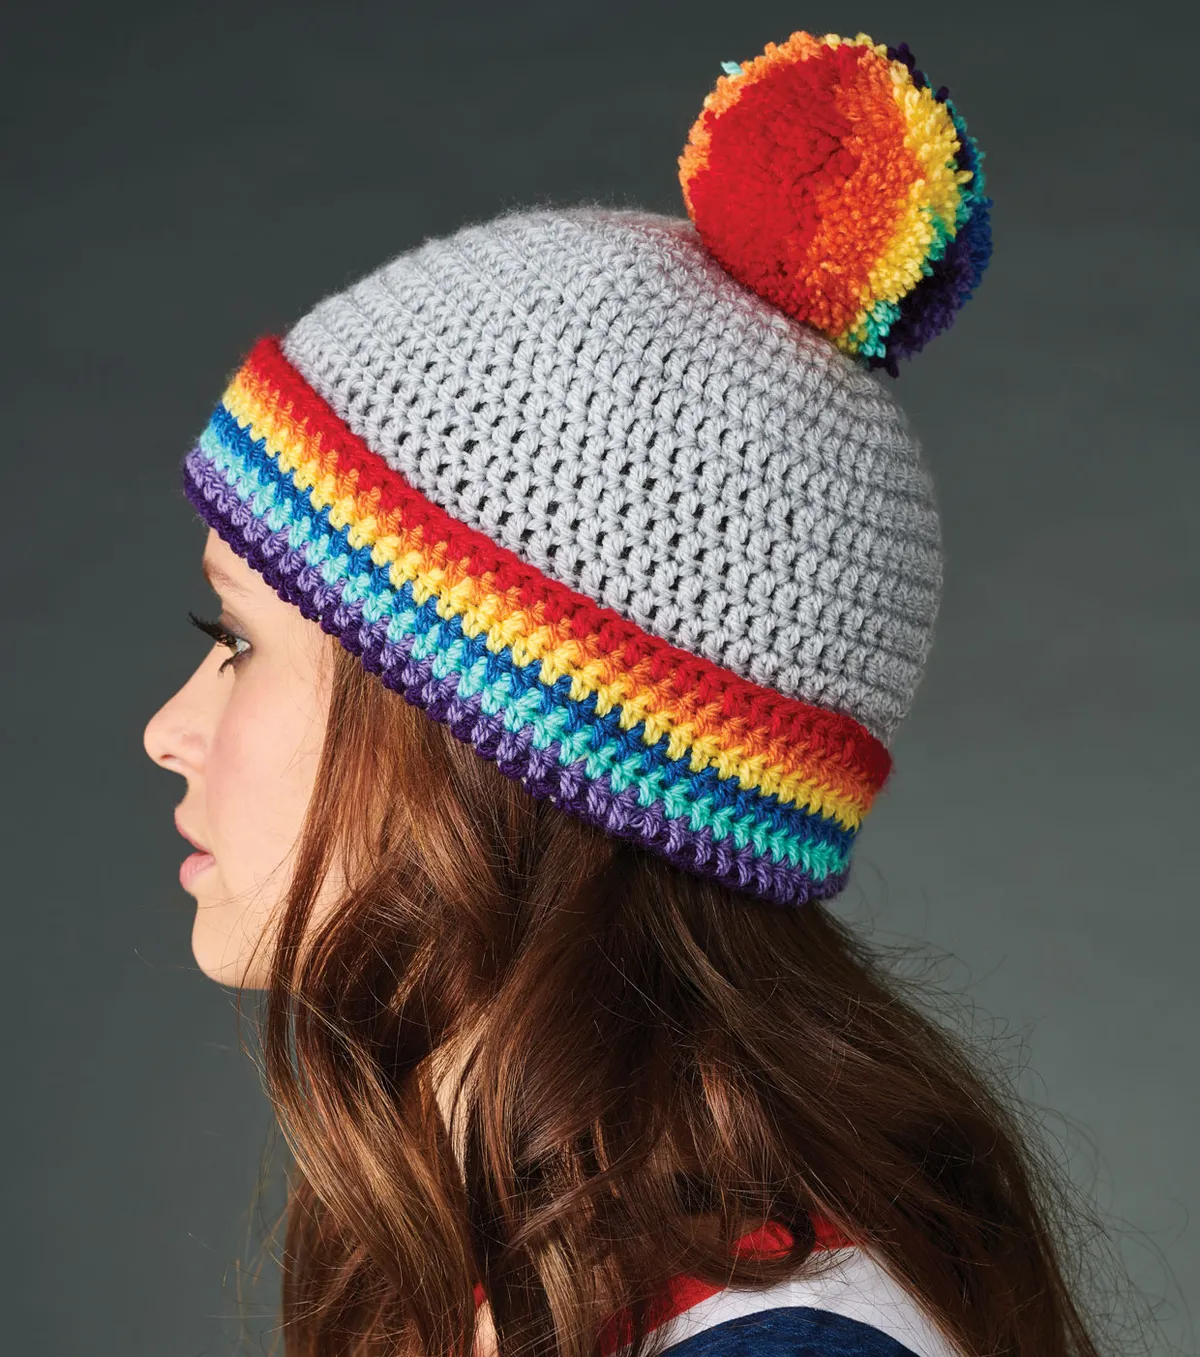
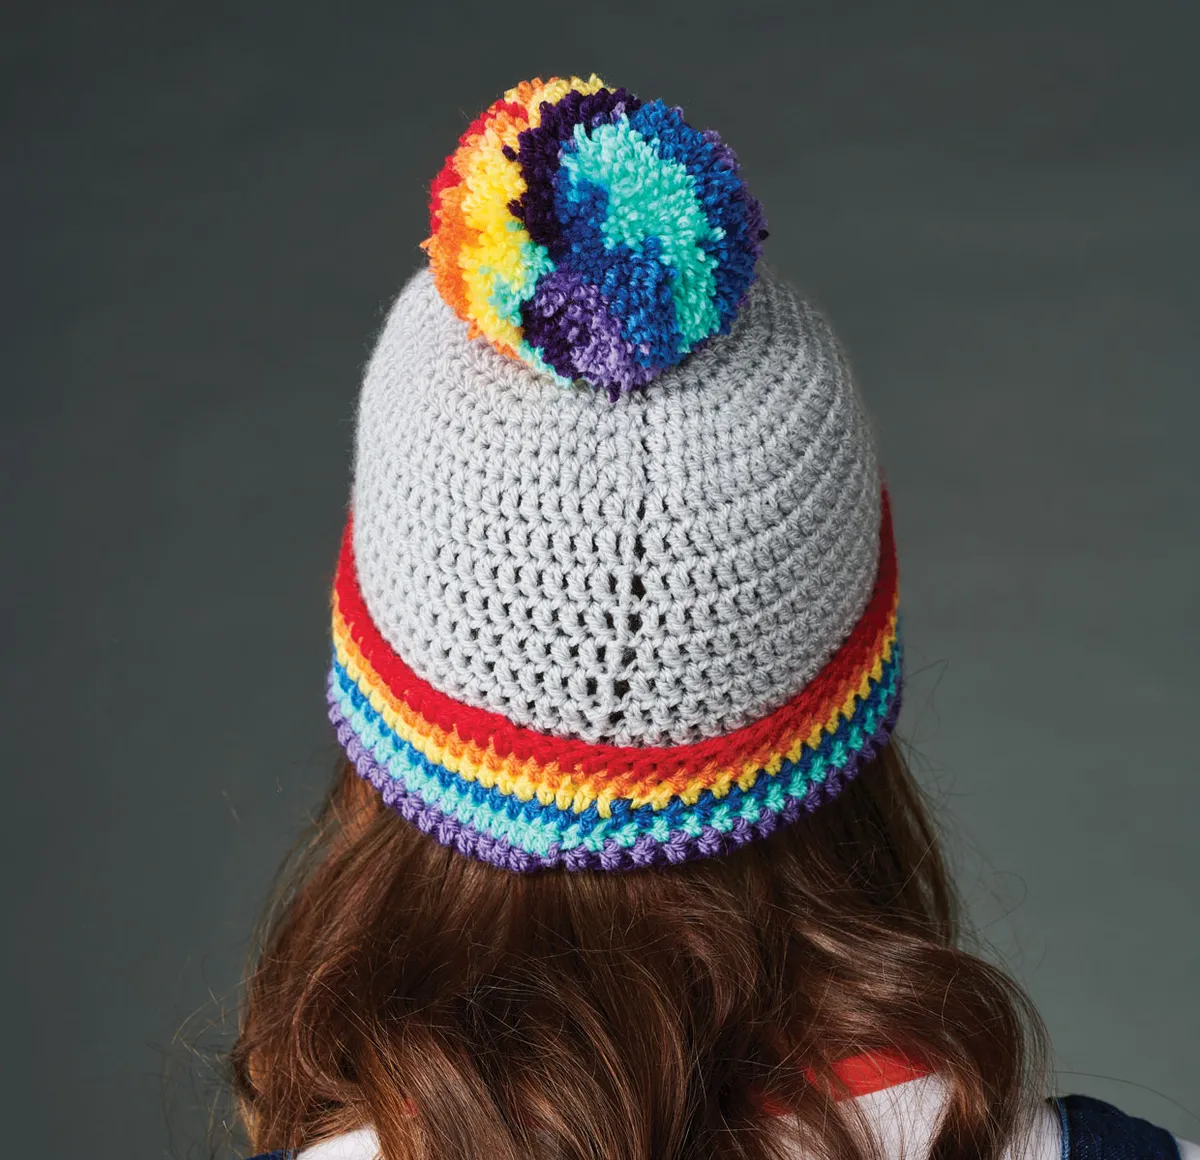
We’ve chosen this free crochet hat pattern by Melissa Masterson as our best crochet hat pattern for beginners. It combines three of our favourite things – simple crochet stitches, rainbow stripes and a giant pom pom!
As long as you know how to make a half treble crochet stitchthen you'll be able to hook up this free crochet bobble hat pattern in no time! If you're not a fan of bobble hats, remember that you can always leave off the pompom for a simple crochet beanie hat.
What do you need to make a crochet hat
To make our free bobble hat crochet pattern, you will need the following materials. Stylecraft Special DK (100% acrylic, 100g/ 295m) or alternative DK yarn, 1 ball of each:
- Silver (1203) - grey
- Emperor (1425) - purple
- Violet (1277) - violet
- Aspen (1422) - green
- Lapis (1831) - blue
- Citron (1263) - yellow
- Spice (1711) - orange
- Lipstick (1246) - red
Before you start, don’t forget to check your tension
Using your DK yarn and 4.5mm crochet hook, make a tension square that is 16 half treble (htr) crochet stitches wide and 12 rows high, which should measure 10x10cm (4x4in). If your square is too small, try increasing the size of your hook by 0.5mm or more (vice versa for if it’s too large).
Important information about this free bobble hat crochet pattern
This crochet hat measures approximately 52cm (20.5in) in diameter, 19cm (7.5in) tall, so should be suitable for most average sized women’s heads. This free crochet hat pattern is worked top down in the round.
You can find a full list of all abbreviations we use in our abbreviations and conversions guide. This crochet bobble hat pattern is written in UK terminology but you can easily convert it to US terms using the guide.
How to crochet a hat
Start your hat by making a circle
Using Silver yarn, make a magic loop. If you’re new to the magic loop technique, you can alternatively chain (ch) 4 and join with a slip stitch (ss) to make a ring.
Round 1 (RS) Ch2 (counts as first htr throughout), 9htr into magic loop, ss to top of beginning (beg) ch-2 to join, pull magic loop closed. [10 sts]
Now we’re going to start increasing the size of our circle
Round 2 Ch2, htr in same stitch (st), 2htr in each st to end, ss to top of beg ch-2. [20 sts]
Round 3 Ch2, 2htr in next st, (htr in next st, 2htr in next st) to end, ss to top of beg ch-2. [30 sts]
Round 4 Ch2, htr in next st, 2htr in next st, (htr in next 2 sts, 2htr in next st) to end, ss to top of beg ch-2. [40 sts]
Round 5 Ch2, htr in next 2 sts, 2htr in next st, (htr in next 3 sts, 2htr in next st) to end, ss to top of beg ch-2. [50 sts]
Round 6 Ch2, htr in next 3 sts, 2htr in next st, (htr in next 4 sts, 2htr in next st) to end, ss to top of beg ch-2. [60 sts]
Round 7 Ch2, htr in next 4 sts, 2htr in next st, (htr in next 5 sts, 2htr in next st) to end, ss to top of beg ch-2. [70 sts]
Let’s get technical!
By now you may have noticed the regular stitch increases that are widening our circle, which can be viewed as:
‘htr in next (previous rows amount of stitches +1), 2htr in next st’.
If you were using a thinner yarn or needed to make a larger than average hat, you could continue adding more rounds using this principle.
If you want to get really technical, taking your desired hat circumference and dividing by pi (3.14) will give you the diameter that you should increase your circle up to.
Note – if you need to adjust this particular pattern you will need to omit round 8.
Round 8 Ch2, htr in next 33 sts, 2htr in next st, htr in next 34 sts, 2htr in next st, ss to top of beg ch-2. [72 sts]
Turning the circle into a semi-sphere
In the following rounds we will just work regular rounds of stitches without increases. You will notice that after doing approximately 2-3 rounds your circle will start to curl into a bowl shape. This is what you want to happen so you can make the sides of your hat.
Rounds 9-19 Ch3 (counts as first tr), treble crochet (tr) in each st to end, ss to top of beg ch-3.
Fasten off and weave in any ends.
How to give your hat a rainbow brim
Every crochet hat looks better with some rainbow stripes, but of course you can skip the colour changes if you’d prefer a plain coloured hat.
Round 1 Holding Hat with top furthest away from you, join Emperor with a ss to front loop (fl) of any st of last round, ch2 (counts as first htr throughout), working in fl only: htr in each st to last st, 2htr in last st, ss to top of beg ch-2. [73 sts]
Fasten off.
Join Violet with a ss to any st of last round.
Round 2 Ch2, htr in each st around, ss to top of beg ch-2. Fasten off.
Rounds 3-8 Rep Round 2 in the following colour sequence: Aspen, Lapis, Citron, Spice, Lipstick, Aspen.
Fasten off and weave in ends.
Finish your crochet bobble hat with a fabulous pompom
Make a large pompom with a pompom maker, using an equal mix of yarn in all colours except Silver.
If you need instructions or don’t have a pompom maker, you can find plenty of handy advice in our how to make a pompom guide. Use the tails of your pompom to attach it to the top of the hat, then weave in all ends.
Making your first crochet hat is just the beginning
Once you’ve made your first crochet hat, there’s so many more to try! You’ll find crochet hat patterns in a range of stitches, textures and colours.
Once you’ve had plenty of practice, you can even freestyle your crochet hats and make your own designs. Now that you know the basics of how to crochet a hat, there’s a whole world of crochet headgear for you to hook!
Try making a crochet beanie hat next
For the next step on your crochet hat journey, we’d recommend making our free slouchy beanie crochet hat pattern. It’s a bit different from this pattern as it’s made from the bottom up and uses UK double crochet stitches, allowing you to learn more useful crochet techniques with Gathered!