All products were chosen independently by our editorial team. This review contains affiliate links and we may receive a commission for purchases made. Please read our affiliates FAQ page to find out more.

How to make an origami rabbit

Learn how to make this adorable origami rabbit with a single sheet of 15 x 15cm paper and our easy-to-follow step-by-step tutorial!

Try our magazines – get 6 issues from just £9.99!

Published: January 11, 2022 at 6:56 am

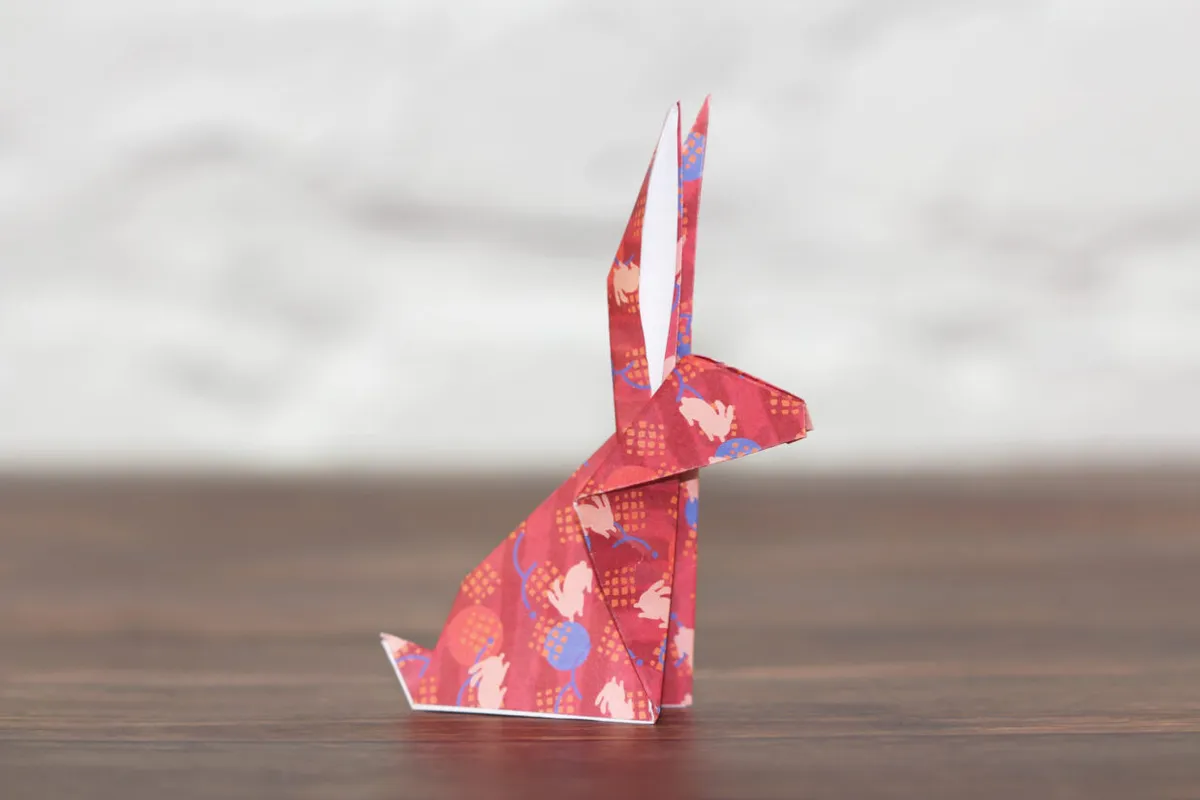
This adorable little origami rabbit is easier than he looks. So, grab a piece of 15 x 15cm paper and follow our step-by-step tutorial to make your own! He stands up on his own, and he’s the ideal model to make using double-sided paper – you can see the reverse of the paper as the inside of his ears.

Like this origami rabbit tutorial? Why not check out some of our other origami projects here on Gathered, like this origami crane, or this origami duck. And if you like origami animals, we also have this origami swan and this origami butterfly.

If you fancy boosting your stash, check out our pick of the best origami paper, or if you’re on the hunt for more easy origami projects, we have them all collated here, in our easy origami for beginners article.

We love seeing what you make, so don’t forget to share your origami projects with us on Instagram, Facebook or Twitter, too!

Buy some origami paper!

Chiyogami origami paper, Amazon

Buy now: £14.99, Amazon

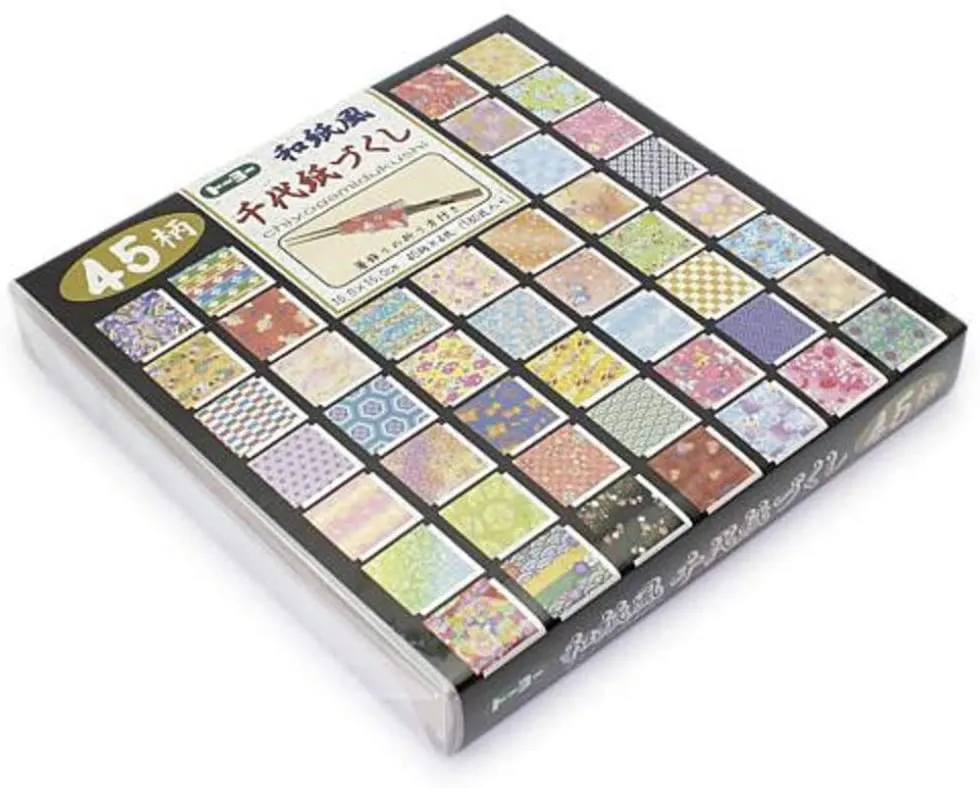
Chiyogami is a specific word developed to describe the patterns and designs applied to paper in Japan’s Edo period, between 1603 and 1867. This speciality origami paper is thinner than regular paper, to enable greater manipulation in terms of the folds, this is the paper we used for our origami crane! You get a whopping 180 sheets with 45 beautiful traditional designs, so plenty of spare paper if you mess up. This is the paper we used for the main origami rabbit in this article - it features wee bunnies as part of the design print!

How to make an origami rabbit - completed model 1

How to make an origami rabbit

Step 1

To make your origami rabbit, start with a 15 x 15cm square of origami paper. Fold in half diagonally. For the purpose of this tutorial, we are using double-sided origami paper which is navy on one side and red on the reverse.

How to make an origami rabbit – step 1b How to make an origami rabbit – step 1d

Step 2

With fold positioned at the top, fold one of the sides down, so that the corner meets the bottom corner.

How to make an origami rabbit – step 2

Step 3

Fold the other side down, so that the other corner meets the bottom corner, creating a square-diamond shape.

How to make an origami rabbit – step 3

Step 4

Next, narrow one of the sides, by bringing the edge to meet the centre line.

How to make an origami rabbit – step 4

Step 5

Repeat with the other side, so that you have formed a kite shape. Flatten the creases with a bone folder if you have one, or the edge of a ruler.

How to make an origami rabbit – step 5

Step 6

Open one of the sides and flatten it to create a diamond shape.

How to make an origami rabbit – step 6

Step 7

Repeat with the other side.

How to make an origami rabbit – step 7

Step 8

Fold the whole model in half (mountain fold) along the vertical.

How to make an origami rabbit – step 8

Step 9

Take one of the points, and fold upwards so that it is at a right angle. As you fold the point upwards, keep it on the inside of the design and you will find that it will naturally want to flip and face the other way, with the folded edge now facing up. This is one of the rabbit’s ears!

How to make an origami rabbit – step 9

Step 10

Turn the model over and repeat on the other side to make the other ear.

How to make an origami rabbit – step 10

Step 11

Next, we’re going to shape the ears by narrowing them. Starting at the base of one of the ears, fold the ear so that it ends up positioned roughly midway between the other ear and the body (approximately a 45-degree angle).

How to make an origami rabbit - step 11

Step 12

Repeat for the other ear, this time aligning it with the first.

How to make an origami rabbit - step 12

Step 13

Rotate the model 90 degrees anticlockwise – it’s starting to look like a rabbit!

How to make an origami rabbit - step 13

Step 14

The next part requires a little paper manipulation. To make the head, bring the top point down, opening the model as you go. Fold the head around the ears, so that the rabbit’s body (chest) becomes vertical. You’ll find the paper will naturally want to fold around the ears. Press the creases to hold it in shape.

How to make an origami rabbit - step 14b

Step 15

Fold the tip of the nose inwards.

How to make an origami rabbit - step 15

Step 16

Finally, give your origami rabbit a tail by folding the tail inwards and up.

How to make an origami rabbit - step 16

Step 17

Open up your origami rabbit model to make it stand up! It’s nice to also open the ears to give your model some shape, as well as to show off the reverse of the paper.

How to make an origami rabbit - step 17
How to make an origami rabbit - completed model 4


Beautiful origami paper to buy!

1. Plain origami paper

Origami for beginners

Buy now: £7.99, Amazon

Coloured on one side and white on the other, having a stash of plain origami paper is great for practising models. There are 50 different colours in the pack and each sheet is 20 x 20cm, just a little larger than the traditional 15 x 15cm square sheets.

2. Clairfontane origami paper

Boheme chic origami paper, Amazon

Buy now: £6.11, Amazon

This pad contains 60 sheets in total with 30 different designs. It’s made from 70gsm paper and is plain white on the reverse. With traditional native-American-inspired designs, the patterns include feathers and flowers in a beautiful, fresh spring colour palette.

3. Bird-print origami paper

Bird themed origami paper

Buy now: £5.63, Amazon

This origami paper pack features eight different bird prints reproduced from Japanese woodblocks in the ukiyo-e style of art, each with a coordinating solid colour on the reverse. The paper is slightly larger, 20 x 20cm, so you can use it for more complicated designs, too. The bird illustrations are gorgeous, and although you only get 48 sheets in a pack, we think it’s worth the money.

4. Handmade origami paper

Handmade origami paper – image 7, Amazon

Buy now: £12.99, Amazon

Okay – so you’ve practised a model, and now you want to make a special one? Perhaps as a gift, or to make a topper on the front of a card? Well, this handmade paper is perfect for when you want to create something a little more special.

5. Colourful double-sided origami paper

How to make an origami crane

Buy now: £8.54, Amazon

This is the origami paper we used for our steps photos – it’s great, because not only is it double-sided, but the sides are different colours so it really adds a little bit extra to those designs where you see both sides of the paper. Plus it comes as loose leaf, so you don’t need to faff with carefully snipping off the perforated edges, which is handy. We love his double-sided origami paper, the blue/red combo works brilliantly for this origami rabbit!

How to make an origami rabbit – completed model 3

How to make an origami rabbit – completed model 2


We hope you’ve enjoyed this tutorial, how to make an origami rabbit. We have plenty of other origami projects here on Gathered, too – like this traditional origami crane, this origami owl or these adorable (and super easy) origami cats.