All products were chosen independently by our editorial team. This review contains affiliate links and we may receive a commission for purchases made. Please read our affiliates FAQ page to find out more.

Make your own cute Easter bunny

Get multi-crafting with Regina Groleau's cute Easter bunny plush, complete with Sara Huntingdon's cute crochet jacket.

Try our magazines – get 6 issues from just £9.99!

Published: March 22, 2023 at 10:41 am

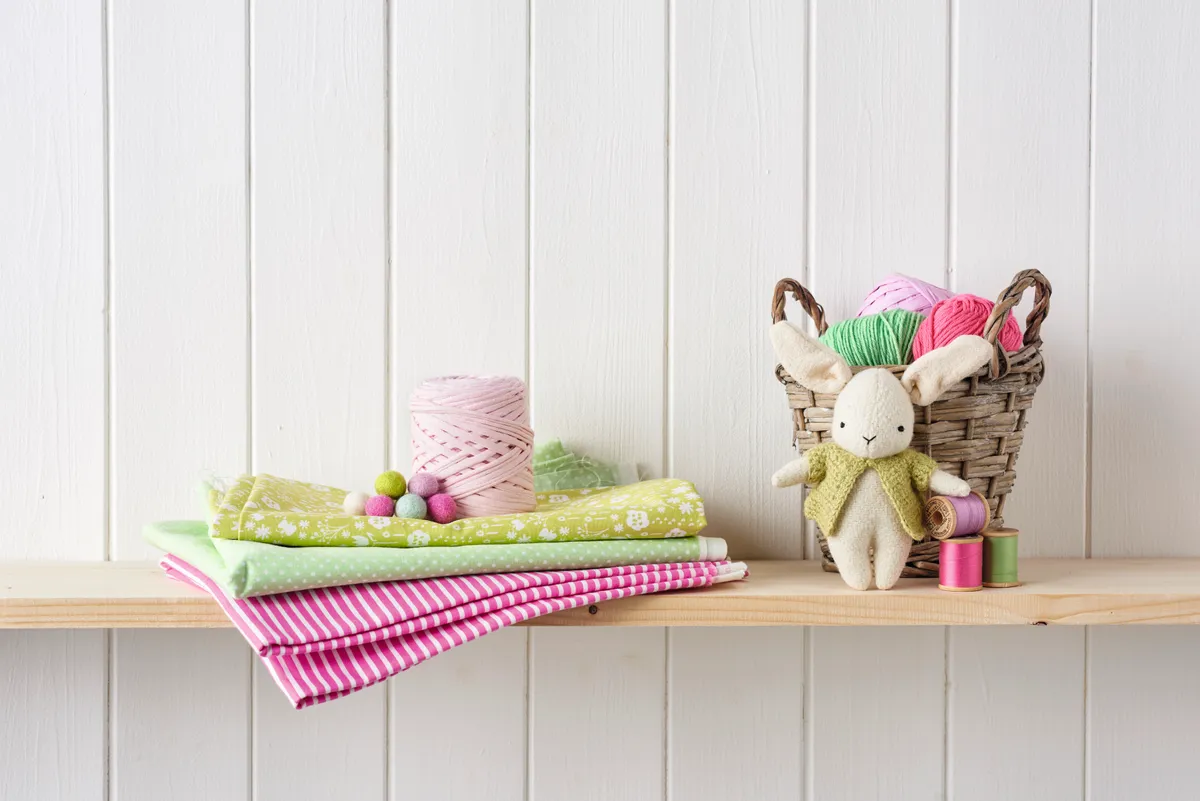
Calling all multi-crafters: here’s a chance to get working your needle, thread, hook and yarn, all at once. Regina Groleau and Sara Huntington have created this bunny pattern to sew and we just love it!

This cute Easter bunny comes with his very own crocheted jacket – however, if you’re a dedicated sewist-only, you could make your own alternative outfit, or simply tie a snazzy bow around his neck.

If you’ve got multiple children to make Easter gifts for, then you could customise each rabbit for its prospective owner. Try to use woven wool fabric with no right/ wrong side for easier assembly.

Make your own cute Easter bunny

Materials

For your cute bunny pattern:

For your cute Easter bunny jacket

Tension: 11sts and 20 rows to 5cm (2")

If you're new to crocheting check out our crochet for beginners guide and our how to crochet video series.

Your free bunny pattern to sew

You will need:

  • Fabric
  • Yarn
  • Thread
  • Crochet hook
  • Stuffing

Step 1

Cutting out your bunny peices

Cute Easter bunny step 1Transfer the Templates from Mollie Makes issue 63 onto your fabric.
 
Cut out the pattern pieces (no seam allowance is necessary for this pattern).
 
If you’re using a fabric with a right/wrong side, remember to reverse one of the headpieces.

Step 2

Cute Easter bunny step 2

Sew up the darts (about 4mm from the edge) on the two head pieces to create cupped shapes.

The two pieces should mirror each other: face one piece to the left, and one piece to the right before sewing the darts.

Step 3

Stitching the body pieces together

Place your two head pieces right sides (RS) together and pin. Sew from point A to point B, following the arrow.

Take extra care to line up the top darts: pin on either side of the dart, right next to the centre seam to stop them from shifting.

Step 4


Cute Easter bunny step 4

Place the two body pieces together and pin. Sew from point C to point D.

Fold one of the arms in half along the dotted line, pin and sew from point E to point F.

Place one outer ear (wool) on one inner ear (cotton) (RS together if applicable), pin and sew from point G to point H.

Repeat for the other arm and ear.

Step 5

Turning your body pieces inside out

Cute Easter bunny step 5

Clip the curves using sharp scissors, taking care not to cut through your stitch line.

Use your forceps to turn your sewn pieces RS out: grab the open edge at the seam with the forceps and flip the edges over.

Slowly push the fabric through to the RS.

If it binds up, pull it back out a bit and use your forceps to gently open the space you’re pulling through.

Cute Easter bunny step 5b

Step 6

Time to get stuffing!

Cute Easter bunny step 6aGently push small pieces of stuffing into the furthest part of each piece, slowly filling in the shape.
You may find it easier to use forceps. Use the curve of your palm to stuff against.
Add extra stuffing to fill out cheeks or tummies and keep an eye on the seams to make sure they’re not strained.
Cute Easter bunny step 6b

Step 7

How to close your bunnies head

Cute Easter bunny step 7

Close up each open seam using a ladder stitch in extra strong thread. Just before you close up each piece, stuff in just a little bit more wool to make it extra stable.

Beginning on one side of the opening, sew small parallel stitches as shown in the photo.

Pull your thread tight and the seam will ‘zip’ closed almost invisibly.

Step 8

How to join your rabbit’s arm to the body

Cute Easter bunny step 8

Join the arms to the body using a simple string joint.

Using your doll needle and extra strong thread, take the needle from inside R arm, outside R arm, inside R arm, through the body, inside L arm, outside L arm, inside L arm, through the body, pulling the thread tight as you go.

Repeat this process three times.

If you’re planning to give this bunny to children, repeat this whole step again with a separate piece of thread to give added security.

To save your hands, you can use some forceps or tweezers to push your needle through and out again.

Step 9

Let’s attach your bunny head to the body

Cute Easter bunny step 9

Attach the head to the body using ladder stitch and extra strong thread. Pull the thread tight to snug the head down against the body.

Step 10

Time to stitch your bunny rabbit’s nose

Cute Easter bunny step 10

Tie a half hitch knot in one end of your embroidery floss and insert your needle into the fabric, tugging until your knot disappears.

Add a classic bunny nose with a single fly stitch (see our embroidery stitches guide to learn how to do this stitch!).

Step 11

Now it's time to give your bunny some eyes

Mark the eyes with glasshead pins.

Try them in several different positions until you have a face you’re happy with.

Embroider them using small parallel lines, taking care to create a smooth, rounded shape.

Step 12

How to sew your rabbits ears

Cute Easter bunny step 12aFold the ear in half lengthwise and sew the bottom edge shut using ladder stitch and extra strong thread.
Ladder stitch the bottom of the ear to the head, using a straight pin to anchor it in place. Repeat for the other ear.
Cute Easter bunny step 12b

Step 13

Sewing your bunnies tail

Cute Easter bunny step 13a

Sew a simple running stitch around the edge of the tail piece using extra strong thread.

Pull it tight to gather the edge and create a ball shape.

Knot off to secure the running stitch, then attach the tail to the backside of the body using ladder stitch.

Cute Easter bunny step 13b

Use a straight pin to anchor the tail in position while you sew.

Double check all joints are fully secure, and your cute Easter bunny is ready to play!

Cute Easter bunny step 14


Looking for more bunny patterns?

Head over to our Easter rabbit sewing pattern and make your little bunny another friend!


Step 14

How to crochet your cute Easter bunny's jacket

cute Easter bunny cropThe fronts and back of the rabbit's jacket are worked as one piece in rows from the top-down and the sleeves are worked in the round. There’s no sewing or seaming required.
 
The finished jacket is 5cm (2") long from the neck downwards, approximately 10cm (4") around the neck, 16cm (6 /8") around the bottom, and the sleeves are  1.5cm ( /8") along the underarm.
The length can be varied by increasing or decreasing the number of rows after the arm shaping.

Step 15

Crocheting the jacket base

Foundation ch25

Row 1 (WS) dc in second ch from hook, 1dc in each st along, turn [24sts]

Row 2 (increase row) ch1 (does not count as st here and throughout), *1dc in each of next 2 sts, 2dc in next st; repeat from * 7 more times, turn [32 sts]

Row 3 ch1, 1dc in each st along, turn [32sts]

Row 4 (increase row) ch1, *1dc in each of next 7 sts, 2dc in next st; repeat from * 3 more times, turn [36sts]

Row 5 ch1, 1dc in each st along, turn [36sts]

Step 16

Crochet your bunnies' armholes

Row 6 (RS) ch1, 1dc in each of next 5 sts, ch5, miss 5 dc, 1dc in each of next 16 sts, ch5, miss 5 dc, 1dc in each of last 5 sts, turn [26dc and 2 x 5ch-sps]

Row 7 ch1, 1dc in each st along and working 1dc in each of the ch of the 5ch-sp, turn [36sts]

Row 8 ch1, 1dc in each st along, turn. Repeat Row 8 until the jacket measures 5cm (2") from neck edge. Break yarn and fasten off.

Step 17

Now it's time for the sleeves!

With RS facing and neck pointing downwards, join yarn to first dc on Row 5 that you missed on Row 6, ch1 (does not count as st), 1dc in each of missed 5 dc, 1dc into corner, pick up and work 1dc into the unused back loops of each of the 5 ch from Row 6, 1dc into corner [12dc]

Now place stitch marker in the first st and work dc in each st in the round (in a spiral formation and not joining at the end of each round, moving stitch marker to the first st of each new round) until the sleeve measures 1.5cm ( /8"), ss to first st of last round to join. Break yarn and fasten off. Repeat for second sleeve.

Step 18

Time to do the edging

With RS facing, rejoin yarn to top left edge of jacket and work dc as follows:

13 dc evenly down each front edge and 36 dc into the bottom of the jacket [62 dc]

Break yarn, fasten off and darn in all ends.

Block and press.

Your Easter bunny is complete!

Sew your own Easter bunny this spring!

This sweet bunny pattern to sew makes the perfect spring stitching project.

Whether you gift your little bunny to a loved one or use it as Easter decor, we hope you enjoy making your own mini Easter bunny!

Discover more adorable animal patterns with Gathered

If you’ve enjoyed this bunny pattern to sew then you’ll love our collection of crochet animals! Check out our amigurumi crochet patterns.