All products were chosen independently by our editorial team. This review contains affiliate links and we may receive a commission for purchases made. Please read our affiliates FAQ page to find out more.

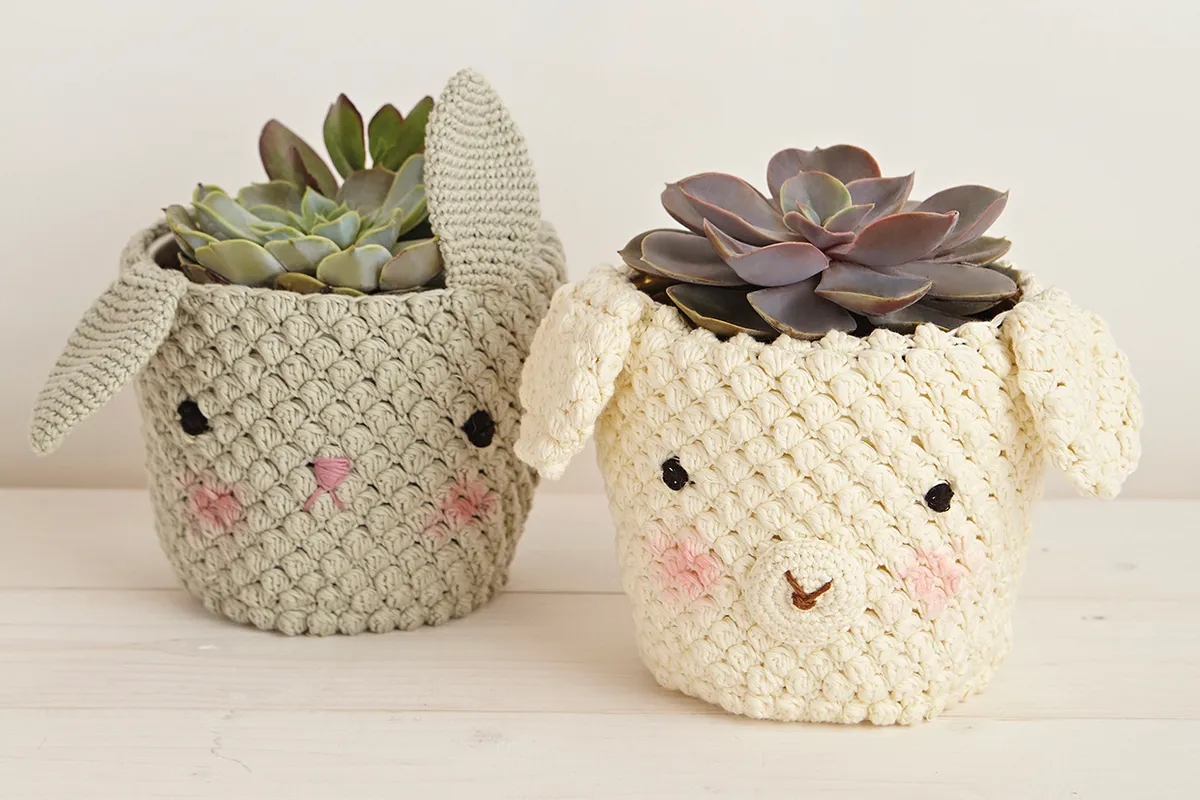
Crochet lamb and bunny DIY plant pot cover patterns

Make your own DIY crochet plant pot cover using our adorable crochet lamb and crochet bunny patterns.

Try 6 issues of your choice of craft magazine from just £9.99

Published: March 3, 2022 at 9:00 am

Spring reminds us of two things, baby animals and plants! These DIY plant pot crochet covers by Sandrine Deveze have the cutest bunny and lamb faces and will be your most popular Easter crochet decorations this year. Plus you could also use your crochet plant pot cover as Easter crochet baskets for the big day. These crochet bunny and crochet lamb crocheted pot covers use bobble stitches to give them a fabulous texture! We've included instructions for this in the tutorial below, but if you need any more help you can check out our full how to crochet bobble stitch tutorial.

And if you're looking for more fantastic Easter crochet patterns, then check out our list of Top 50 free Easter crochet patterns.

You will need

DMC Natura Just Cotton, (100% cotton, 50g/155m), or alternative 4 ply cotton yarn, one ball each in

  • Nacar (N35)
  • Ambar (N04)

Black, brown and pink embroidery thread

Small piece of scrap fabric and red coloured pencil

3mm (UK 10, US D/3) crochet hook

Stitch marker

Tapestry needle

Embroidery needle

Scissors/snips

Abbreviations (UK)

You can find a full list of all abbreviations we use in our abbreviations and conversions guide. This crochet plant pot cover pattern is written in UK terminology but you can easily convert it to US terms using the guide.

dc2tog double crochet 2 together – (insert hook in next st, yrh and draw loop through) twice, yrh and draw through all 3 loops on hook.

Finished Size

Each crochet plant pot cover fits a plant pot around 12cm (4¾“) in diameter and 12cm (4¾“) tall, but they can be easily adapted to any size by increasing the rounds. Tension is not too important for these crocheted pot covers, just aim for a firm finish that covers the pot well.

Notes

Both of the crochet plant pot covers are made in one piece, crocheting from the base upwards. They are then decorated with crocheted ears and embroidery for the face details.

Each piece begins with a ring. To start a round, use any type of ring you are comfortable with. We've started our first round of the base with (ch2, work 6 dc into 1st ch) but you can use the a crochet magic loop if you prefer. Work in one continuous spiral (do not join rounds) and mark the last stitch of each round with a stitch marker to keep track of where you are.

How to crochet bobble stitch

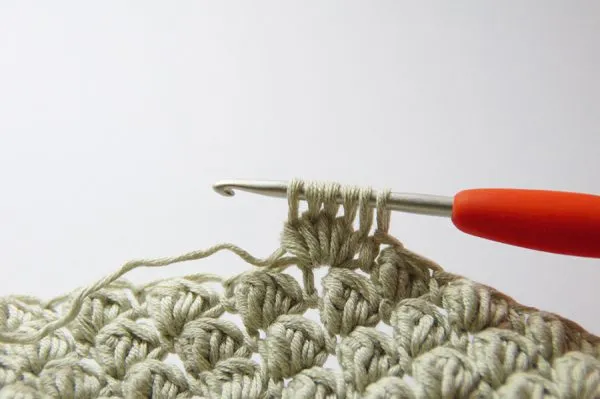
Bobble stitch is where you work several stitches into the same place but omit the last step of each stitch. After you complete the stitches, yarn over and pull through all remaining loops on the hook.

This pattern uses a 5tr bobble stitch as follows: (yrh, insert hook in next st, yrh and draw loop through, yrh and draw through just 2 loops on hook) 5 times, yrh and draw through remaining 6 loops on hook. Crochet tightly, taking care that your bobble stitch stands out on the front of your work and not on the back. If you need more help with these stitches check out our how to crochet bobble stitch tutorial.

Easter bunny and lamb crochet plant pot covers

You will need:

  • Yarn
  • Crochet hook
  • Tapestry needle

Step 1

How to make the base

Use Nacar yarn for the crochet lamb plant pot cover and Ambar yarn for the crochet bunny plant pot cover .

crochet plant pot cover step 1

Round 1 ch2, work 6dc into 1st ch [6 sts]

Round 2 2dc in each st around [12 sts]

Round 3 (2dc in next st, 1dc in next st) 6 times [18 sts]

Round 4 (2dc in next st, 1dc in each of next 2 sts) 6 times [24 sts]

Round 5 (2dc in next st, 1dc in each of next 3 sts) 6 times [30 sts]

Round 6 (2dc in next st, 1dc in each of next 4 sts) 6 times [36 sts]

Round 7 (2dc in next st, 1dc in each of next 5 sts) 6 times [42 sts]

Round 8 (2dc in next st, 1dc in each of next 6 sts) 6 times [48 sts]

Round 9 (2dc in next st, 1dc in each of next 7 sts) 6 times [54 sts]

Round 10 (2dc in next st, 1dc in each of next 8 sts) 6 times [60 sts]

Round 11 (2dc in next st, 1dc in each of next 9 sts) 6 times [66 sts]

Round 12 (2dc in next st, 1dc in each of next 10 sts) 6 times [72 sts]

Round 13 (dc2tog, 1dc in each of next 10 sts) 6 times [66 sts]

Round 14 (bobble in next st, 1dc in next st) all around [66 sts]

Round 15 (dc2tog, 1dc in each of next 9 sts) 6 times [60 sts]

Our plant pot cover diameter measured 12cm (4¾”). If yours is larger, continue increasing after Round 12 until you reach the size you require, before finishing with Rounds 13 to 15.

If you fancy trying some alternative crochet plant pot covers, our free pen pot cosies crochet pattern or our 3 DIY craft storage pots would both make great crafty plant pot covers. Or you could try suspending your plants with our simple How to make a macrame plant hanger tutorial!

Step 2

How to make the sides

crochet plant pot cover step 2

Round 16 (bobble in next st, 1dc in next st) all around [60 sts]

Round 17 (dc in next st, bobble in next st) all around [60 sts]

Note that the bobble st on one round goes into the dc in the round below, and the dc on a round goes into the top of a bobble on the round below.

Repeat Rounds 16 and 17 a further 7 times, then repeat Round 16 again (32 rounds in total)

Slip stitch to join final round. Fasten off and sew in ends.

Step 3

Crochet Bunny ears (make two)

crochet plant pot cover step 3

These are also made in the round, in a spiral using Ambar yarn.

Round 1 ch2, work 6dc into 1st ch [6 sts)

Round 2 1dc in each st around [6 sts]

Round 3 2dc in each st around [12 sts]

Round 4 1dc in each st around [12 sts]

Round 5 (2dc in next st, 1dc in next st) 6 times [18 sts]

Rounds 6-15 1dc in each st around [18sts]

Round 16 (dc2tog, 1dc in next st) 6 times [12 sts]

Round 17 1dc in each st around, ss to 1st dc of round to join [12 sts]

Break yarn and fasten off, leaving a long tail for sewing.

Step 4

Crochet Lamb ears (make two)

These are also made in the round, in a spiral using Nacar yarn.

Round 1 ch2, work 6 dc into 1st ch [6 sts]

Round 2 2dc in each st around [12 sts]

Round 3 (bobble in next st, 1dc in next st) all around [2 sts]

Round 4 (2dc in next st, 1dc in next st) 6 times [18 sts]

Round 5 (bobble in next st, 1dc in next st) all around [18 sts]

Round 6 (dc in next st, bobble in next st) all around [18 sts]

Note that the bobble st on one round goes into the dc in the round below, and the dc on a round goes into the top of a bobble on the round below.

Round 7 Repeat Round 5

Round 8 Repeat Round 6

Round 9 Repeat Round 5

Round 10 (dc2tog, dc in next st) 6 times [12 sts]

Round 11 (bobble in next st, 1dc in next st) all around, ss to 1st bobble of round to join [12 sts]

Break yarn and fasten off, leaving a long tail for sewing.

Step 5

Assembling your crochet plant pot covers

Using a tapestry needle, sew the ears to the body. Then using black embroidery thread, embroider the bunny’s and lamb’s eyes, using the image as a guide.

The lamb’s nose is also made in the round, in a spiral using Nacar yarn.

Round 1 ch2, work 6dc into 1st ch [6 sts]

Round 2 2dc in each st around [12 sts]

Round 3 (2dc in next st, 1dc in next st) 6 times [18 sts]

Round 4 1dc in each st around, ss to 1st dc of round to join [18 sts]

Break yarn and fasten off leaving a long tail for sewing.

crochet plant pot cover step 4

With an embroidery needle and brown thread, embroider the nose using the image as a guide. Then sew the nose onto the crochet lamb’s face.

crochet plant pot cover step 5

For the crochet bunny, embroider a nose in pink using the image as a guide.

crochet plant pot cover step 6

Finally, rub a red coloured pencil repeatedly on a piece of scrap fabric. Then gently rub the fabric on the cheeks of their faces for an extra-cute finishing touch.

If you’re looking for some more fun crochet patterns, why not try hooking up our free easter basket crochet pattern (which would also double up as a nice crochet plant pot cover too) or our free crochet plant hanger pattern.

We hope you’ve enjoyed making these crocheted pot covers, don’t forget if you need any help with your crochet stitches you can always check out our crochet for beginners guide. And if you’re looking to treat yourself, check out our list of the best crochet hooks and the best crochet kits for beginners.