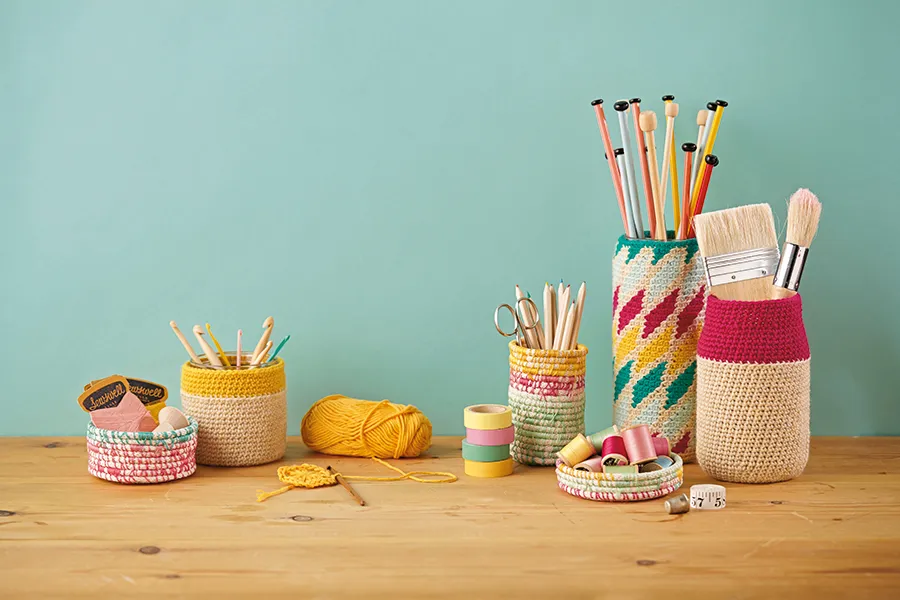
Get rid of the plastic cups your pens are in, gather all your bits of jewellery from the bathroom and next to your bed, and make yourself some jazzy rope coil baskets to store them in. Using just cotton rope and thread with a fresh palette of mint, aqua, mustard and rose, you can add colour and handmade style to your space. They make gorgeous gifts, although we'll warn you − you may not want to part with them!
These craft storage pots were created for Mollie Makes magazine – for easy-make craft projects and creative inspiration, subscribe to Mollie or click here to find out more.
Materials
For the coiled craft storage pots
- Cotton sash cord, 0.5cm (1⁄4") diameter. You’ll need around 6m (6yrds) for each small vessel, but don’t cut the cord – it’s better to leave it on the spool so you aren’t limited by its length.
- Embroidery floss in mint, aqua, pale pink, rose, yellow and mustard
- Large darning needle
- Scissors
For the crochet craft storage pots
- Three jars in various sizes. Ours are 22, 1 18 and 9cm (83⁄4, 7/8 5 and 3 /8") tall.
- Cascade 220, 100% wool, 100g/200m per hank, 1 hank each in Antiqued Heather 9600 (Yarn A), Cerise 7802 (Yarn B) Goldenrod 7827 (Yarn C) Mint 9076 (Yarn D) and Lagoon 7812 (YarnE)
- 4mm (UK 8, US G/6) crochet hook
- Tapestry needle
Tension
16sts and 16rows to 10cm (4") square. Tension isn’t critical to this project, but make sure it's tight enough that the jars won’t show through the stitches.
Abbreviations (UK)
St(s) stitch(es) ch chain
ch-sp chain space Ss slip stitch
Dc double crochet BLO work stitch through back loop only
Craft storage boxes tutorial

 Tightly bend the wrapped cord over to form a squashed ‘U’ shape with a very small hole in the centre. Now wind the thread around and around to tightly bind the two sections of rope together.
 Wrap a section of the rope, stitching them into place as you go.
 To end a thread colour pass the needle through a few stitches in the coil below and pull it tight. Trim off the extra thread.
 To start a new thread run it under the same stitches but in the opposite direction until the end is concealed. Wrap the thread around the rope a few times before continuing to stitch.
 Once you’re happy with the size of the base hold the rope on top and begin to build up the sides of your basket. For the first round, all the stitches will wrap around both pieces of rope – the base and the new coil – to make sure they are securely connected.After you’ve completed the first round go back to stitching as before, with some stitches passing over two rope coils, and some over one. Remember to catch a small section of the lower coil with each stitch.
 When you are happy with the height, continue stitching until you have completed a round. Look back at the base and find the place where you started to overlap it to make the side wall. The top should finish above that spot. Cut the rope off on an angle so it tapers off. Continue stitching until you’re about 1.5cm ( /8") from the end.Wrap the last 1.5cm ( /8") tightly and then secure it to the coil below with a few stitches.

 Using Yarn A, make a magic ring Round 1 Ch1 (doesn’t count as a st), work 6dc into the ring. Join with a ss into the 1st dc. Pull ring tight. [6sts]


 This jar cover uses tapestry crochet, a method using two or more colours in a pattern to create a multi-coloured fabric. It's normally used with double crochet.You'll be using two or more colours of yarn on each row, so you'll need to ‘carry’ the yarn not in use. This can be done by leaving the unused yarn at the back of the work (wrong side) or by encasing the yarn as you work. This pattern uses the encasing method for a neater and smoother finish.