How to install coving: add beautiful period detail with ease

Learn all about coving and ceiling moulds and give your plain ceilings a stylish makeover.

Try our magazines – get 6 issues from just £9.99!

Published: March 1, 2024 at 5:02 pm

Coving or ceiling moulding is the ideal finishing touch for any decorating scheme. It seamlessly makes a visual transition from the walls to the ceiling.

Depending on which style you choose, you can turn it into an eye-catching feature or simply use it as a subtle architectural tool to give your room a more considered finish.

What is coving?

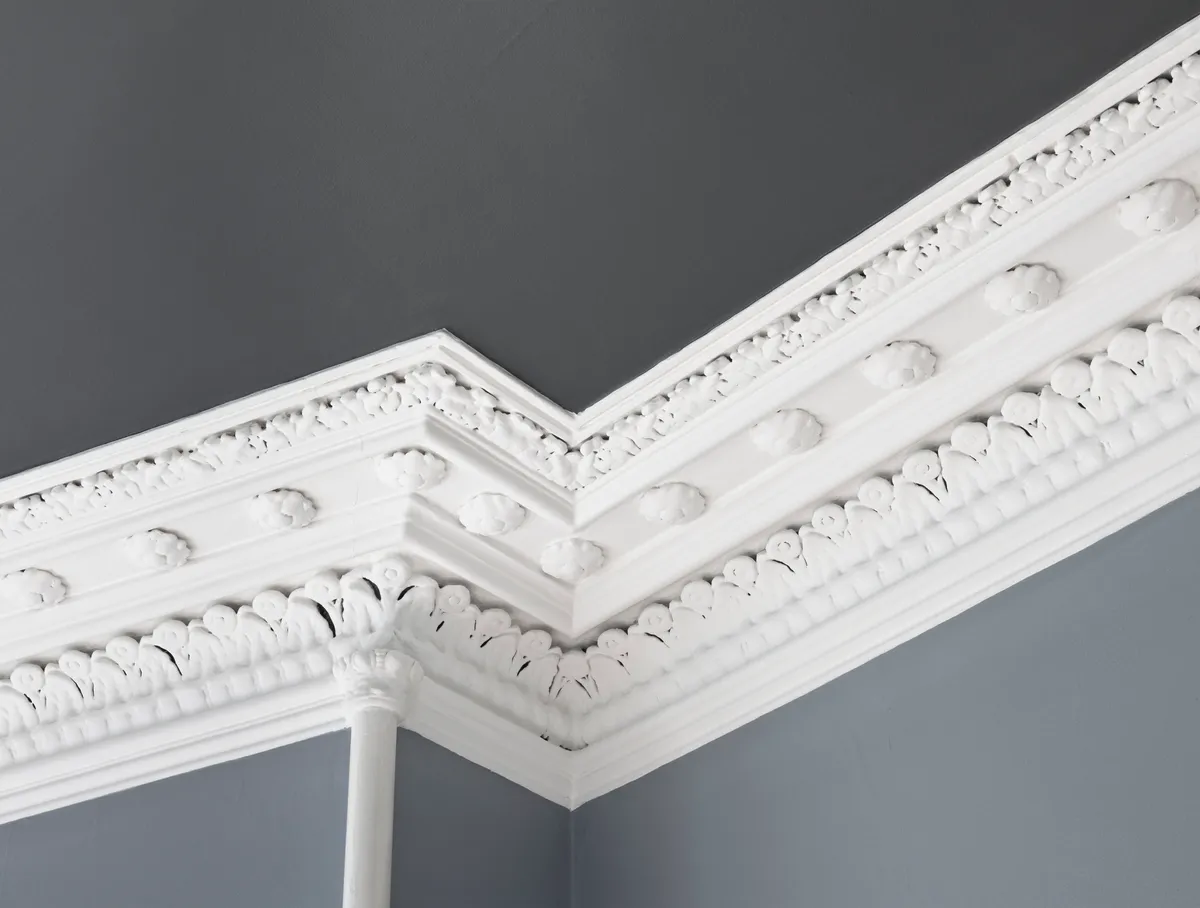
Coving is a decorative join between the wall and the ceiling of a room. It comes in a wide variety of styles to suit both traditional or more contemporary interiors. It is also sometimes known as ceiling moulding.

Coving with a C-shaped or geometric profile best suits modern properties, while for period homes like Victorian or Georgian, there’s a host of intricate mouldings that add character and interest to the room.

The popular ‘egg and dart’ or fleur-de-lys patterns are ideal for Victorian properties, whereas the Georgians preferred detail with square patterns, often incorporating dentils (or ‘teeth’) in the designs.

Types of coving

There are three main materials:

Plaster – the most traditional material and also the most durable, so it needs less maintenance and less painting. However, plaster is heavier than other coving.

Duropolymer – this comes with the benefits of plaster coving, but it’s more lightweight and also quicker to install.

Polystyrene – this is the cheapest option, and again is more lightweight than plaster coving. It’s also the least durable, and usually needs several coats of paint to achieve a good finish.

What is the difference between cornicing and coving?

Ornate cornicing painted white joining mid-grey walls with white ceiling
This is an example of cornicing – it's beautifully detailed and ornate

Coving is the generic term for a moulding designed to hide the join between the wall and the ceiling. But the difference between then two is that cornices are ornate and covings are simple.

Covings form a steady line along the ceiling with the profile being a very traditional quarter-circle (or C shape). Standard covings can come in various sizes, with the most popular being 127mm.

However, this number does not refer to the height or projection, it indicates the imaginary diagonal line from the wall to the ceiling that will be filled by the coving.

Cornices, on the other hand, can be highly intricate and complex in design. From different degrees of depth to intricately decorative carvings, cornices require a little more thought and effort to be crafted and fitted properly.

How do I measure up?

You should always put up ceiling mouldings straight and level, as you can fill in any gaps afterwards.

Lay down a dust sheet before you start and use a pipe detector to check for hidden pipes behind the walls.

Start on the longest wall and plan from there how it will go around the room and where the mitre joints on the corners will be internal or external.

  1. Check the manufacturer’s instructions to see how far the edges should be fixed from the wall and ceiling. This varies according to the style and size you choose.
  2. Go around the room and draw pairs of marks onto the wall and ceiling at 500mm intervals.
  3. Using a long spirit level, join up the marks so you have two continuous level pencil lines, one on the wall and one on the ceiling. These lines will be your guidelines.

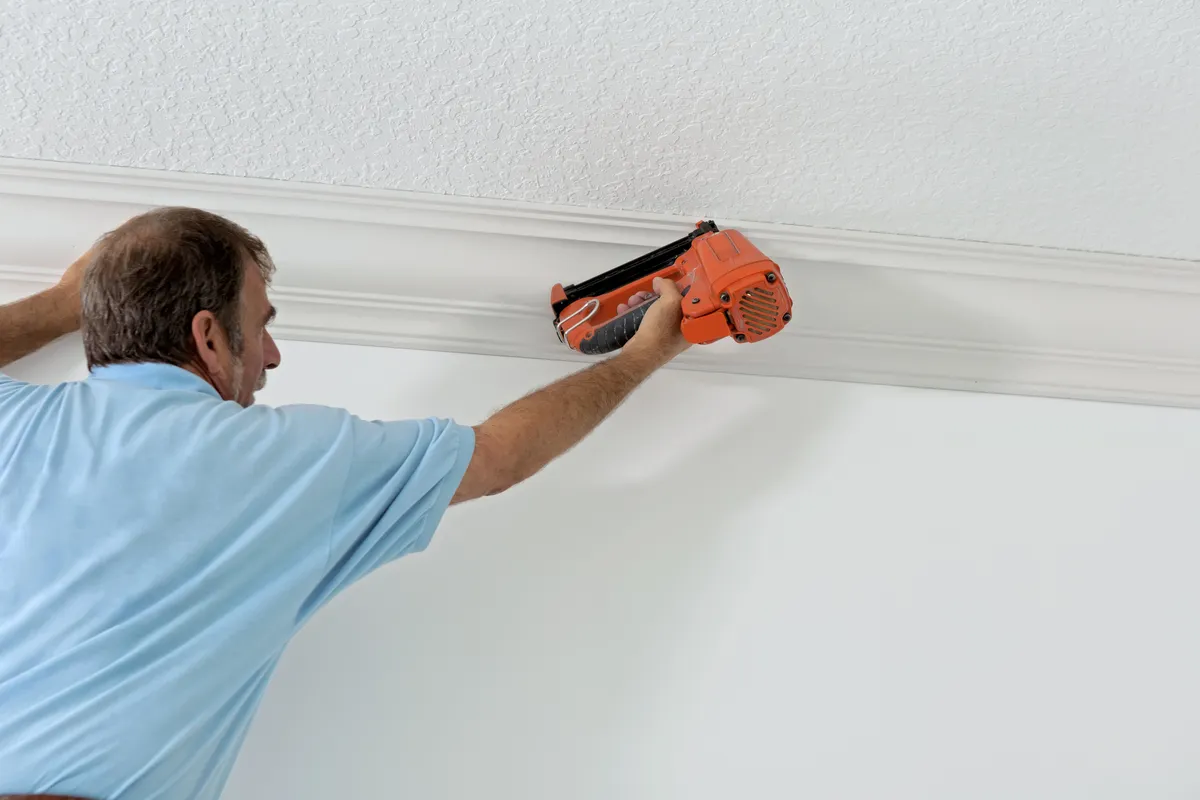
How do I put up coving or ceiling moulding?

What you need to fit coving

  • Tape measure
  • Pencil
  • Long spirit level
  • Mitre box
  • Coving mitre tool
  • Fine-toothed panel saw
  • Coving (and coving corners)
  • Coving adhesive
  • Ladder
  • Sealant gun
  • Retractable knife
  • Fine graded sandpaper
  • Cleaning cloth
  • Scraper
  • Workbench
  • Paintbrush
  • Panel pins
  • Hammer
  • Safety goggles
  • Dust mask

Step 1

To fit the coving, start by holding the cut piece in position to check that it’s a good fit.

Step 2

Ensure the area marked for your coving is free from dust and any loose plaster by giving it a quick brush over.

If you’re applying coving to fresh plaster, or a very porous surface, apply some PVA adhesive first and allow it to dry before you fit your coving.

Score the area on the wall and ceiling in between your pencil marks with a sharp knife, as this will help the adhesive to bond firmly.

Step 3

Apply a generous line of adhesive to the top and bottom edges of the coving. Use enough so that a little will ooze out and help to fill any small gaps.

Align the coving with the lines on the wall and ceiling then press it firmly into position, working your way along the length.

Step 4

Lightly hammer panel pins into the wall at approximately 60cm intervals to hold the coving in position while the adhesive dries.

Remove the pins once the adhesive has thoroughly set.

Step 5

On a long wall you may have to join two pieces of coving together. Do this using a pair of matching mitre cuts. Apply adhesive to the cut faces before joining them together.

Step 6

Corner time! If you’re using pre-cut corners, ensure you carefully follow the manufacturer’s instructions on the correct order of fitting the corners and straight lengths of coving. Then fix the coving as explained above.

Step 7

How do I fit corners with coving?

Sections of coving need to be joined at the corners with mitre cuts. This applies to both internal and external corners.

However, some coving comes with pre-cut internal and external joints. This means you’ll only have to make simpler cuts to join pieces together on a length.

Step 8

How do I cut coving corners?

Measure out the sections of coving you will need, remembering to account for the internal and external mitre cuts.

Mark the direction of the intended cuts on the coving face. When measuring and marking coving it’s useful to mark on the rear side of the piece which is the wall edge, and which is the ceiling edge.

For an internal corner the wall face is the longest end, while for an external corner the wall face is the shortest end.


Step 9

Firmly secure your mitre box on a workbench and put the coving in the mitre box with the wall edge at the top of the box.

Use a fine-toothed panel saw to make the 45 degree cuts at each end of the coving, in the marked direction. If necessary, lightly sand the ends until smooth.


Step 10

Use a little extra adhesive to fill in any small gaps between adjoining pieces of coving, or between the coving and the wall or ceiling.

Then remove any excess adhesive first using a scraper, then wipe off the remainder with a damp cloth.

If you want to paint the coving, wait at least 24 hours and use a suitable primer first followed by a matt emulsion paint.

This article first appeared in YourHomeStyle and HomeStyle magazine.


Add decorative details like a pro with our guide to how to install coving 

Any decorating scheme can benefit from a beautiful finish such as coving or cornicing. Minimalists may prefer the simple, clean lines of coving, whereas maximalists are bound to love the extra flamboyant flourishes that cornicing provides.

You can choose from three types of decorative moulding – it depends on your preference which one you go for. But a general rule of thumb is the lighter the material the easier it will be to work with. 

Painting your mouldings will ensure you get a crisp finish and will mean they also match your ceiling or walls as you wish. Remember to prime it first then finish with a matt emulsion.

Give your kitchen a refresh with new worktops

While it's an exciting prospect, having a totally new kitchen fitted is an expensive, disruptive and messy undertaking. Often doing a light update will improve things significantly.

Changing your worktops is one way to give your kitchen a makeover and laminate is the most straightforward option as it's easy to cut to size with basic tools.

Laminate comes in so many different styles – you can even get marble or granite-effect which will instantly give the heart of your home an injection of luxe. Find out how to fit a new kitchen worktop with our guide.