All products were chosen independently by our editorial team. This review contains affiliate links and we may receive a commission for purchases made. Please read our affiliates FAQ page to find out more.

How to make an easy origami dove

Learn how to fold your own origami peace dove with our super easy, step-by-step tutorial. We have pictures to guide you through each step, so grab a piece of square paper and follow these instructions.

Try our magazines – get 6 issues from just £9.99!

Published: July 13, 2023 at 9:00 am

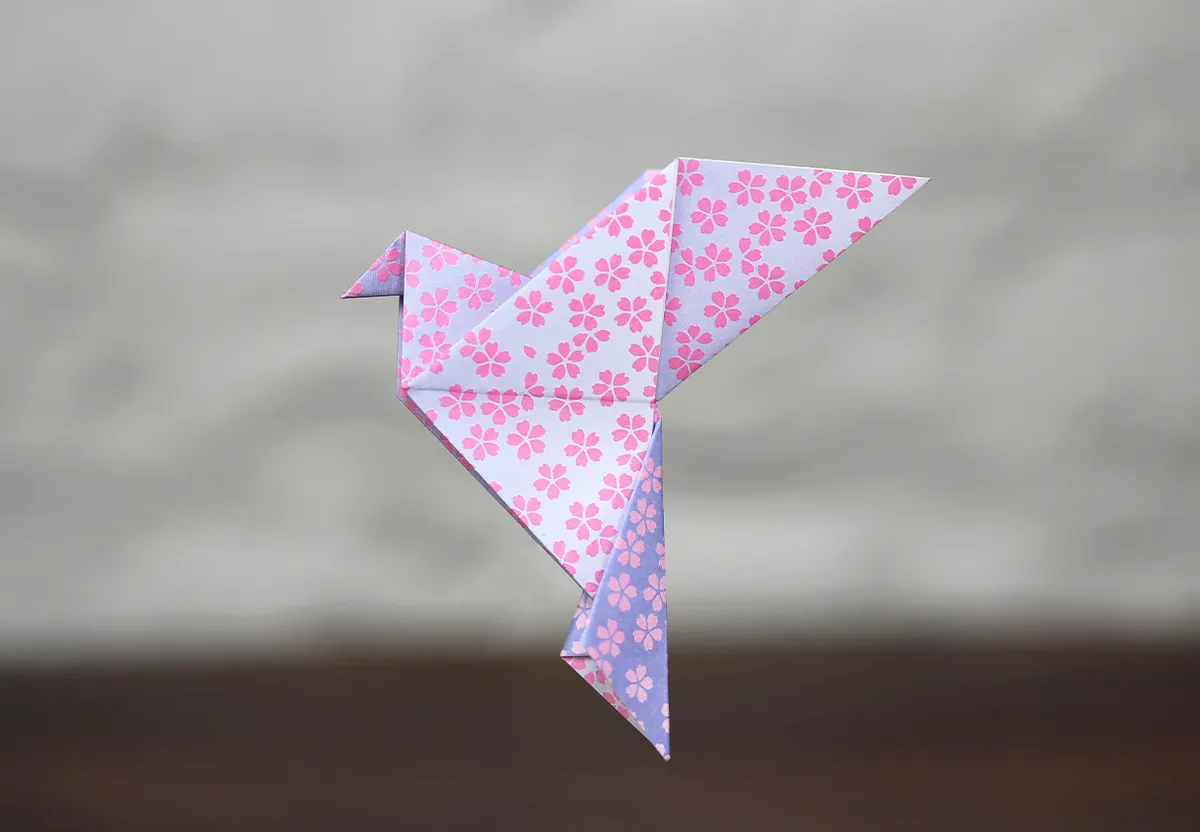
Origami, the ancient Japanese art of paper folding, has captivated hearts and minds for centuries. Among the myriad of stunning creations, the origami dove has long been seen as a symbol of peace, serenity, and hope.

Crafted with a few simple folds, this elegant origami dove captures the essence of tranquillity, making it a perfect bird origami project for both beginners and children.

In this step-by-step origami dove guide, we unveil the secrets behind folding your own origami dove.

Whether you're looking to engage in a relaxing, mindful activity, make bespoke toppers for cards, or share a heartfelt gift with a loved one, this tutorial will equip you with the knowledge and skills needed to fold an easy origami dove step-by-step.

Ready? Here’s how to create your own exquisite origami dove with just a single sheet of paper.

Stock up on origami paper!

Chiyogami paper

Buy now, Amazon (£13.00)

How to make an origami dove - Chiyogami paper

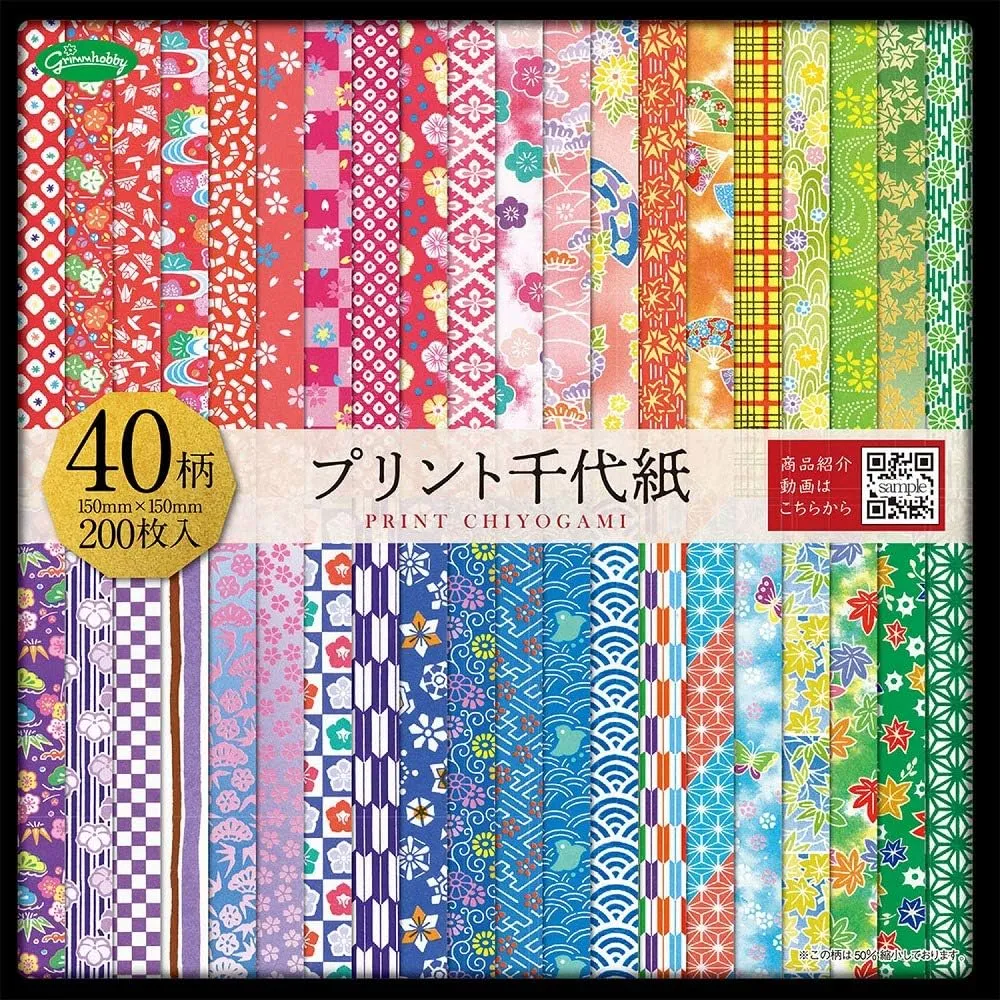
This origami paper is thin, just 55g/m2, so it’s ideal for folding intricate projects. Although for other papercrafts, thinner paper is often difficult to work with, in origami it’s just what we need.

It allows for crisper creases and neater projects, and you don’t need to work your fingers as hard when burnishing the folds.

This is the paper pack we used for the steps in this tutorial, and there’s 40 traditional patterns across 200 sheets to choose from.


How to make an easy origami dove

This fantastic origami dove can be made from any square piece of paper. Whether you have all the kit and are folding with genuine origami paper, or are fiddling with a square candy bar wrapper, this easy origami dove project is one that anyone can master.

For a super-easy card idea, try mounting your finished origami dove onto a blank card. Perfect for weddings, anniversaries, or even sympathy cards, attach your origami dove onto a rectangle of coordinating paper, then mount this on the front of a card blank for a quick and easy card idea.

For the purpose of these origami dove instructions, we have used paper that is patterned on one side (the front) and plain on the other (the back).

origami-dove-main3

Origami dove tutorial, step-by-step with pictures

You will need:

  • Origami paper
  • Paper creas

Step 1

Start with a 15x15cm square of paper. With the reverse side facing upwards, fold it in half along the diagonal.

How to make an origami dove – step 1a
Step 1a

How to make an origami dove – step 1b
Step 1b

Step 2

Fold it in half again, to make a smaller triangle.

How to make an origami dove – step 2

Step 3

Make sure your paper is oriented so that the closed, vertical edge is on the left-hand side, and fold the bottom right-hand flap up, to meet the top corner.

How to make an origami dove – step 3

Step 4

Fold the right-hand corner of this flap over to meet the vertical edge, crease well and unfold.

How to make an origami dove – step 4

Step 5

Using the crease that you just made, open the flap slightly, and push this flap inside itself to create the first wing.

How to make an origami dove – step 5

Step 6

Turn the model over and repeat on the other side.

First, fold the flap up, so that the bottom left-hand corner meets the vertical edge (now on the right).

How to make an origami dove – step 6a
Step 6a

How to make an origami dove – step 6b
Step 6b

Step 7

Like before, fold the left-hand corner in to meet this right-hand vertical edge, burnish well to ensure a crisp fold, and unfold.

How to make an origami dove – step 7

Step 8

Using this new crease, push the corner inside the shape, opening the model a little as needed, to create the second wing.

How to make an origami dove – step 8

Step 9

Rotate the model so that the open end (with all the layers) is at the bottom.

How to make an origami dove – step 9

Step 10

Next, we’re going to make the head. Fold the tip of the model down and burnish the fold.

How to make an origami dove – step 10

Step 11

Push the head inside itself, flipping the paper inside out as you go. Burnish the folds to neaten up the head and beak. Cute!

How to make an origami dove - step 11

Step 12

Now, all that’s left to do is to shape the wings and the tail. Lift the front wing up, folding along the horizontal line that’s already there.

How to make an origami dove - step 12

Step 13

Turn the model over and repeat for the other wing, lining it up with the first. It’s starting to look like a dove!

How to make an origami dove - step 13a
Step 13a
How to make an origami dove - step 13b
Step 13b

Step 14

Fold the tail forward, creasing the tail along the line where the tail meets the body. Fold the tail back to the original position.

How to make an origami dove - step 14

Step 15

Using this crease, open the tail slightly, and push it around the body, so that half the tail goes either side of the body.

Congratulations, you’ve completed an easy origami dove!

How to make an origami dove - step 15a

What you need to make your own origami dove

A craft mat

How to make an origami dove – Ansio craft mat

Having a solid folding surface makes it a lot easier to master folds, especially while you’re learning a new project.

A craft mat is an ideal surface to fold on, as you can also get an idea of how big each fold needs to be, thanks to the measurements printed on the surface.

This is the craft mat we’ve used in this tutorial, but if you don’t like the blue it comes in a rainbow of different colourways, including pink, grey, purple, brown, green, and even black.

It’s double-sided, too, with imperial (inches) on one side and metric (centimetres) on the other.


Origami paper

Clairefontaine origami insects kit

You can never have too much origami paper! Once you start folding your creations, it’s difficult to stop.

They make excellent toppers for cards, easy Christmas tree decorations or just for hanging around the house. But if you’re still relatively new to origami, it’s nice to have some projects to work on straight out of the packet.

This kit from Clairefontane has everything you need to make a host of insects, and there’s even video tutorials to show you all the folds to make a butterfly, grasshopper, beetle, and dragonfly.


Paper creaser

CrafTreat paper creaser

If you need a little help achieving the perfect fold, you might like to consider getting a paper creaser. Use this instead of your nails or fingertips to press down and burnish the folds on your origami creations.

Making crisp folds early on is key to easy folds later; as you progress through a project, the paper becomes thicker and more difficult to fold. Having a paper creaser (or bone folder, as they used to be called) not only eases pressure on your fingers, but it allows for a neater final project.

If you’ve ever bought a scoring board, you’ll more than likely find a paper creaser (called a scoring tool in this instance – but they’re essentially the same thing) tucked away underneath the board somewhere.

But if you’re in the market for a new paper creaser and are wondering where to start, look for one made from Teflon. That’s right, the non-stick coating found in frying pans; but it works a treat on paper, too.


Metallic origami paper

Metallic origami paper

For an origami dove, you can get away with using slightly more luxurious paper as there’s not a huge number of fiddly folds. Plain white paper will do if you don’t have anything else, but we love this metallic rainbow paper, especially the iridescent white colourway!

There are 100 sheets in the pack and 10 different colours to choose from. Each sheet is slightly embossed giving it texture, but as it’s a little thicker than traditional origami paper, it’s best suited to simple projects, like this origami dove.


Make your own origami peace dove

Whip up this easy origami dove with our easy-to-follow instructions with pictures. You’ll be a pro in no time; all you need is a single square of paper.

It’s an easy tutorial, and you don’t need any prior origami knowledge to make this beautiful origami dove. If this is your first time folding an origami project and want to explore more about this relaxing and fun art form, we have a whole stash of projects right here on Gathered, all with the same easy-to-follow step-by-step instructions.

Discover more child-friendly origami projects with Gathered

All of our in-house origami tutorials have clear, step-by-step photos for each part of the project, so you can practise your folding with confidence.

Why not check out this easy origami owl? It’s perfect for your expanding your origami bird collection!

Halloween origami, How to make an Origami Owl – patterned paper