All products were chosen independently by our editorial team. This review contains affiliate links and we may receive a commission for purchases made. Please read our affiliates FAQ page to find out more.

How to make an origami pumpkin for Halloween

This easy origami pumpkin is a fun craft activity for kids that is perfect for Halloween, and only takes a few minutes to fold.

Try our magazines – get 6 issues from just £9.99!

Published: August 4, 2023 at 7:00 am

Spooky season is just around the corner and what better way to prepare with some simple Halloween origami projects? Origami offers a wonderful way to engage children's creativity and enhance their fine motor skills, while also being lots and fun – and educational too!

In this article, we will guide you through the step-by-step process of creating an easy origami pumpkin – a delightful autumn-themed project that your kids are sure to love!

No need to worry if you've never tried origami before; we'll walk you through each fold, ensuring that you and your little ones can effortlessly create a charming origami pumpkin to decorate your home or classroom.

So, grab a piece of square paper, prepare your folding fingers, and read on!

origami pumpkin

Handmade origami paper

Handmade origami paper

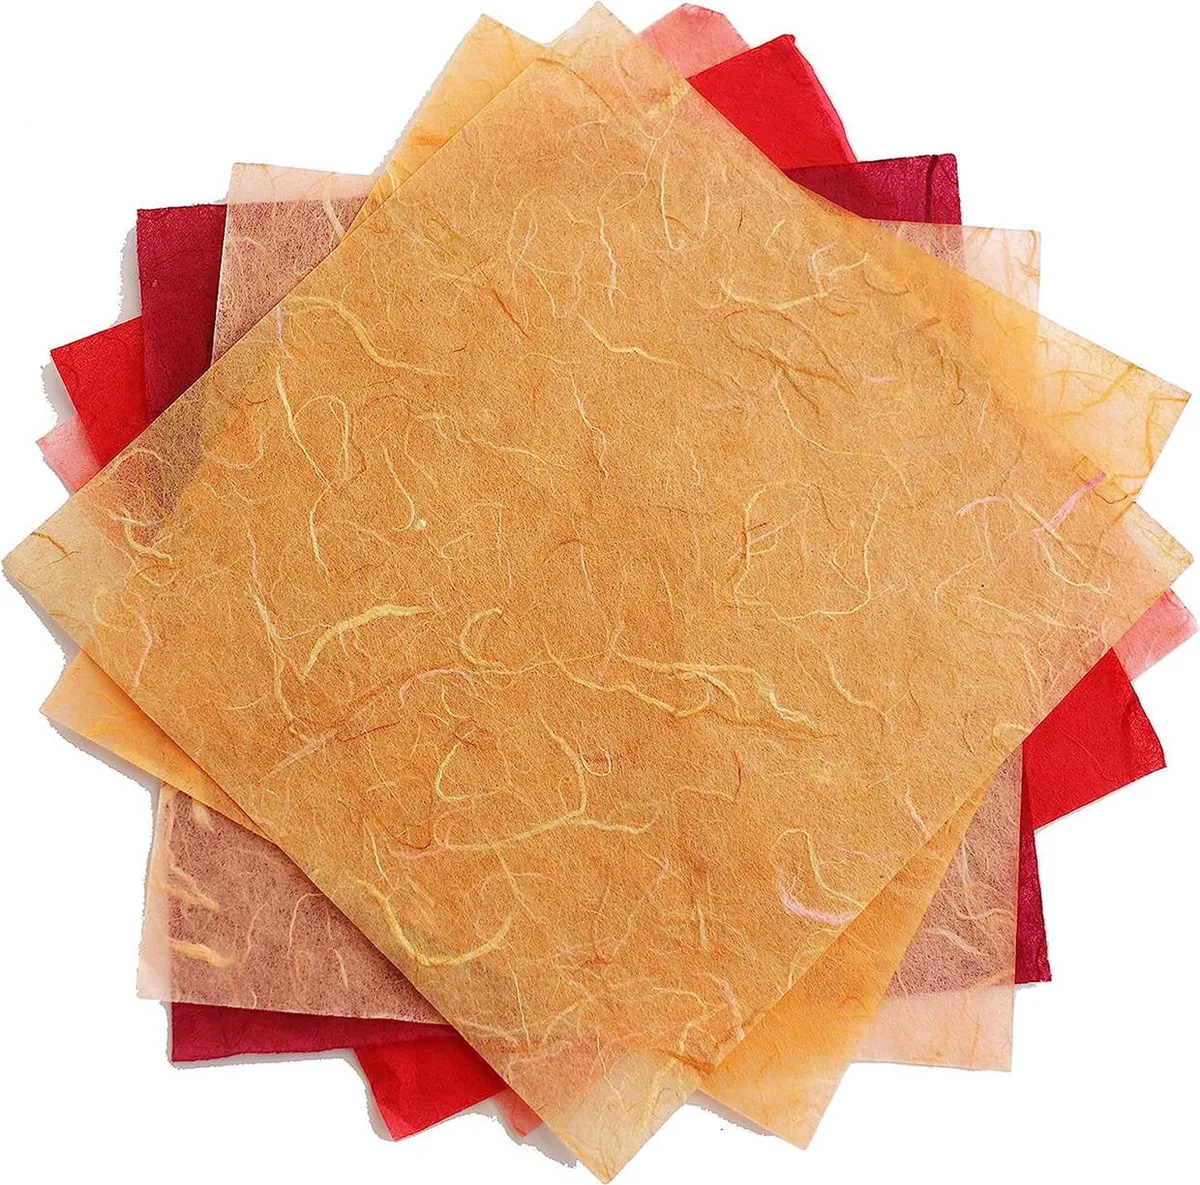
Handmade paper is ideal for origami pumpkins, as the stringy composition of the paper provides an interesting texture to the finished pumpkin. It’s thin enough to work with, so it won’t crack along the folds, and the result is pure luxury.

We don’t recommend this paper for more intricate models, but for this origami pumpkin tutorial, it’s absolutely ideal.

How to make an easy origami pumpkin

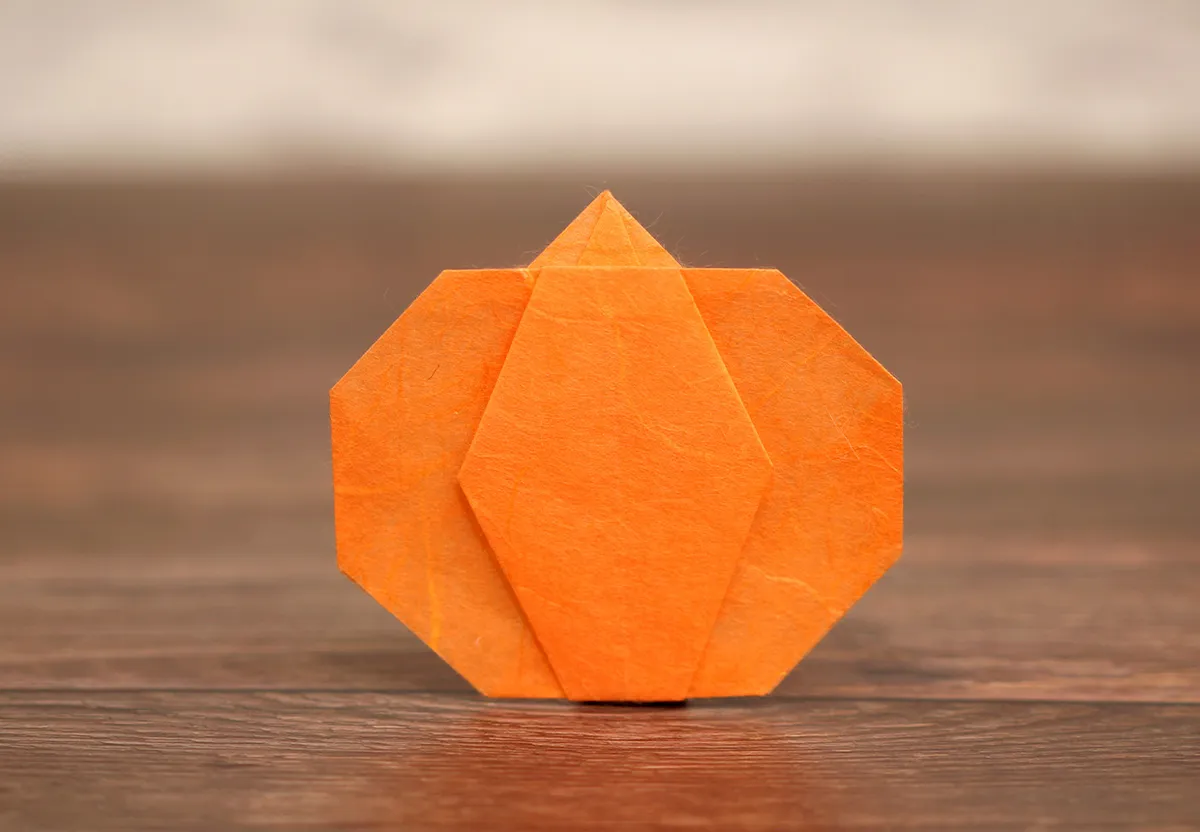
This super easy origami pumpkin uses just one sheet of square paper, and once it’s made you can personalise your project however you like!

Draw on a spooky face to turn it into an origami Jack O’ Lantern, or, why not add some curls of green paper at the top for a more natural look?

Pumpkins and gourds come in lots of different shades of yellow, orange, green, white, and grey – so have fun and experiment to find your favourite colour.

In this tutorial, we are using paper that is orange on one side and green on the other. This is just to help show you which side we’re folding.

You might like to opt for paper that is the same colour on both sides, as you won’t be able to see the reverse in the final model.

You will need:

  • Origami paper
  • paper creaser

Step 1

Start with a 15x15cm square of paper. If you’re using paper that is only coloured on one side, make sure the orange-coloured side (the side you want on the outside of your origami pumpkin) is facing upwards. Fold it in half along the diagonals.

How to make an origami pumpkin – step 1

Step 2

With both the diagonals folded, turn your paper over (so the reverse is facing upwards) and fold along the horizontal and vertical. This is called a book fold.

How to make an origami pumpkin – step 2

Step 3

This is what your paper should look like (the picture shows the reverse of the paper).

How to make an origami pumpkin – step 3

Step 4

Rotate the paper so that the corners are at the top and bottom. With the inside still facing up, bring the corners together so that they meet. This will essentially collapse the paper, and you’ll notice that the paper will want to go in a particular direction, thanks to these folds. You’ll end up with a smaller square shape.

How to make an origami pumpkin – step 4a
Step 4a

How to make an origami pumpkin – step 4b
Step 4b

Step 5

Make sure the open end of your model is facing downwards. Fold the left-hand flap over to the right, then fold the open edge of this flap inwards, so that it meets the centre line. Burnish the fold well.

How to make an origami pumpkin – step 5a
Step 5a

How to make an origami pumpkin – step 5b
Step 5b

Step 6

Fold the top edge of this same flap down to meet the centre line. It doesn’t look like much at the moment, but what you’re actually doing is shaping the pumpkin and giving it some definition. Don’t worry if your paper wrinkles at this stage, as you won’t be able to see this in the final model.

How to make an origami pumpkin – step 6

Step 7

Fold the flap back over so that these folds are hidden, and it looks like this.

How to make an origami pumpkin – step 7

Step 8

Repeat on the opposite side. So, working on the right-hand side now, fold the right-hand flap over to the left.

How to make an origami pumpkin – step 8

Step 9

Like before, fold the bottom open edge of this flap up to meet the centre line, and burnish the crease to ensure a nice, crisp fold.

How to make an origami pumpkin – step 9

Step 10

Fold the top of the flap down, so that it meets the centre line.

How to make an origami pumpkin – step 10

Step 11

Fold this flap back, so that it looks like this. Your origami pumpkin is starting to take shape!

How to make an origami pumpkin - step 11

Step 12

Next, we’re going to make the stalk. Flip your model over, and fold down the top corner of the model. We’ve gone for around 1.5cm.

How to make an origami pumpkin - step 12

Step 13

Fold the stalk back up again, leaving around a 5mm pleat. You can make the stalk as big or as small as you like!

How to make an origami pumpkin - step 13

Step 14

Shape the bottom of the pumpkin by folding up approximately the same amount of paper as you did for the stalk. We’ve folded up around 1.5cm here.

How to make an origami pumpkin - step 14

Step 15

Shape the sides by folding one side in.

Repeat on the other side.

How to make an origami pumpkin - step 16

Step 16

Flip your model over again, and voila! You’ve completed one super-easy, origami pumpkin.

How to make an origami pumpkin - step 18

What you need to make your own origami pumpkin

Simple, orange origami paper

Simple orange Japanese origami paper

If you want to keep things simple and fold a patch of orange origami pumpkins, then we highly recommend this brand of origami paper.

Made in Japan, TOYO is the same brand as the black and white paper we used to make the origami penguin; it’s thin, perfectly square and folds like a dream.

Folds are crisp, and there are different shades of orange to choose from if you’d prefer a slightly darker pumpkin.

It’s single-sided paper, so ideal for this origami pumpkin.

Nature patterns origami paper

Nature patterns origami paper

Tuttle produce some really lovely origami paper with photographic prints on one side and a coordinating plain colour on the other.

They’re not too expensive, either, and these nature print designs feature autumnal leaves, peacock feathers, pink feathers, green leaves, honeycomb, berries, flowers, and pebbles.

The classic 15x15cm size is ideal for most projects, and there’s 200 sheets in the pack with 12 different designs.

The Encyclopedia of Origami Techniques

Encyclopedia of Origami Techniques

You might have noticed terms like ‘square base’, ‘bird base’ or ‘frog base’ as you peruse the internet for origami tutorials.

If you’re after a comprehensive guide to all the basic folds and bases, plus more than 30 projects (both traditional and modern), then The Encyclopedia of Origami Techniques by Nick Robinson has everything you need to start creating your own paper sculptures. And you can often find it on Amazon with two-thirds off the RRP. Nice.

My First Origami Fairy Tales Kit

My First Origami Fairy Tales kit

Perhaps your origami pumpkin will turn into a beautiful carriage and take Cinderella to the ball? Why not let your imagination go wild and fold a princess, fairy godmother and fearless knight to go with your pumpkin?

This kit contains everything you need to make a whole host of fairy tale characters and accessories, even a big bad wolf!

There are stickers, too, so you can add faces to your characters and details to the included backdrops. And the full-colour book will take you through the folds needed to make each of your magical characters.

Make your own origami pumpkin

Create this simple origami pumpkin by following our easy step-by-step tutorial, complete with pictures that detail every fold.

It’s a quick project, and will only take a few minutes to fold, so you can whip up a whole pumpkin patch in no time!

It’s ideal for children or origami artists who are just starting out on their paper folding journey.

No previous experience in origami is required to make this fun origami pumpkin. If this is your first attempt at folding an origami creation and you’d like to try more, we have plenty of ideas available right here on Gathered.

Discover more origami projects for children with Gathered

If you’re looking for super easy origami projects for children, be sure to check out these fantastic projects; easy origami Halloween ideas.

Each of our origami tutorials features clear, step-by-step photographs accompanying the instructions, ensuring you can fold with ease and confidence. Why not have a go at our simple origami owl tutorial?

Halloween origami, How to make an Origami Owl – patterned paper