How to repair pottery with the kintsugi technique

Transform broken ceramics into something beautiful with the Japanese art of kintsugi.

Try our magazines – get 6 issues from just £9.99!

Published: January 21, 2024 at 6:47 am

Don’t throw away your broken plates and vases! Old ceramics can be rescued and turned into something magical with the Japanese art of kintsugi.

This clever technique repairs broken pottery without concealing the cracks, making them a feature instead. Read on to learn everything you need to know about this beautiful pottery technique – and how to use it to fix your broken pots.


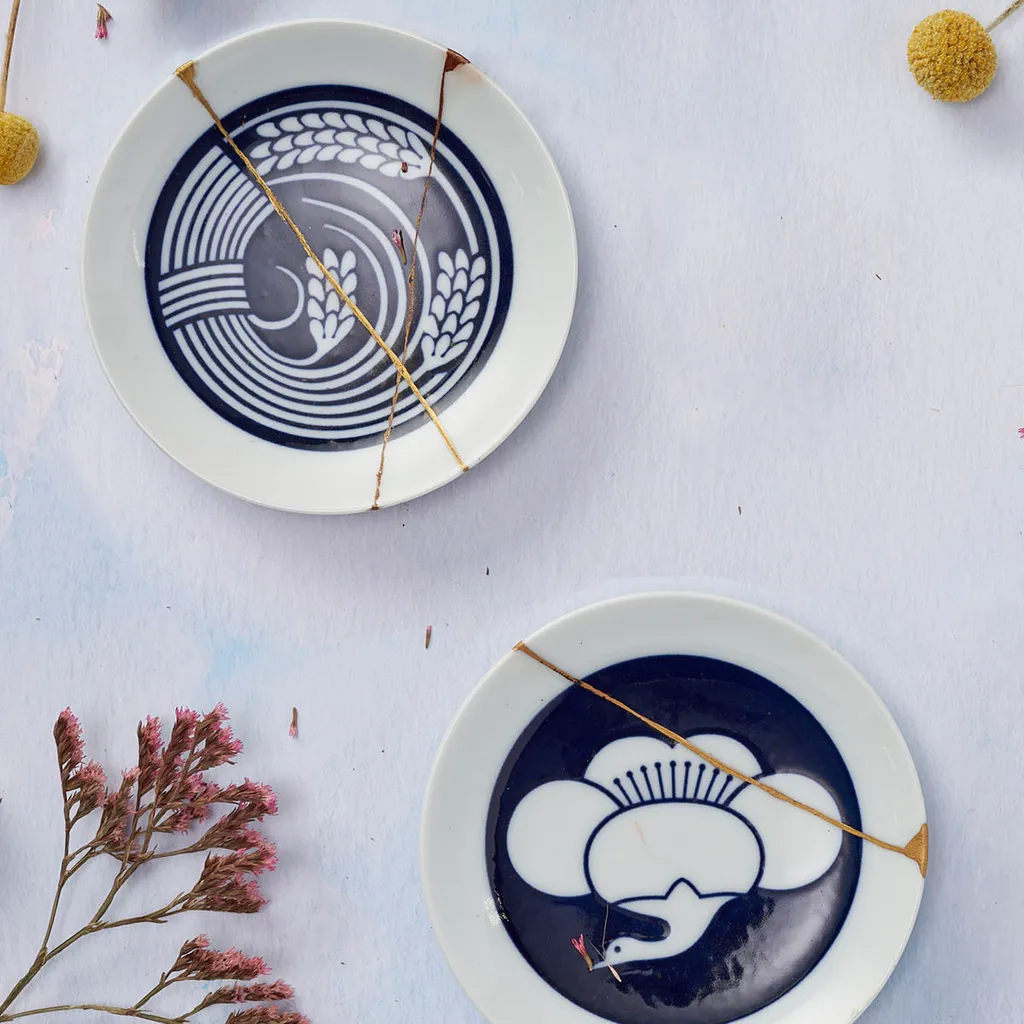
What is kintsugi pottery?

Kintsugi is a Japanese technique where gold lacquer is used to repair broken pottery, which dates back to the 15th century. The idea is to highlight, not conceal, the cracks within the pottery. The flaws make the ceramics more beautiful and unique.

The practice has its roots in the Japanese wabi-sabi philosophy, which encourages people to embrace imperfections and understand that nothing is permanent.

As sustainability and reducing waste become more important, adopting practices such as kintsugi is a great way to get into mending and upcycling. Why throw something away if you can turn it into something that’s both attractive and practical?


Get started with a kintsugi kit

If you’re looking for a simple way to try kintsugi for the first time, picking up a kintsugi kit is a great option.

There’s a good selection of kintsugi kits available online, which are perfect for beginners to attempt. Check our pick of the best kintsugi kits to try this amazing technique for yourself.


Kintsugi: a how to guide for mending ceramics

Repair cracked or broken ceramics with the ancient craft of kintsugi – a decorative technique using urushi (lacquer), rice glue and metal powder.

Kintsugi repaired items should not be used in a microwave or dishwasher, nor be left to soak in water or used to hold contents with temperatures above 100°C. Although urushi is food safe, brass is not. Use sterling silver or 24ct gold leaf powder if you plan to use metal powder to finish plates used for food.

Kintsugi

You will need:

  • Disposable gloves
  • Cardboard box (or a plastic box)
  • Sandpaper
  • Epoxy glue
  • Paintbrush
  • Dusting brush
  • Small spatula
  • Acetone
  • Craft knife
  • Epoxy putty and hardener
  • Urushi
  • Gum turps
  • Brass powder
  • Silk wadding

Step 1

Make a humid box by placing a cup of water or a wet cloth in either a cardboard or plastic box. This is to help the urushi set. The ideal setting temperature is 20-25°C, with a humidity of 80%.


Step 2

Thoroughly clean the damaged areas and the entire piece (using bleach if necessary).

Lightly scratch any sharp glazed edges with sandpaper to help the urushi stick. Do not sand the actual broken edges.

Step 3

Thoroughly mix together the epoxy from both base and hardener tubes for about 1 minute. Apply the glue onto the broken areas of your pieces, making sure that joints are compressed tightly together during glueing. Hold the parts together for 5-10 minutes.

Remove the excess glue using acetone. A cutter or craft knife can be used to remove larger excesses and any hardened glue.


Step 4

Mix the correct amount of putty and hardener, then re-construct any chips/ missing areas and any gaps along the glued lines of your repair. The putty can be smoothed before it has set, using either a damp rag or a wet finger.

Once the putty has hardened (2-12 hours, depending on thickness), further shaping can be achieved with sandpaper.

Step 5

Urushi is an irritant and therefore it’s important to wear disposable gloves when using urushi. In the event of exposure, wipe and clean the affected area using oil, then remove the oil with acetone or simply wash with soapy water.

Place a drop of urushi on a palette; if the urushi has become too thick during storage, dilute and mix with gum turps. Apply a smooth layer to the area with a paint brush.

Any putty or glue that remains exposed on the repair must be covered with urushi, in order to seal its surface.

Step 6

Place the urushi-coated item in the humid box. Urushi can be applied more than once, but each application is best made 12 hours apart in order to achieve a smoother surface.

Clean any urushi dropped on the work surface, using acetone.

Step 7

Unfold the packet of brass powder carefully, dip the tip of the dusting brush into the powder, then gently dust the powder onto the urushi until the coated area is fully covered.

Step 8

Return the item into the humid box and leave it for 1-2 hours. Take it out, then shape the silk wadding into a small ball with your fingertips and use it to gently dust off the surface of the repair. A light touch is important – avoid stroking too hard.

Return the item to the humid box for at least 24 hours. Polish the surface with the silk wadding several times during this period.

Step 9

After a week, the urushi will normally be fully set. Carefully wash the finished item using a soft sponge. Any excess urushi and powder can be removed with acetone. Clean the paint brush using vegetable oil, then remove the oil with acetone.

Apply a drop of gum turps onto the paintbrush to preserve its condition for future use. There’s no need to wash the dusting brush or silk wadding.

Revive shattered pottery with kintsugi

Bring your broken ceramics back to life with this stunning pottery technique! Kintsugi is a fabulous way to mend damaged ceramics and turn them into something more beautiful.

Get started with our kintsugi guide and you’ll soon be hooked on this stunning craft.

Build your skills with our pottery techniques masterclass

Whether you’re new to pottery or looking to take your skills to the next level, get a strong foundation with Gathered’s pottery techniques guide.