All products were chosen independently by our editorial team. This review contains affiliate links and we may receive a commission for purchases made. Please read our affiliates FAQ page to find out more.

How to make crochet jar covers

Learn how to make your own crochet jar covers with Anabela Félix's free tutorial. Get your wool out and start decorating your cupboard supplies!

Try 6 issues of your choice of craft magazine from just £9.99

Published: September 1, 2021 at 1:04 pm

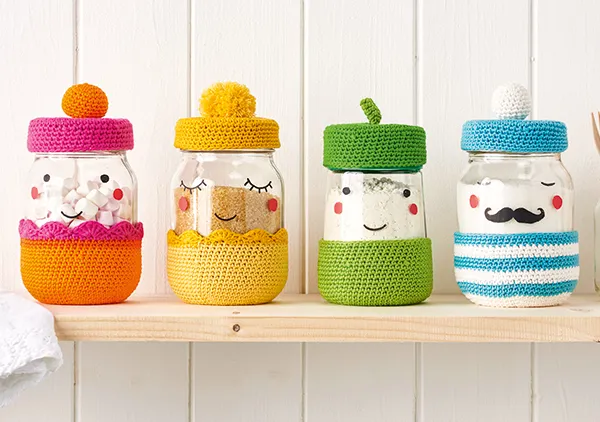
Who said cupboards are boring? You'll be taking that back as soon as you've seen Anabela Félix's crochet jar covers! Meet Mr. Francois and his wife, Cleo. They’re always feeling full of beans (or tea bags, or sugar) and happily creating domestic bliss atop your kitchen units. Then further down the shelf, you’ll run into his step-brother, Claude, and Cleo’s cousin, Marianne. Anabela shows you how to turn crochet jars covers into your very own cute set of characters by customising your pantry jars. You can crochet in stripes, and add different toppers or trims and add little faces for an extra sweet touch.

These crochet jar covers also make fun gifts when customised to look like your recipients! Bake some gingerbread biscuits to pop inside and download a quick printable birthday card for an easy but still lovely handmade present. Oh and remember if you use 100% cotton yarn your crochet jar covers can be washed but will maintain their shape and colour. Plus they're a great stash buster project because you can use all your yarn scraps. If you're new to crochet don't worry just head over to our crochet for beginners guide and our crochet kits for beginners to learn all the basic techniques for these crochet jar covers. Now it’s over to Anabela.

Projects shot in the studio

You’ll need

• DMC Natura Just Cotton, 100% cotton, 50g/155m per ball, or similar 4 ply/fingering cotton in colours of your choice • 2.5mm (UK 12, US C/2) crochet hook (find the best crochet hooks on the market in our round-up) • Glass jars • Stitch marker (find the best stitch markers on the market in our round-up) • Black and red Pilot Frixion erasable pens or any other pen that can write on glass • Tapestry needle

Tension

Tension is not important for this project.

Finished size

Size will vary according to your jar
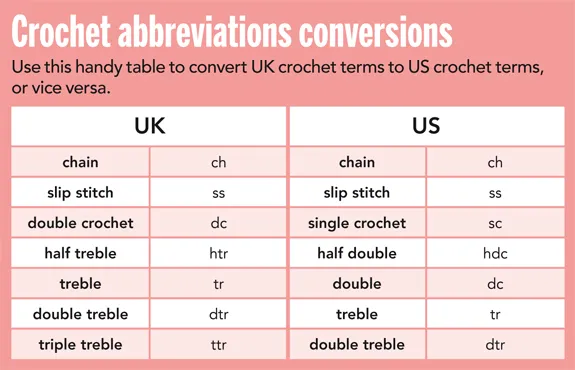
Abbreviations (UK)

yrh: yarn round hook dc2tog: double crochet 2 together (insert hook in next st, yrh and draw loop through) twice, yrh and draw through all 3 loops on hook.

Crochet Magic loop: hold thread in your hand and wrap working yarn around forefinger twice to create ring, slip ring off your finger and insert hook to pick up first st, ch1, then work the necessary sts for round 1 and close the ring tightly by pulling the loose end.

You can find a full list of all abbreviations we use in our abbreviations and conversions guide. This pattern is written in UK terminology but you can easily convert it to US terms using this handy chart.

How to make crochet jar covers

You will need:

  • Yarn
  • Glass jars
  • Crochet hook
  • Stitch Marker

Step 1

The lid and base of these jar cosies are worked in continuous rounds like a spiral. You may find it helpful to use a stitch marker at the beginning of each round. The base is made from the bottom upwards and the lid is made from the top downwards. You can vary the height to suit your jar or design. The instructions are the same for the lid and base. You can adjust the height of each by varying the number of rounds.

crochet jar cover step 1
crochet jar cover step 2
crochet jar cover step 3
crochet jar cover step 4
crochet jar cover step 5
crochet jar cover step 6

Round 1 Start with a magic ring. Make 6dc into the ring and close the ring tightly by pulling the loose end. Mark the first stitch of the next round with a removable stitch marker. Reposition the marker at the beginning of each round.

Round 2 2dc in each st around [12dc]

Round 3 (1dc in next st, 2dc in next st) 6 times [18dc]

Round 4 (1dc in each of next 2sts, 2dc in next st) 6 times [24dc]

Round 5 (1dc in each of next 3sts, 2dc in next st) 6 times [30dc]

Round 6 (1dc in each of next 4sts, 2dc in next st) 6 times [36dc]
At this stage, your lid or base is starting to form a hexagonal shape. Continue in this way, increasing the number of single dc between the increases until your crochet piece is about the same size as your jar base or lid.

Next round On the following round, you will make a decrease where you’ve made an increase on the previous round. Make the same number of single dc as the last round and then dc2tog over the increase in the last round, continue until the end of the round.

Next round 1dc in each st around. Repeat last round until you have your desired size, ss to join the last round. Break yarn and fasten off, weave in ends. You’re now ready to make cosies for all your jars.

crochet jar cover final

Finishing the crochet jar covers

Step 1

Now comes the fun part – drawing faces on your jars! Frixion pens are great for this, as you can draw, erase and draw again if you’re not happy with your first try. Plus, you get to change the faces any time you wish.

Crochet jar covers - shell edging (optional)

Step 1

You can add a shell edging to the top edge of base as follows: *1dc in next st, miss 2 sts, 8tr in next st, miss 2 sts; repeat from * to end of round and ss to 1st dc to join.

crochet jar cover final

Crochet jar covers - Embellishments

Step 1

You can attach a fluffy pom pom, crocheted ball or a little tag to the lid if you like.

Ball

Rounds 1 to 4 as for the jar cosies [24dc]

Rounds 5 and 6 1dc in each st around.

Round 7 (1dc in each of next 2 sts, dc2tog) 6 times [18dc]

Round 8 (1dc in next st, dc2tog) 6 times [12dc]

Stuff ball with a little scrap yarn.

Round 9 dc2tog 6 times. Pull yarn through last st. Thread yarn through top of sts and pull tight, sew end through ball and onto lid.

Tag
Made in one piece in the round.
Ch7, 1dc in 2nd ch from hook and 1dc in each of next 4ch, 2dc in last ch, turn and work 1dc in each sts on the opposite side of the foundation ch. Break yarn, fasten off and sew to lid.

Pop your crochet jar covers onto your jars then fill with dried goods and line them up ready for action. For more cute projects check out our free amigurumi crochet patterns and our free crochet poppy pattern