How to make a scandi wooden village scene for your window

Wooden Christmas decorations look set to be a huge trend this year – so we’re here to show you how to get the look and decorate your own wooden window decorations using our new favourite tool!

DIY wooden window scene

Happy days we’ve found a new must-have tool to add to our craft kit, and it’s powering up our makes. The new Maker X Wood & Crafter Kit from Worx is set to become a crafting classic. This sleek clever multi-functional tool will boost your craft skills with its beginner-friendly design. It’s easy to use and battery operated so you can craft on the go. It allows you to work on wood, metal and glass in a variety of ways, all with a cordless battery and lightweight design. Get ready to level up your craft game.

The Maker X Hot Air Gun Patches
You can use the versatile Maker X for all sorts of craft and DIY fashion projects

Traditional wood burning is enjoying a surge in popularity, and fans of pyrography will love the Maker X’s slimline heat tool, which is held like a pen for ease of use and has a variety of tips to create numerous designs. If you’ve been wanting to try pyrography for a while but haven’t been sure where to start, this is the tool for you. The temperature of the heat tool can be set to help achieve the perfect finish and it comes with an array of decorative tips which are easily interchangeable. The heat tool is ideal for fine work as well as larger designs and the powerful battery ensures you have plenty of time to create your designs.

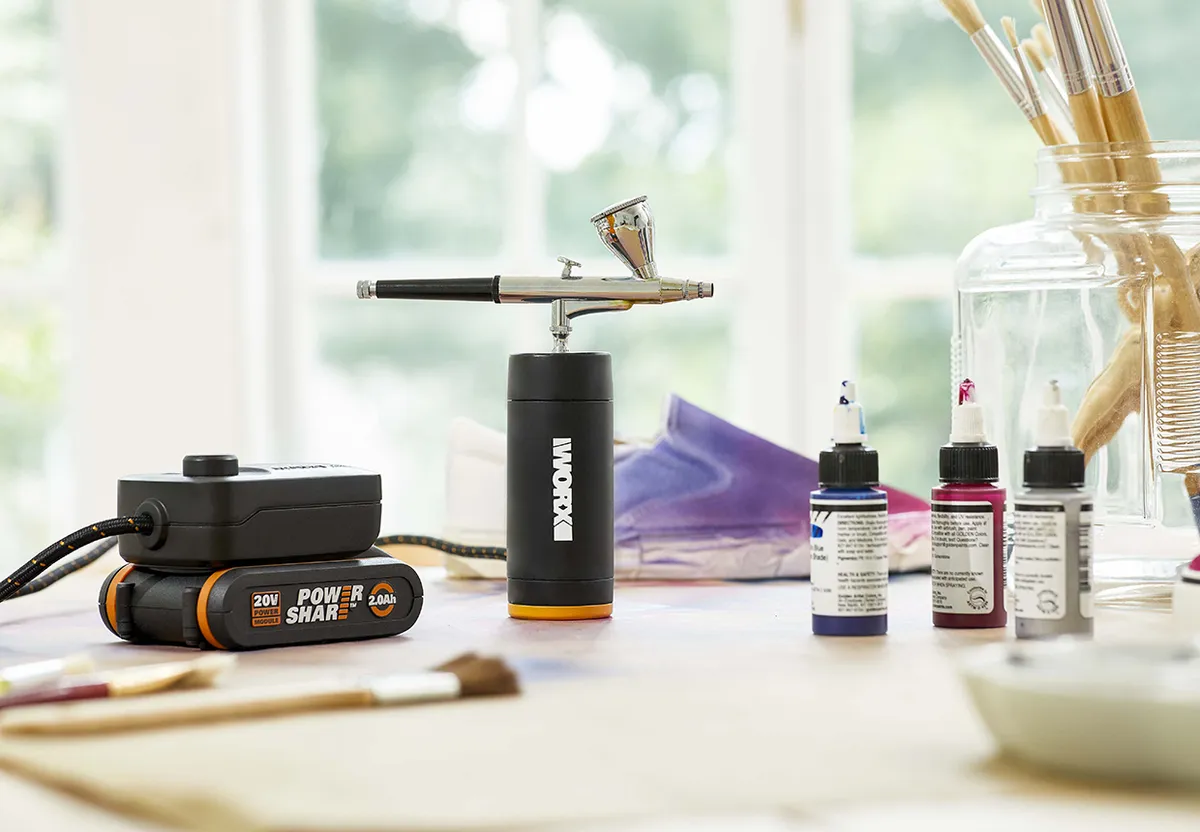
The hub and powerful 20V battery are compatible with other tools in the range too, including the cordless airbrush which is perfect for adding a subtle splash of colour to your finished designs. We’ll show you how to use it below to add a snow affect to your Scandi Christmas village.

The Maker X Battery Airbrush

Find out more about Maker X at www.worx-uk.com/makerx and read on to see it in action in our DIY winter window scene tutorial.

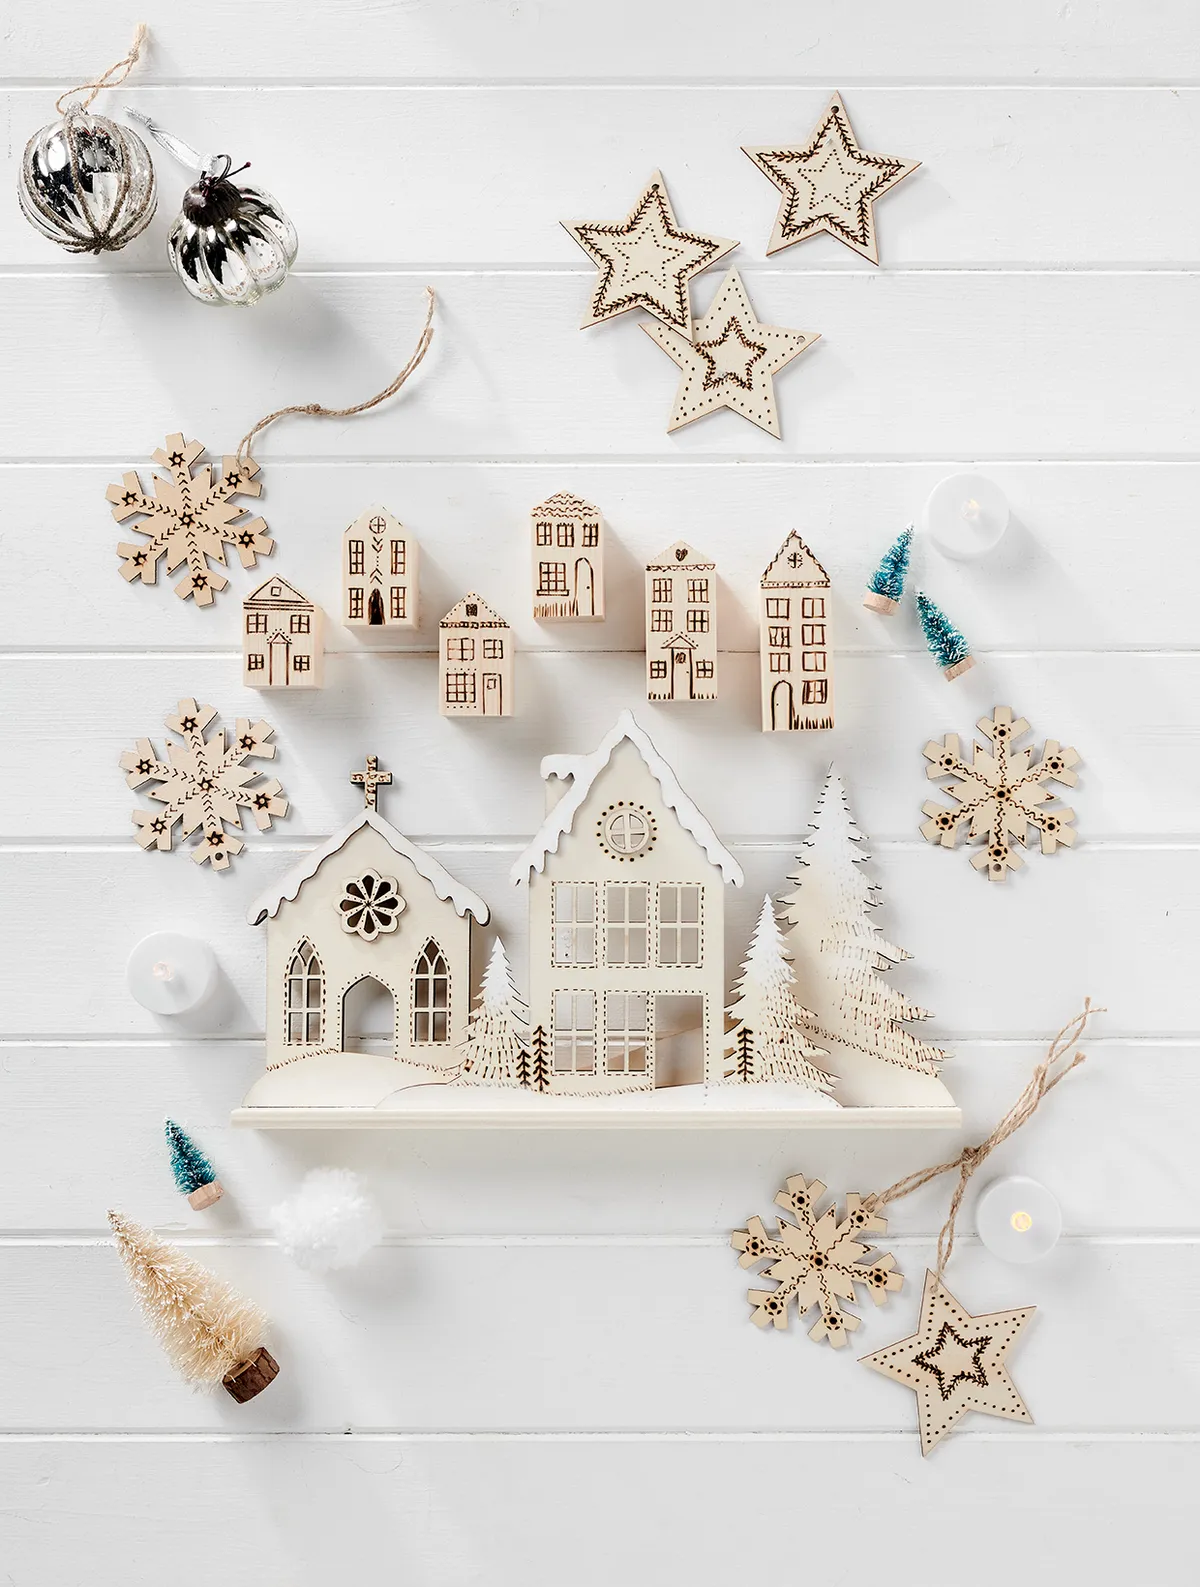
How to make a Scandi wooden village window scene

You will need:

  • Worx Maker X Wood & Metal Crafter Kit – buy it here
  • Worx 20v Maker X Ink/Paint Cordless Air Brush* – buy it here
  • Wooden village scene – pre-cut shapes
  • Small wooden houses
  • Wooden stars
  • Wooden snowflakes
  • White acrylic paint
  • Pencil
DIY wooden burning window scene

Before you start

  • Ensure the battery is fully charged using the charger provided.
  • Important: Make sure the hub speed control is set to “Min” before plugging the heat tool into it.
  • Do not change the nibs on the heat tool until it has completely cooled down.
  • Set the tool temperature to 480 degrees using the instruction manual provided in the kit.

Advertisement

You Will Need

  • Maker X Wood & Metal Crafter kit
  • Worx 20v Maker X Ink/Paint cordless air brush
  • Wooden village pre-cut shapes
  • Wooden stars & snowflakes
  • White acrylic paint
  • Paint

Total time:

Step 1

Take a wooden star and lay on a flat, even surface. Draw your design lightly on the star with a pencil. Attach the long nib to the heat tool and set the temperature using the instruction manual as a guide. Draw on your design by evenly moving the heated nib across your design or using the very tip to create dots. Decorate four stars in two different designs then switch off the heat tool and allow to cool down.

How to make a wooden village scene step 1

Step 2

Once the heat tool is completely cool, remove the long nib then attach a shaped tip. Use the tip to decorate three wooden snowflakes then switch off and leave to cool. Attach another shaped tip then decorate another two snowflakes. Cool the heat tool again then re-attach the long nib and add more decoration to the snowflakes.

How to make a wooden village scene step 2

Step 3

Cool the tool then remove the long nib, replacing it with the finest nib. Lay your wooden village scene flat then heat up the tool again and use the fine nib to draw delicate stitch lines around the windows and doors. Use the very tip of the nib to add tiny dots around some of the windows.

How to make a wooden village scene step 4

Step 4

Draw designs on six small wooden houses with a pencil then lay them flat, design side up. Carefully move the fine nib along the pencil lines, applying even pressure to achieve a neat finish. Add a few dots with the tip of the fine nib then turn off the heat tool. Rub out any pencil marks on the houses.

How to make a wooden village scene step 4b


Step 5

Choose three different shaped tips then attach one to the heat tool as soon as it has cooled down. Lay a wooden house on its side then create a design on one side of the roof with the shaped tip. Turn the house over then repeat on the other side of the roof. Decorate another roof the same then use the other two shaped tips to decorate the other roofs.

How to make a wooden village scene step 5

How to make a wooden village scene step 5b

Step 6

Lay the wooden village scene flat then draw on three tiny trees with a pencil. Cool the heat tool then attach the shaped tip that creates a small line. Use this to add decoration to the large trees on the wooden village scene. Cool, remove tip then attach the long nib and use to draw in the tiny trees. Switch off the heat tool and remove from the hub.

How to make a wooden village scene step 6

Step 7

Plug the cordless air brush into the hub then set it up for use using the instruction manual included as a guide. Mix one part white acrylic paint to one part water then pour into the feeding cup. Replace the feeding cup lid then stand the small houses upright. Point the tip of the air brush towards the centre of a roof then press and push the trigger back at the same time to release a fine spray of paint. Spray on the desired thickness of paint then repeat on the other roofs.

How to make a wooden village scene step 7

Lay the wooden village scene flat then use the cordless air brush to spray white paint to the tops of the trees and along the roofs of the houses. Remove the air brush from the hub then remove the lid and wash out the paint. Leave the all the painted items to dry before arranging on a windowsill and adding lights.

Advertisement
How to make a wooden window scene

Want to make your own wooden shapes?

We’ve used pre-cut shapes for our scene, but if you want to take this up a notch, why not cut your own?

  • The Maker X battery is compatible with the full range of Worx PowerShare tools, including the Worx Cordless Sonicrafter oscillating multi-tool WX696.9 for all types of cutting jobs!
  • You can even sand down any smaller rough edges using the Worx 20V MAKER X Rotary Tool – it comes included in the Worx 20V MAKER X Combo Kit.

For serious sanding and grinding, the Worx 20V MAKER X Angle Grinder – WX741.9

The Maker X Angle Grinder Sanding Wood

Can’t wait to have a go with the Maker X?

Head over to www.worx-uk.com/makerx to read more about what it can do for your crafting.