How to make resin earrings

Treasure petals and precious metals with Benita Nagra’s how to make resin earrings tutorial.

Try 6 issues of your choice of craft magazine from just £9.99

Published: June 11, 2021 at 7:55 am

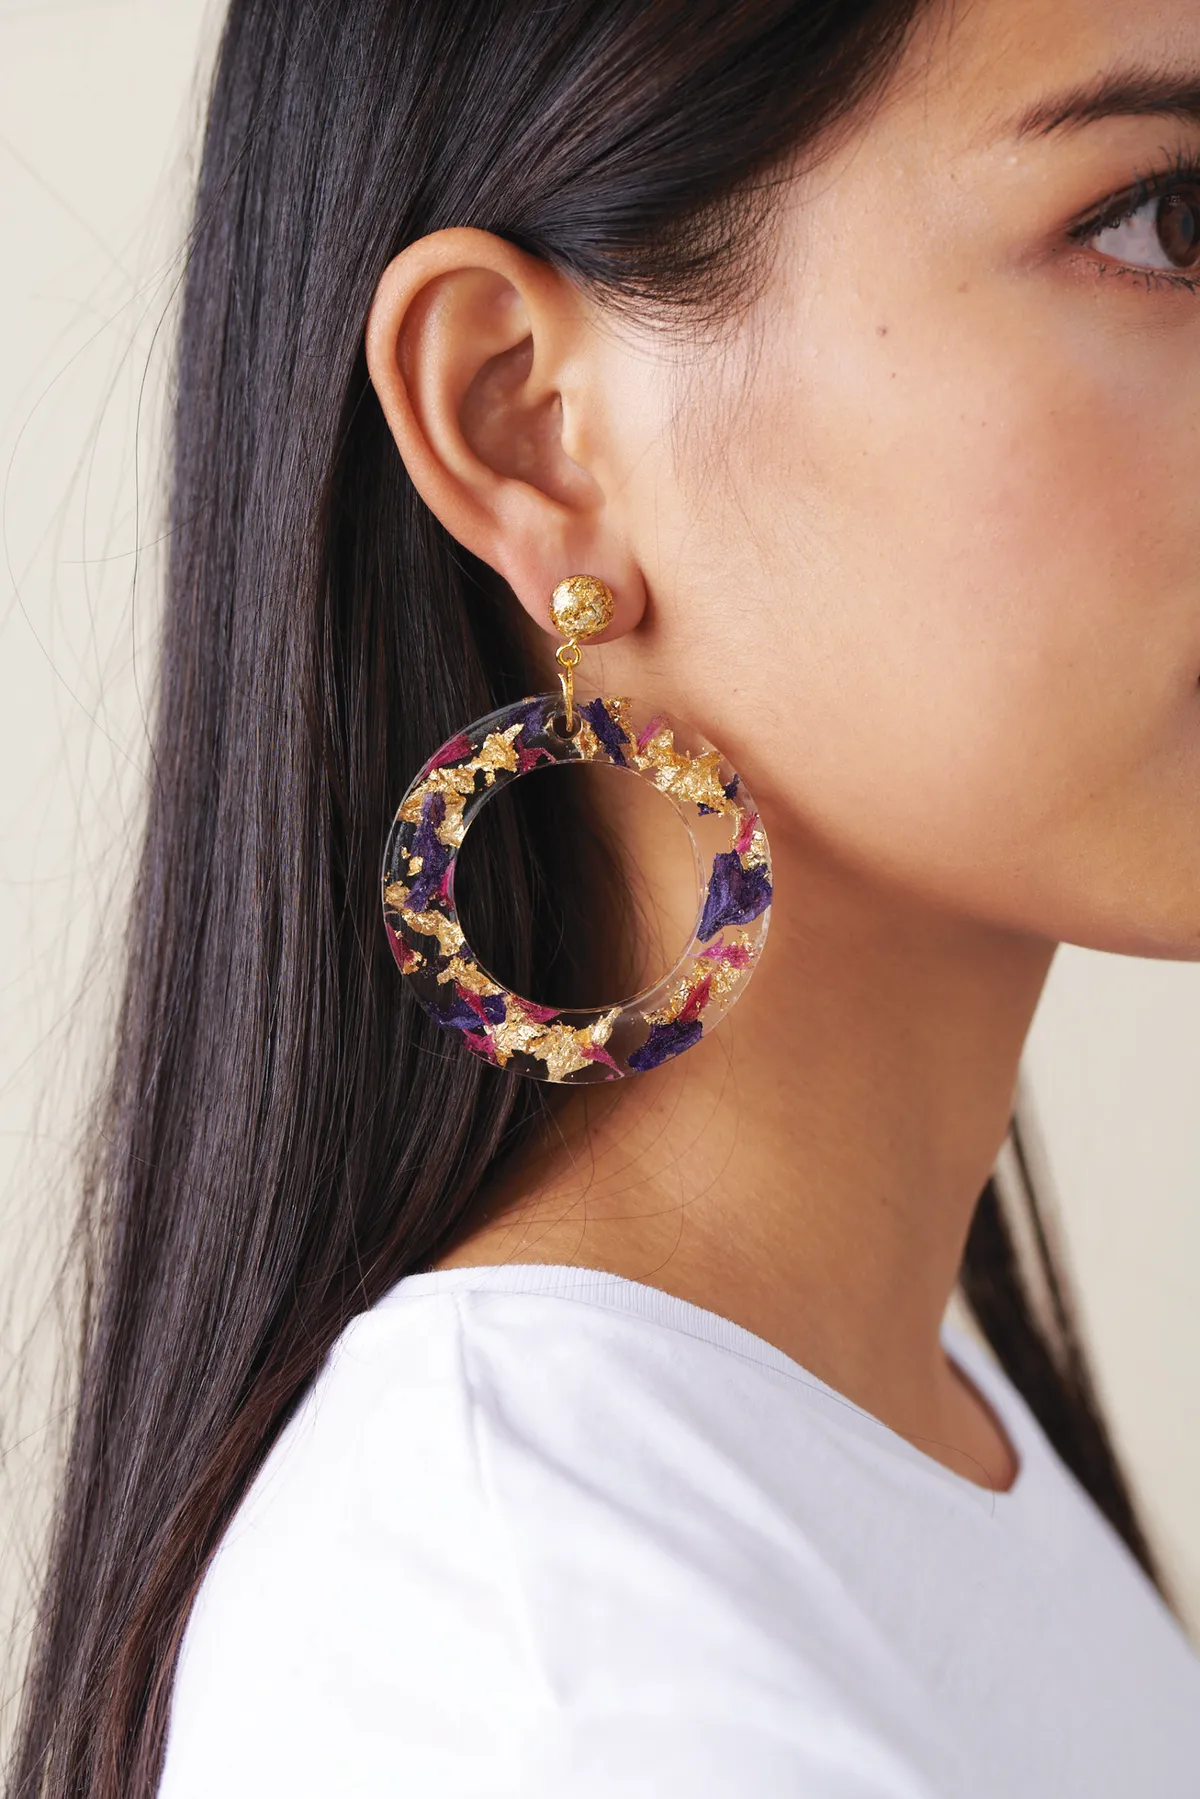
Petal faffers, this is your time to shine – encapsulate pressed flower pieces and golden flakes forevermore with a spot of resin wizardry. For these resin earrings, we’ve opted for a notice-me statement hoop style, but you could make yours in whatever shape you like, as long as there’s a mould for it. And how about saving petals from a special bouquet for handmade jewellery with even more meaning?

This project was created by Benita for Mollie Makes magazine – for more easy-make craft projects and creative inspiration, subscribe to Mollie or click here to find out more.

Right, let's make some resin earrings!

You will need:

  • 150ml Gedeo Crystal Resin KitGold flakes (we used Nuvo Gilding Flakes in Radiant Gold)
  • Flower petals
  • Two sterling silver earrings backs and fastenings
  • Two 6mm gold jump rings
  • Two gold screw eye pin bails, 8 x 4mm
  • Fine 1mm screw bradawl
  • 6cm (23/8") hoop style silicone mould (to learn more about moulds head to our resin mould round up)
  • 1cm (3/8") stud style silicone mould
  • Jewellery pliers
  • Measuring cups
  • Wooden stirrer
  • Pipette
  • Tweezers

If you're new to the world of resin make sure you read our beginners guide to resin which teaches you all the basics. We also have a resin craft ideas post so once you've finished your earrings you can find a new project to work on.

How to make resin earrings

You will need:

  • Gedeo Crystal Resin
  • Flower petals
  • Sterling silver earrings backs and fastenings
  • Gold jump rings
  • Gold screw eye pin bails
  • Screw bradawl
  • Silicone moulds
  • Jewellery pliers
  • Measuring cups
  • Wooden stirrer
  • Pipette
  • Tweezers

Step 1

How to make resin earrings Step 1

Leave the petals to dry, laid out in a tray or pressed between weights, such as pages in a heavy book. Use darker flower petals as the pigment is less likely to fade in the resin over time. You’ll know they’re dry when they’re crispy and paper-like – allow two or three weeks minimum. Trim them and remove any stems before using.

Step 2

How to make resin earrings Step 2

To measure out the resin in the measuring cups, add the correct ratio of resin to hardener, in this case it is 2:1. You’ll need approximately 30ml in total for these earrings, therefore mix 20ml resin with 10ml hardener.

Step 3

How to make resin earrings Step 3

Resin is very sensitive so follow the ratio exactly and mix well. You can pour the mixture from one cup into another to ensure a thorough blend. Mix the resin and hardener thoroughly in a disposable cup with a clean wooden stirrer until the mixture goes from clear to cloudy, then back to transparent again. Ensure the moulds for the earrings are clean and dust free and leave the resin to settle before pouring.

Step 4

How to make resin earrings Step 4

For the earring studs, fill the smaller moulds halfway with the resin mixture using the pipette. Add in two or three gold flakes using tweezers and ensure they’re covered in the resin.

Step 5

How to make resin earrings Step 5

For the hoop shape, fill the moulds halfway with the resin mixture, then add in the flower petals and gold flakes using tweezers. Mix around in the resin mixture to ensure all the pieces are coated and create an even arrangement you like.

Step 6

How to make resin earrings Step 6

Next, fill all the moulds to the very top with the resin mixture, using the pipette, for a smooth finish. If any bubbles do form in the moulds, use a pin to pop them to ensure clarity. Have some additional moulds on standby to fill with any leftover resin and make some extra earrings.

Step 7

How to make resin earrings Step 7

Before the resin sets, add in the earring fixtures to the studs. You can do this after around 13-14 hours while the resin is still malleable. Push each earring back into the resin, ensuring the base of the earring back is covered and it stands straight. Keep adjusting them to a standing position until the resin is set if they begin to lean.

Step 8

How to make resin earrings Step 8

After 24 hours, you can remove the four resin pieces from their moulds. Peel the shapes away slowly and use a sharp pair of scissors to trim any excess resin.

Step 9

How to make resin earrings Step 9

Use the small screw bradawl to begin the hole on the base of the stud earring, as shown. Once a small hole is made, use this to place the screw bail.

Step 10

How to make resin earrings Step 10

Turn slowly and keep straight until the screw is completely in the resin. You can use pliers to turn the screw for a more secure hold. Be sure not to over tighten – stop once you reach the eye of the screw pin.

Step 11

How to make resin earrings Step 11

Create the hanging fixings for the hoops. For each earring, use a 6mm jump ring and open it with pliers. Thread one through each hole in the resin hoops. Keep the jump ring open and thread on the screw eye bail fixed in the stud, then close the rings tightly. Add the earring backs to finish.

how to make resin earrings

You’ve officially made your first pair of resin earrings – congrats! Now you’ve caught the resin bug check out our resin jewelry tutorial which will teach you how to make a gorgeous necklace. We also have some beautiful resin coasters here on Gathered waiting for you to make them.