Epoxy resin has become a very popular craft over the past few years, and we can see why. Resin is an exciting and unique craft that you can use to produce useful and beautiful items.
Resin has qualities similar to those of plastic and glass, making it ideal for a range of crafts. Yet, unlike plastic and glass, you can make resin items at home without complex machines or fire!
If you love to make gifts for friends and family, resin is a useful craft to know. With resin, it's possible to make truly beautiful and unique objects.
Make everything from jewellery to cake stands and buttons to tabletops! The joy of resin is that each piece is so unique. With the addition of glitter, pigments and dried flowers the creative possibilities are endless!
Check out our favourite epoxy resin projects for lots of inspiration.
How to use epoxy resin: video tutorial
There is an endless world of resin moulds to discover which are suitable for any budget. The beauty of the moulds is they are reusable. Each time you use the mould you can create a new style by mixing colours and additions. If you want to step up your game, you can even make your own moulds using silicone rubber.
I love crafting with resin because it actually feels like magic. I’ve been using resin for about five years now and I am still excited about de-moulding every piece - it’s always a surprise. It is so satisfying to peel off a mould and finally see what it is inside. I must warn you, it is addictive!
Bonnie Cummings
Jump to:
- What is epoxy resin
- Which resin to use?
- How to use epoxy resin safely
- DIY resin craft ideas
- How to use resin for crafts: a step-by-step guide
- Resin kit and tools
What is epoxy resin?
Epoxy resin is a two-part liquid that when mixed together causes a chemical reaction and cures to form a hard object. The resin is mixed with a hardener, and as they are combined they react and produce heat.
The ratio of resin to hardener varies between brands but is often 1:1.
Epoxy resin is a synthetic resin that is a liquid that can be poured and moulded into any shape. When the hardener is added the resin will cure as a solid. Mixing instructions will vary between brands so must you follow these.
Which resin to use?
There are many types of epoxy resin and you need to choose one that is appropriate for your project. Here are the key things to consider when choosing an epoxy resin.
Resin viscosity - what is it and why do you need to know?
We use the term 'viscosity' to describe how thin or thick the epoxy liquid is. This has a significant effect on the types of projects you can use it for. If your mould has lots of intricate detail then you will need a thin resin (low viscosity) to get into all the details.
Thinner resins (low-viscosity) have a longer cure time than thick (high-viscosity). This means there will be a longer wait time to de-mould your creations.
By using the incorrect type of viscosity, you could end up having a project that won’t cure. For example, if you used a low-viscosity resin to cast a large, deep sphere you may not be able to get the resin out of the mould. If you used a high-viscosity resin in an intricate mould, it might not fill all the details.
If you're still unsure, we'll guide you through working with resin for the first time in this article!
Is resin heat resistant?
For items that come into contact with heat like coasters, you'll need to use a heat-resistant resin. Cure time for heat-resistant resin can be longer (expect to wait several days before you can de-mould).
Resin cure time
Cure time means the length of time it takes for the resin mixture to harden. There are several factors at play; the brand of resin, the atmosphere in which you cure, and the viscosity.
It will vary from project to project.
Depth and thickness of the resin
There are different types of resin suited to different pour depths. You can find the information stated in the instructions of your resin (usually in CM). It is important to use the correct resin otherwise your project may not cure and will remain tacky or soft.
Transparency & yellowing resistance
Most resins tend to yellow over time, especially if the resin is clear (no colour). To reduce yellowing, use a resin that states it is resistant to yellowing. You should also store your resin creations out of direct sunlight.
Other types of resin
Although epoxy resin might sound like a wonder material, it is not suitable for all projects.
- Epoxy resin (as above) - can be polished by hand
- Polyester or polyurethane resin - great for a glass-like finish and can be polished by machine.
- UV resin - Takes minutes to cure under a UV lamp and works well for smaller projects.
How to use epoxy resin safely
We've teamed up with Resiners®, the resin professionals, to guide you through the essential safety precautions when working with resin.
Whether you're using resin for the first time or are a seasoned pro, it's important to follow these steps to avoid harm, especially when working with resin over prolonged periods. Regularly reviewing this list ensures you're always up to date with your safety gear.
5 must-follow safety tips when working with resin
Resin is a versatile and fun material that can be used to create an endless array of items. However, before you get started, it's essential to follow these important steps to ensure you stay safe!
1. Use a Resiners® Purair Air Purifier

The most important tip we’ll give you in this article is to ensure your workspace is well-ventilated. Most resin is odourless, but even though you can’t smell it, fumes are still being released into the air. Breathing in these fumes can cause skin and respiratory irritation, which can worsen with prolonged exposure.
The Resiners® Air Purifier is a device used to remove or reduce harmful volatile organic compounds (VOCs) and other air pollutants generated when mixing resin. The machine purifies the air through filtration and adsorption techniques, removing fumes, especially in poorly ventilated indoor environments.
It’s an absolute must-have if you work with resin a lot, especially if you run a small business selling resin items, such as jewellery.
Do you want to know more about why this machine is a must-have? Our resident resin expert, Sarah Jackman Read, tested the Resiners® Air Purifier, and you can read her expert opinion in her review:
2. Wear PPE / gloves
Protect your hands and face with PPE. As you may already know, resin can be messy, and you don’t want it on your skin. Once dried, resin becomes a solid, durable substance that can be difficult to remove from both skin and clothing. We recommend using protective layers for yourself and any surfaces you’re working on!
3. Make sure your workspace is clear
Ensure your resin kit and space are out of reach of children and pets – those things do not mix well!
4. Wear a ventilator mask
A ventilator mask is a great extra layer of protection to ensure you are not breathing in dangerous fumes. It will also protect from particles if you use mica powders or if you sand your resin. Look for respirators that filter organic vapours as well as particles.
Note: If you notice any sort of skin irritation or breathing problems stop using resin immediately.
5. Be aware of food safety
Most resins are not food-safe and not suitable to eat or drink from. There are certain brands will are suitable, but ensure you find one that states it is.
DIY resin craft ideas
Resin is perfect for making personalised items as you can tailor so much of it. You can incorporate resin into other crafts too, like jewellery making. When it comes to resin, the scope of the project you can undertake is only limited by your imagination!
For more inspiration on your next project browse these amazing epoxy resin projects.
Resin does have its challenges and we'll show you how to tackle them below. Hello, temperature, air bubbles and patience! Keep on reading.
How to use resin for crafts: a step-by-step guide
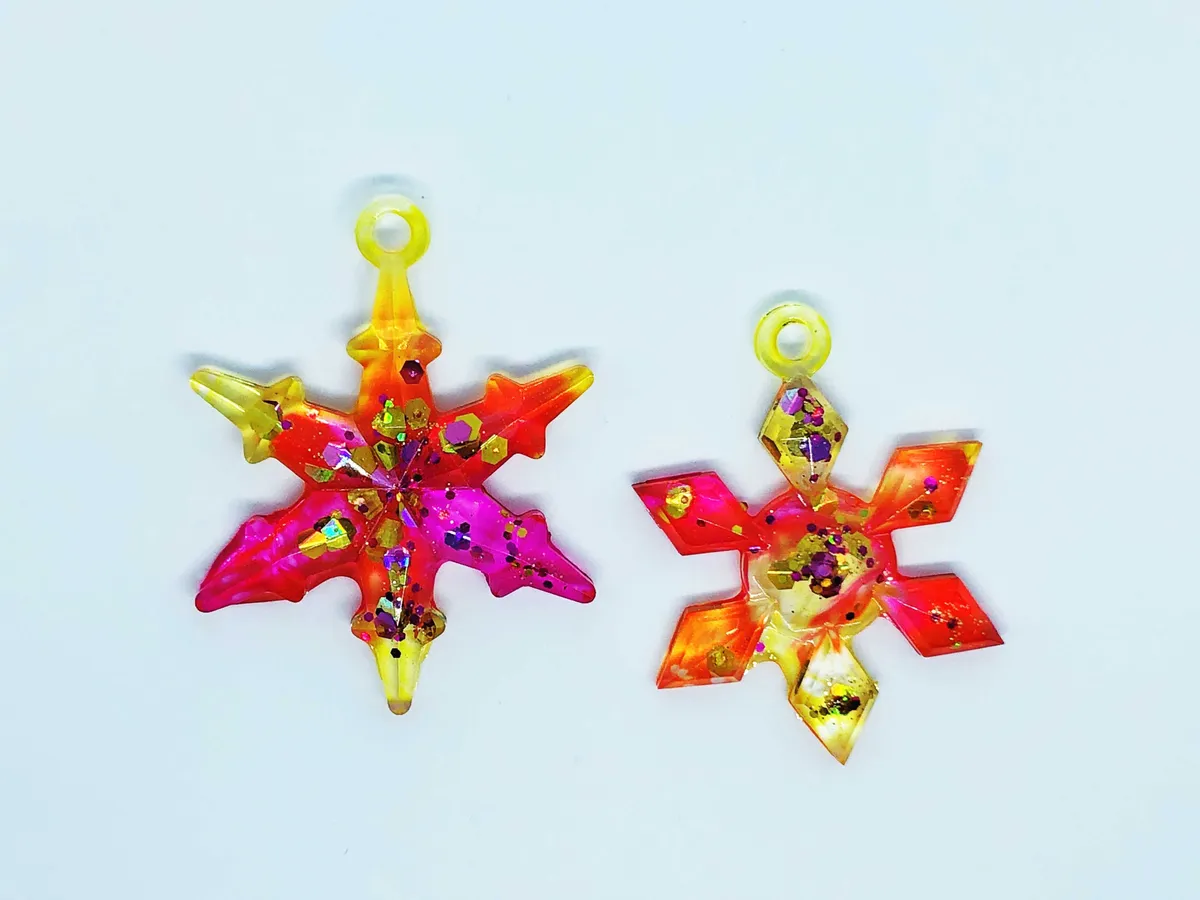
Epoxy resin is used to make a wide range of crafts but most commonly it's used to make jewellery or accessories. Once you've bought your perfect mould it's up to you what you turn your pieces into. From bookmarks to earrings, keyrings to charms, epoxy resin is super versatile.
The following step-by-step guide will talk you through making your first resin project with a simple mould.
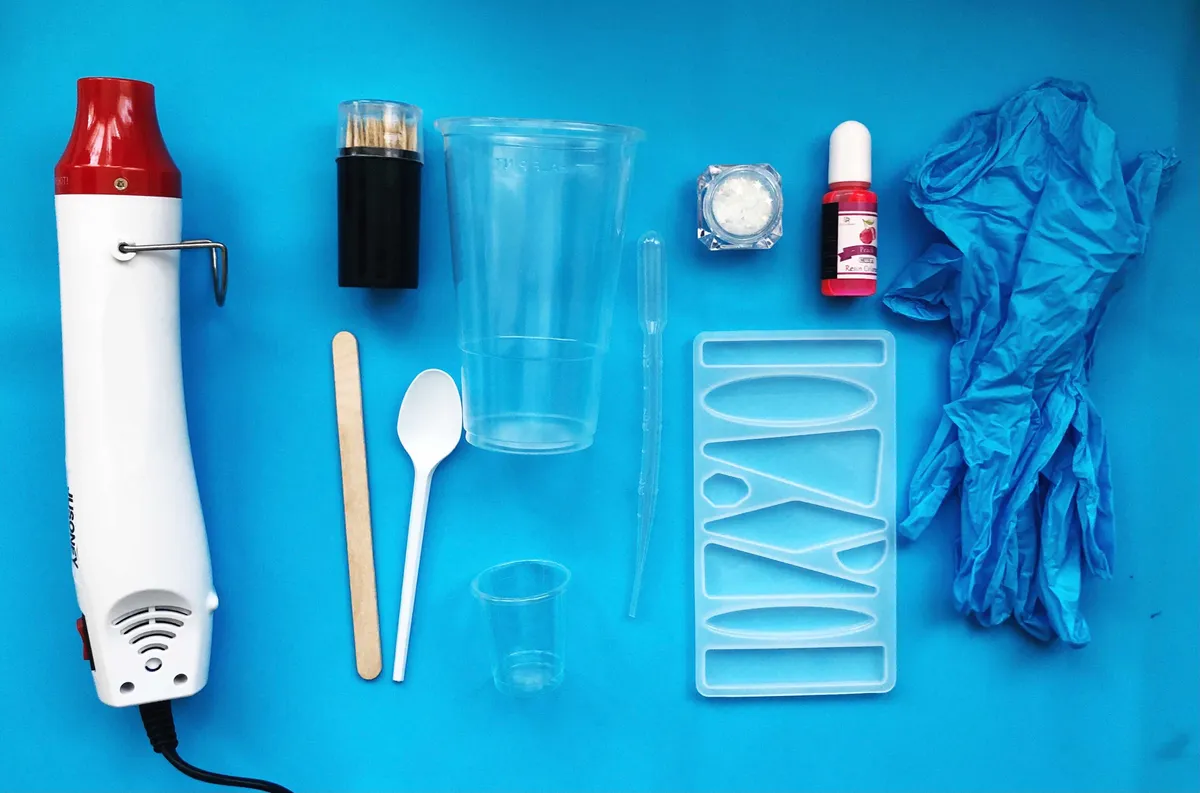
You will need
- Resin and hardener
- Measuring cups
- Mixing cups
- Gloves
- Stirring sticks
- Mould(s)
- Toothpicks
- Protective cover for your table (A silicone mat works best)
- Heat gun or lighter
- Well ventilated space
- We recommend using a respirator mask as well
Optional
- Resin colourants
- Glitter
- Dried flowers
- Beads
- Gold flakes
- Heat mat
- Disposable pipettes
- Baby wipes
Where to buy epoxy resin for crafts
You can buy the supplies for resin crafts online. Many shops will sell kits that include resin, hardener and protective equipment. Here are a few of our favourite starter kits. We've included a full section on where to buy resin at the bottom of this article.
- Epoxy Resin Crystal Clear Kitmazon (Amazon, £11.89)
This is a great resin kit for a beginner as it comes with everything you need but in a small quantity. If you're a pro already you can buy industrial-sized resin on Amazon. This resin promises to be anti-yellowing and comes with helpful instructions.
- Diamer resin kit (Etsy, £19.99)
This kit includes everything you need as a beginner resin artist. You'll find some adorable moulds to get you started too! With a 1:1 ratio of resin and hardener, you'll find this kit easy to use. If you want a low-cost, full kit this one is for you.
- Gedeo Crystal Resin and Hardener (Hobbycraft, £16.00)
Hobbycraft sells a few resin craft kits which include quality crystal resin. This kit includes two ready-to-mix parts, two measuring cups, two mixing sticks and a pair of protective gloves. You'll need to find your moulds and you're ready to go!
Plan your project
Before you start, you should plan out what you are going to do. Unlike many crafts, there is no undo when it comes to resin. Once you have mixed your resin, you have a limited amount of time to work with it. So having a clear plan ahead of getting started will make the process more relaxed and a lot more enjoyable.
Step by step: epoxy resin craft for beginners
Step 1
Read the instructions. Each brand of epoxy resin will come with its particular instructions and advice.
Step 2
Prepare your workspace:
- Ensure you have a low-humidity environment
- Find a workspace that will have a warm, consistent temperature
- Have a clean and tidy workspace (to avoid dust in your projects)
- Cover your working surface with a silicone mat
Pro tip: If you don’t have somewhere with a warm temperature, then you can use a plant propagation mat.
Pro tip: Cold temperatures and moisture may slow the curing process and cause the resin to have flaws.
Step 3
Warm your resin and moulds. Using warm resin and moulds will help to reduce the number of bubbles within the resin and allow it to cure.
Pro tip: If your resin is cold, immerse the bottles in warm water. Dry thoroughly before opening.
Step 4
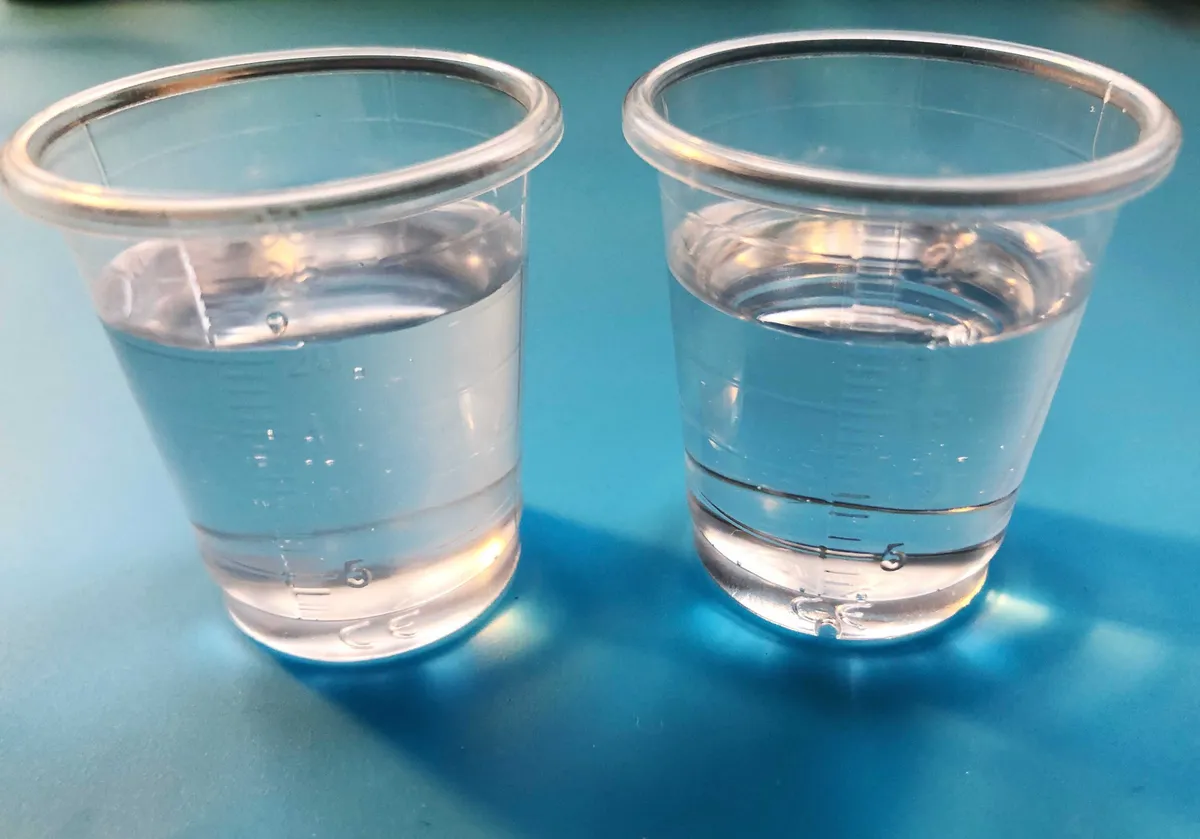
Measure your resin. Before opening your bottles of resin, put on your gloves!
Open and measure each part as per the instructions. Replace the cap on the bottle before moving on to the next bottle.
Pro tip: Make sure you replace the correct lids on the bottles - if you mix them up the lid may get stuck. (This is due to the resin mixing and curing).
Pro tip: If you have lots of items to make, mix in several small batches. You will have roughly 45 minutes for each batch before it begins to cure.
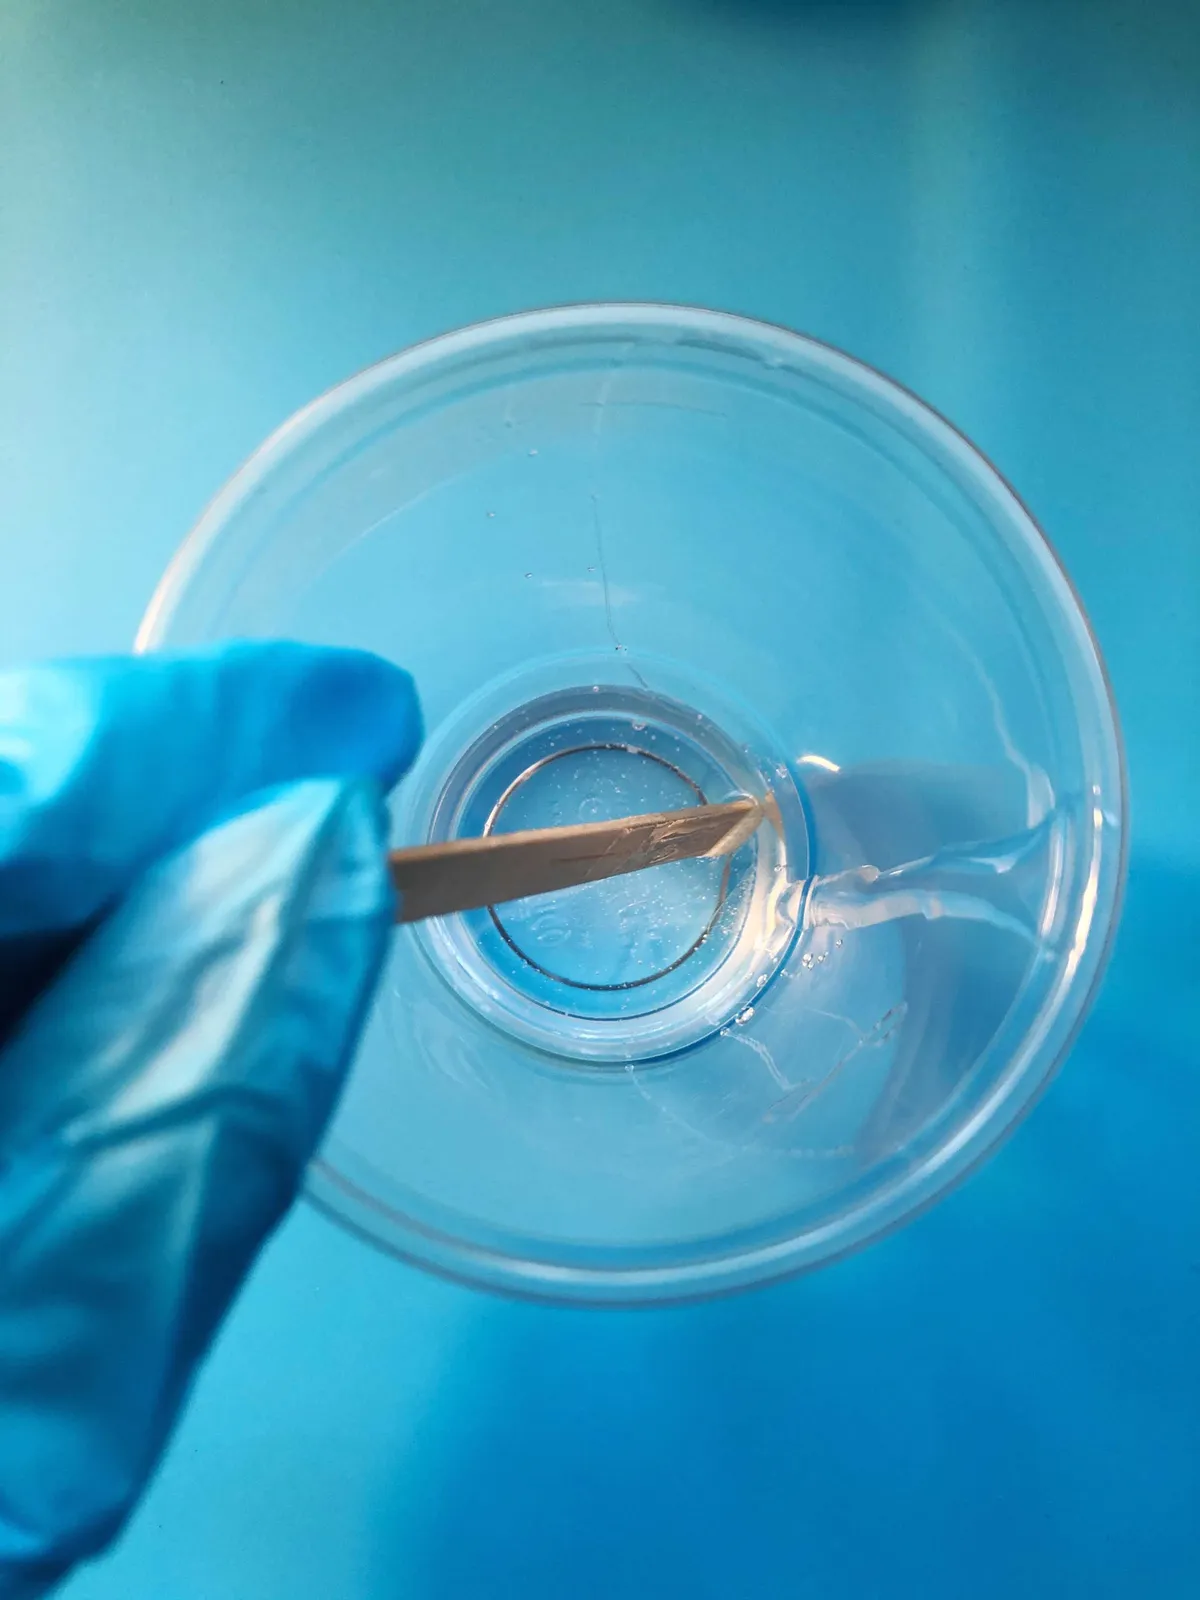
Step 5
Mix your resin. Mix your resin. When you are ready, pour both the resin and the hardener into a cup and then mix them together.
Pro tip: Use silicone cups as these are easily cleanable once the resin has cured.
Mix for around 3 minutes at a slow pace (times may vary, check your instructions).
Use a slow and steady motion to avoid working extra air into the mixture (this stops bubbles from forming). Make sure to scrape the sides of the cup and the bottom to ensure an even mix. If you miss parts of it, your resin might not cure and could have soft patches.
After you have mixed it for the time stated in the instructions, leave it to sit for two or three minutes to allow bubbles to rise and pop before you pour it into your mould.
Step 6
This step is optional, but now is the time to colour your resin and/or add glitter.
If you want to add glitter you can add it now and mix it in.
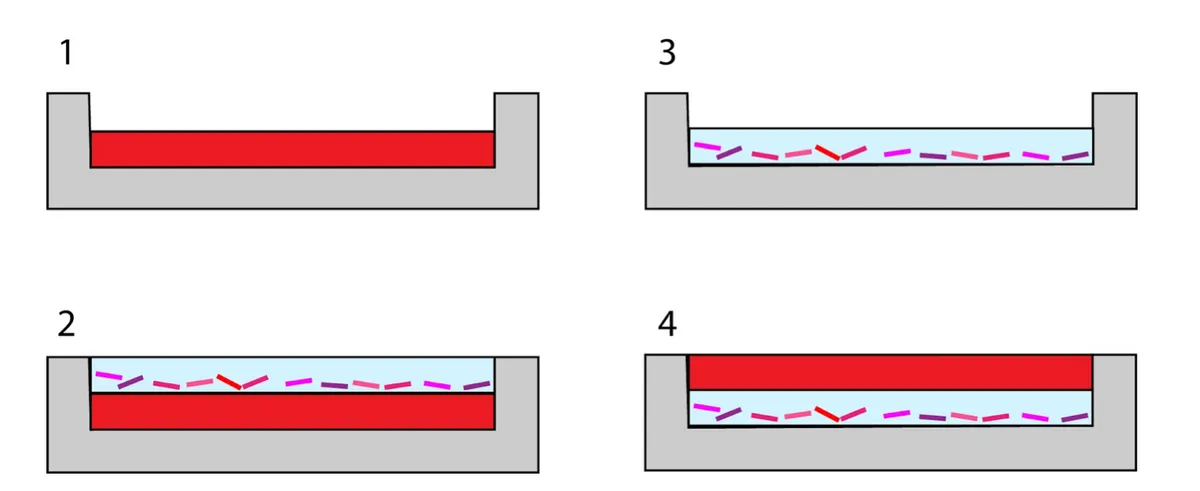
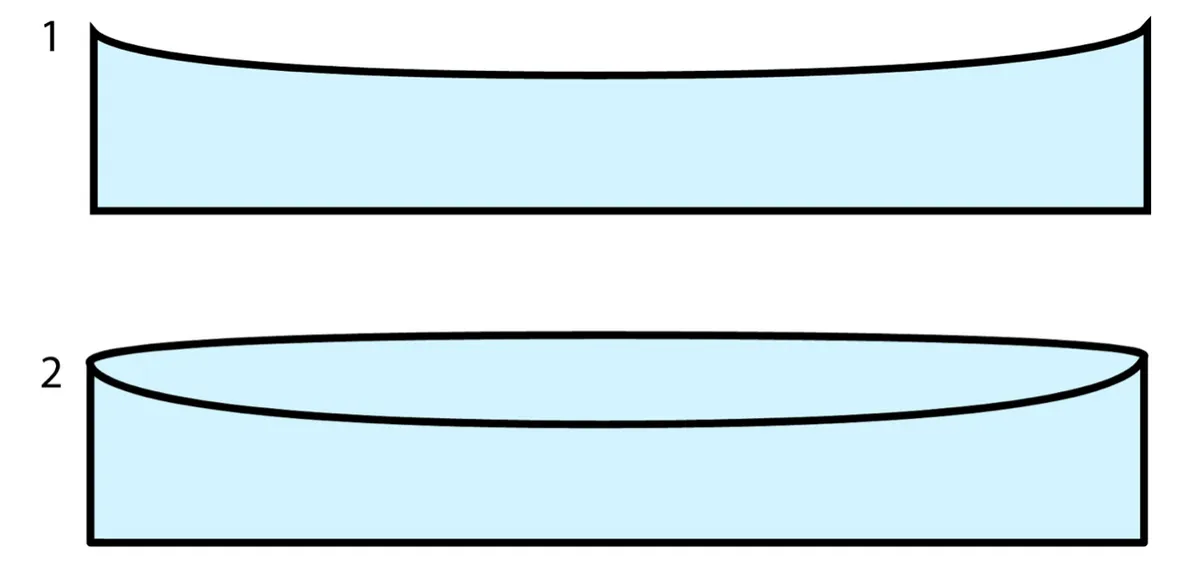
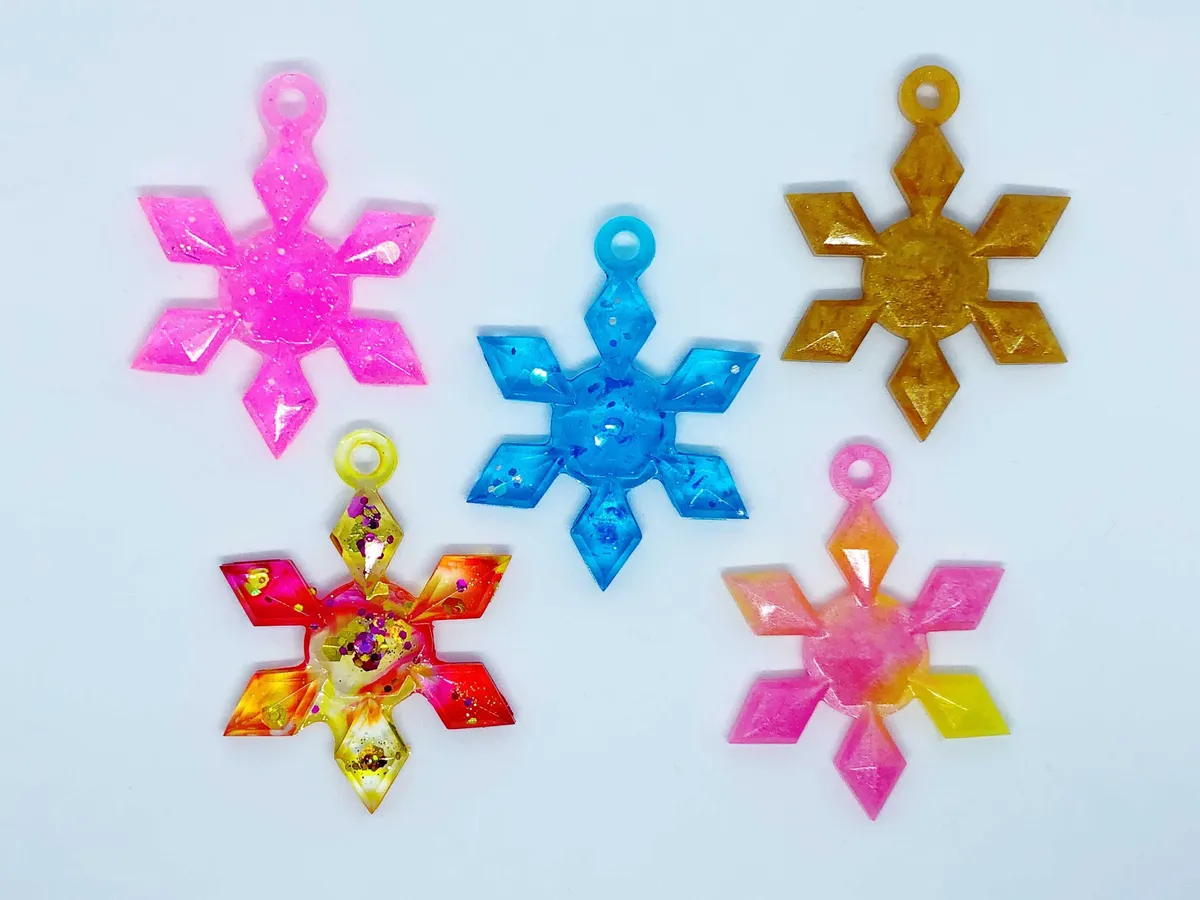
If you are making a clear piece with glitter, most of the glitter will sink to the bottom of the mould (diagram 1).
If you want your piece to look full of glitter, you’ll need to do at least two pours (more if your piece is thick) (diagram 2).

If you want to use an opaque colour and glitter, you’ll need to do at least two pours. Figures 1 and 2 show the order of pouring the coloured resin followed by clear with glitter resin.
Note: The glitter will sink to sit on top of the coloured layer and will be behind the clear top.
Figures 3 and 4 show the order you can pour if you want the glitter to be flat on the front of the piece. There will be a clear gap between the glitter and the coloured resin.
If you are pouring in stages like this do not de-mould your piece between pourings.
If you want to add colour to your resin, now is the time. You can use resin pigments, alcohol inks or mica powders to add colour. Make sure they are thoroughly mixed to avoid the final item having streaks. Do not use anything that contains water as this will stop your resin from curing.
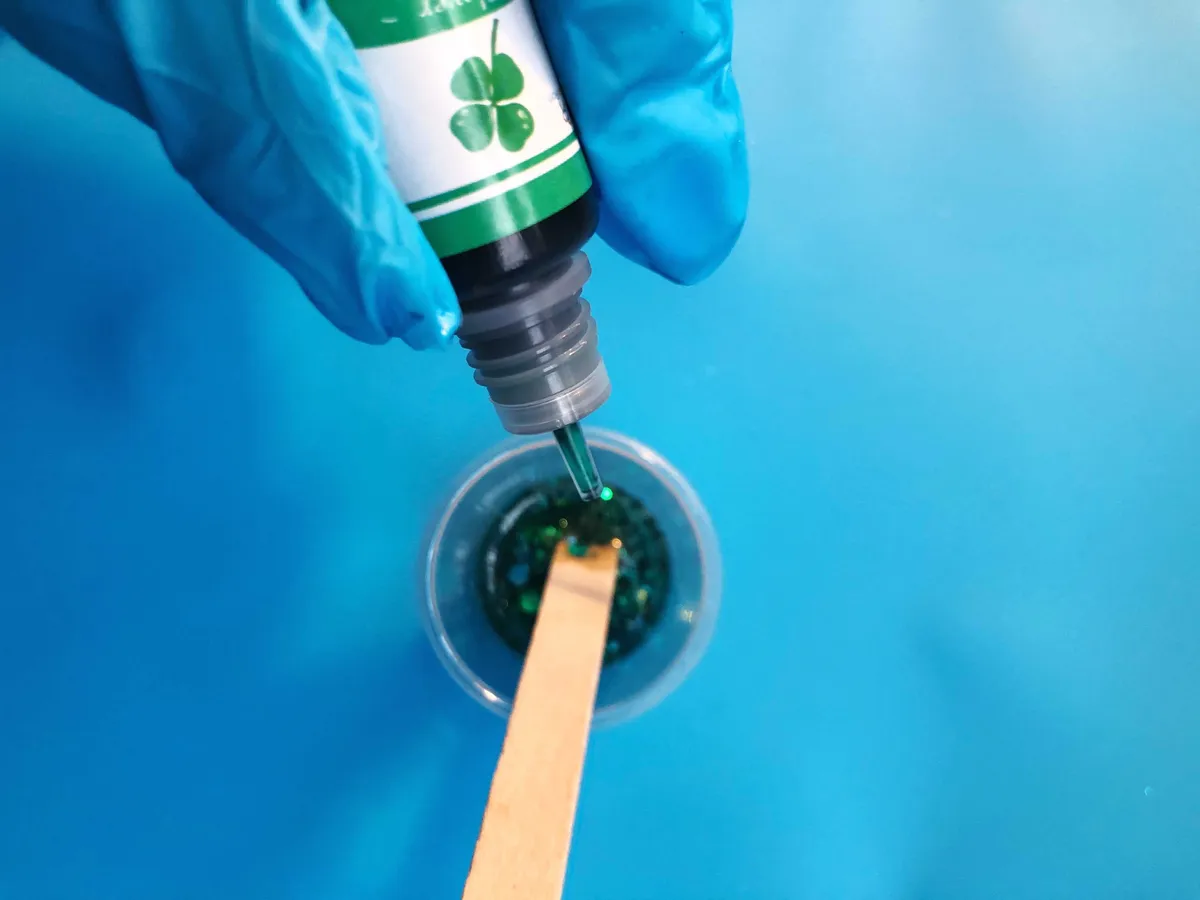
Mica powder must be mixed well, I find it takes a bit more mixing than liquid colourants do. If the mica isn’t mixed your pieces might show striping or patches of different colouration.
Step 7
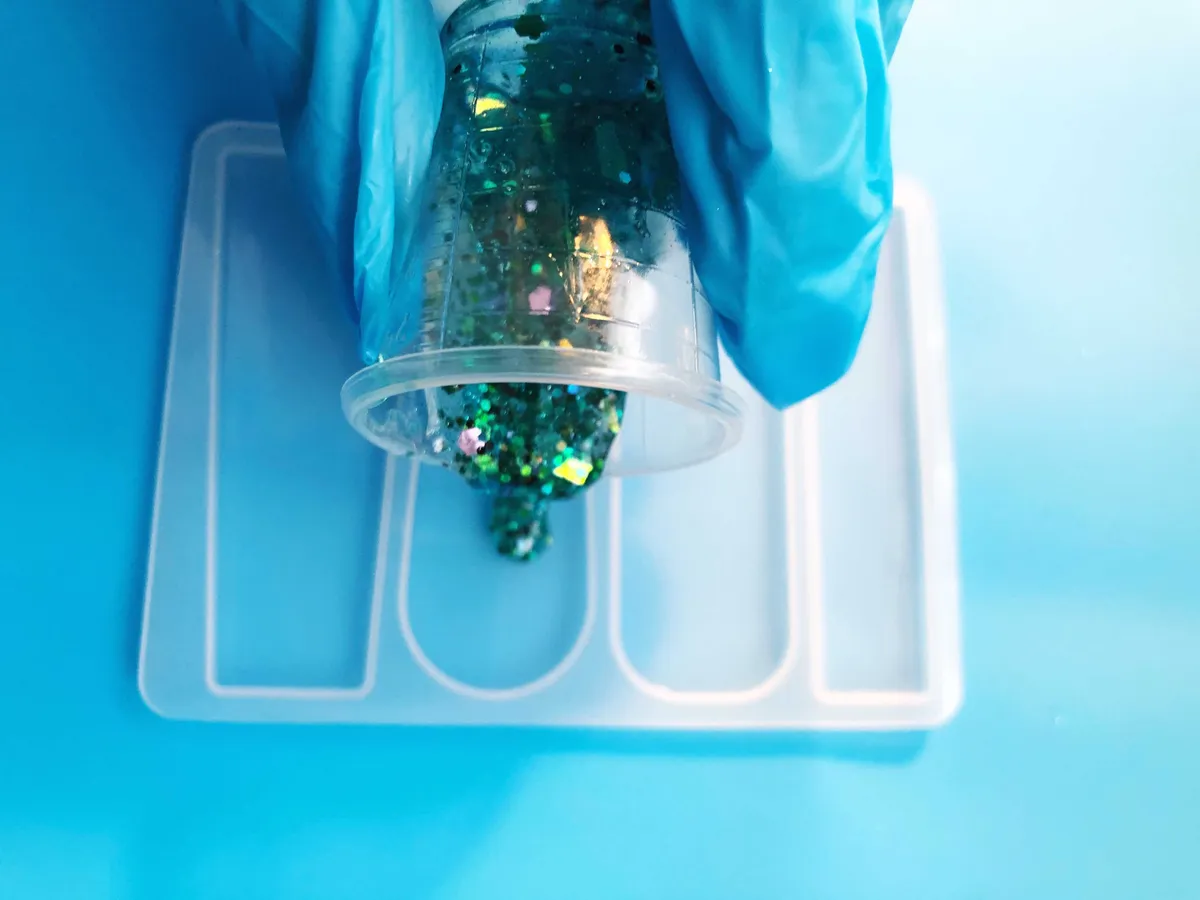
Fill your moulds. The size and depth of your mould will dictate how you pour your resin.
Large moulds: Pour straight from the mixing cup
Small moulds: Use a stirring stick or small plastic spoon
Pro tip: If you overfill it, you can use a stirring stick to scrape across the top of the mould to remove the excess resin. (Or use a pipette).
Pro tip: If your mould has flat areas around it (such as a flat earring mould) you can peel off any excess after curing.
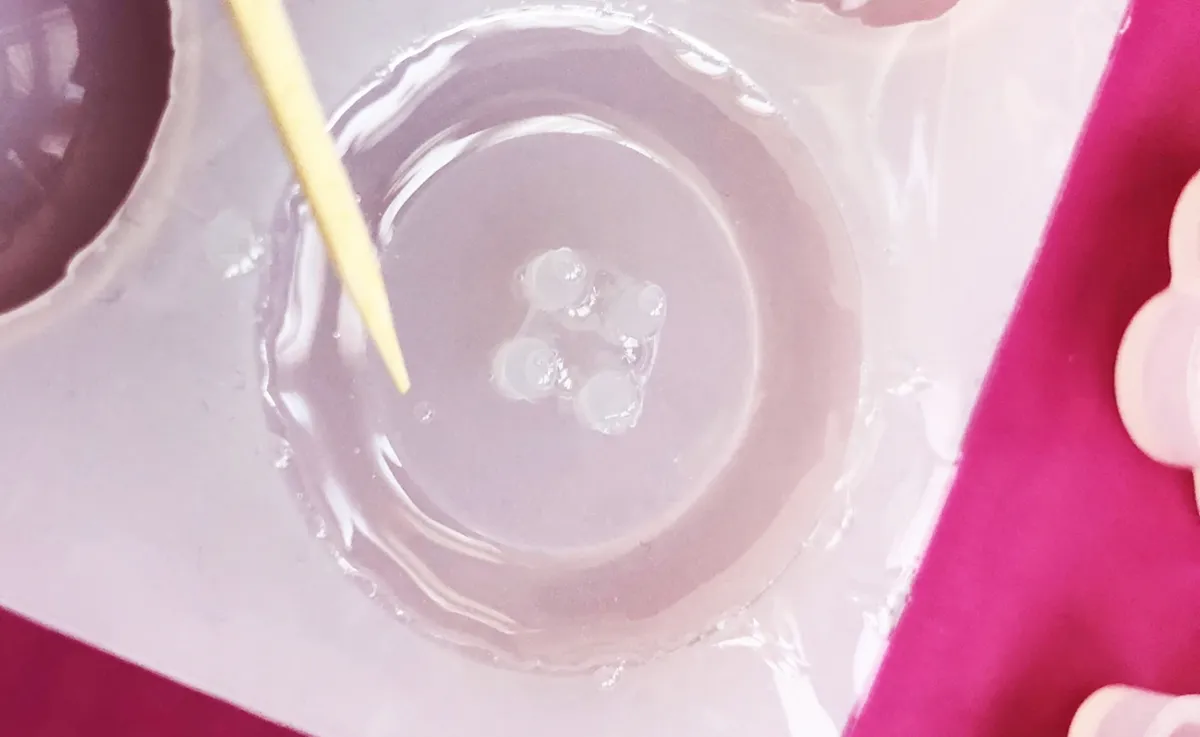
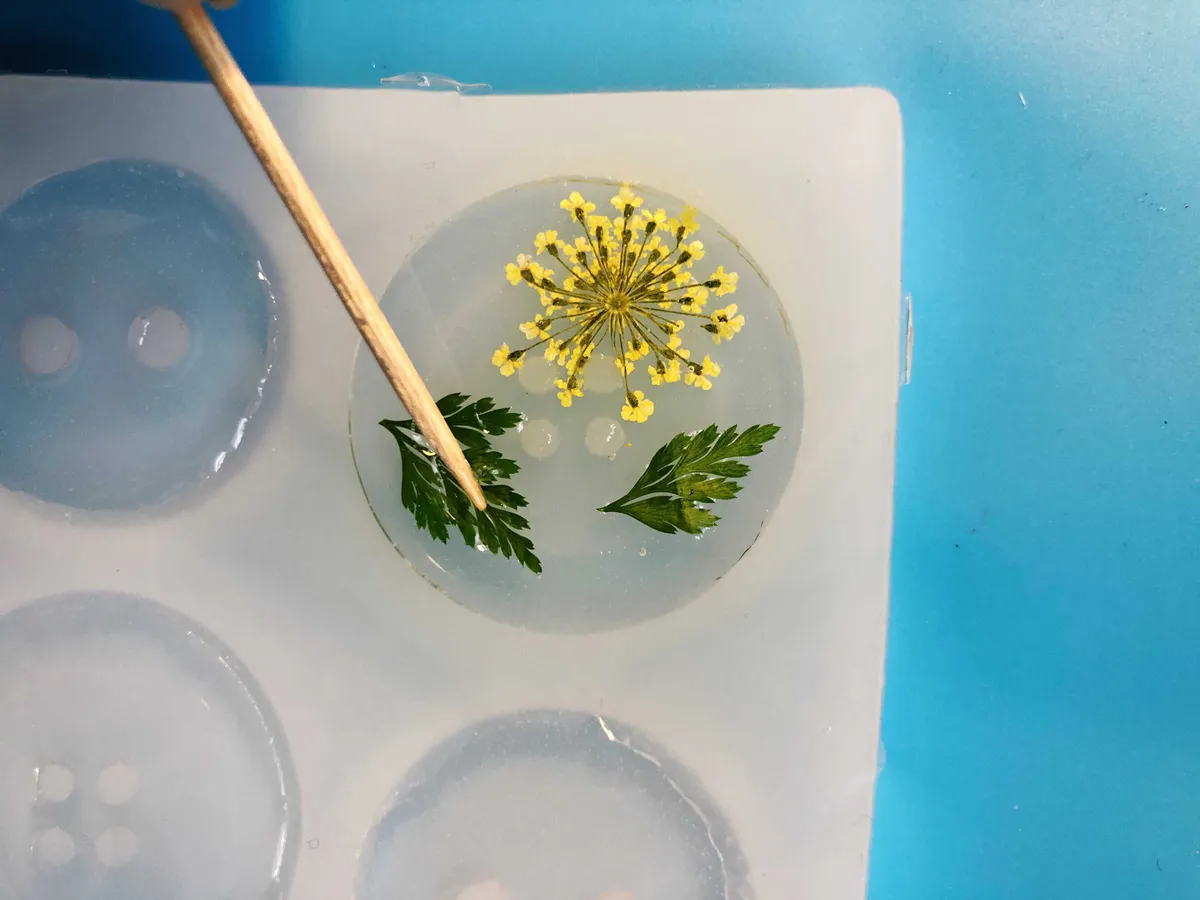
If you have any items you want to add to the mould, such as stickers, beads or dried flowers add them to the resin now. Tweezers that have a long pointed tip can make this easier to do. Go slowly and watch out for bubbles that might form when the item enters the resin.
Note: do not add porous items (e.g: paper or photos) to the resin without first sealing them.
Pro tip: Keep extra moulds on hand to use up any excess resin.
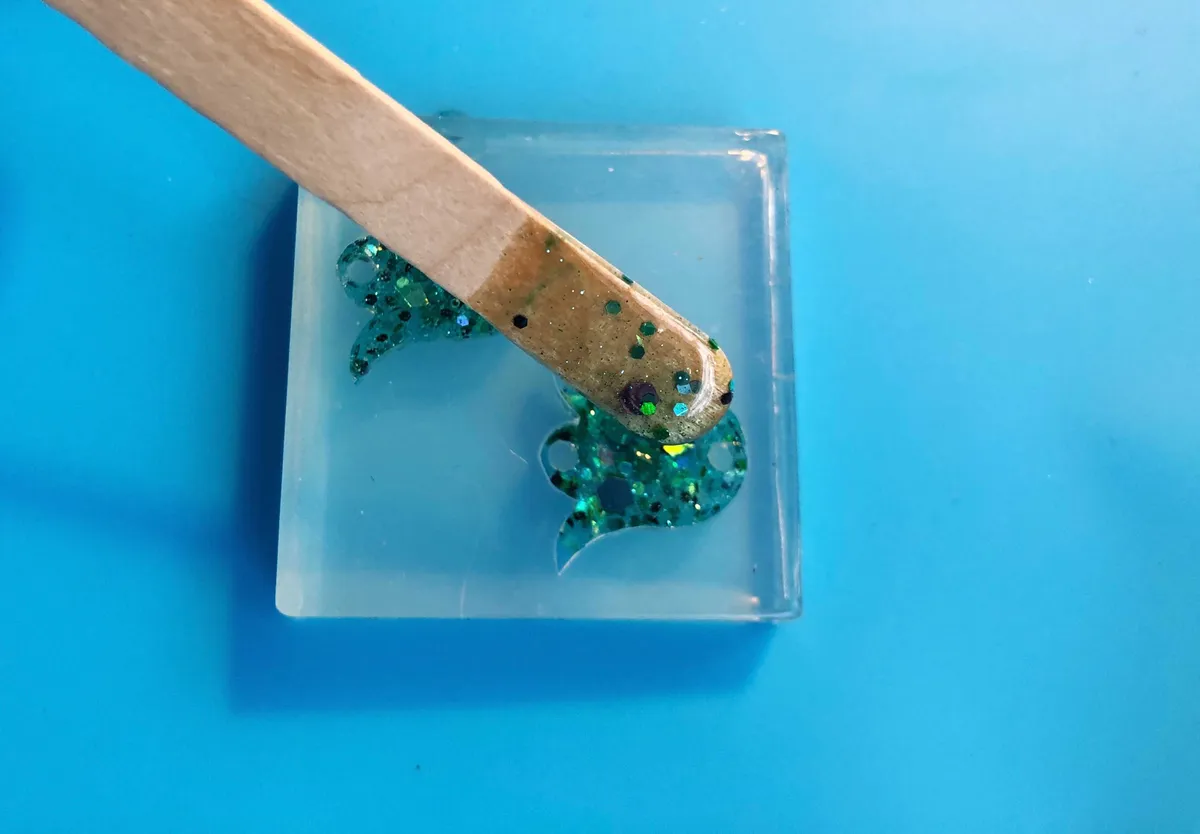
Step 8
Pop bubbles. Even if you have been super careful mixing your resin, it's may still have some bubbles in it. After you have filled your mould, wait two or three minutes for the resin to settle and for bubbles to form and rise.
Top tip: use a toothpick to pop and move the bubbles to the surface. Careful not to scratch the bottom of the mould though!
Top tip: If your mould has pointy corners there is likely to be a bubble stuck there! Check them out.
To pop surface bubbles: Use a heat gun or a lighter and run the flame across the surface for a few seconds.
Add embellishments to your resin (optional step)
You can add items to your resin before it starts to gel. Dried flowers, stickers, beads as well as anything non-porous.
Step 9
Cure. Leave your resin in a safe place to cure.
As we've mentioned above there is a variety of factors that affect the curing process. As an average resin will take 12 hrs to 3 days to cure.
- Room temperature
- Size of mould (viscosity)
- Resin brand
- Type of resin
When curing leave your makes in a well-ventilated room away from children and pets. To avoid dust getting onto your project cover with a bowl.
Be patient! It can be very tempting to de-mould your items early but try to be patient as you can ruin them if they have not cured.
As resin cures, it can ‘shrink’ and the middle part of the resin can dip down. When this happens the top of the resin piece can feel quite sharp around the edges (figure 1). You can rectify this by doing a tiny pour on the top and filling the dip with clear resin (figure 2).
Step 10
Remove it from the mould. When you are sure that the resin has cured you can de-mould your item! This is the exciting part. Pull the mould away from the resin piece to remove it. If you are using a silicone mould, be careful not to tear it.
If your resin has not cured, you can distort your piece by demolding it too soon.
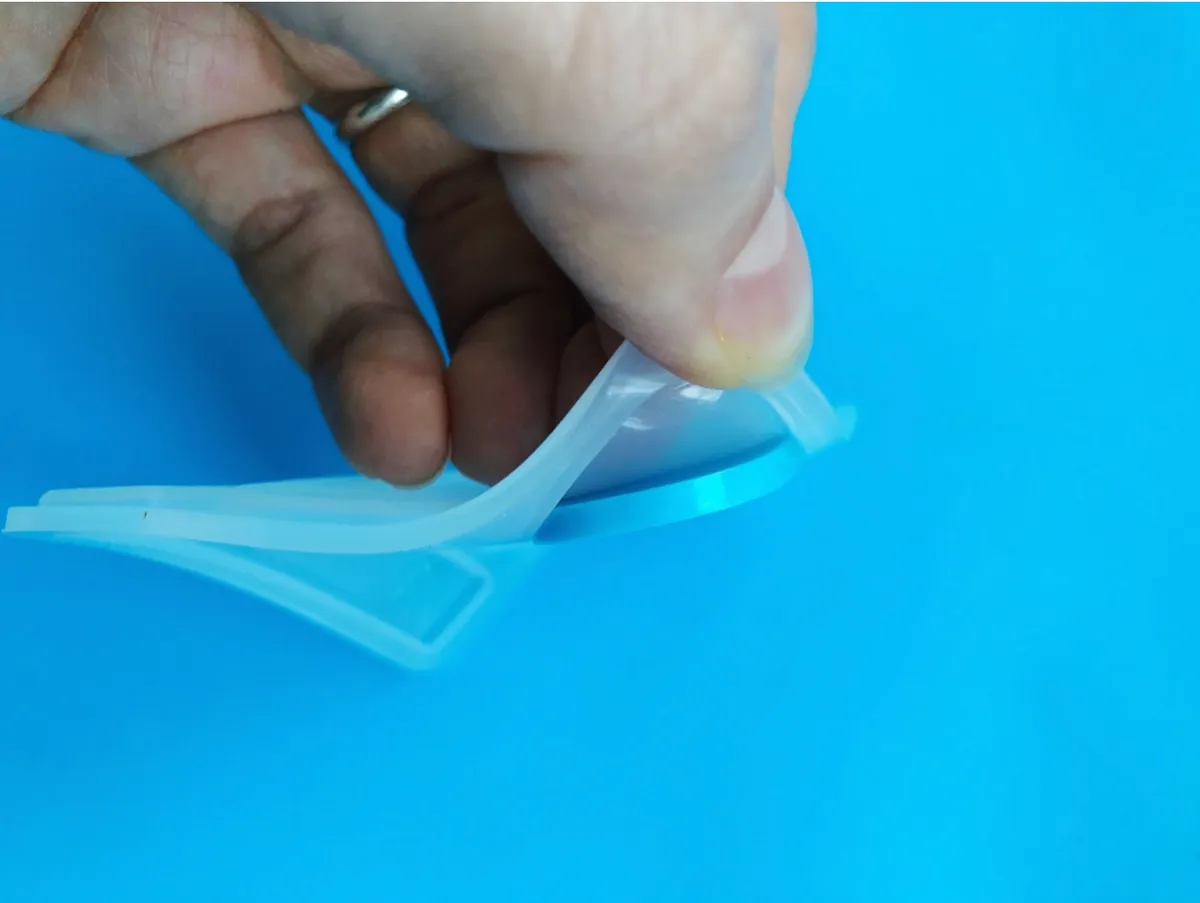
If your resin has not fully cured, you can distort your piece by demolding too soon.
Step 11
Sand and finish. You may notice that the edges of your piece are rough. Remove this using some wet and dry sandpaper in a fine grade. Be careful not to scratch the shiny surface of the resin. You can also use resin polish to give your piece an extra shine.
When sanding resin you should always wear a mask to avoid inhaling any particles.
If your mould didn’t give your piece the shiny finish you wanted, you can add a thin layer of resin to the top of it. Due to the properties of resin, it will ‘dome’ when it is applied (figure 1 below).
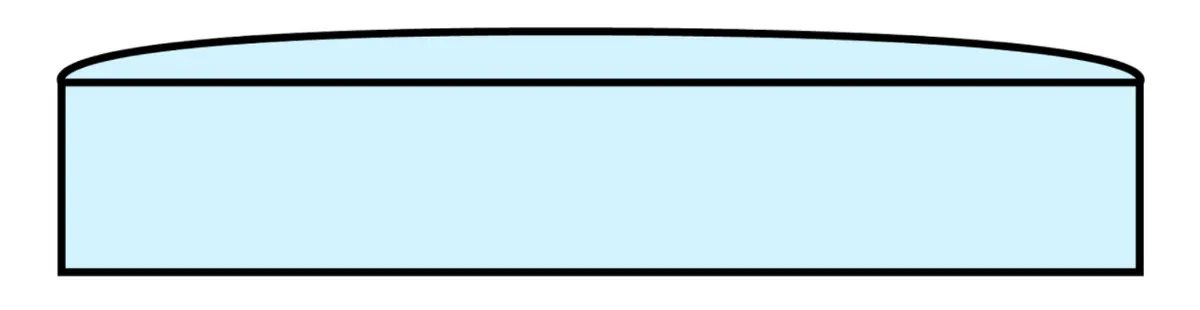
Doming resin. You will need to judge the right amount of resin to cover the surface area of the piece. Too much will spill over the sides and flow off, and too little and will not spread fully over the piece. Go slow, be patient, and gently use a stirring stick to help add extra resin and spread it.
Cleaning up resin
Once you are finished use up any remaining resin if you can. Baby wipes can be used to mop up any small resin drips. Always clear up spills and drips as you go, so that you don’t end up getting things stuck to them. Do not pour resin down the drain.
To dispose of resin wipe onto a kitchen towel and throw in the general waste.
Resin kits and tools
The best type of epoxy resin will depend on the type of project you want to make with it. There are some great and affordable resins available that are suitable for beginners. Ideal for small casting projects - a great way to get a feel for the craft.
1. Gedeo Crystal Resin
Gedeo has a small starter kit (150ml) that is an affordable way to try resin without spending a lot of money. The ratio of resin to hardener is double rather than 1:1, so you just need to measure the amounts as instructed in the kit.
2. Craft Resin
Craft Resin is versatile and affordable that is easy to work with and produces great results. It is low viscosity so perfect for small projects like jewellery. The mixing ratio is a simple 1:1 resin to hardener too. The beginner's kit includes bottles of resin and hardener.
3. Decor Rom Epoxy Resin
This resin is available in smaller quantities so it's perfect if you want to make a smaller investment. It does work out more expensive if you decide you want to make more items. The kit comes with gloves, stirring sticks and measuring cups.
SQUIRREL_13080803
There are, of course, hundreds of other epoxy resins available. As with most things, you get what you pay for. Cheaper resins can be prone to yellowing faster or producing more fumes or odours. Be sure to buy resin from reputable manufacturers and resellers.
What else do I need for resin craft?
Having the right tools and set-up will help you to achieve the best results when working with resin. As well as moulds and safety gear (mentioned above), the following items will help you get started:
Silicone mixing cups
We highly recommend silicone mixing cups for resin projects, as they’re reusable and allow cured resin to be easily peeled away. This Resiners® set includes silicone pouring cups, measuring cups, and mixing sticks, providing all the essentials for your crafting needs.
SQUIRREL_13140173
Resiners® Nonstick Heat-Resistant Leather Craft Mat
Protect your tabletop with this extra-large silicone mat, perfect for handling those inevitable resin spills and drops. Simply wait for the resin to cure, then peel off the blobs effortlessly. The Resiners® mat comes in an attractive mint green, adding a stylish touch to your craft space while keeping it tidy.
SQUIRREL_13140171
Stirring sticks
The humble wooden lollipop stick makes a great stirring stick when mixing resin. They are very inexpensive and come in handy for other craft uses too.
Toothpicks
Toothpicks are an essential part of your resin toolkit! They are perfect for getting bubbles out of corners in moulds.
Heat gun
A heat gun is essential for removing bubbles in resin, as the heat helps bring them to the surface. The Resiners® heat gun features a 3-in-1 nozzle and dual temperature settings, making it versatile and ideal for a variety of resin projects.
SQUIRREL_13140169
Heat mat
To ensure a consistent temperature use a heat mat. This will help your resin cure, and help to reduce bubbles. These vary in cost, but are a great investment if you want to do a lot of resin craft and don’t want to have your heating on 24/7!
SQUIRREL_13080751
Colouring epoxy resin
Adding colour and embellishments to resin is where you can get creative. Experimenting with different types of pigment, ink or glitter is so satisfying, as each piece comes out as a surprise.
There are a variety of different ways you can colour resin, each has its pros and cons. We'll talk you through these below:
- Liquid pigments
- Alcohol inks
- Mica powder
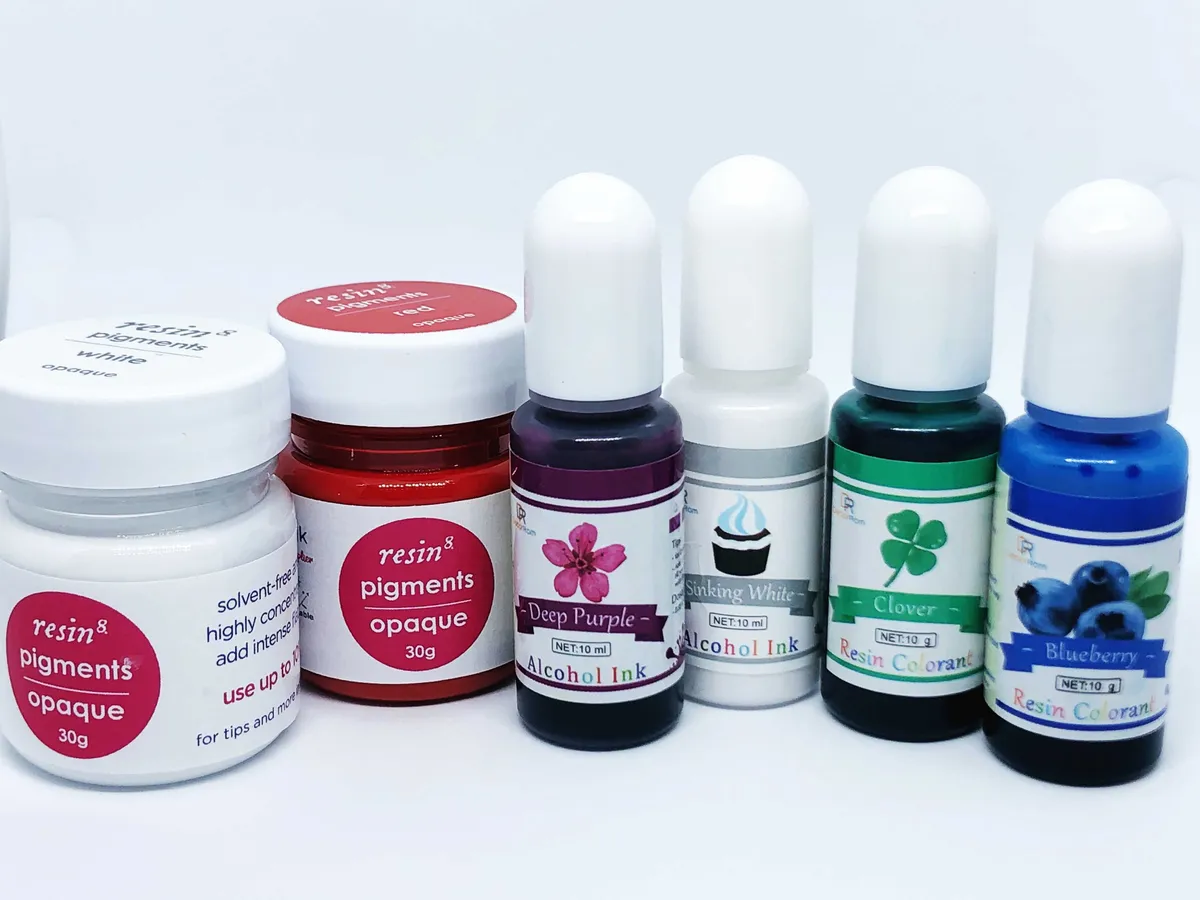
Liquid pigments for resin
These pigments come in liquid form, in a huge variety of colours. They are available in small bottles with droppers and you only need a few drops to achieve a bright but translucent colour. These are great for making resin pieces where you want the light to still shine through them, but be colourful too.
If you want to make more opaque resin pieces, add white and your chosen colour and mix them together. This results in pastel colours.
SQUIRREL_13080752
When you have added the drops of the colour to your resin, make sure to thoroughly mix it in. If you don’t, your final resin piece can have streaks of colour in it or might look patchy.
If you want to make opaque resin pieces (where no light goes through them) you will need to buy opaque pigments. Resin8 make a fantastic range of opaque resin pigments which are extremely concentrated.
These pigments come in jars and you need to use a stirring stick to mix a very small amount with resin. You can see the range of opaque colours they produce on their website.

Alcohol Inks for resin
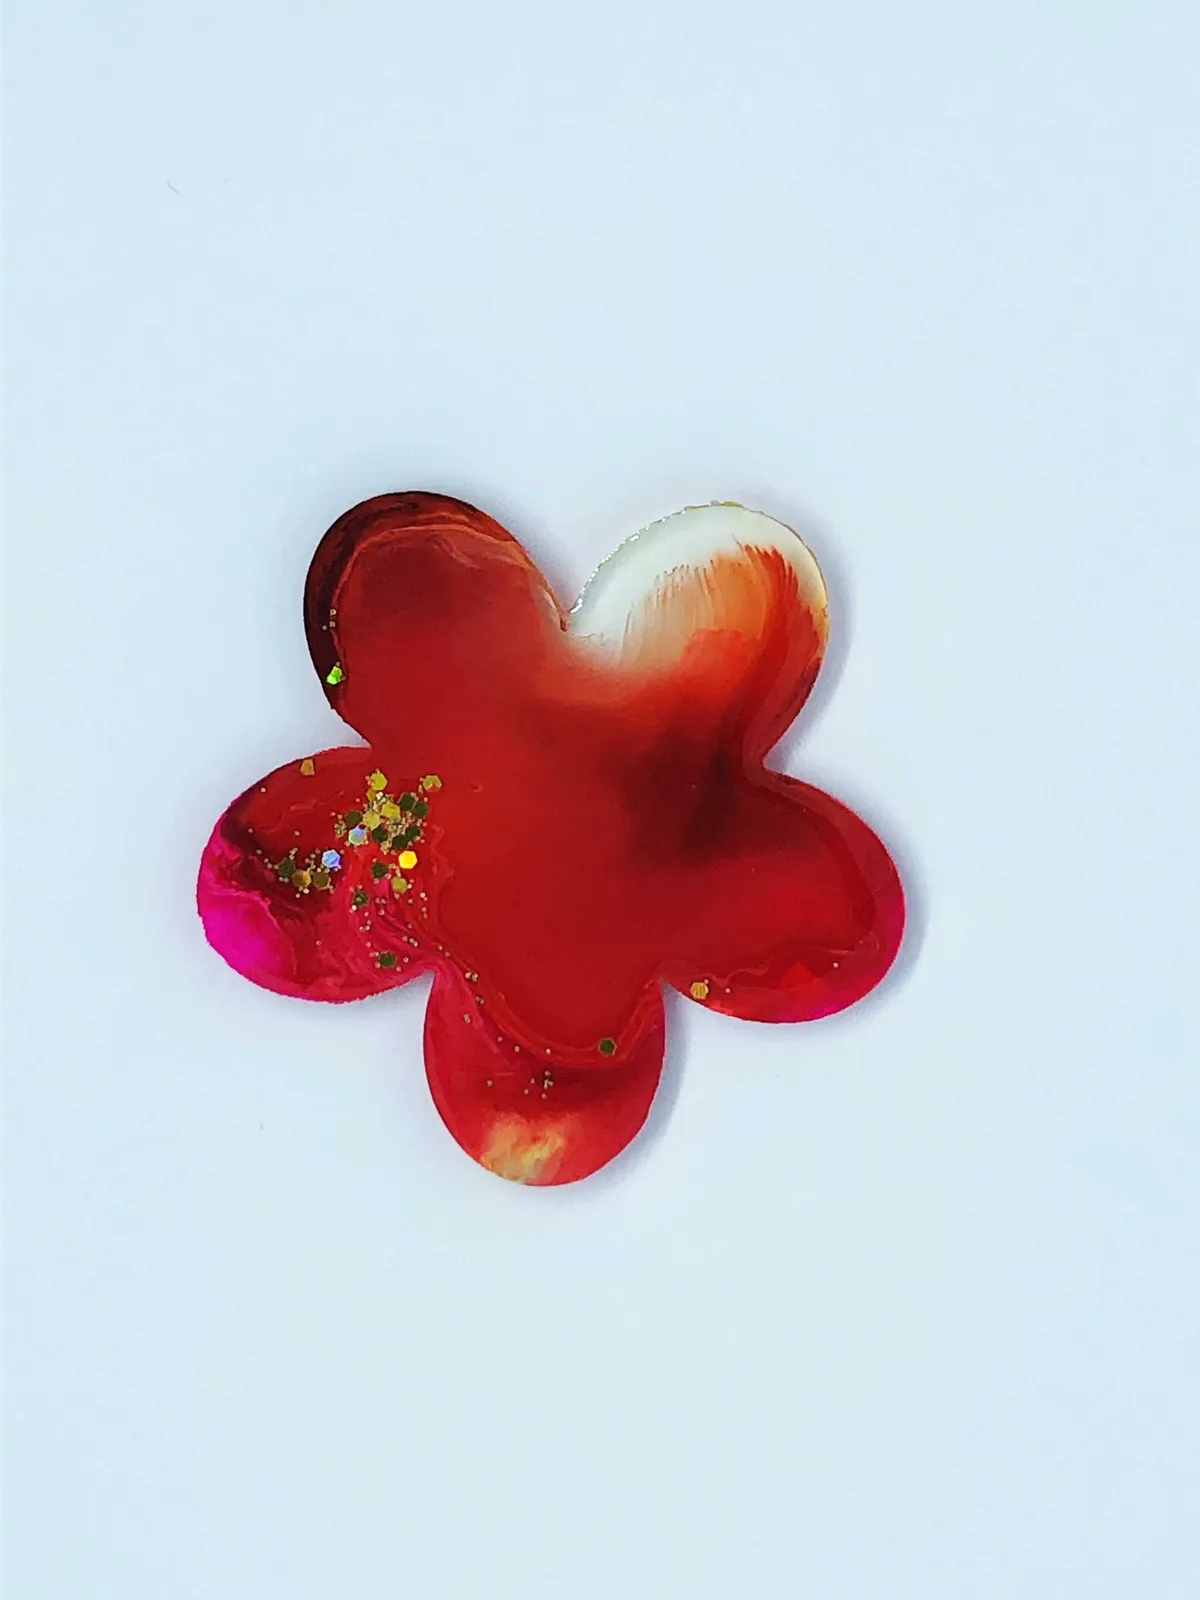
Alcohol inks have some interesting differences from liquid pigments. By dropping the ink into poured resin you will see unpredictable colours and patterns, like marbling.
Mica powder
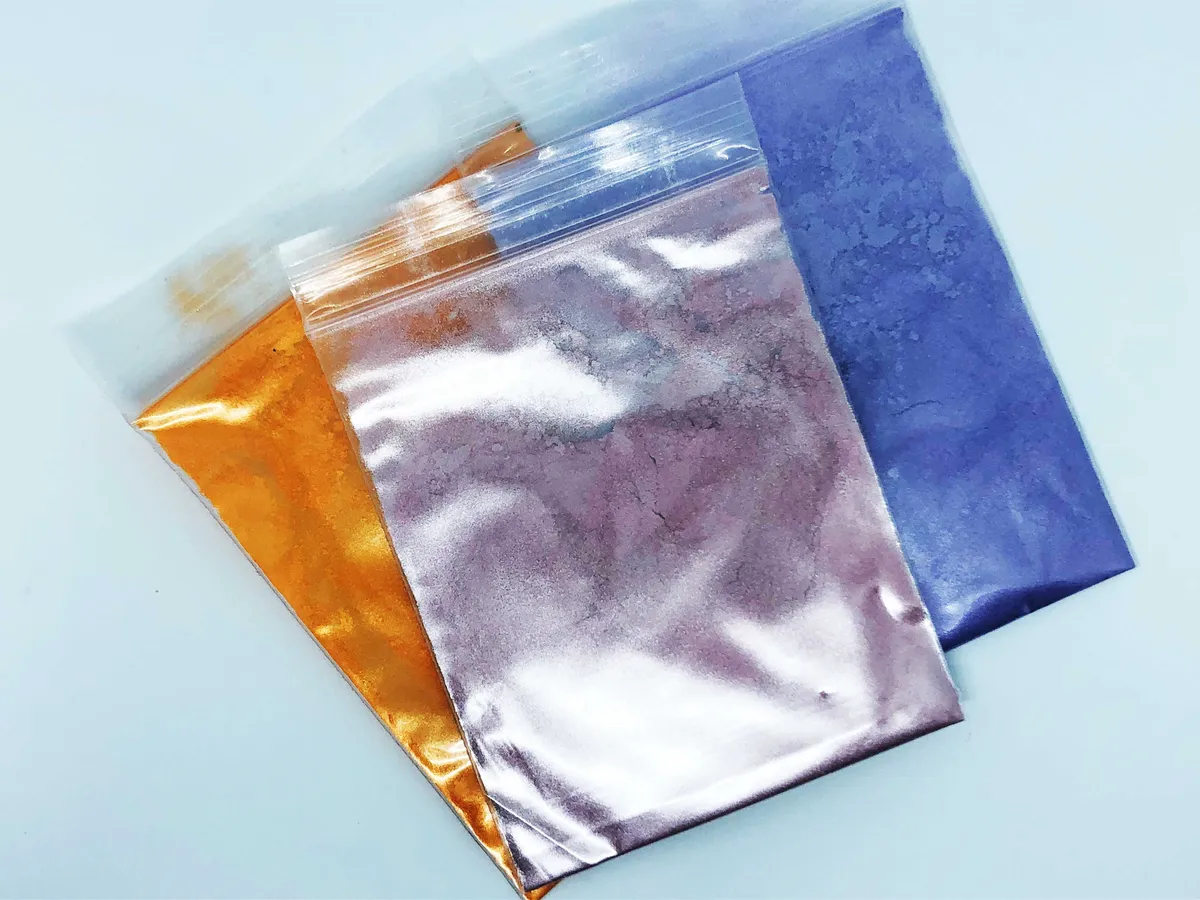
Mica is a type of silicate that has special properties that make it possible to be very fine. It is used in the cosmetic industry to colour products, such as eyeshadow and soap, but, it can also be used to colour resin.
SQUIRREL_13080767
Please note: you should wear a protective mask when using mica as the particles should not be inhaled.
Mix mica well to ensure there are no lumps of powder stuck in it. Keep baby wipes on hand to catch any powder spills.
Adding embellishments to epoxy resin
You can add almost anything to epoxy resin as long as it is free from any moisture. If you’re not sure if something will work, it is best to test a small amount with a small resin pour.
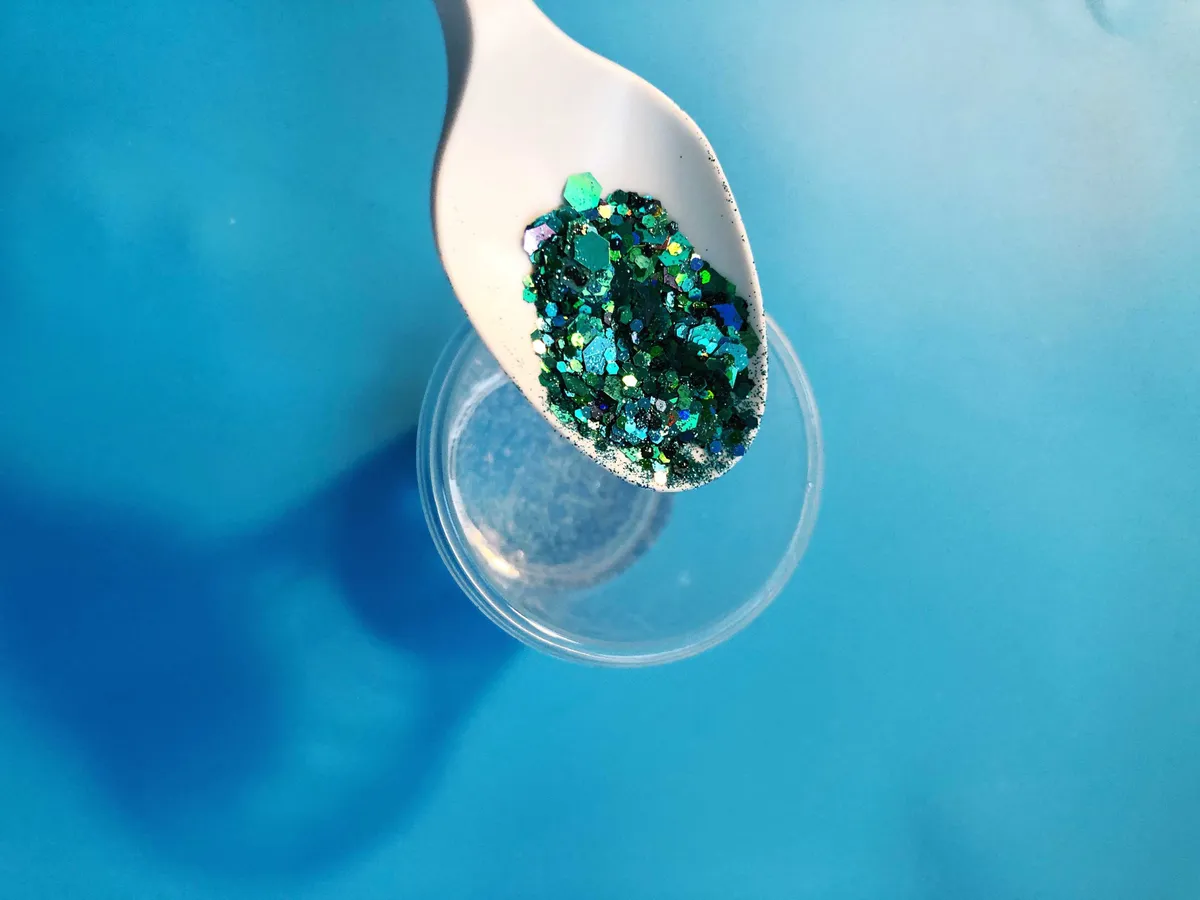
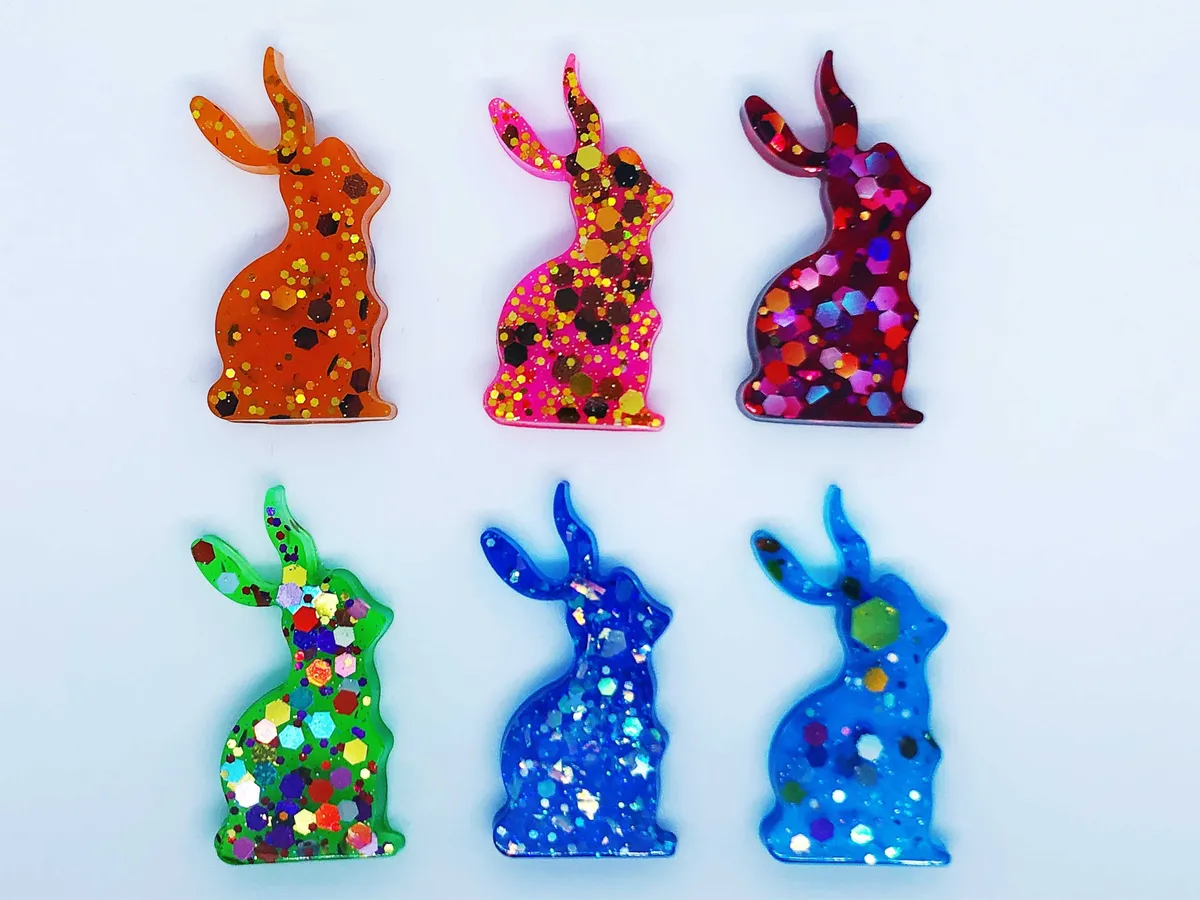
Glitter and foil flakes
You can achieve so many different effects with glitter. Depending on how much you add, the type of glitter you use, and what pigments you use alongside it.
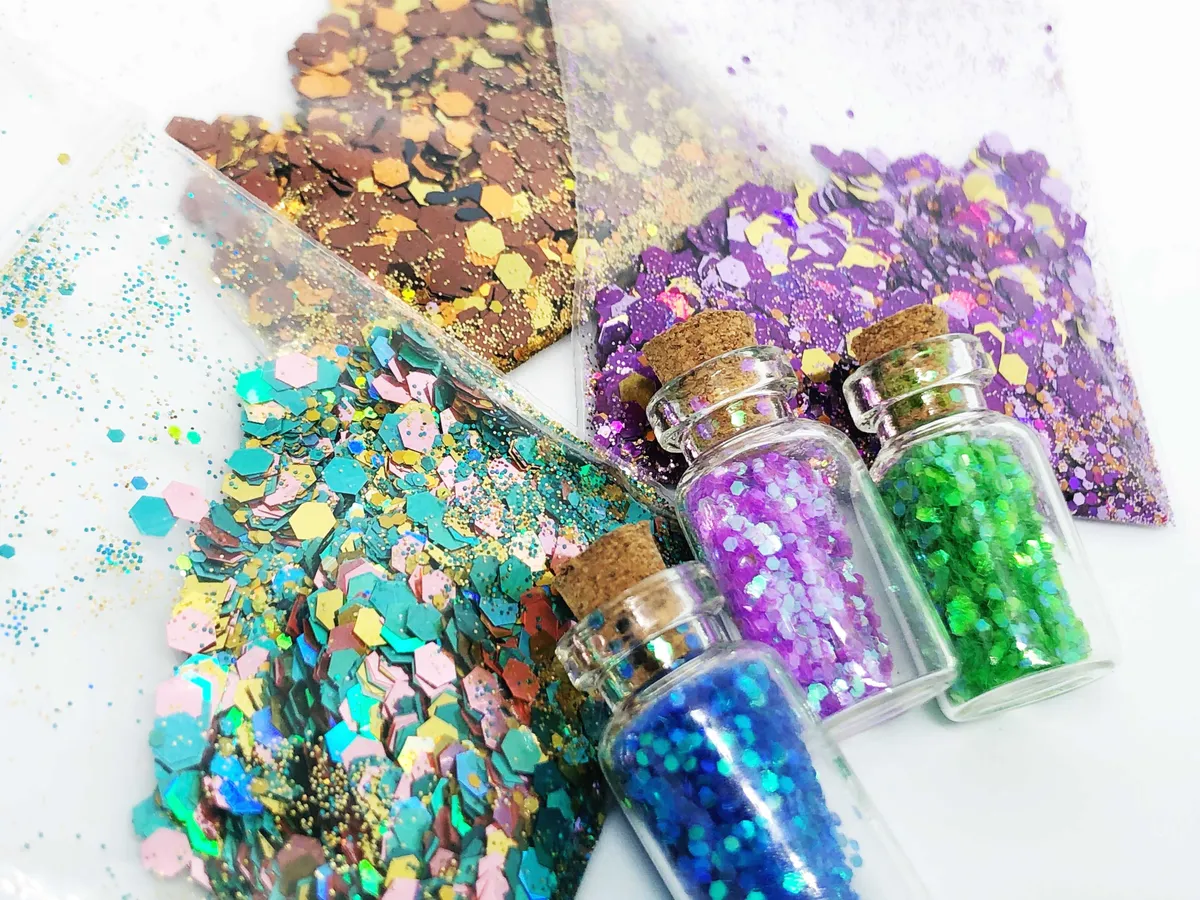
Mylar is a type of glitter that comes in shard-like flakes. It creates an opal-like finish that catches the light. The white and pale blue mylar flakes make your resin look icy (great for Christmas!).
SQUIRREL_13080771
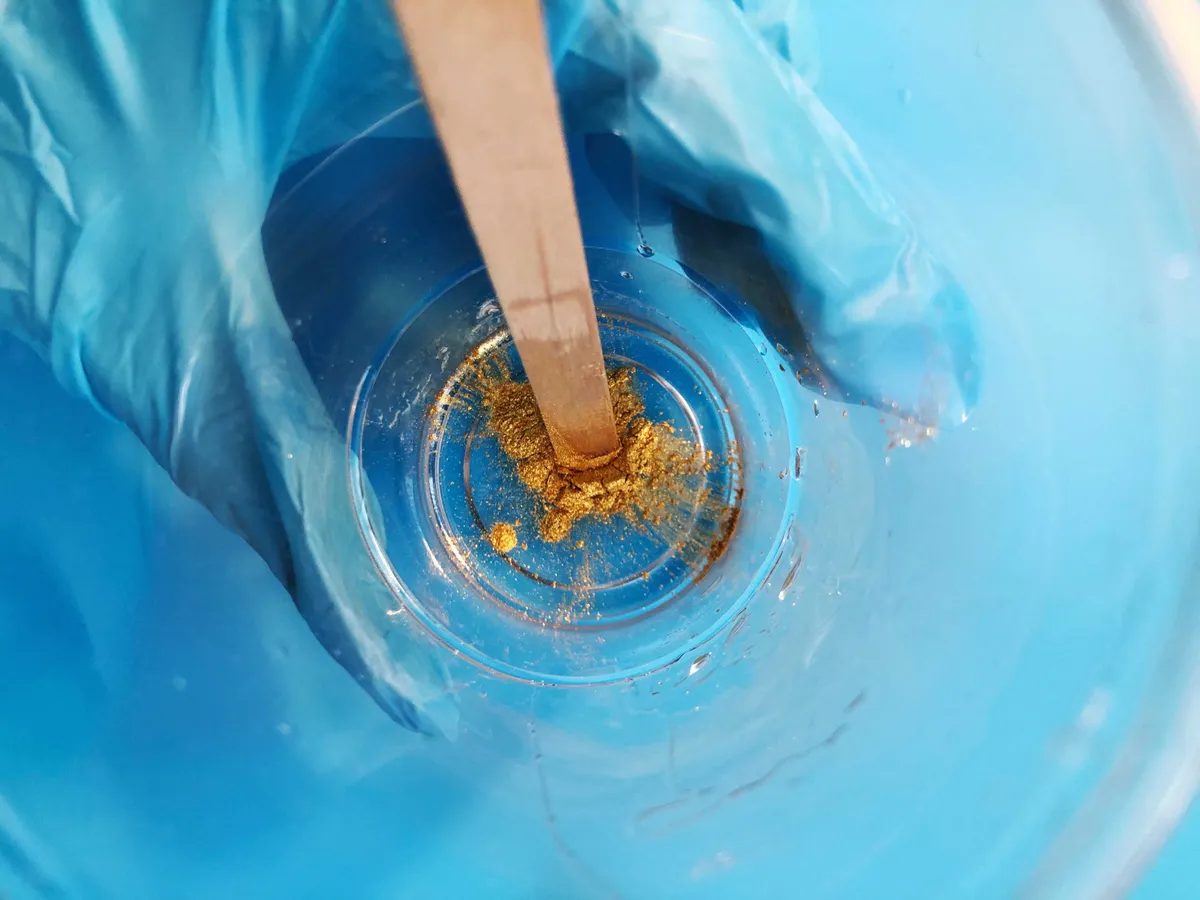
Foil flakes are another very popular way of embellishing resin pieces. These come in four main colour options: gold, silver, rose gold and copper. Foil flakes tend to look more sophisticated and expensive than glitter.
SQUIRREL_13080772
Stickers
You can use stickers to add fun embellishments to your resin pieces. These work well for keyrings and kawaii-style jewellery. Only plastic stickers can be added to resin. Paper stickers absorb the resin and discolour straight away.
To add stickers to resin:
- Peel off the sticker and avoid touching the sticky side with your fingers
- Use a pair of tweezers to place your sticker into the resin
- Move it with a toothpick into place
- Check for air bubbles
- Check within a few minutes to make sure the sticker hasn't moved.
SQUIRREL_13080775
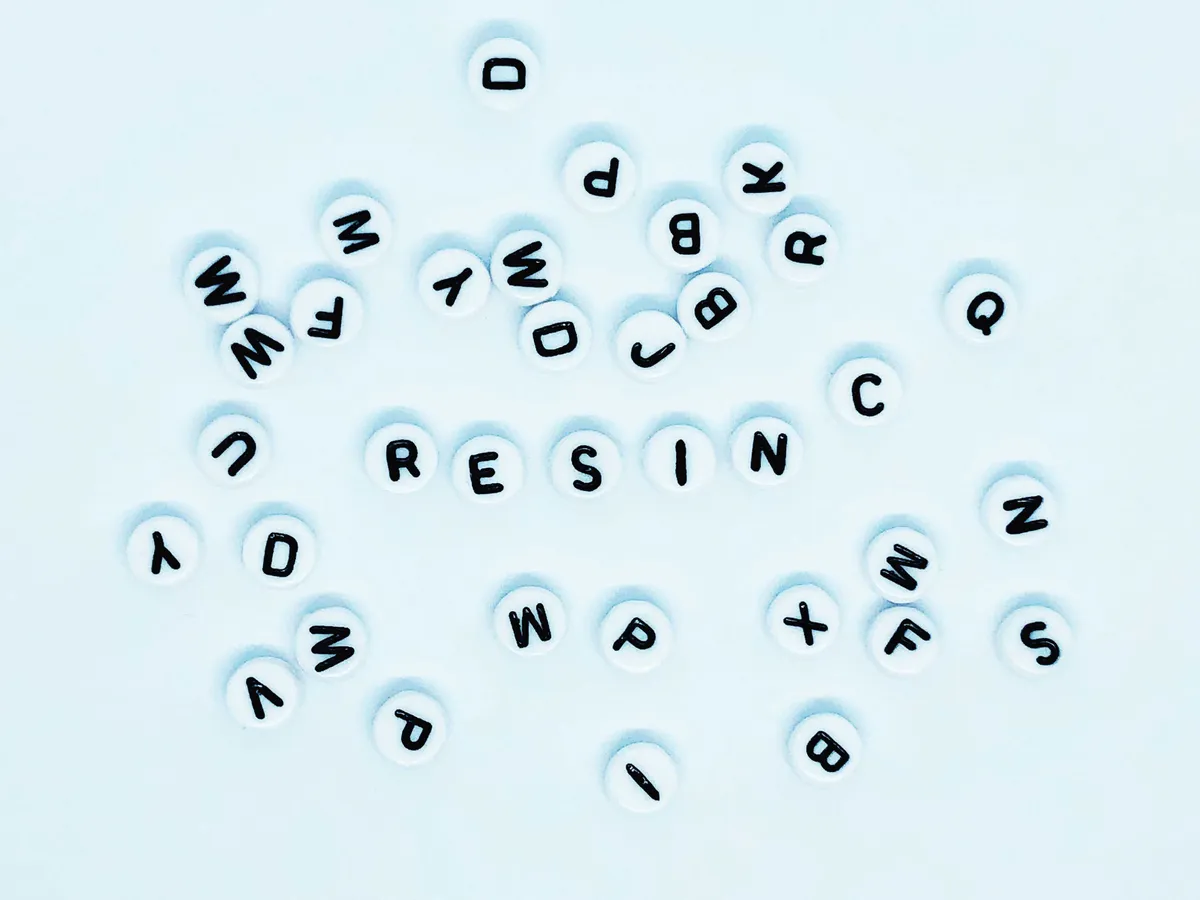
Letter beads
Plastic letter beads are a great way to personalise your resin creations. Use them to add names or favourite quotes or lyrics to pieces. Letter beads come in a variety of colours and shapes and are low-cost.
Check the orientation of the letters on both sides of the bead before you start putting them into the resin. You might need to spell your words upside down and back to front when you place the letters in!
SQUIRREL_13080777
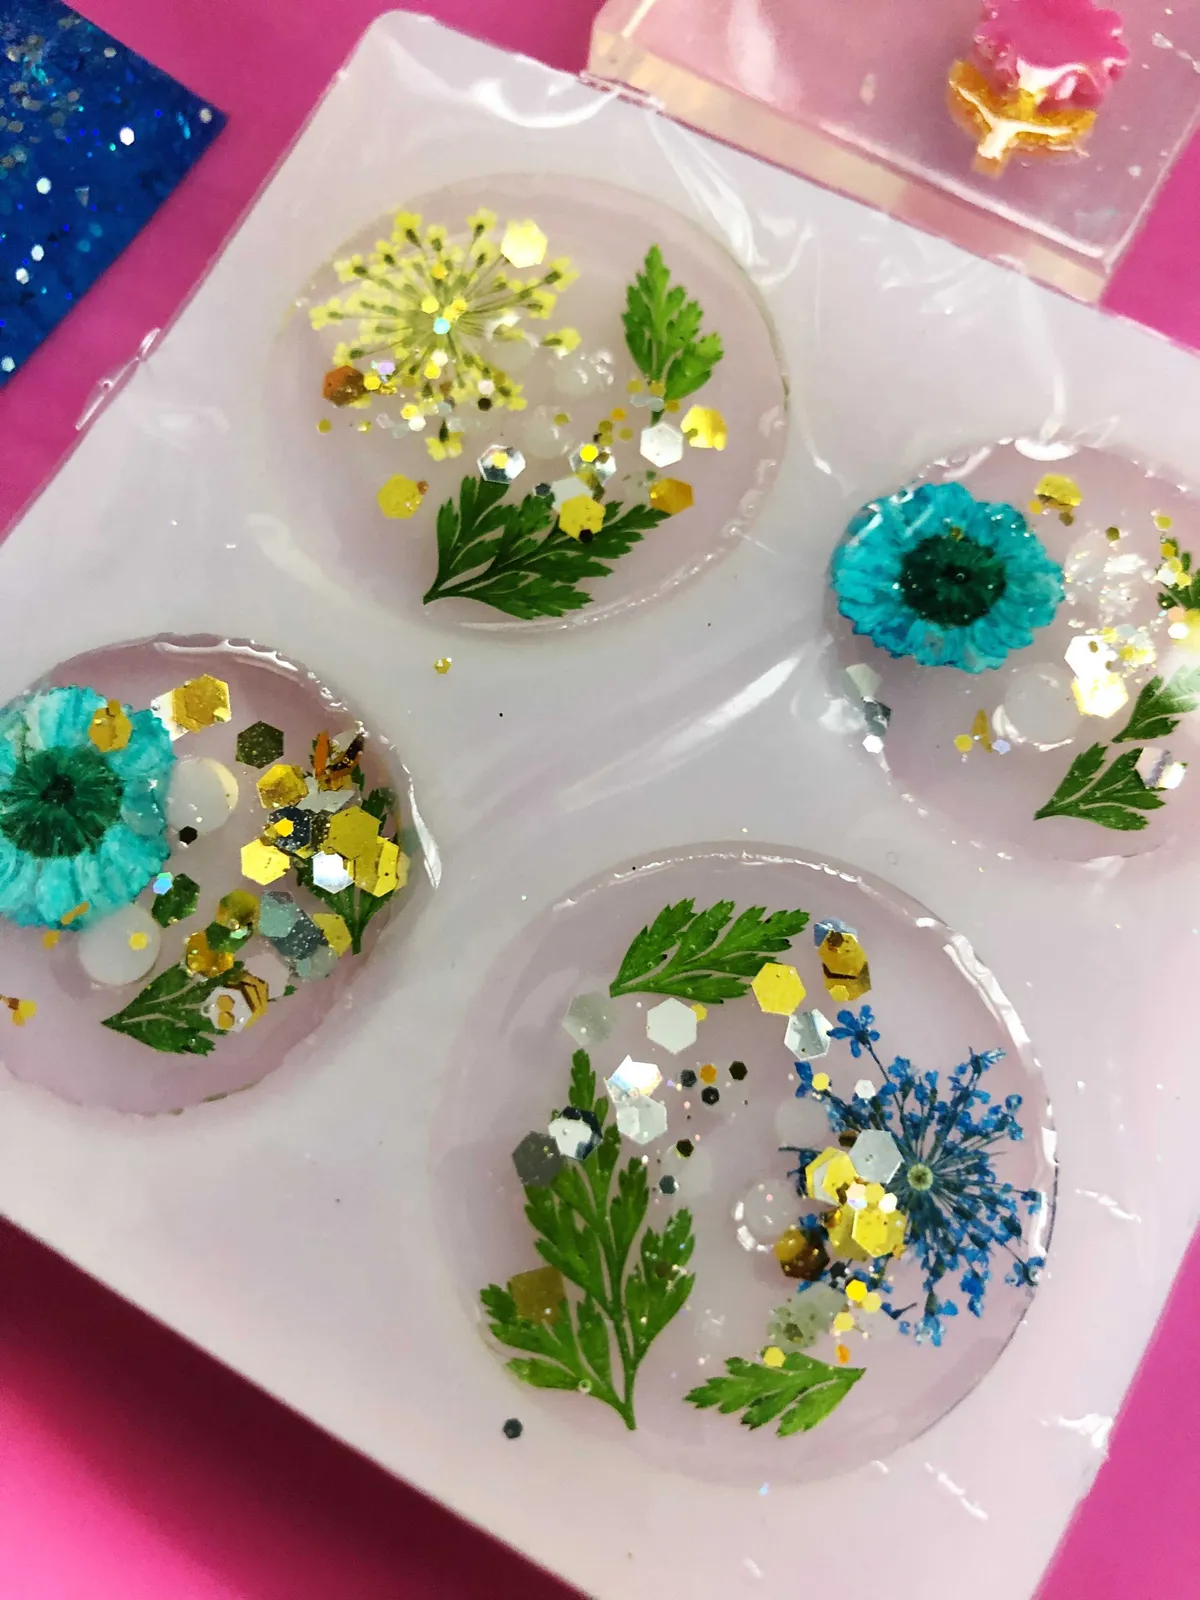
Dried flowers
Dried flowers are ideal for resin as long as they have been completely dried out. Dry flowers yourself to make some very special keepsakes from special events or preserve flowers from a wedding bouquet or flowers you love from your garden.
You can also buy packs of dried flowers in different colourways. The blue flowers in the photo came as part of a set of dried flowers in different colourways.
The flowers are small enough to fit into pendants and earring moulds, perfect for earrings. Cut down leaves and some small flowers for smaller jobs.
SQUIRREL_13140182

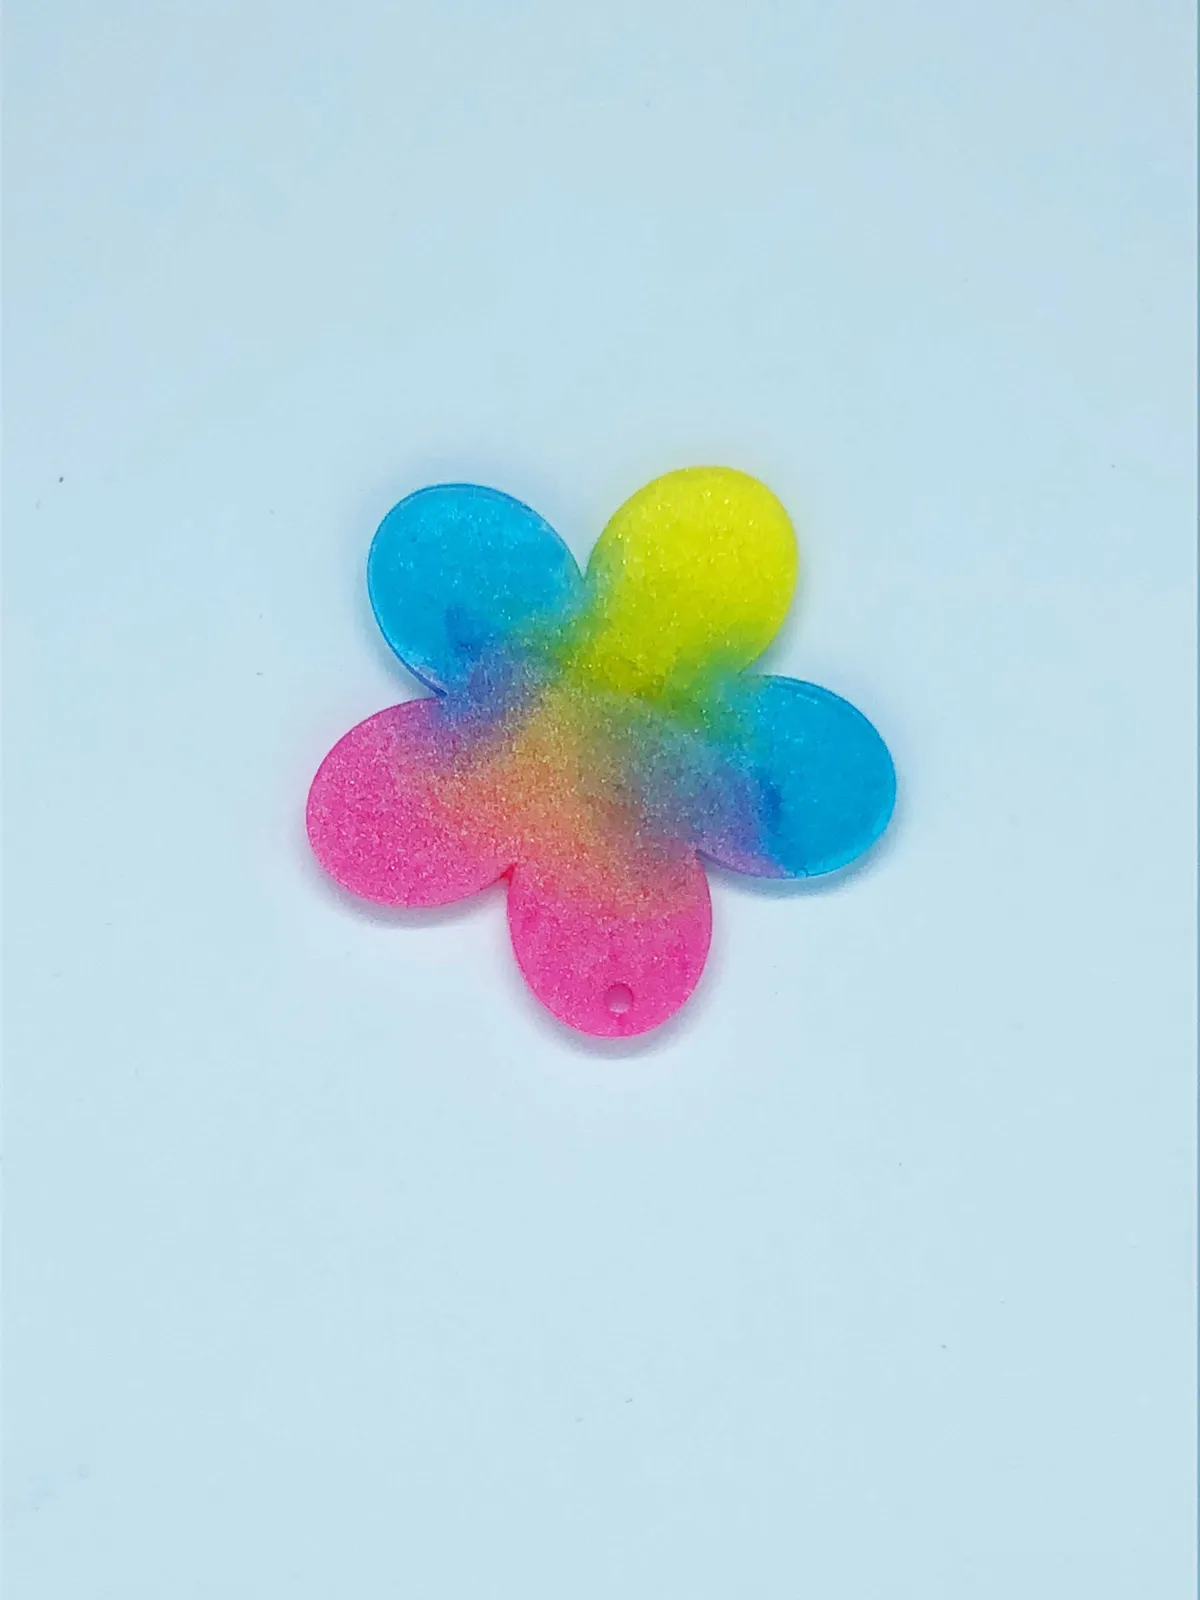
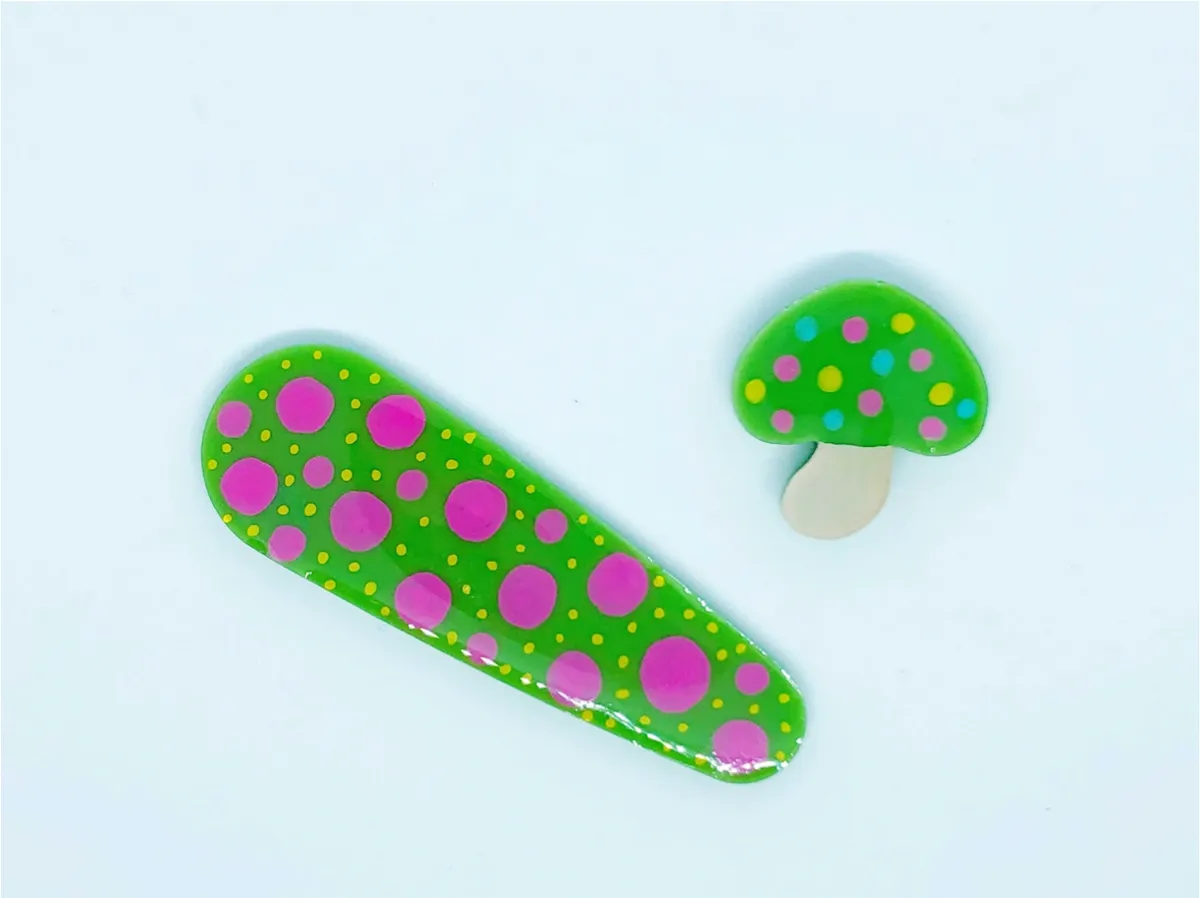
Paint pens
The sky's the limit when it comes to using paint pens to create designs within your resin pieces! We used Posca Paint Pens to draw on an opaque layer of green cured resin. After they dried we poured a clear layer of resin on the top to seal in the design.
The best moulds for epoxy resin
Resin moulds are commonly made from either silicone, polypropylene or polyethene. There are so many great moulds out there, we've made a list of our favourites for you! Head to our guide to the best resin moulds to get shopping.
Get creative with resin crafts for beginners
Resin can be used to make all kinds of amazing creations from earrings to coasters! You need to learn a few basic techniques to get started and you'll be making your own resin crafts in no time.
This is a fabulously versatile medium and you'll love coming up with your own projects too!
Discover the Resiners® AirLess Resin Bubble Removal Machine
Achieve flawless resin creations with the Resiners® AirLess Resin Bubble Removal Machine. Discover why this must-have tool is a game-changer as resin expert Sarah Jackman Read puts it to the test.