All products were chosen independently by our editorial team. This review contains affiliate links and we may receive a commission for purchases made. Please read our affiliates FAQ page to find out more.

How to make resin coasters

Savour the season’s wildflower blooms with Becki Clark’s how to make resin coasters tutorial!

Try 6 issues of your choice of craft magazine from just £9.99

Published: May 10, 2021 at 8:36 am

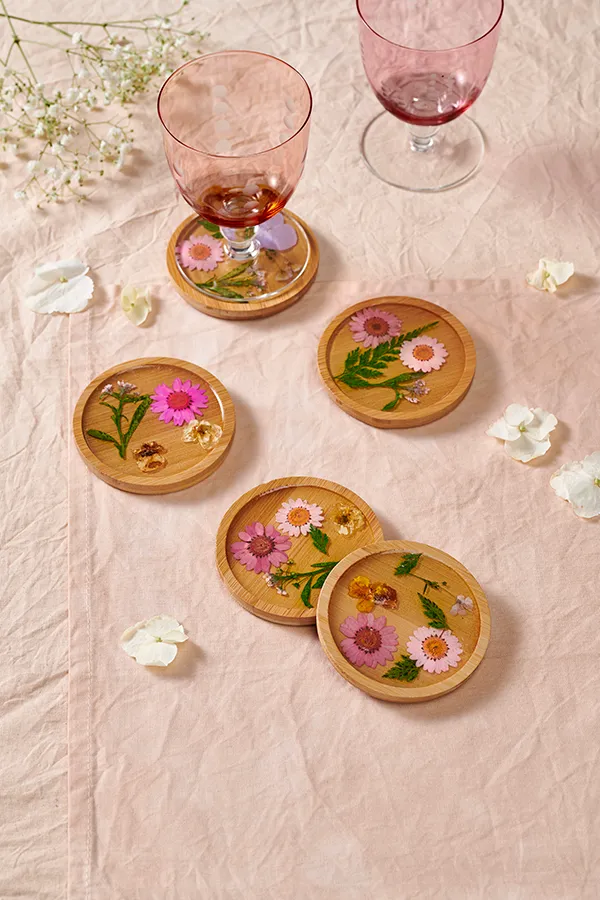
Let’s not beat about the bush, we’re all here for the petals. And if there’s a way we can keep them around for good, you can bet we’ll be trying it. Pressed flowers preserved in resin look amazing, and they’re so easy to create especially with Becki Clark's gorgeous how to make resin coasters tutorial! Wooden coasters work best for a more natural look, avoid using porous materials such as cork.

This project was created by Becki for Mollie Makes magazine – for more easy-make craft projects and creative inspiration, subscribe to Mollie or click here to find out more.

If you're a complete newbie to the resin game then make sure you check out our epoxy resin crafts for beginners guide. It has all you need to know about resin inside. Now without further ado let's learn how to make resin coasters!

How to make resin coasters

How to make resin coasters

You will need

You will need:

  • Stackable coasters
  • Crystal Resin and Hardener
  • Dried flowers
  • Blotting paper
  • Tweezers

Step 1

How to make resin coasters

Prepare the flowers by pressing. Flatter flowers such as violas, pansies, cow parsley, ferns and violets work better than fuller flowers such as roses or lilies. Lay them on blotting paper with enough space to spread out.

Step 2

Place another sheet of blotting paper on top and place inside a book with more books stacked on top. Leave for around two weeks. This is the more traditional way of pressing flowers, however, you can speed up the process with an iron.

Step 3

How to make resin coasters

To press with an iron, use a very low heat so you don’t burn through the paper. Press onto the blotting paper, remove the iron and press again. Don’t move the iron across the paper, instead keep pressing it down to cover the area, removing it each time you wish to move it.

Step 4

How to make resin coasters

Once you’re happy with how the flowers look – ideally as flat as possible – you can remove them from the blotting paper.

Step 5

How to make resin coasters

Pick a few stems and heads and place them in the recesses of the coasters. Play around with the composition until you’re happy with how they look. It’s a lot easier to move them around at this stage before the resin has been poured.

Step 6

How to make resin coasters

Mix 60ml of crystal resin with 30ml of hardener, combining into a mixture that’s consistent and well blended. Don’t over mix as this can create bubbles.

Step 7

How to make resin coasters

Pour the resin mix into the recesses of the coasters, covering the flowers. They may rise slightly – use tweezers to push them down and make sure they’re covered.

Step 8

How to make resin coasters

Leave to dry for 24 hours. Within the first 12 hours you can move the objects in the resin – after this, the mixture will begin to set firmly. Your resin coasters are now complete and ready to use for all those summer parties and BBQs.

Now you’ve learnt how to make resin coasters you need a new resin project! Head over to our 39 epoxy resin projects for a whole host of free and gorgeous resin craft ideas. Oh and there’s free daily patterns here on Gathered too so you’ll never be bored again.

Meet the Maker

Becki’s a designer and illustrator who specialises in hand-drawn typography and surface design. She teaches workshops in brush lettering and painting and loves getting to share her passion for lettering, painting and all things floral with lots of lovely people.