Knitted steeks are a few extra stitches cast on to temporarily close (‘steek’ in Scots) a gap such as a neckline, armhole or cardigan opening, enabling the piece to be knitted in the round. The steek is secured at the top (usually by simply casting off), cut down the middle to restore the gap, often stabilised by sewing, trimmed and sewn down as a facing, but exactly how it is handled can vary greatly.
A steek can be any size, but 8 to 10 stitches in total is a reasonable number. The technique itself has been fully described in Jane Crowfoot’s Masterclass (from The Knitter Issue 23), but since your favourite design may be ‘flat-written’, here we show you how to add steeks to convert your pattern from flat knitting to knitting in the round.
Adding steeks to flat–written patterns
For this example, we'll use ‘Aviemore’ (a subscriber exclusive knitting pattern from our issue 41). This is a scarf with Fair Isle pockets – where instructions are given for both flat and circular knitting by adding steeks, allowing both pockets to be knitted at once, then cut apart. Here is a simplified version to show how it is translated (1).

Fair Isle Pocket - knitted flat (Make 2) Cast on 51 sts. Work chart for Fair Isle Pocket, sts 5 to 55 until all 62 rows have been completed. Cast off.
Fair Isle Pockets - knitted steeks method Cast on 118 sts. Work chart for Fair Isle Pocket, sts 1 to 59 twice until all 62 rounds have been completed. Cast off.
Trim the steeks (sts 1 to 4 and 56 to 59 inclusive of both) to 2 sts width and oversew to stabilise. Fold to inside along the edge st (sts 5 and 55), press.
The process – just cast on some extra stitches – is much the same for more complicated shapes and these are shown below. But where do you cut, and where do you pick up for any bands or edgings?
Marking the steek
For the Fair Isle pocket, the steek is knitted with alternating yarns (this technique is called ‘Salt & Pepper’), but for another option, you can alternate the colours to produce lines which clearly define the edge of the steek.
If working in one colour only, try weaving a piece of waste yarn between the last steek stitch and the first ‘proper’ stitch to clearly mark it out. Illustrations 2 and 3 below show the edge of the steek in orange and the centre in black. This will help during finishing when you need to know where to fold to the WS for a facing or to make attachments such as bands or sleeves. Where there are colour changes, always do this at the round end (in the centre of the steek); this way, the end of the new yarn will fall where the steek is cut, and will not have to be darned in.
Cardigan (straight front edge)

Cast on 5 sts (half the steek), place marker (pm), then cast on the sts for Right Front, pm, Back, pm, Left Front, pm, and ending with 5 sts for the second steek (giving a 10 st steek in total), pm (round end marker). Join round and work the 5 sts of steek, Right Front, Back, Left Front, steek simultaneously just as you would for a sweater except that there are 10 steek sts, 5 either side of the round end marker which, of course, are not referred to at all in the pattern.
In the photo, the edges of the steek are marked out in orange yarn and the centre in black. Secure, cut and finish off the steeks as preferred, then add the button and buttonhole bands.
Cardigan (shaped front edge)
(3) A V-neck cardigan has front shaping usually starting immediately above the welt. Cast on the extra steek sts and knit the welt as for a straight front cardigan, then when the decreases at the Front edge start, knit the 5 steek sts, slip marker (sm), work the shaping for the Right Front edge, pattern to the Left Front edge working the shaping as described in the pattern instructions finishing just before the second steek (5 sts before the end of the round), then knit the last 5 steek sts.

V neck sweater
(4) We have used a Fair Isle design here based on ‘Julia’ (as featured in The Knitter Issue 8), which was actually a round neck top.
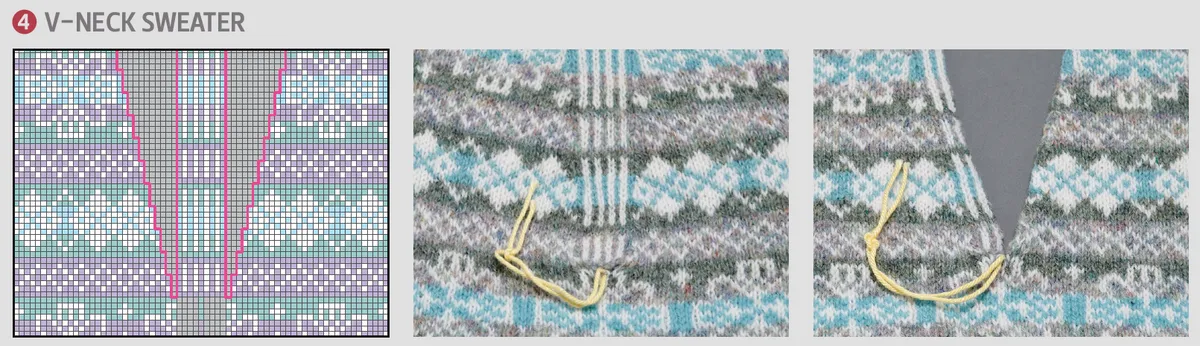
Flat knitting
Typically, work to 3 sts before the centre st, SSK, K1, turn and work on these sts only for the Left Front, setting the remainder aside. Having completed this, with RS facing, slip centre st onto a safety pin (on a yellow thread in the photo), K1, K2tog, pattern to end of Right Front, complete to match Left Front.
Adding steeks
Work across the Back, slip the marker, work to 3 sts before the centre st, SSK, K1, pm, turn, cast on 10 sts for the steek, pm, slip the next st onto safety pin, K1 (the steek is now joining the Left and Right Front), K2tog, work across Right Front to end of round.
Now follow the shaping instructions, but work them either side of the central steek. If you prefer, you can work the shaping right up against the steek, omitting that K1 which would be the edge stitch if knitting flat.
Round neck
(5) This is similar to a V neck with the slight complication of stitches being cast off or held on waste yarn, usually in two sets, so requires a bit of ‘fudging’. For example, the flat pattern might read:
Row 1: Pattern 48, slip centre 11 sts onto a holder, set remaining 48 sts aside for Right Front, turn.
Row 2 (WS): Working on this set of sts only, cast off 6 sts at neck edge of Left Front, pattern to end.
Rows 3 to 16: Decrease 1 st at neck edge of every row 14 times.
Rows 17 to 29: Decrease 1 st every RS row 7 times.
Rows 30 to 32: Work three rows ending with RS facing.
Row 33: Dec 1 st at neck edge.
Work straight to match Back at shoulders.
Row 1: Rejoin yarn at neck edge of Right Front sts, cast off 6 sts, work to end.
Row 2: Pattern to end. Complete to match Left Front.
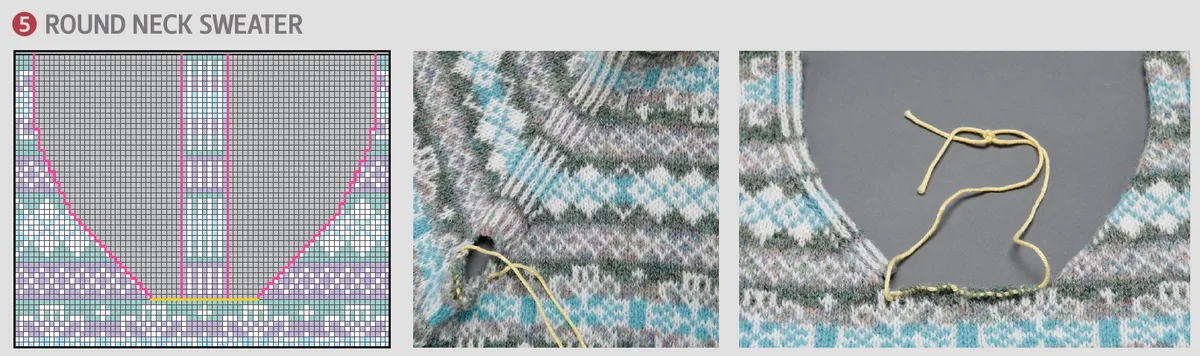
Adding steeks
In the flat knitting instructions, the centre sts are removed over two rows which we want to avoid when adapting this pattern to knitting in the round. Try taking them all off in one step either on the first or the second round. Here we will rewrite the instructions to take them all, bar 2 sts, off on the first round, just because it seems to fit the Fair Isle pattern better, and add an extra decrease to take off those remaining two sts, making a smoother line.
(Assuming the round starts in the centre steek of the Right armhole).
Rnd 1: Work across armhole steeks and Back sts to the Front sts. Since we are taking all the centre sts (except for 2) off in one step, pattern 43 (48 minus 5), pm, slip the centre 21 (5 plus 11 plus 5) onto waste yarn, turn, cast on 10 sts (the neckline steek), pm, pattern to end of round.
Rnd 2: Work to 3 sts before the neckline steek, SSK, K1, sm , knit the 10 steek sts, sm, K1, K2tog, pattern to end.
Rnds 3 to 16: Repeat Rnd 2, 14 more times.
Rnd 17: As Rnd 2.
Rnd 18: Pattern to end.
Rows 19 to 30: Repeat the last two rounds 6 more times.
Rnds 31 & 32: Work two rnds without shaping at neckline edge.
Rnd 33: As Rnd 2.
Work straight to match Back at shoulders.
Armhole
(6) For a straight armhole, simply cast on steek stitches to bridge the gap and if the armhole is shaped, start off as for a straight armhole then work the shaping just as you would a neckline. For example:
Flat knitting
Rows 1 & 2: Cast off 5 sts at beginning of next 2 rows (4 sts for the Front to preserve the Fair Isle symmetry).
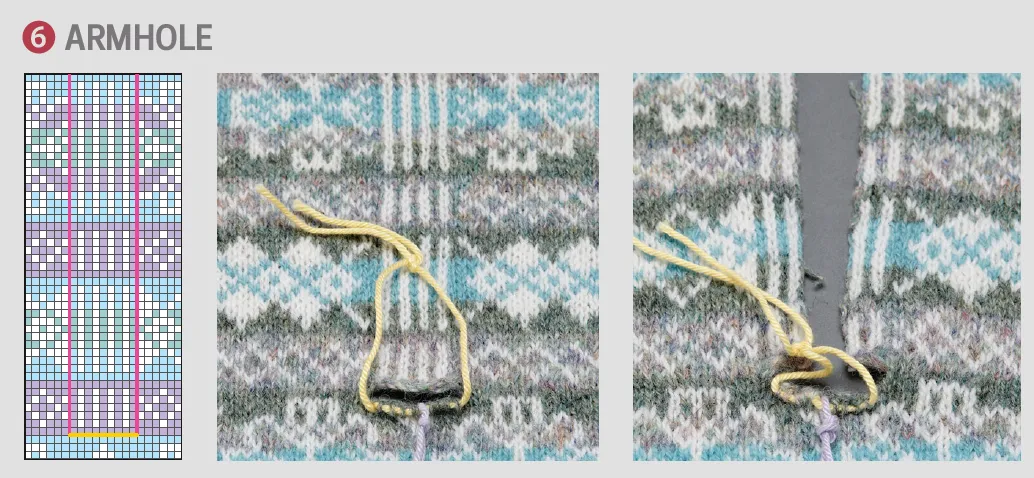
Adding steeks
Rnd 1: Assuming the round starts at the Right underarm ‘seam’ (marked here with a purple thread), work the number of sts to be cast off for the Back armhole shaping (5 sts in this case) and slip these and the last 4 sts (or required number for the Front armhole cast-off) of previous round onto waste yarn, cast on 5 steek sts and knit them, pm (edge of Right armhole of Back), work across Back sts until 5 sts (in this case) before the next marker (left underarm ‘seam’), cast off 9 sts (5 sts for the Back and 4 sts for the Front armhole shaping), pm (edge of Left armhole of Back) cast on 9 sts for the steek, knit the 9 steek sts, pm (edge of Left armhole of Front), work across Front, pm (edge of Left armhole of Front), turn and cast on 4 sts, pm (new round end marker).
The coloured lines of the steek, or the waste marker yarn if knitting in one colour, will show you where to attach the sleeve or, if sleeveless, which column of sts to pick up for the armband.
If the armhole is shaped, continue as you would for shaping a round neckline.
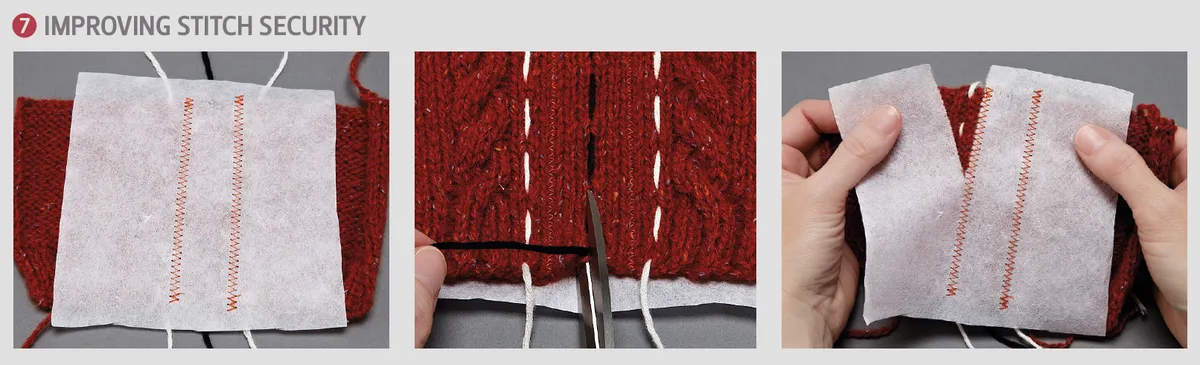
Improving stitch security
There is much debate about stitch security for steeks. Should they be machine stitched, hand stitched, crocheted, bound or even not stitched at all, relying solely on the ‘sticky’ nature of the yarn? This last option works well with Shetland yarn and Fair Isle patterns as the yarns mesh with each other, but is not so assured when only one colour is being used.
(7) If you elect to sew either by machine or hand, it can be helpful to use a ‘tear-away’ stabiliser such as Madeira Tear Away Cotton Soft, which is normally used for machine embroidery. This will help to ensure sure that the knitted fabric isn’t stretched during sewing, or gets caught up in the feed dog of the sewing machine. After sewing, just rip the stabiliser away. It’s good practice to try out whichever steek securing method you choose on a knitted swatch first – especially if you are converting the pattern from flat knitting, because the recommended yarn for the original design most likely did not have steeking in mind. This is a pretty good use for your tension swatch!