Whether you’re knitting a beanie or a beret, hat styles are determined by the way the crown is shaped. Designer Woolly Wormhead explains how to create your own patterns.
Whenever I start a new hat design, I invariably start with the crown. Even if I know exactly which style I’m aiming for, or which stitch pattern I’m going to use, and whether it be a top-down, bottom-up or even a sideways design, the crown is the first thing I consider.
The maths of the crown determines not only the type of crown finish (beanie, beret, pixie, gathered or anything in between), but also the mathematical structure that runs all the way through a hat.
The ‘decrease 8 sts every other round’ formula
This is a common formula for a hat, and results in a beanie style (half-dome, watch-cap) hat. However, it’s not applicable to every situation. Let’s look at some numbers.
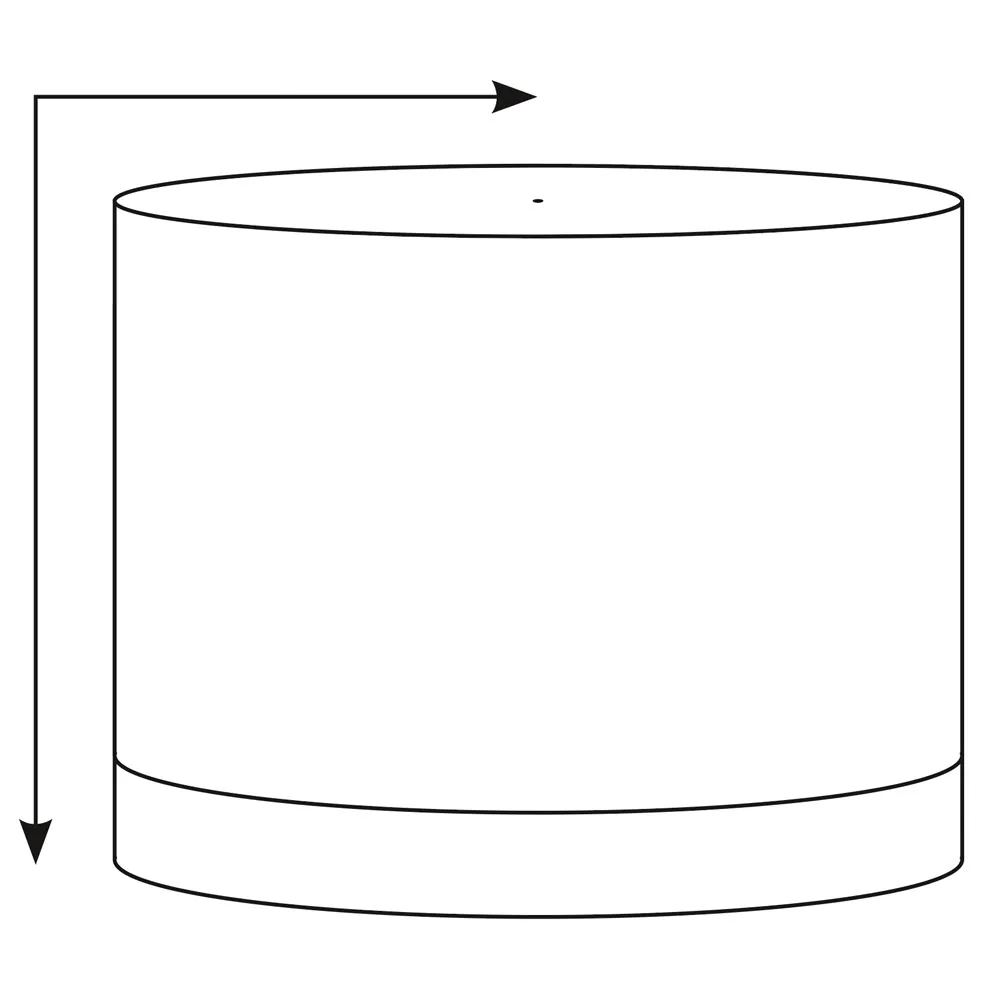
When we create a beanie, what we are essentially doing is knitting a cylinder that’s finished off with a circle on top. The schematic above shows that the length of a hat, from the crown to the base of the ears, is the length from the centre of the crown to the brim edge – or the radius of the top circle plus the length of the cylinder. With negative ease, this method works, as the edge around the top of the cylinder is smoothed off when worn.
The common formula for a circle is to decrease 8 sts every other round, or 4 sts average per round. This works well in something like stocking stitch, where the row and stitch gauge have a common relationship, or in lace, whereby blocking helps all the proportions settle.
Woolly designed this beanie hat for Simply Knitting issue 124.
The role of the radius and the circumference
Step 1
We’ll remember from school that the circumference of a circle is 2 x pi x the radius, where pi can be rounded to 3.14. In short, the circumference is 6.28 x the radius.
The circumference of our hat is the number of stitches on our needles right before we start the crown shaping – it’s the widest part of the knitting, and the part that determines fit in a beanie. To know this measurement we’ll also want to know our gauge/tension.
Let’s use an example of a hat knitted in a DK-weight yarn with a gauge of 22 sts to 10cm. With a circumference of 100 sts, it will measure 45.5cm – the perfect finished size for the average adult female (allowing for 6.5cm of negative ease).
Step 2
If we want to knit a beanie, and have the top of that hat flat as a circle, we’ll be able to calculate the radius of our circle, which in turn helps us calculate the number of rounds over which we will decrease.
45.5cm/6.28 (2 x pi) = 7.25cm crown circle radius
If our row gauge follows a typical fashion of 3:4, our row gauge would be approximately 30 rows/rounds to 10cm, or 3 rows to 1cm, and so we would have to work our decreases over 22 rounds:
7.25 (length of radius in cm) x 3 (number of rows/rounds per cm) = 21.75 rounds
We have 100 sts we wish to decrease, so we would aim to decrease 4.5 sts per round on average. (100/21.75)
Step 3
Except that as we close the top of the hat, we don’t want to decrease down beyond say 6 or 8 sts, as this creates an unfortunate bump at the very top of the hat. So we would change our decrease ratio slightly:
(100-6)/21.75 = 4.32 sts decreased per round, average
Knitting is forgiving enough to allow us to decrease on average 4 sts per round, and it would usually even out with blocking.
And don’t forget that 4 sts is an average figure – you could decrease 8 sts every other round, or 12 sts every third round, and so on – it allows for a bit of flexibility when you need to adapt stitch patterns.
Taking the numbers beyond stocking stitch
What if your row and stitch gauge differ wildly, or your stitch pattern gauge doesn’t match that of your stocking stitch? A good example would be a Fair Isle hat where the row and stitch gauge are almost square, e.g. 22 sts x 24 rows, and the numbers would look a little different. Working again with a cast-on example of 100 sts:
45.5cm/6.28 (2 x pi) = 7.25cm crown circle radius
Our row gauge gives us 2.4 rows per 10cm, so we would need to decrease over 17.4 rounds:
7.25 (length of radius in cm) x 2.4 (number of rows/rounds per cm) = 17.4 rounds
We have 100 sts we wish to decrease down to 6 sts, the numbers would look like this:
(100-6)/17.4 = 5.5 sts decreased per round or 11 sts decreased every other round.
Another example might be garter stitch, where the row gauge is invariably double that of the stitch gauge, e.g. 22 sts x 44 rows to 10cm:
45.5cm/6.28 (2 x pi) = 7.25cm crown circle radius
Our row gauge gives us 4.4 rows per 10cm, so we would need to decrease over 31.9 rounds:
7.25 (length of radius in cm) x 4.4 (number or rows/rounds per cm) = 31.9 rounds
We have 100 sts we wish to decrease down to 6 sts, the numbers would look like this:
(100-6)/31.9 = 3 sts decreased per round or 6 sts decreased every other round.
‘Aeonium’ tam by Woolly Wormhead incorporates crown shaping into the stitch pattern.
Beanies vs Berets
A beret essentially is the same idea as a beanie, except it’s a wider circle on top of a wider cylinder.
The length of a beret body is usually similar to that of a beanie; the fundamental difference is that larger circle on top, which not only adds width, but effectively adds length, too. The standard increase formula from the brim into the body of a beret is to increase by 50%, e.g. something along the lines of (K2, M1) to end (where M1 is a lifted bar increase). Our circumference would then be 50% bigger than that of our beanie, and that creates a lot more room to play with.
The same methods and formulas would be applied; first calculate the circumference measurement using the stitch count (at the point where you would start the crown shaping) and the stitch gauge. From there, calculate the radius and use the row gauge to determine how many stitches on average would be decreased per row/round.
‘Ivydene’ is an example of a beret with a wider top circle than a beanie.
As the maths of the circle is consistent, the number of stitches decreased per row/round should stay the same (4.32 sts per row on average in stocking stitch) yet in practice, I have found that anything up to 6 sts per round works well, too, even for stocking stitch. This is largely due to the larger area and the ability to block out smoothly.
Turning a circle into a cone
Having determined how many stitches on average we need to decrease across a set number of rows to make a crown flat, we can now think about what happens if we reduce or increase the decrease ratio (i.e. decrease more or less stitches than the beanie examples gave us).
If we increase the number of stitches we decrease, i.e. work fewer rows and on average decrease more per row/round, then we will head towards a gathered finish as the radius of the circle is rapidly shortened. If we reduce the number of stitches we decrease on average, and work more rows/rounds into the crown, then the radius lengthens, and creates a cone – this is how we create a pixie hat.
With a pixie hat, the number of rows/rounds we decrease over is increased, and what was the radius of the circle now becomes the slant height (or angled edge) of the cone.
The circumference of the hat has the same properties, but as a cone is essentially an incomplete circle, the circumference of the hat would equate to the arc of the cone (if we were considering this cone as a flat construct).
The slant height of the cone is an important factor, as that determines the overall length of the hat from the cast-on edge. The actual height of the cone tells us how high the hat is through the centre, and that requires a bit more maths. However to simplify things, you can simply add more non-decrease rows/rounds to the numbers that a beanie formula gives you – the more plain rounds you add, the taller your hat will be.
One final thing to bear in mind when designing pixie hats: the length of the body doesn’t need to be as long, as head will sit higher in the crown. You will still get that lovely pixie finish, but it is better supported (i.e. it will stand up straight rather than flop over!) if the crown shaping is started a little sooner.
About our expert
Woolly Wormhead is a ‘hat architect’ with an instinctive flair for unusual construction and a passion for innovation, whose patterns are trusted and celebrated by knitters all over the world. You can find all her hat designs at www.woollywormhead.com
Digital Assistant, Simply Knitting and The Knitter
Sarah has been knitting for as long as she can remember, and spends her working days thinking about yarn as Digital Assistant for Simply Knitting and The Knitter. She’s also a knitting designer with a passion for making cosy accessories – you can check out her latest patterns on Ravelry. Sarah has more than 10 years’ experience in the publishing industry, starting as author of The Good Nutrition Guide, and working on magazines including 3D World and The Simple Things. When she’s not in the office you’ll usually find her snuggled up on the sofa with a cup of tea, a packet of biscuits and her latest craft project.
This website is owned and published by Our Media Ltd. www.ourmedia.co.uk


 With a pixie hat, the number of rows/rounds we decrease over is increased, and what was the radius of the circle now becomes the slant height (or angled edge) of the cone.