Knitting abbreviations: learn the language of knitting
You’ll notice that knitting patterns are presented differently in every publication. All the different components can look quite confusing, with what seems like a code to be cracked before you can knit!
Don’t worry, though – learning how to read knitting abbreviations is really quite simple. While it can be frustrating to encounter all these strange knitting terms when you're first starting out, rest assured that you'll soon become fluent.
And if you ever need a reminder, we have a handy guide that you can return to again and again. Just bookmark this page so it's easy to find!
In our complete guide to knitting abbreviations, we'll cover:
- Why do we use knitting abbreviations?
- Are there standard knitting abbreviations?
- Our knitting abbreviations list
Oh, and if you're confused by other knitting lingo, or want to know your "frogging" from your "Fair Isle", we can help with that too! Take a look at our knitter's glossary.
Knitting abbreviations
To a beginner, knitting patterns can look like they're written in another language. And in a way they are!
Most patterns use knitting abbreviations to represent the stitches, actions and techniques you encounter as you knit.
This special shorthand is easy to understand once you know how, but it can be very confusing if you're reading a pattern for the first time. How would you b&t on a K rnd, or C4B after mrk on alt rows? We'll help you find out!
Why do we use knitting abbreviations?
Knitting patterns use abbreviations for two main reasons: clarity and brevity.
Instead of saying, "Knit one, then purl one, then knit another one and purl another one, and carry on doing this until you run out of stitches", which is difficult to follow at a glance and takes up a lot of space on the page, your pattern might read: "*K1, P1; rep from * to end of row." Simpler, shorter, and much clearer.
If we didn't use abbreviations, patterns would be extremely long and dense, and the lack of consistency could baffle even experienced knitters.
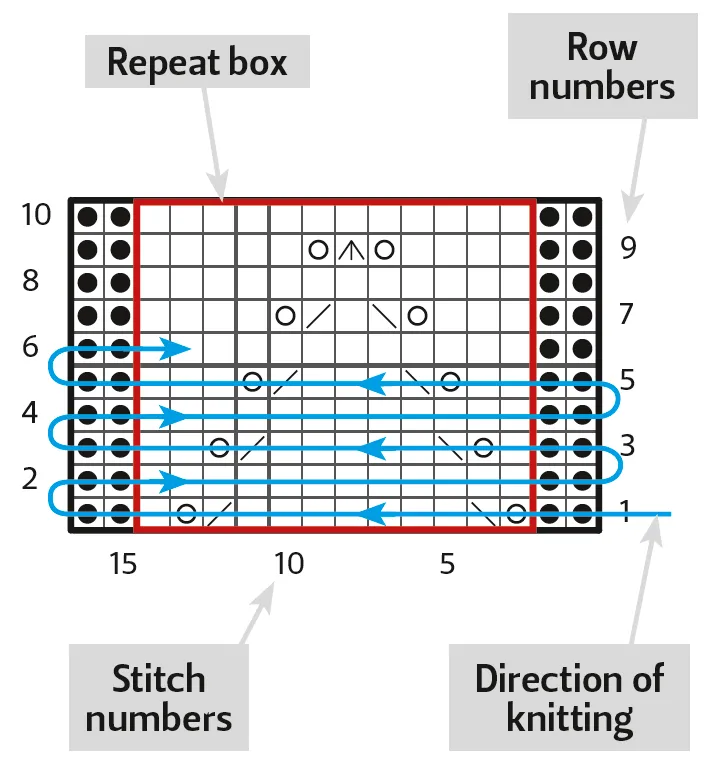
Some patterns – particularly complex lace, cable or colourwork ones – will still be long or hard to follow even with abbreviations included. This is where knitting charts come in. Sometimes a visual representation of the pattern is a better option!
You'll usually find charts included alongside written instructions, though you'll occasionally see a pattern marked as "charted only". If you're new to charts, learn how to read charts in knitting patterns with our guide.
Are there standard knitting abbreviations?
The short answer is no! While there are similarities in the knitting abbreviations used across different pattern writers and even different countries, there are no fixed standards and variations are widespread.
However, there are common abbreviations that you'll see used in lots of patterns, such as K for knit and P for purl. These letters are usually followed by a number that tells you how many stitches to work – so K2 means "knit two stitches".
You'll also spot similar-sounding terms that you may be able to figure out from context (such as "knitwise" and "knitways").
Most patterns will either have their own abbreviations somewhere on the page or refer to a set of definitions elsewhere. Some publications may only mention abbreviations that are unusual or specific to that pattern, and then send you to their own standard terms for the rest.
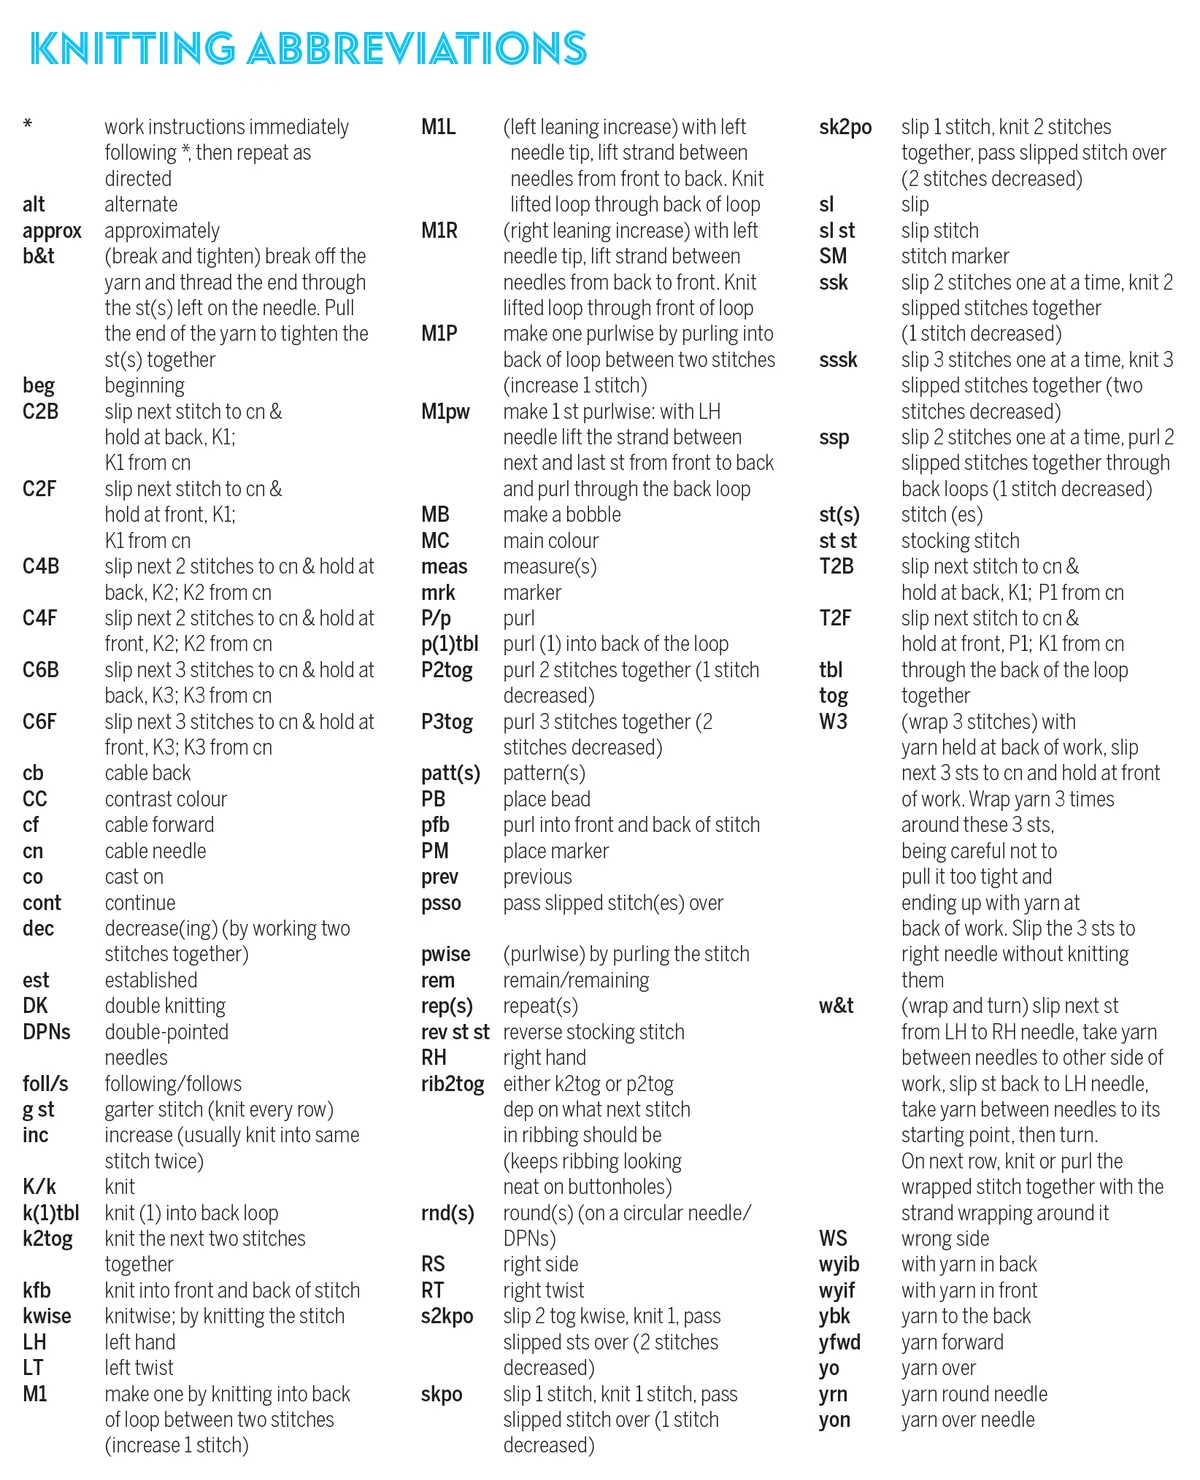
Knitting abbreviations list
The abbreviations you'll see below are the ones we use and reflect UK knitting terms, but they should also help you to decode any other patterns you find around the web.
*
work instructions immediately following *, then repeat as directed
alt
alternate
approx
approximately
b&t
(break and tighten) break off the yarn and thread the end through the st(s) left on the needle. Pull the end of the yarn to tighten the st(s) together
beg
beginning
C2B
slip next stitch to cn & hold at back, K1; K1 from cn
C2F
slip next stitch to cn & hold at front, K1; K1 from cn
C4B
slip next 2 stitches to cn & hold at back, K2; K2 from cn
C4F
slip next 2 stitches to cn & hold at front, K2; K2 from cn
C6B
slip next 3 stitches to cn & hold at back, K3; K3 from cn
C6F
slip next 3 stitches to cn & hold at front, K3; K3 from cn
cb
cable back
CC
contrast colour
cf
cable forward
cn
cable needle
co
cast on
cont
continue
dec
decrease(ing) (by working two stitches together)
est
established
DK
double knitting
DPNs
double-pointed needles
foll/s
following/follows
g st
garter stitch (knit every row)
inc
increase using method of your choice (usually knit into same stitch twice)
K/k
knit
k(1)tbl
knit (1) into back loop
k2tog
knit the next two stitches together
kfb
knit into front and back of stitch
kwise
knitwise; by knitting the stitch
LH
left hand
LT
left twist
M1
make one by knitting into back of loop between two stitches (increase 1 stitch)
M1L
(left leaning increase) with left needle tip, lift strand between needles from front to back. Knit lifted loop through back of loop
M1R
(right leaning increase) with left needle tip, lift strand between needles from back to front. Knit lifted loop through front of loop
M1P
make one purlwise by purling into back of loop between two stitches (increase 1 stitch)
M1pw
make 1 st purlwise: with LH needle lift the strand between next and last st from front to back and purl through the back loop
MB
make a bobble
MC
main colour
meas
measure(s)
mrk
marker
P/p
purl
p(1)tbl
purl (1) into back of the loop
P2tog
purl 2 stitches together (1 stitch decreased)
P3tog
purl 3 stitches together (2 stitches decreased)
patt(s)
pattern(s)
PB
place bead
pfb
purl into front and back of stitch
PM
place marker
prev
previous
psso
pass slipped stitch(es) over
pwise
(purlwise) by purling the stitch
rem
remain/remaining
rep(s)
repeat(s)
rev st st
reverse stocking stitch
RH
right hand
rib2tog
either k2tog or p2tog dep on what next stitch in ribbing should be (keeps ribbing looking neat on buttonholes)
rnd(s)
round(s) (on a circular needle/DPNs)
RS
right side
RT
right twist
s2kpo
slip 2 tog kwise, knit 1, pass slipped sts over (2 stitches decreased)
skpo
slip 1 stitch, knit 1 stitch, pass slipped stitch over (1 stitch decreased)
sk2po
slip 1 stitch, knit 2 stitches together, pass slipped stitch over (2 stitches decreased)
sl
slip
sl st
slip stitch
SM
stitch marker
ssk
slip 2 stitches one at a time, knit 2 slipped stitches together (1 stitch decreased)
sssk
slip 3 stitches one at a time, knit 3 slipped stitches together (two stitches decreased)
ssp
slip 2 stitches one at a time, purl 2 slipped stitches together through back loops (1 stitch decreased)
st(s)
stitch(es)
st st
stocking stitch
T2B
slip next stitch to cn & hold at back, K1; P1 from cn
T2F
slip next stitch to cn & hold at front, P1; K1 from cn
tbl
through the back of the loop
tog
together
W3
(wrap 3 stitches) with yarn held at back of work, slip next 3 sts to cn and hold at front of work. Wrap yarn 3 times around these 3 sts, being careful not to pull it too tight and ending up with yarn at back of work. Slip the 3 sts to right needle without knitting them
w&t
(wrap and turn) slip next st from LH to RH needle, take yarn between needles to other side of work, slip st back to LH needle, take yarn between needles to its starting point, then turn. On next row, knit or purl the wrapped stitch together with the strand wrapping around it
WS
wrong side
wyib
with yarn in back
wyif
with yarn in front
ybk
yarn to the back
yfwd
yarn forward
yo
yarn over
yrn
yarn round needle
yon
yarn over needle

Learn to knit with us!
If you're picking up your needles for the first time, check out our how to start knitting guide for everything a newbie needs to know.
Print out and keep our knitting abbreviations guide:
Know your knitting abbreviations!
Now you know the most common knitting abbreviations, but there's still a chance you'll come across patterns that use their own custom abbreviations. This is normally only done when there's a special or unusual stitch used, or a combination of stitches that are repeated.
If this is the case, the pattern will usually give you full instructions for what the abbreviation means in the pattern notes.
Learn to read patterns today
As well as knowing all about knitting abbreviations, it's also wise to familiarise yourself with the other features of knitting patterns before starting your first project.
Our how to read knitting patterns guide will get you up to speed.