If you’ve ever admired a beautiful twisted stitch hat or cable yoked jumper, you may have spotted that the stitch pattern seems to imperceptibly shrink as the circumference gets smaller. While this aspect of a design looks rather magical, like so much in knitting, it all comes down in the end to some pretty simple basic principles.
Step 1
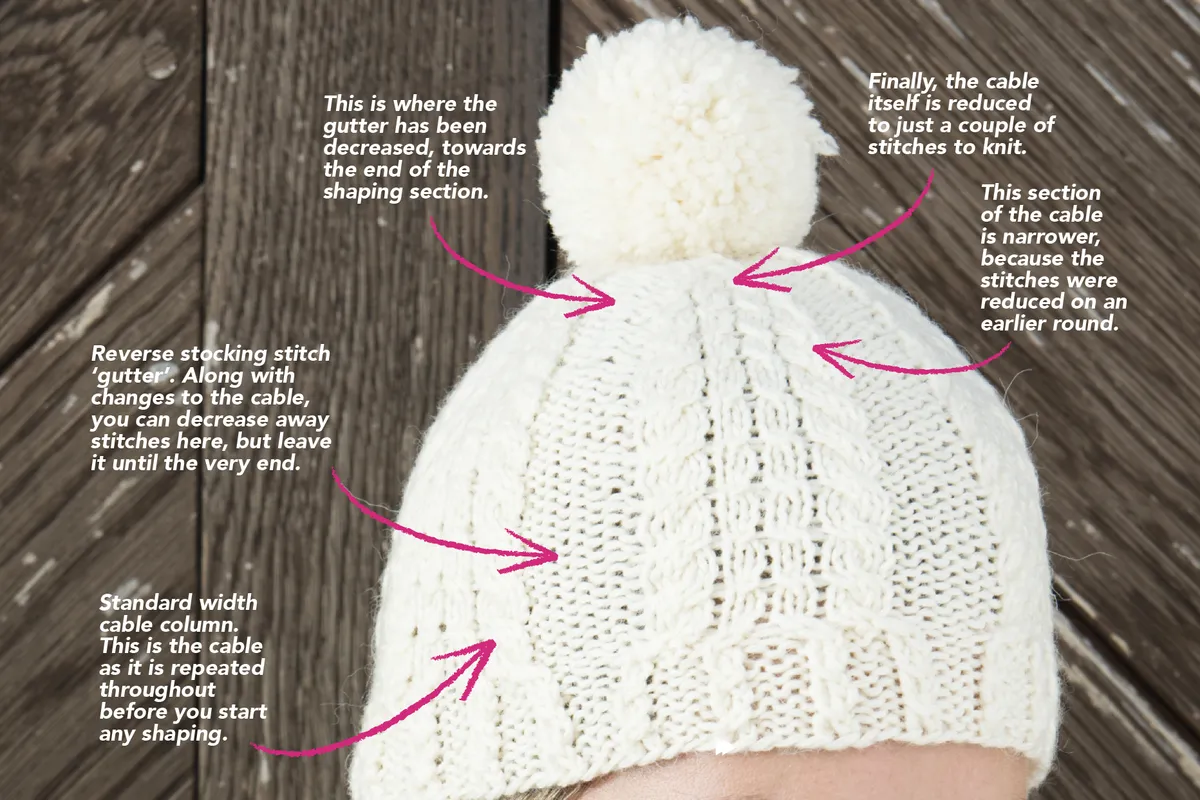
Contrast is key
One of the key things when decreasing across cables is to make sure you keep a background to the main pattern for as many rows/rounds of the decreasing as possible.
In Sarah Winsper’s lovely hat from issue 153 of Simply Knitting, she has maintained the 2 st reverse stocking stitch background to each cable almost to the very end of the hat.
This allows the cables to stand out better against the background right until the end. If you decrease away the ‘gutter’ around your cable column too soon, it won’t stand out any more, and you’ll also lose some of the natural ability of the cable to pull in widthways. That doesn’t mean you shouldn’t decrease your gutter stitches at all though. See below for more about the best way you can do this.
Avoid decreasing your ‘gutter’ stitches too soon or your cables won’t stand out.
Step 2
Make your decreases smooth
It’s possible to decrease within cables themselves. For example, instead of working C4F, you could work a C4Ftog, decreasing the stitches at the back of the cable. To do this, you would place 2 sts on cable needle, hold at front, k2tog from left needle, K2 from cable needle, leaving you 3 sts.
This way of decreasing appears more ‘stepped’ and is useful if you want that look. But if you prefer a smoother sloping edge, then work the decreases on rows/rounds between the cables as Sarah has – one set of decreases between each cable. You can see an example of this on the Decreased Cable chart, on the opposite page, on rounds 2, 5, 8 and 11. If you work more than one set of decreases between each cable your angle of decrease will be sharper.
Work the decreases on rounds between the cables for a smooth slope.
Step 3
Careful placement is crucial
When you work decreases in the cable column, place them with care. If you place them in the centre of the column, you’ll make them more visible, and create a downwards pull in the centre. This can lead to stitches becoming distorted if your cable is quite wide and only travels in one direction.
Sarah has worked her decreases on the outer edges, which helps define them, keeping it looking contrasting and clear, even as it shrinks. Make sure any decreases lean into the centre of the column – left leaning decreases (ssk, skpo) go on the right edge of your stocking stitch column, right leaning decreases (usually k2tog) go on the left edge.
Make sure that your decreases lean into the centre of the column to keep them neat.
Step 4
Don’t blow things out of proportion
As your cable narrows, the number of rows/rounds between each set of cabled stitches will decrease. So where you might have 3, 5 or 7 rows between cable rows/rounds you will decrease this to keep your cable in proportion.
This is easier if you’re working in the round, as you don’t have to worry about ending up on the wrong side of the work if you reduce the rows/rounds by an odd number.
Sarah changes from cabling every 4 rounds to every 3 in her hat. If you’re working in flat knitting, it’s better to keep your cables on the RS of the work. Make sure there’s always an odd number of plain rows between cable rows.
As your cable narrows, decrease the number of rounds between each set of cabled stitches to keep it in proportion.
Step 5
Remember to lean in
Your final decreases should be in the reverse stocking stitch ‘gutter’ between cables. Remember to keep things in proportion. If you have a gutter 12 sts wide, don’t reduce your cable column down to 2 stitches before decreasing the gutter! If you only have a few gutter stitches, leave them until the end, but if you have a lot, decrease them regularly with the cable column to keep everything in proportion.
When reducing the width of the gutter, these decreases should also lean inwards. Use a left leaning p2tog on the right-hand side of the gutter, and a right leaning ssp on the left-hand side of the gutter. Keep the last decrease which removes the gutter until the very end of your work. This will help the final edge of your knitting pull together neatly.
Make sure that the gutter decrease stitches lean inwards: p2tog on the right side and ssp on the left.
Step 6
Switch it around
If you’re working your knitting from the top down, you can reverse this entire principle to increase in pattern instead. Remember, as before, it’s better to increase between cables, rather than on the cable rows/rounds themselves. Increases actually tend to be more visible than decreases, so in this case it can be better to make more increases in the gutter, where they are harder to spot, and fewer in the cable ‘column’ of stocking stitch, where they will stand out more.
You can reverse these instructions to knit your hat from the top down.
Example of a cable decrease knitting chart
3 great examples of shaping in cable patterns
owls by Kate Davies
This pattern features fun ‘owl’ cables on the seamless yoke, which are decreased quickly to create the face and ears of the owls. Available here for £6 as a PDF download.
Caramel Cable Hat by Iris Wilde
You can never have too many cabled hats, so if Sarah’s pattern has given you the bug, why not try this fun make from Iris Wilde? The pattern even helps you use a new yarn. It’s free here!
Rialto Wrap by Debbie Bliss
This gorgeous wrap features complex cable ‘columns’ mixed with normal and reverse stocking stitch. The shaping is taken care of by subtle decreases throughout the wrap. Designer Yarns pattern number DB108. Find more information here.
Rosee Woodland is a designer and freelance journalist. She lives in Bristol with her family and their Boston terrier, Ponyo. See specialises in knitting design and grading, and regularly teaches classes for A Yarn Story in Bath. She’s worked with leading brands in the craft industry including Rowan, Patons, Aurifil, Rico Design and Lewis & Irene. Her work has been featured in many magazines including The Knitter, Knit Now, Simply Knitting, Mollie Makes, Simply Sewing and Simply Crochet. When she’s not busy making she shares her wild swimming adventures at www.iswimlikeagirl.com.
This website is owned and published by Our Media Ltd. www.ourmedia.co.uk