
Intarsia knitting is named after a noun that refers to the art or technique of decorating a surface with inlaid patterns. When used in knitting it describes the technique used to create patterns with multiple colours with only a single thickness of fabric. Intarsia is one of the main ways of creating different coloured designs within your knitting. The other major one is Fair Isle where yarns are woven or stranded across the reverse side of the fabric, resulting in a double thickness.
As with the woodwork technique, areas of colour are inlaid in one another using separate pieces of yarn, which are knitted to appear like a jigsaw puzzle. This method creates a single weight of fabric in which many colours can be used to a row, unlike Fair Isle, which produces a thicker fabric and traditionally has just two colours to a row.
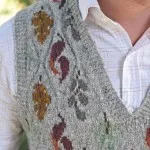
Featured image: Sasha Kagen: Sweet Briar pattern, from The Knitter issue 85
Following a pattern
Most colourwork patterns will ask you to proceed in a certain way. The pattern may ask you to use the Fair Isle or intarsia technique or a mixture of both. Indeed, without an idea of how to work both techniques you will be stumped as some of the methods (such as carrying colours from one place to another and weaving in the yarn ends) transpose between both Fair Isle and intarsia. Over the past decade more and more knitting patterns include a chart of stitches. These charts not only save space, but also give the knitter a visual idea of how their knitting should progress. If you have never tackled chart knitting before, intarsia is the ideal starting place. Each square or rectangle on the chart represents a stitch (horizontally) and a row (vertically). You may have a chart filled with colour, or maybe one that has symbols such as stars, dots and crosses to represent the colour used.
In the Argyll Leaf pattern by Sasha Kagan (The Knitter issue 10, page 56), we are given coloured squares for each block of colour.
It is always a good idea to photocopy your chart; you may want to enlarge it to make it easier to read. You may even want to use a ruler to make each line clearer to read (Post-it notes are also good). Make sure that you line the ruler up under the row you have completed and do not block from sight the next row up the chart, this will help you to see what needs to be done on the next row and whether or not you need to carry or weave in any yarn to a certain place in preparation for it.
Preparation
It is essential that you do some ground work before you start knitting. The more prepared you are the better and the less likely you are to get in a major tangle.
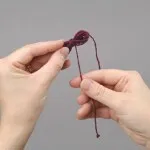
How to make a bobbin
Bobbins are used when you do not wish to have a whole ball of yarn attached to the knitted piece while working intarsia. For larger areas of color you may wish to wrap the yarn in small plastic bags, secured with elastic bands. You may want to use plastic bobbins which are available from most suppliers or you may want to make your own. Wrap the yarn around two fingers of your chosen hand in the form of a figure of eight. Carefully remove the yarn from the fingers and cut the yarn. Wind this end of yarn around the centre of the figure of eight and secure tightly with a knot.
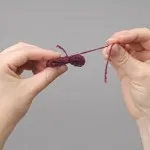
When using a bobbin pull the yarn from the centre of the bobbin (not the knotted end) a little at a time and keep it as close to the work as possible to avoid tangling.
Preparing the yarn
Across a row of intarsia you could have many bobbins or balls of colour hanging from the reverse of the work. To prevent these from becoming tangled and knotted, it is definitely a good idea to keep these in good order. To roughly calculate how much yarn you will use for each area of colour: •
- Count the number of stitches used by each colour. I am going to use the example of the ‘Claret’ pair of leaves at the centre point of Sasha’s chart. The two leaves are made from 90 stitches of this colour. Wrap the yarn around the correct size knitting needle 10 times and this will show you how much yarn 10 stitches would use. Measure this piece and multiply by your number of stitches, for example: if 10 sts = 14cm, then 90 sts = 9 x 14 =126cm.
- Allow enough yarn to get from one row up to the next. To allow for the fact that you may also need to travel across some stitches it is a good idea to add an extra 2 stitches worth of yarn for every row of colour. In this case that is another 46 sts worth of yarn so the calculation would be 4.6 x 14 = 64.4 rounded up to 65cm.
- Allow enough yarn for the tail end which will hang at the beginning and the end of the motif. Add another 15cm worth of yarn for each tail: 2 x 15 = 30cm.
- The total amount of yarn needed for this motif will be approximately 220cm. The calculation is motif (126cm) + travelling yarn (65cm) + tails (30cm) = 221cm yarn. In this case I would round this up and cut myself a yarn length of 230cm to be sure that I had enough. For Sasha’s design I would keep the background colour (Grey Mist) as a full ball and would wind off small amounts of all the other colours.


